
This page contains Bromcom guidance on Learning Aims.
We strongly recommend reading the DfE guidance here on Post 16 Programme and Learning Aims.
See also: How to use Bulk Learning Aim Update and How to manage Programme Aims
Learning Aims are attached to the Programmes or Courses that Students are studying and they can be added through multiple ways on the MIS.
The Start Date, End Date and Planned End Date of the Learning Aims must fall within the Start, End and Planned End Date of the Programme Aim that was previously set.
Each Learning Aim has a unique QN Code, the QN Codes must be correctly entered when adding a Learning Aim. Your Local Authority/the DfE can assist you if you are unsure which one to select.
Learning Aims can be added using 4 methods;
- Add Learning Aims in the Student Record
- Add Learning Aims to a Course
- Add Learning Aims to a Teaching Class
- Add Learning Aims in Bulk
Add Learning Aims in the Student Record
Access: To use this method, you will need the following permissions enabled within the Framework Module of Config>Setup>Roles and Permissions.

- Learning Aims can be added individually via a Student’s Record (Students>View a Student>Enrolment Tab>Learning Aims) – This method will be very time consuming so one of the next methods may be more efficient, but this is a good way of making individual changes if needed.

Via Students
Add Learning Aims to a Course
Access: To use this method, you will need the following permissions enabled within the Curriculum Module of Config>Setup>Roles and Permissions.

Go to Groups then change the Group Type drop down to Course, click on the required Course or Courses and then click View.
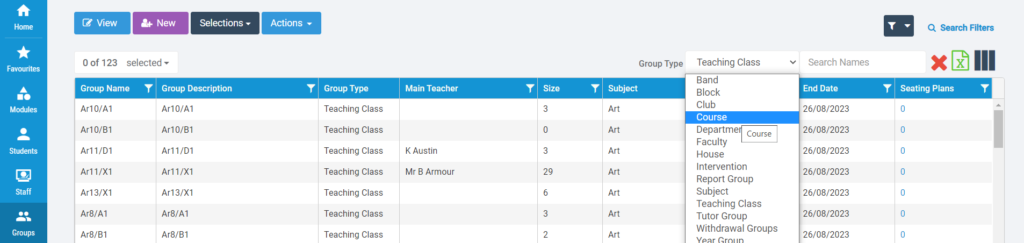
Scroll down to the Learning Aims Details panel, click to Add a New Record.

These Learning Aims will then cascade down to the Classes within the Course, which in turn will apply the QN Code against the Students in the Class with a one year Planned End Date.
Note: You will need to manually extend the Planned End Date of the Learning Aim if a two Year Course is being added.
Add Learning Aims to a Teaching Class
Access: To use this method, you will need the following permissions enabled within the Framework Module of Config>Setup>Roles and Permissions.

Learning Aims can be added to a Teaching Class directly, which will apply the QN Code to the Students but NOT the Course. This is because the Course is above the Class on the MIS and the Learning Aims do not apply upwards.
Go to Groups check the Group Type is Teaching Class, click on the required Teaching Classes or Classes and then click View.

Important note : Please ensure the Exam Level is completed within the Teaching Class in the Additional Group Details section otherwise you will not be able to add a new record in the Learning Aim Details panel.


Click Save.
Add Learning Aims in Bulk
Access: To use this method, you will need the following permissions enabled within the Curriculum Module of Config>Setup>Roles and Permissions.
Note: The functionality of this page is expected to change as of 21/10/22, both methods will be described below;

To add Learning Aims in bulk go to Modules>Curriculum>Bulk Learning Aim Update.


The idea of this page is to apply Learning Aims in Bulk using a table where you can either amend existing or add new Learning Aims as seen below;
Original Method
In this method, you were able to amend the dates of each row individually or in bulk.

Selecting Add Learning Aim allows you to apply a QN Code for individual or multiple Students with the desired dates. Choose the correct QN Code and press Done.

This will take you back to the original page where the QN Codes will be added and you need to press Apply if the data is correct.

New Method
Moving forward, you can no longer change the dates of each row individually.

Instead, you now need to click on/highlight each row that you wish to change and use the selectors at the top of the page.
The selectors will allow you to overwrite the values currently against the student, press Apply update the information and then press Save to confirm the changes.
