
In this guide, we show the processes and procedures required to close the 2026-2027 Financial Year. This guide is split into the following sections:
- Overview
- 1. Setting Up the New Financial Year
- 2. Preparing for the End of Year
- 3. End of Year Processes
Access: the processes and procedures described in this guide are subject to having the relevant Roles and Permissions.
Pre-requisites: this guide assumes that all previous Financial Years have been closed. In addition, the New Financial Year needs to have been added to the system and it needs to have been opened. See: How to Create a New Financial Year.
Related Guides:
When completing End of Year tasks, ensure that no one else is using the Finance Module.
It is important that no unauthorised changes are made or tasks carried out in Bromcom Finance whilst working through sections 2. Prepare for the End of Year and 3. End of Year Processes, as this could lead to the generation of inaccurate Financial Year End information.
Overview
This guide covers the processes and procedures required to Set Up a New Financial Year and the processes and procedures required to Close the Financial Year.
Depending on how the school uses Bromcom Finance, not all sections of this guide may be applicable.
Throughout this guide, the term Old Financial Year is used to refer to the Financial Year that is to be Closed, in this instance Financial Year 2026-2027. Similarly, the term New Financial Year is used to refer to the Financial Year that is to be Created and Opened, in this instance Financial Year 2027-2028.
Guide Navigation:
- This section is: Overview
- Jump forward to: 1. Set Up the New Financial Year
- Jump forward to: 2. Prepare for the End of Year
- Jump forward to: 3. End of Year Processes
- Open in a new tab: Finance End of Year Checklist
There are two types of End of Year Closure:
- Preliminary Closure: Schools should aim to do a Preliminary Closure of an Old Financial Year as soon as possible in the New Financial Year, to ensure that all items fall into the correct year. Any number of Preliminary Closures can be done
- Final Closure: Only one Final Closure can be done
Also see: Finance End of Year Checklist.
1. Set Up the New Financial Year
Guide Navigation:
- Jump back to: Overview
- This section is: 2. Set Up the New Financial Year
- Jump forward to: 2. Prepare for the End of Year
- Jump forward to: 3. End of Year Processes
- Open in a new tab: Finance End of Year Checklist
In this section, the processes and procedures required to set up the New Financial Year are covered. Many of these processes and procedures can be carried out well in advance of the end of the Old Financial Year and before the completion of sections 2. Prepare for the End of Year and 3. End of Year Processes, easing time pressures and reducing stress at a busy time of the year.
1.1. Create a New Financial Year
Before closing the Old Financial Year, the New Financial Year needs to be defined. A New Financial Year can be edited before the year is open but it cannot be edited once the setup is complete.
Follow this guide on Creating a New Financial Year: How to Create a New Financial Year.
1.2. Create VAT Periods
Ensure that the new VAT Periods are created in the New Financial Year.
Follow this guide on Creating VAT Periods: How to Create VAT Periods.
1.3. Define Salary Periods
Ensure that the new Salary Periods are created in the New Financial Year.
Follow this guide on Defining Salary Periods: How to Define Salary Periods.
1.4. Update the Chart of Accounts
It may be that some Cost Centres and Ledger Codes are not required in the New Financial Year, and that new Cost Centres, Ledger Codes and their associated Links need to be created for the New Financial Year.
Unless done with the utmost of caution, removing Cost Centres, Ledger Codes and Cost Centre Ledger Links that are no longer required in the New Financial Year can have unintended consequences. This is therefore best done by Managing the Timeline of the Cost Centre and / or the Ledger Code.
See the next section: 1.4.1. Managing Timelines.
1.4.1. Manage Timelines
Cost Centres and Ledger Codes that have previously had Actuals recorded against them but are now no longer in use cannot be deleted. However, their Timeline can be Managed.
Follow this guide on Managing Timelines: How to Manage Timelines.
1.4.2. Create New Cost Centres
Ensure that any new Cost Centres are created in the New Financial Year.
Follow this guide on Creating a New Cost Centre: How to Create a New Cost Centre.
1.4.3. Create New Ledger Codes
Follow this guide on Creating a New Ledger Code: How to Manage Ledger Codes.
1.4.4. Create New Cost Centre Ledger Links
Follow this guide on Creating Cost Centre Ledger Links: How to Manage Cost Centre Ledger Links.
1.5. Check and Update Base Pay Mappings and Salary Projections
Note: If this part of the Finance Module is not used, please move on to the next section: 1.6. CFR Mappings.
1.5.1. Base Pay Mapping
For Salary Projections to correctly show, the Base Pay Mapping needs to be mapped into the New Financial Year.
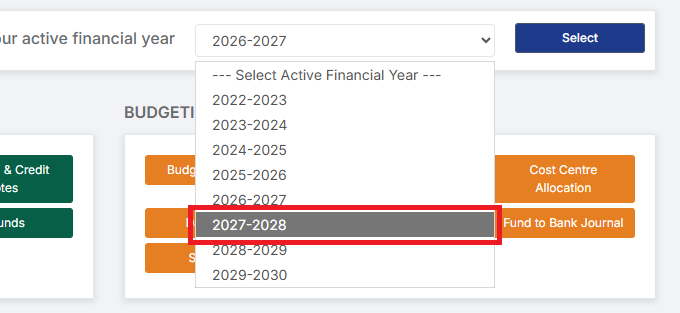
Go to Modules > Finance > Finance Home Page and the select the New Financial Year.
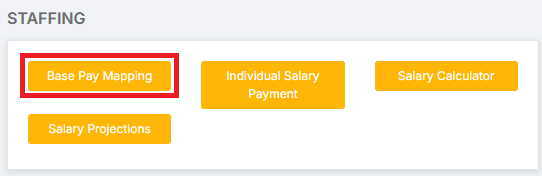
Then, go to Modules > Finance > Finance Home Page > Staffing > Base Pay Mapping.
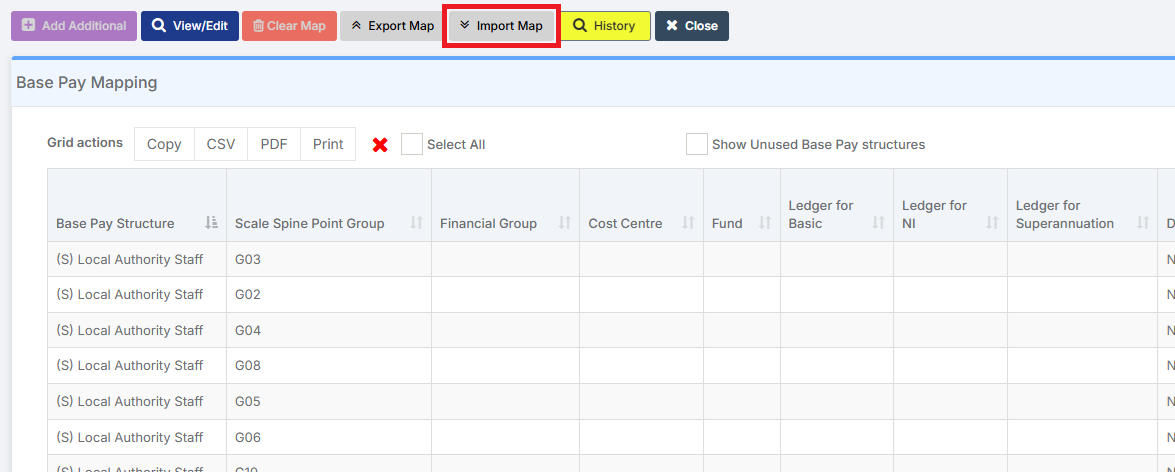
Select Import Map.
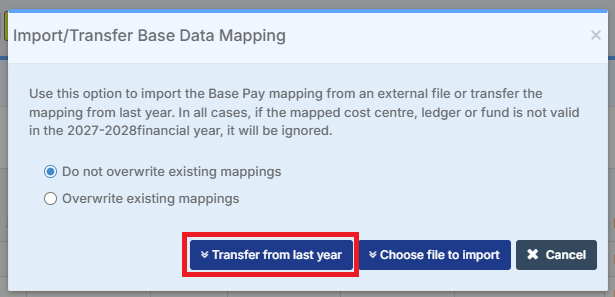
Select Transfer from last year.
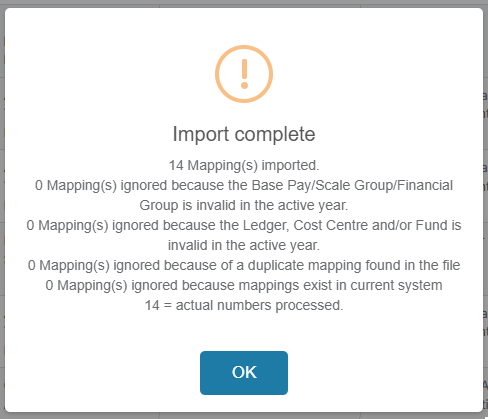
Once the import is complete, confirmation is generated.
1.5.2. Salary Projections
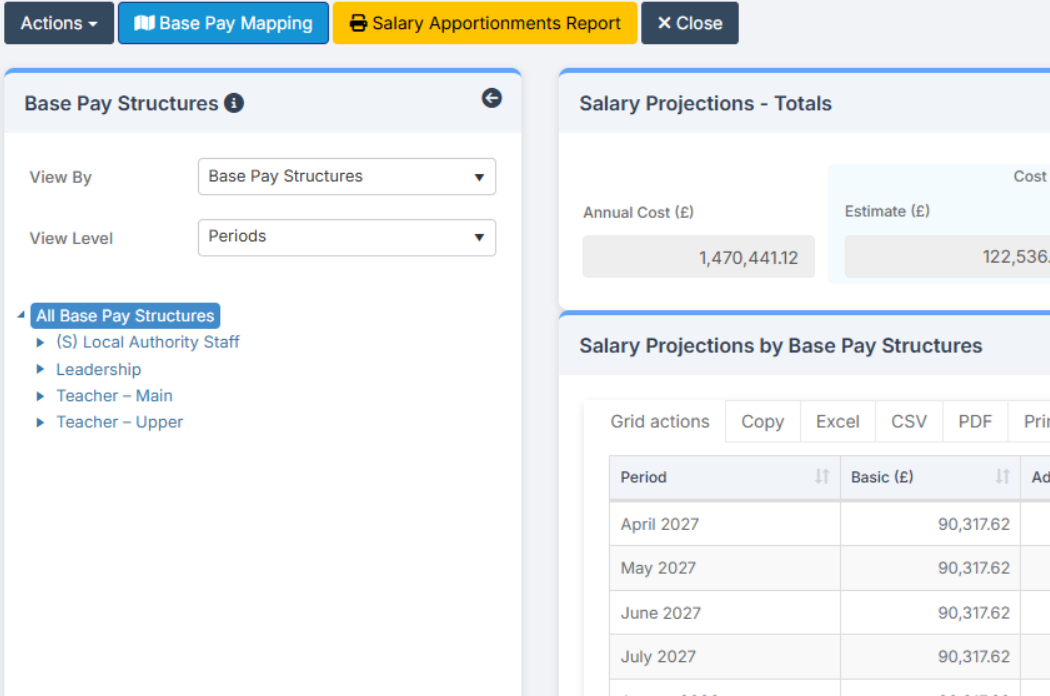
To ensure the Base Pay Mapping is mapped correctly, look at the Salary Projections.
Go to Modules > Finance > Finance Home Page > Staffing > Salary Projections.
All mapping completed will be displayed.
1.5.3. Annual Award / Percentage Increase
Apply the relevant pay increase for teaching staff and support staff for the relevant dates for budgeting purposes. This can be amended at a later stage.
For the Annual Award / Percentage Increase to correctly show, the Annual Award / Percentage Increase needs to be applied to the New Financial Year.
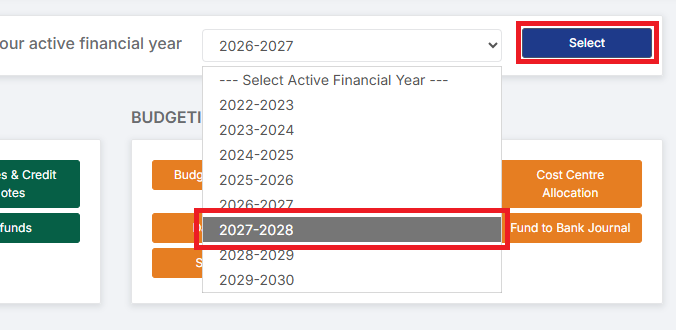
Go to Modules > Finance > Finance Home Page and the select the New Financial Year.
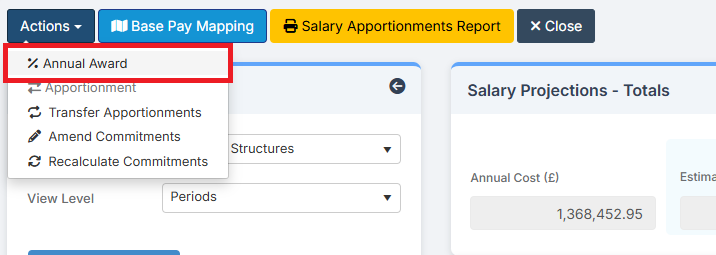
Then, go to Modules > Finance > Finance Home Page > Staffing > Salary Projections > Actions > %Annual Award.
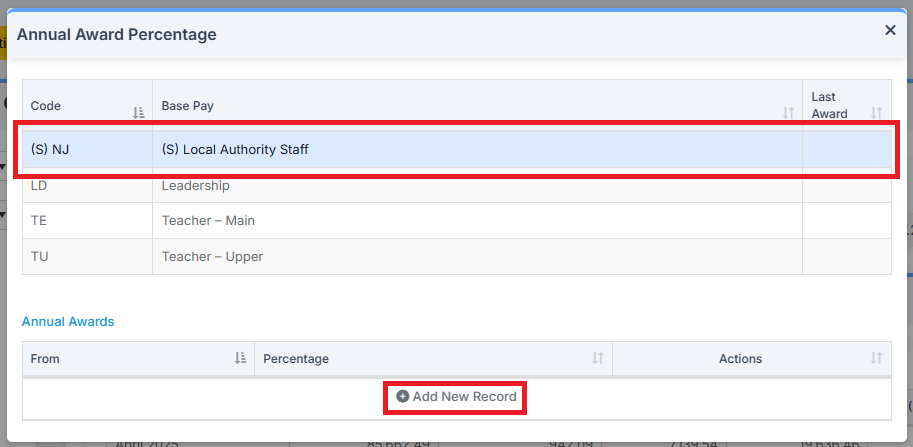
Select the staff group line to Add a New Record to, and then click Add New Record.
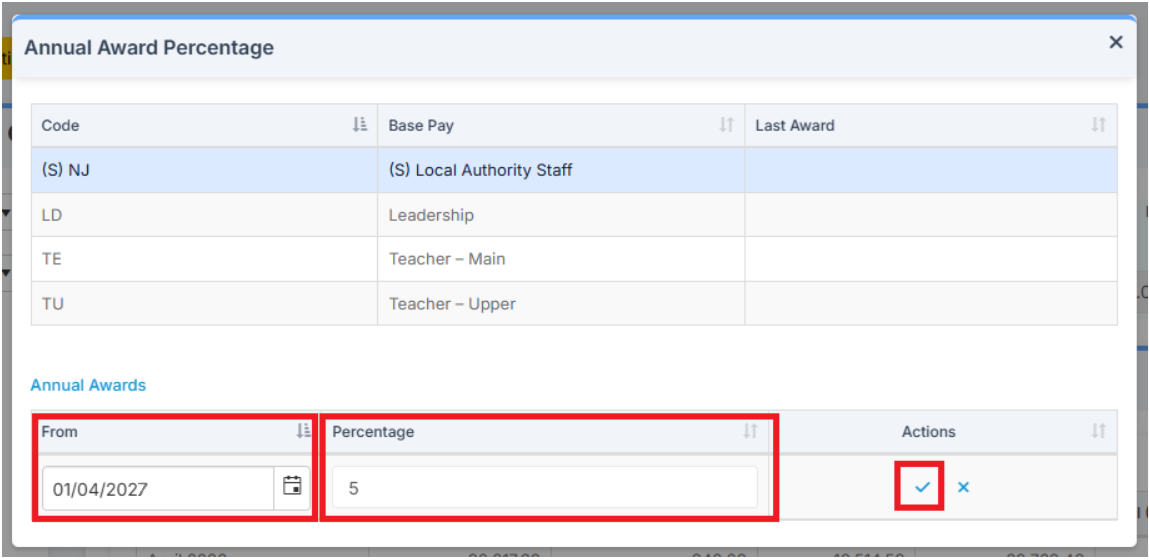
Support Staff usually get an increase from 1st April and Teachers from 1st September. Enter the Date for the Annual Award Percentage adjustment to be applied in the From Date field. In the Percentage field add the expected Percentage amount. Use the Tick to save the award.
1.6. Check and Update CFR Mappings
Note: If CFR Codes are not used, please move on to the next section: 1.7. Switching Off Ordering in the Old Financial Year.
Follow this guide on CFR Mappings for further information: How to Complete CFR Mapping.
1.7. Switch Off Ordering in the Old Financial Year
Orders can be switched off in the Old Financial Year to stop orders being placed in the wrong year. Any outstanding Orders will be carried forward into the New Financial Year.
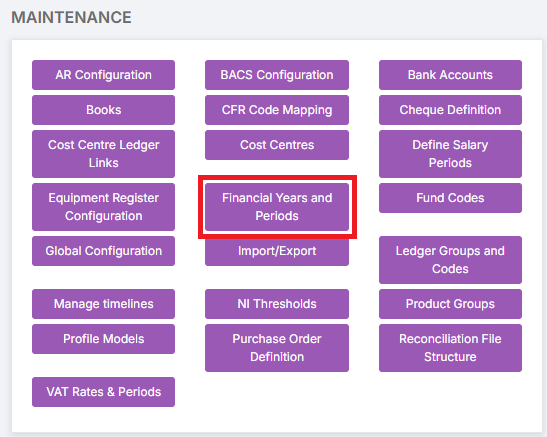
Go to Modules > Finance > Finance Home Page > Maintenance > Financial Years and Periods.
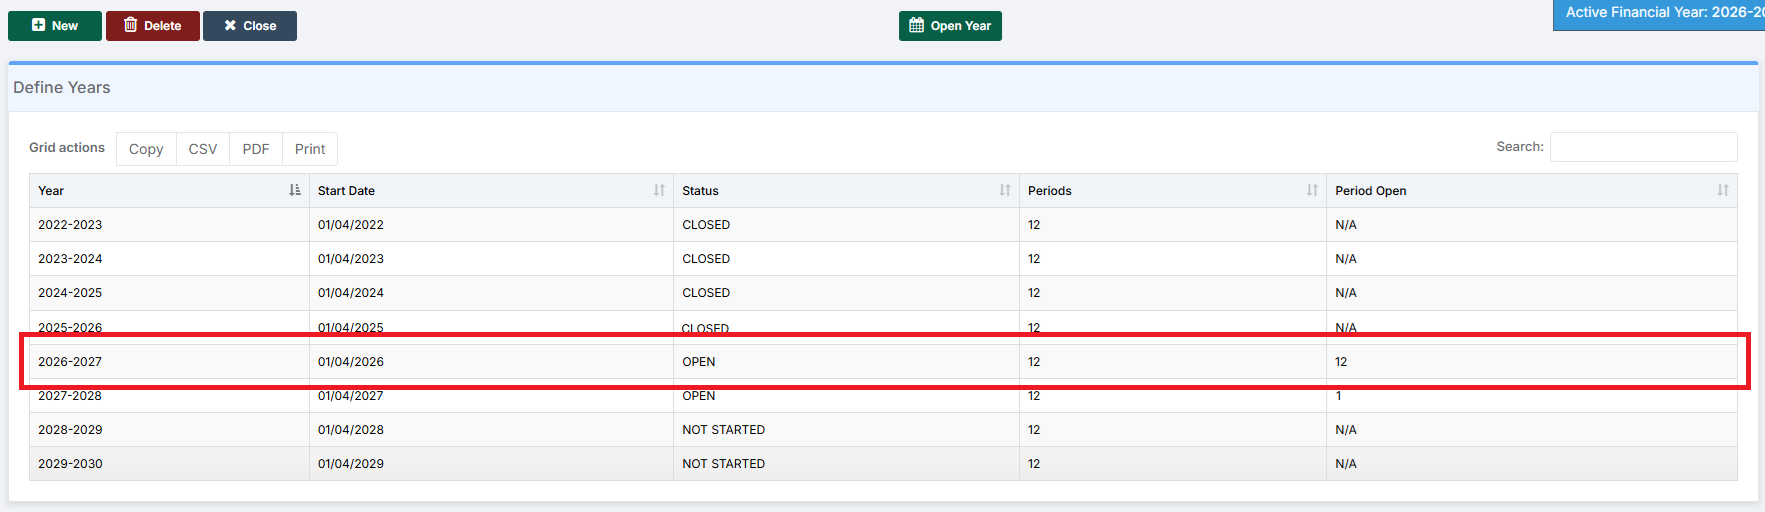
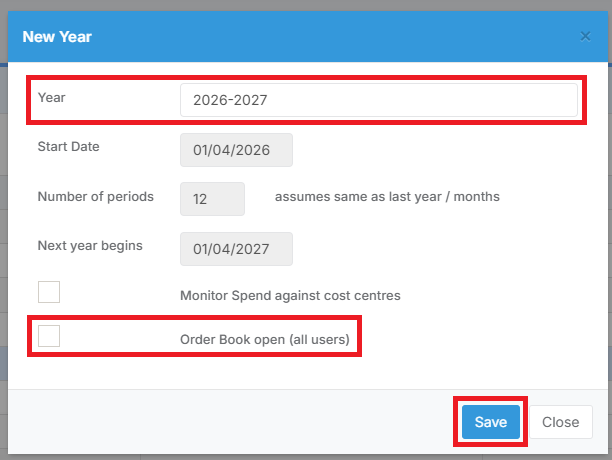
Double click on the Old Year to edit it.
Switch off the Ordering Facilities by de-selecting the Order Book Open tick box. Then click Save.
1.8. Switch On Ordering in the New Financial Year
Ordering for the New Financial Year should be switched on.
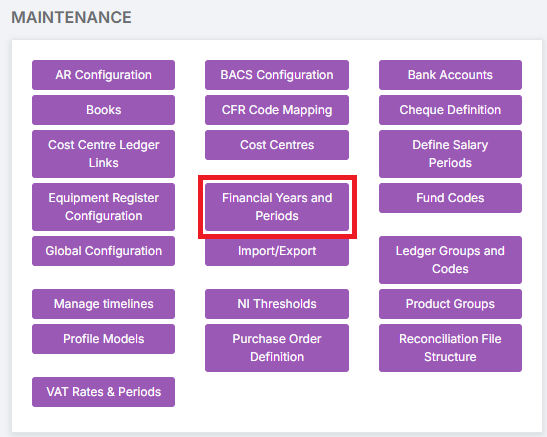
Go to Modules > Finance > Finance Home Page > Maintenance > Financial Years and Periods.
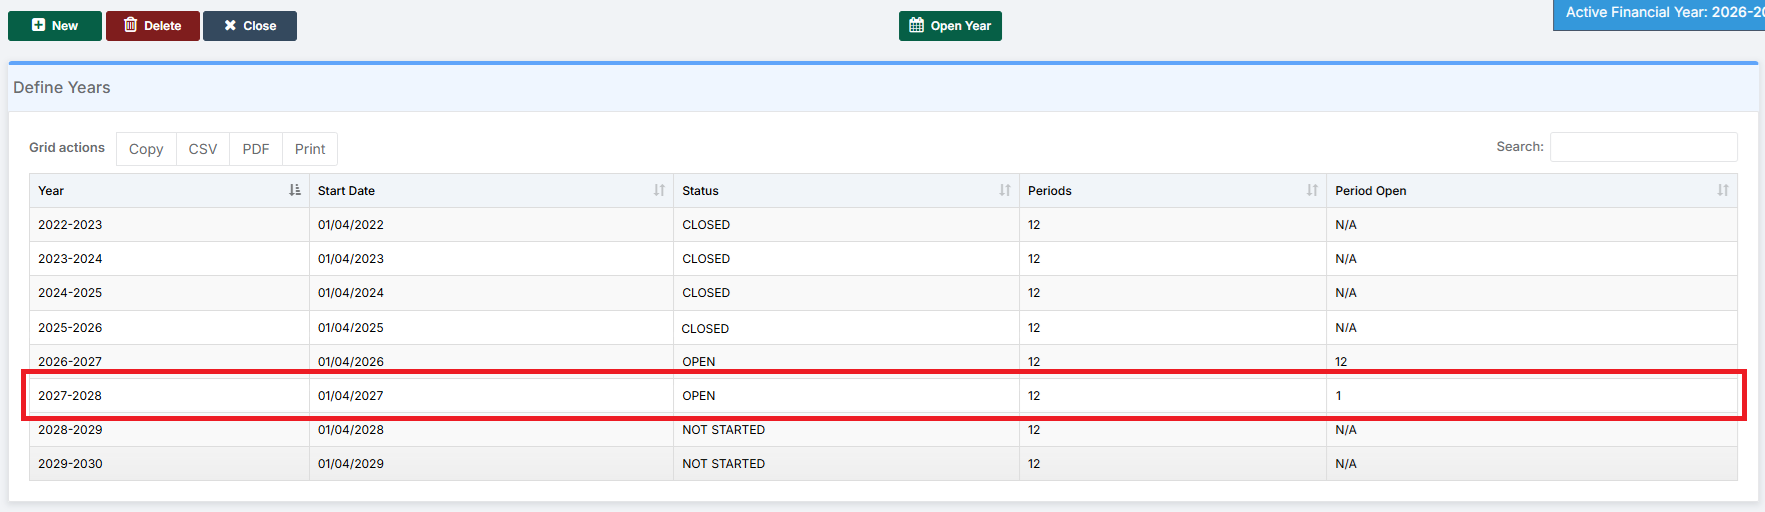
Double click on the New Financial Year to edit it.
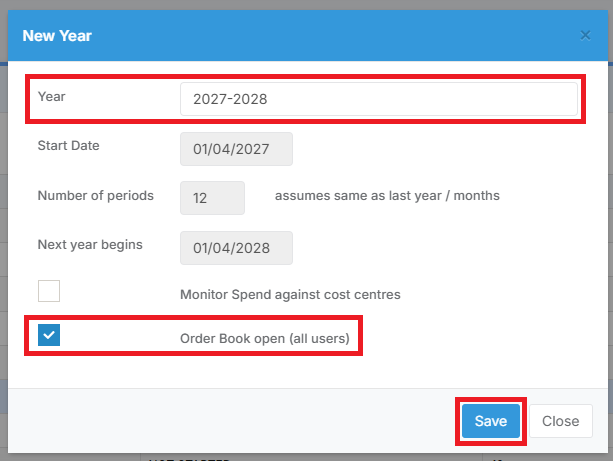
Switch on the Ordering Facilities in the New Financial Year by selecting the Order Book Open tick box. Then click Save.
1.9. Enter Cash Allocations
Note: If this part of the Module is not used, please move on to the next section: 1.10. Online Payment Mapping.
Go to Modules > Finance > Finance Home Page > General Ledger > Journals.
In Manual Journal Processing, click on Cash Book.

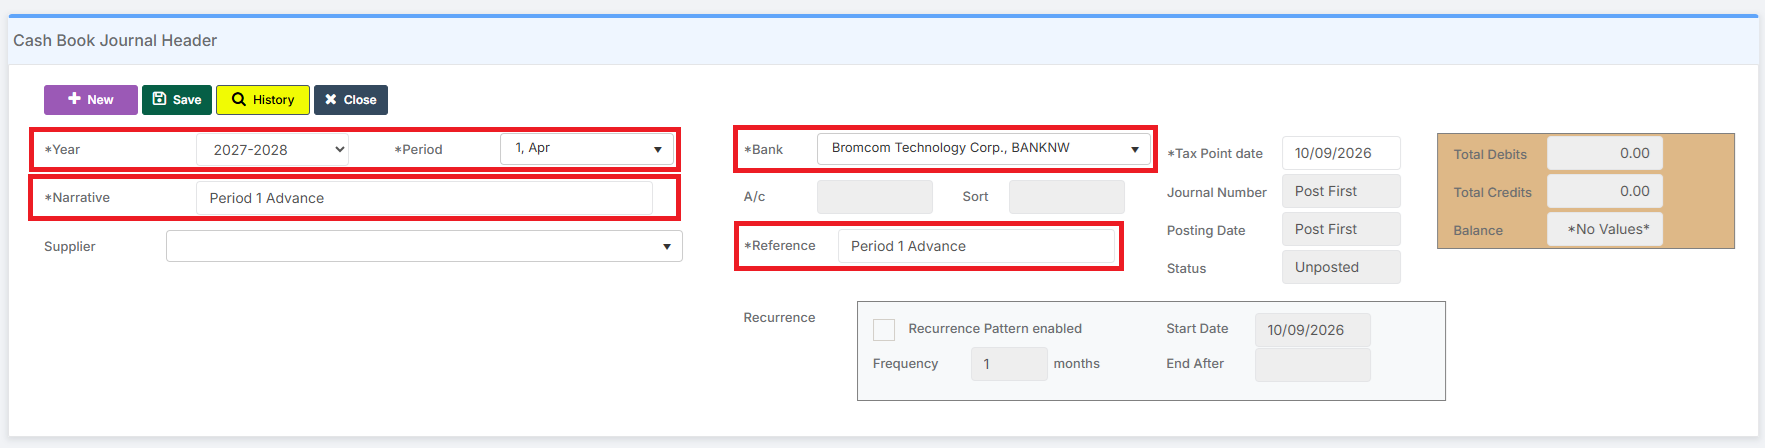
Select the New Financial Year and the first Period in the year. Enter a narrative, for example Period 1 Advance, and select the Bank Account. A reference must be entered, this can be a copy of the narrative. Select Save.
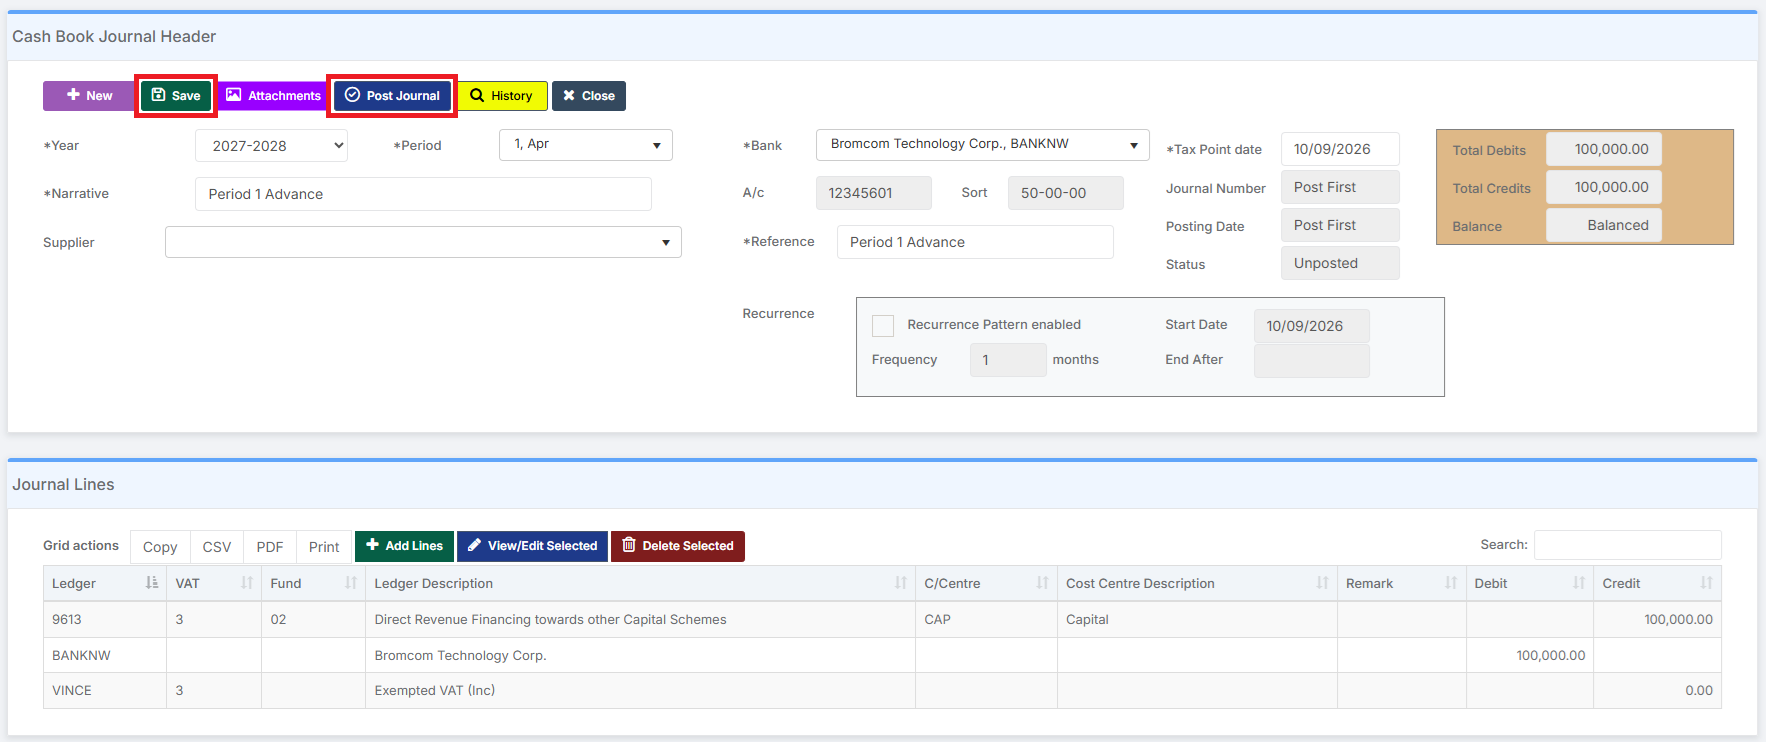
The Journal line will appear at the bottom of the screen. Click Add Lines to add Journal details.

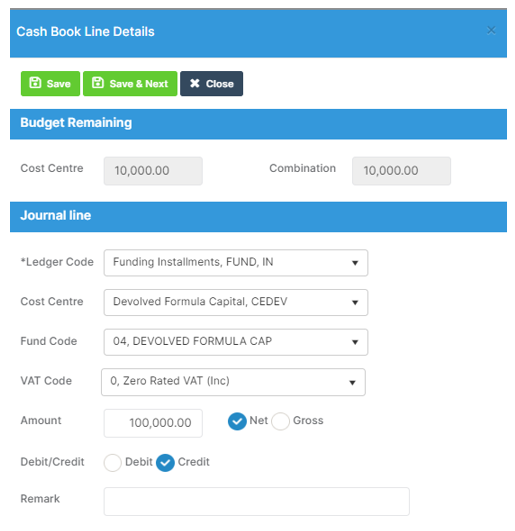
The Cash Book Line Details pop-up displays.
Enter the required Ledger Code, the system sometimes automatically default fills Cost Centre, Fund Code and VAT Code. Enter amount as Net. The advance will be recorded as a Credit. Enter a remark i.e., Period 1 Advance. Click Save.
Record each sum against the specific code. Then Save and Post the Journal.
1.10. Check and Update Online Payment Mapping
Online payment mapping in the New Financial Year needs to be completed.
Follow this guide on Online Payment Mapping: How to Manage Online Payment Mapping.
2. Prepare for the End of Year
Guide Navigation
- Jump back to: Overview
- Jump back to: 1. Setting Up the New Financial Year
- This section is: 2. Prepare for the End of Year
- Jump forward to: 3. End of Year Processes
- Open in a new tab: Finance End of Year Checklist
In this section, the processes and procedures required to prepare for the close of the Old Financial Year are covered.
In conjunction with the Finance End of Year Checklist and the System Checks Report, work through the following sections 2.1. to 2.8. to ensure readiness for the Financial Year End.
Checks can be started before the end of Period 12 to give time for chasing up Invoices and Payments, for example. This ensures a minimal number of items are outstanding at the end of the Period / Financial Year.
See:
2.1. Confirm Readiness
Go to Modules > Finance > Finance Home Page > Routines > Close Financial Year Process.
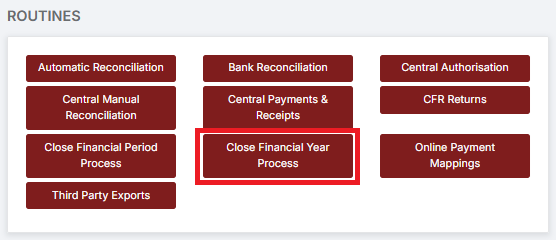
Ensuring the correct Financial Year is being closed, click on the Confirm Readiness button.
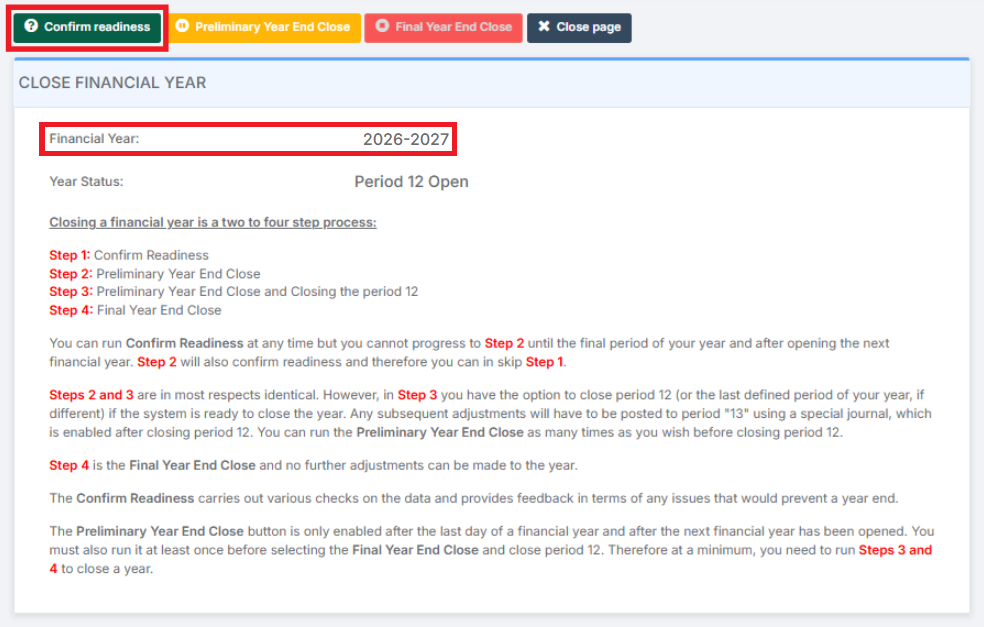
This will give a list of items to be resolved before closing the year.
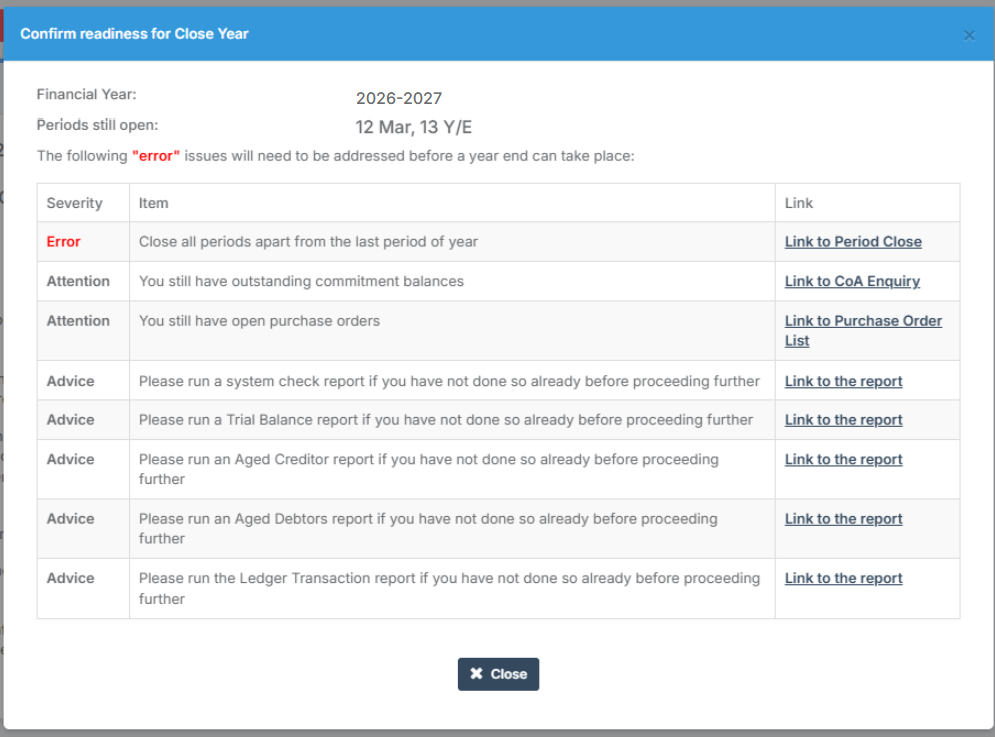
There are three levels of Severity:
- Error: The system does not allow the Financial Year to be closed until all Errors have been dealt with; that is, either deleted, cancelled, cleared, posted, or authorised
- Attention: The system allows the Financial Year to be closed with outstanding items for Attention, but recommends they were dealt with where possible
- Advice: The system recommends these Reports are run and attention paid to them – they will always show and do not prevent a Financial Year from being closed
2.2. Run the System Checks Report
The System Checks Report gives a list of items that need reviewing before completing the End of Year.
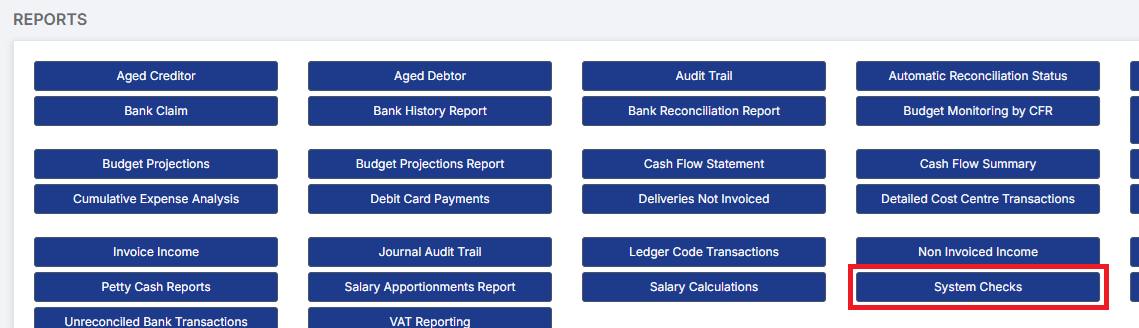
Go to Modules > Finance > Finance Home Page > Reports > System Checks.
The System Checks Report draws attention to any outstanding items.
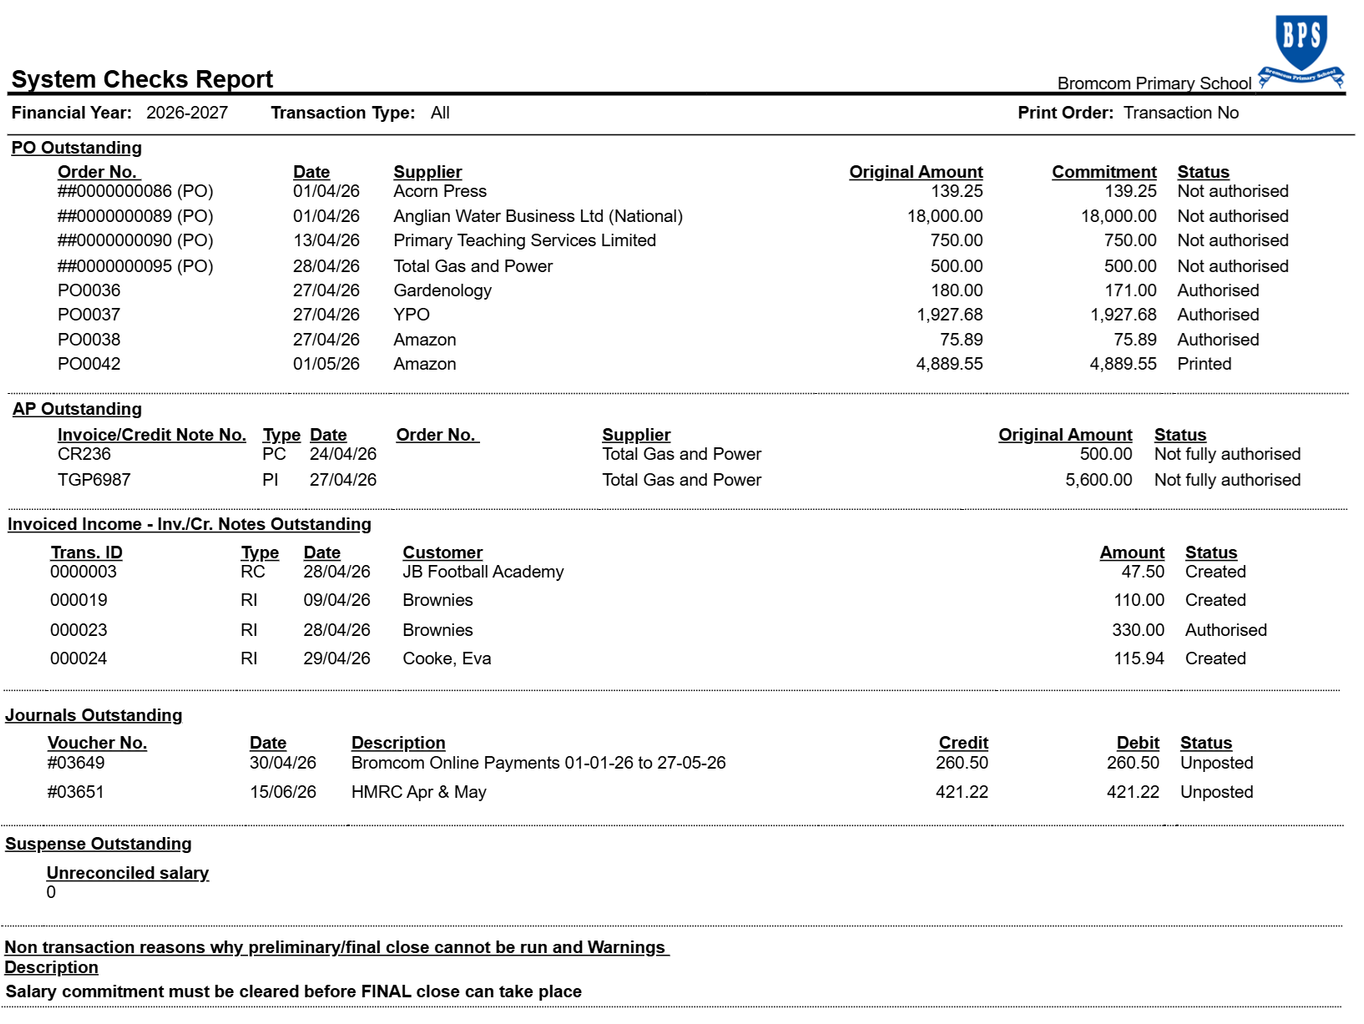
The following actions should be taken to deal with the items on the System Checks Report.
| Item Type | Status on Report | Action Before End of Year |
|---|---|---|
| Order | Not authorised | Authorise or delete |
| Accounts Payable Invoice | Not fully authorised | Authorise or cancel |
| Accounts Payable Invoice | On hold | Change status or cancel commitment |
| Credit Note | Not authorised | Authorise or cancel |
| Non-Invoiced income | Created | Post or delete |
| Accounts Receivable (Invoiced Income) | Created or authorised | Authorise and print, print, or cancel |
| Petty Cash | Unposted | Post or delete |
| All Journals | Unposted | Post or delete |
| Suspense Outstanding | Unreconciled salary | Clear unreconciled items |
| Salary Commitments | Salary commitment must be cleared before Final Close can take place | Clear salary commitments |
2.3. Accounts Payable
This section deals with issues relating to Accounts Payable.
2.3.1. Orders and Commitments
Unauthorised Purchase Orders should be Authorised or Cancelled. Go through all outstanding Purchase Orders and ensure that they are still valid. Some Purchase Orders may have been raised several months ago with only a few items outstanding that may never be delivered.
2.3.1.1. Authorise Orders
Any Unauthorised Orders will need to be resolved. They can either be Authorised and Printed, or Deleted.
Go to Modules > Finance > Finance Home Page > Accounts Payable > Purchase Orders.
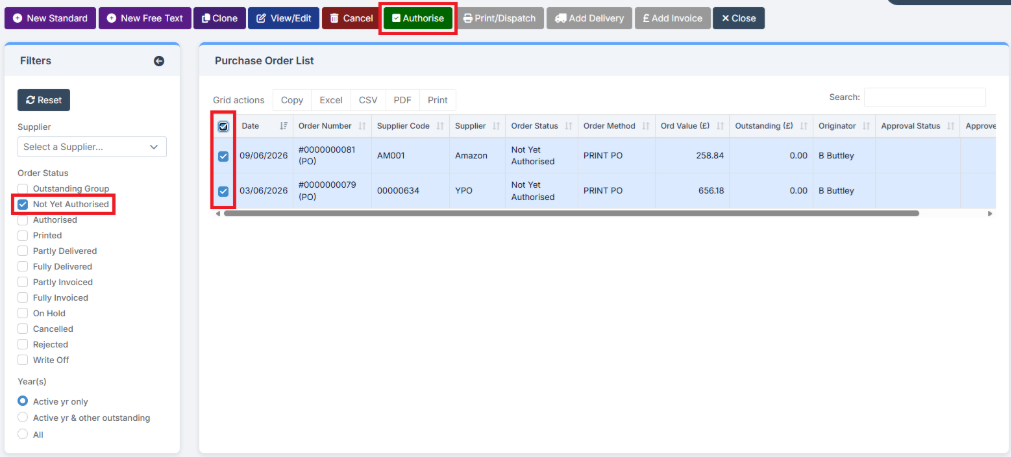
Using the Filters on the left of the screen, select Not Yet Authorised. Select all the items to Authorise and then click on Authorise. Alternatively, go into each Purchase Order and authorise them individually.
2.3.1.2. Deal with Outstanding Ordered Items
Check whether all ordered goods have been delivered, or if there are any outstanding items. Items which are not going to be delivered should be Cancelled to clear commitments. To do this, show all outstanding orders for all Suppliers.
Go to Modules > Finance >Finance Home Page > Accounts Payable > Purchase Orders.
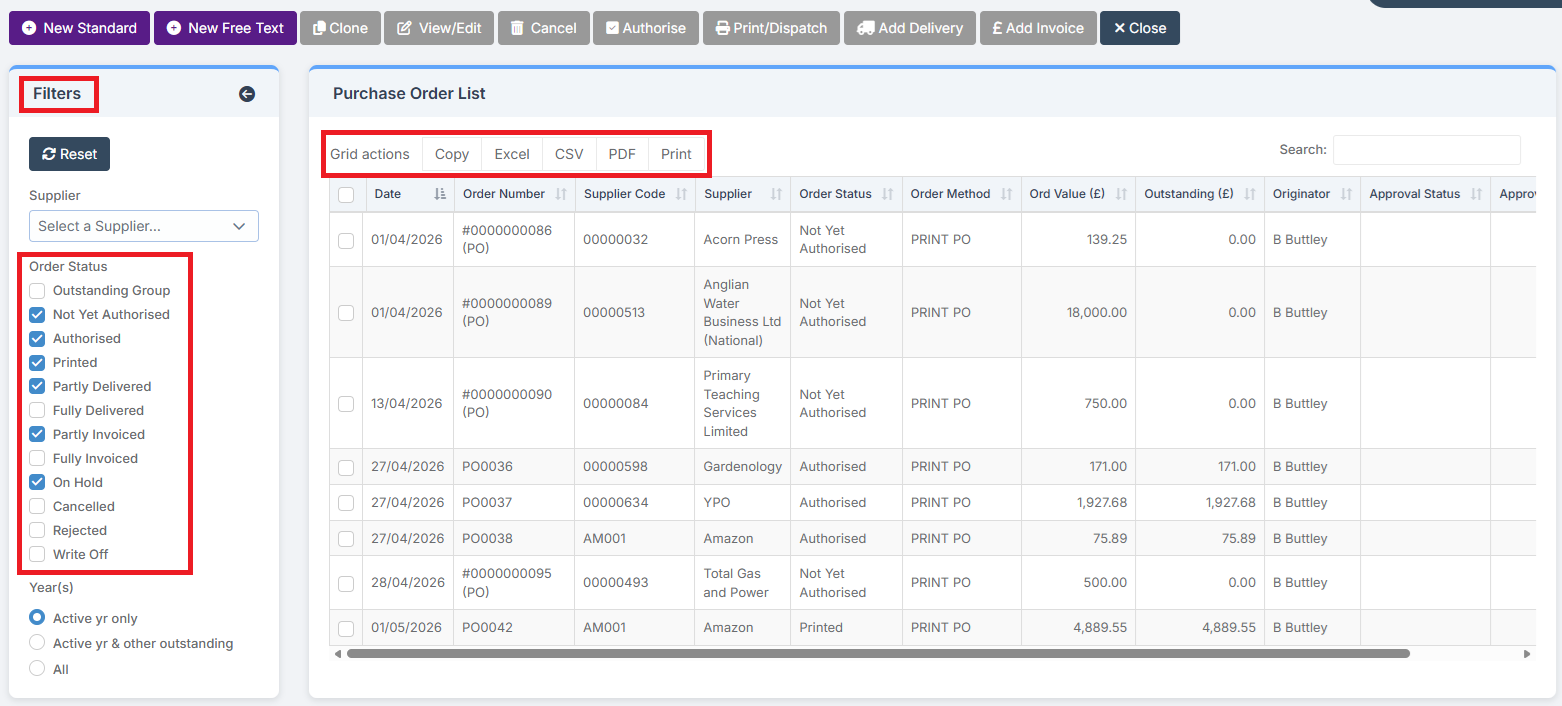
In the Filters box on the left, deselect everything except Not Yet Authorised, Authorised, Printed, Partly Delivered, Partly Invoiced and On Hold to display a list of outstanding and partly invoiced Purchase Orders. The Purchase Order List Grid can be printed or exported using the Grid Actions.
2.3.1.3. Cancel Unwanted Outstanding Orders
Go to Modules > Finance > Finance Home Page > Accounts Payable > Purchase Orders.
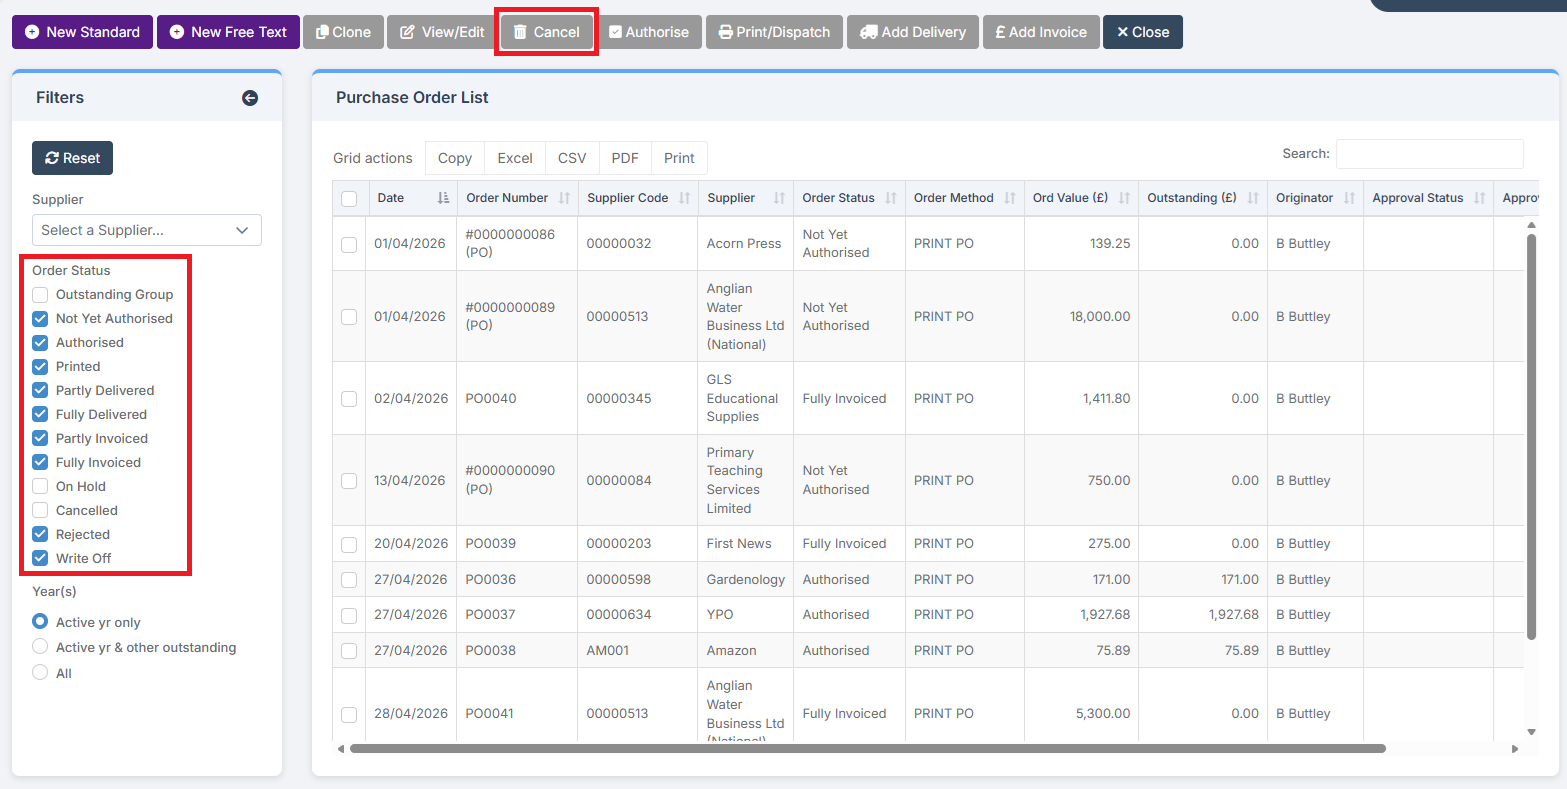
Change the Order Status to select everything except Fully Invoiced, On Hold and Cancelled. Using the Cancel button at the top right of the screen, cancel any outstanding orders no longer needed. Viewing each order individually before cancelling is recommended.
In some instances, it may only be necessary to Clear the Commitment on a single line of a Purchase Order. This might be because one item on the order is no longer available. If this is the last remaining item or commitment on a partially invoiced order, then the status of the order will change to fully invoiced.
Go to Modules > Finance > Finance Home Page > Accounts Payable > Purchase Orders.
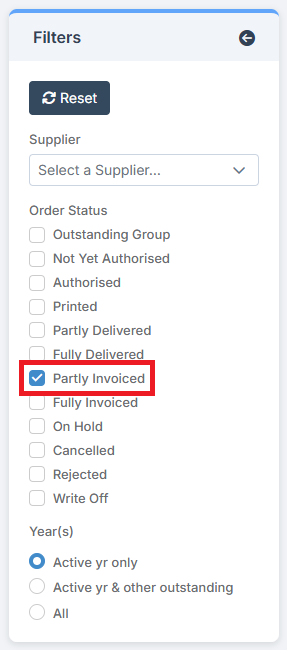
Deselect everything in the Filter except Partly Invoiced.
Open the Purchase Order and look at the second section, Order Lines.
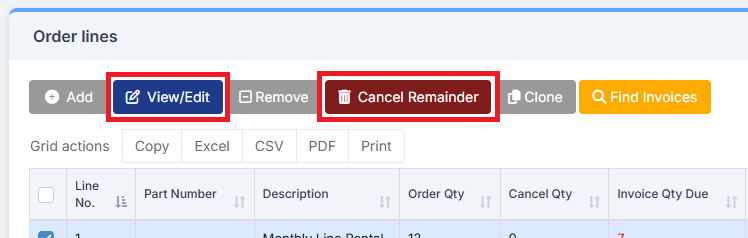
From the list of outstanding items, select the Line to edit by double clicking or selecting View/Edit at the top of the screen. Go down to the Order Line and select either View/Edit or Cancel Remainder.
2.3.2. Invoices and Credit Notes
There may be several Invoices and Credit Notes at various stages of processing.
2.3.2.1. Unentered Invoices and Credit Notes
Make sure all received Invoices and Credit Notes have been entered onto the system.
2.3.2.2. Unauthorised Invoices and Credit Notes
Any Invoices or Credit Notes entered but Not Yet Authorised should be Authorised or Cancelled.
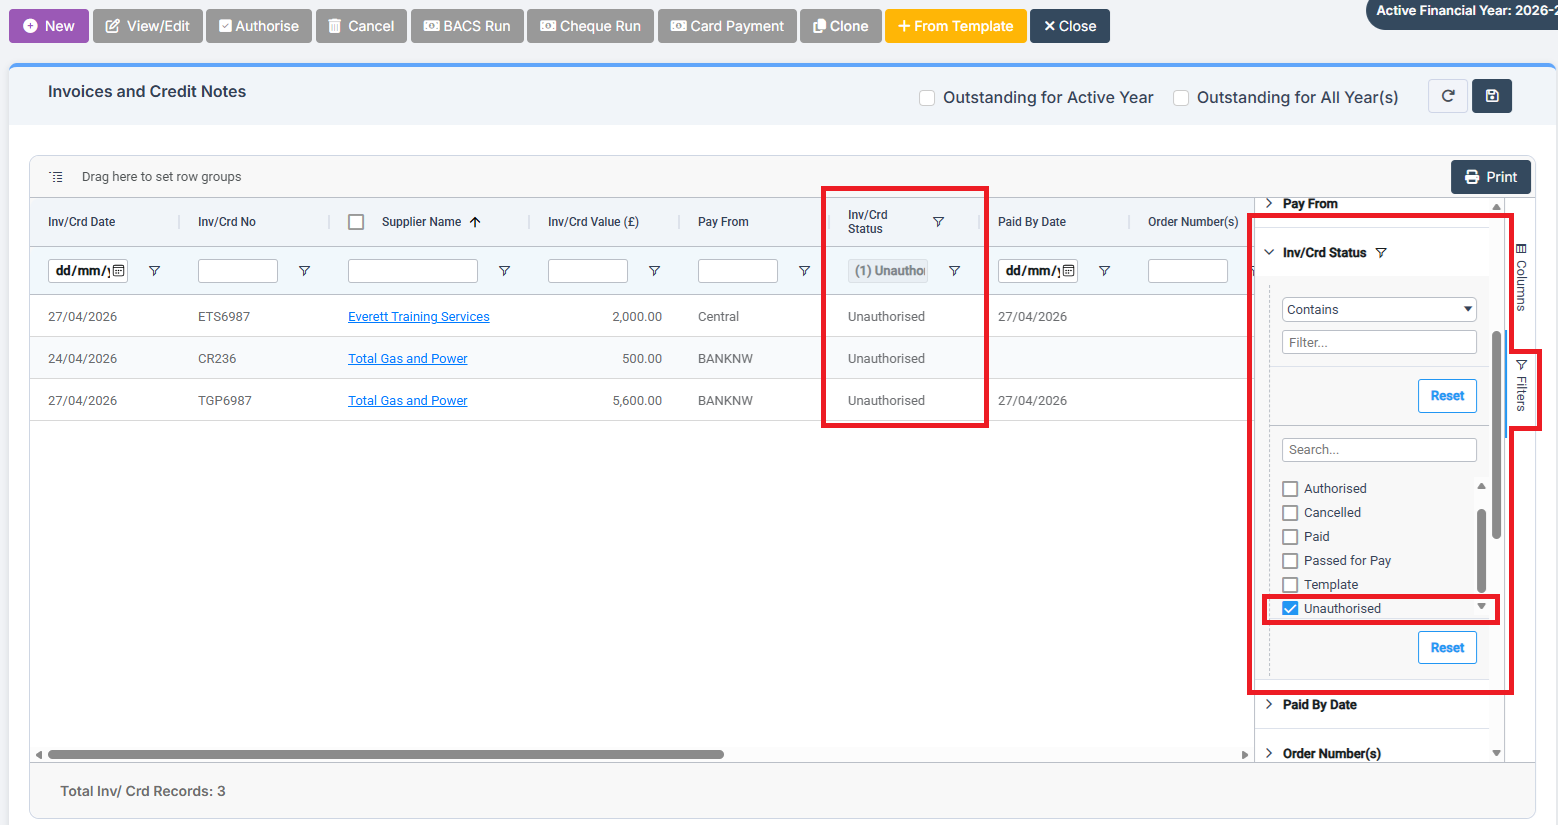
Go to Modules > Finance > Finance Home Page > Accounts Payable > Invoices & Credit Notes.
From the Filters pop out on the right, in Inv/Crd Status, select Unauthorised from the Filter and then either Authorise or Cancel them accordingly.
2.3.3. Creditor Review
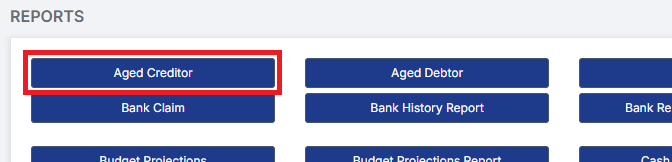
It is recommended that the Aged Creditor Report is reviewed to check that all outstanding invoices are paid.
Go to Modules > Finance > Finance Home Page > Reports > Aged Creditor.
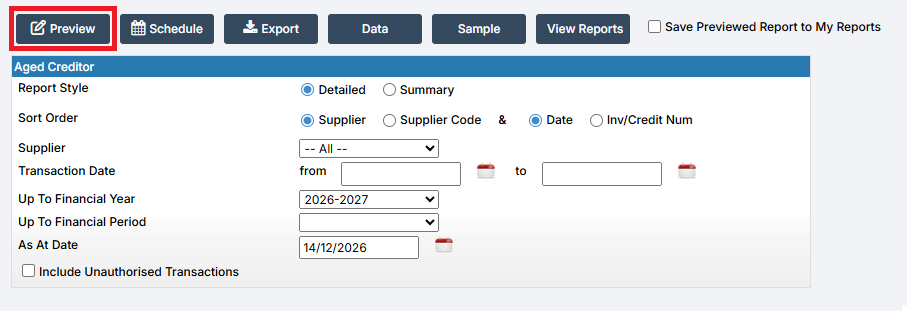
Choose the parameters and click Preview to display the report.
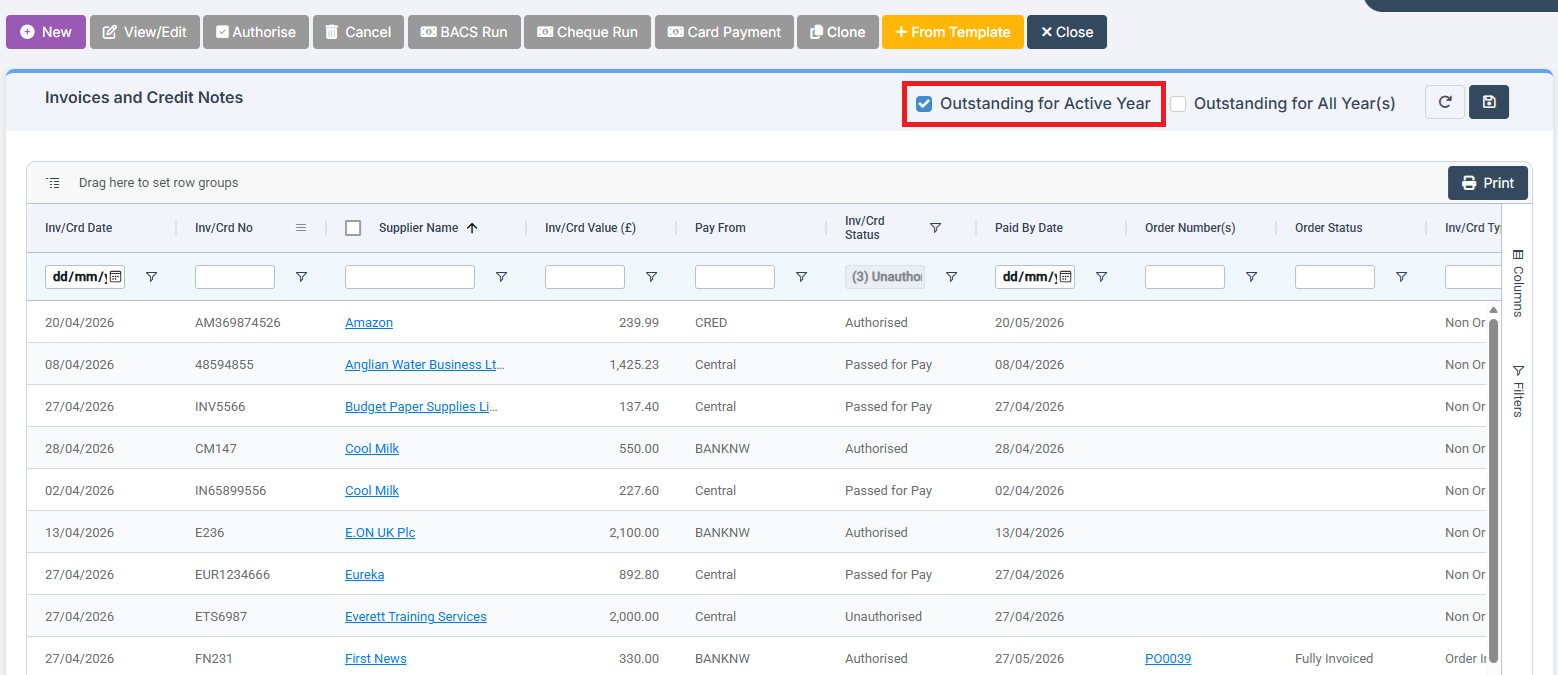
Go to Modules > Finance > Finance Homepage > Accounts Payable > Invoices and Credit Notes to cancel any Outstanding Invoices.
Ensure the filter at the top is set to Outstanding for Active Year. Select the relevant Invoice, using the search function if necessary, and select Cancel. The Purchase Order may then need to be Cancelled. See: Clearing Commitments.
2.3.4. Payment Processing
2.3.4.1. Cancel Unwanted Cheques
It may be necessary to cancel Cheques that have been issued but are no longer required, perhaps because the Cheque presentation period has expired. All Cheques older than six months should be cancelled both on the system and at the bank.
Note: Do not cancel a Cheque from a previous Financial Year. In this instance, a Journal should be added to make up the difference, as cancelling the Cheque will affect the opening balances.
Go to Modules > Finance > Finance Homepage > Routines > Bank Reconciliation to identify the Cheque to cancel.
Open a Bank Statement for the relevant account and select the Unreconciled transactions. This shows the Cheque Run that needs to be opened.
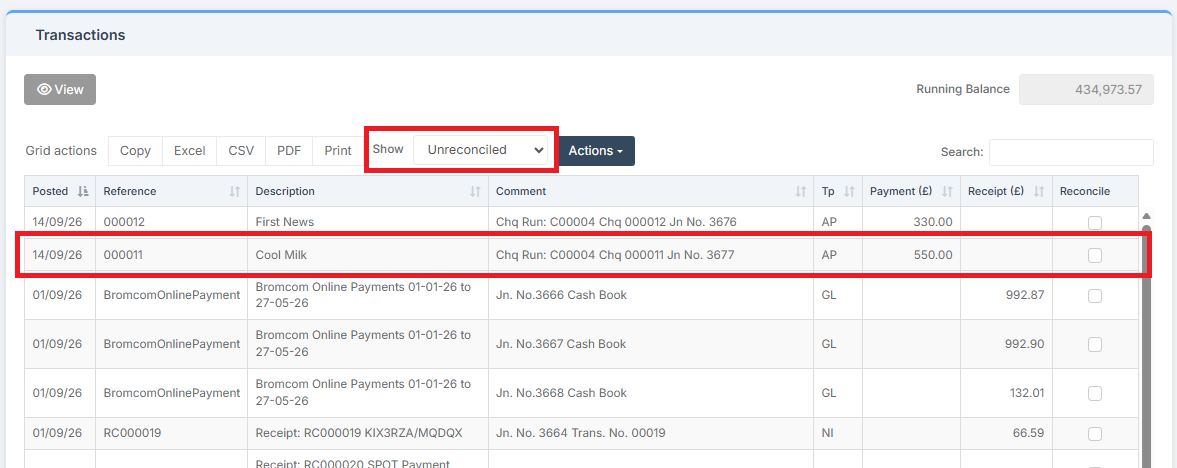
To find the relevant cheque run in Payment Processing, use the search function, or use the Filters on the left.
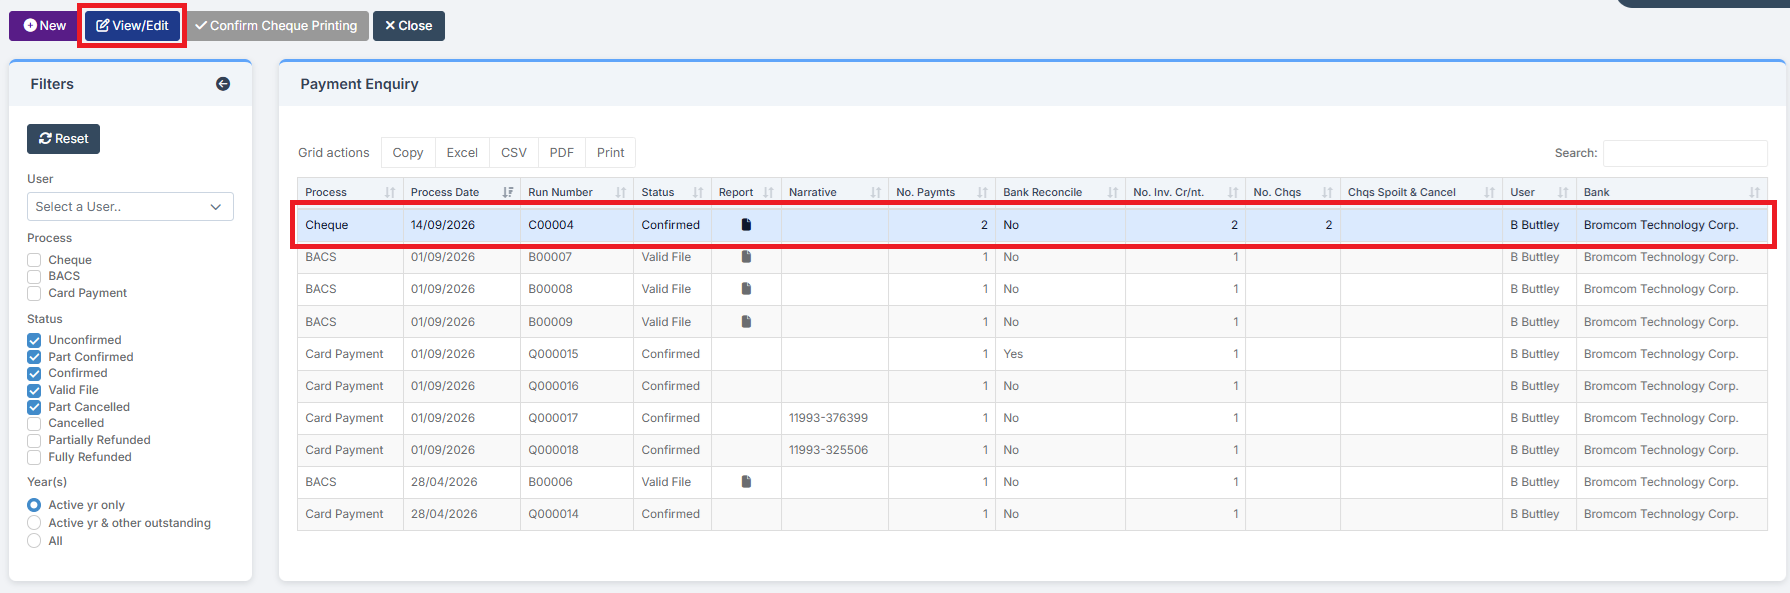
Go to Modules > Finance > Finance Homepage > Accounts Payable > Payment Processing.
Highlight the relevant Cheque Run and select View/Edit.
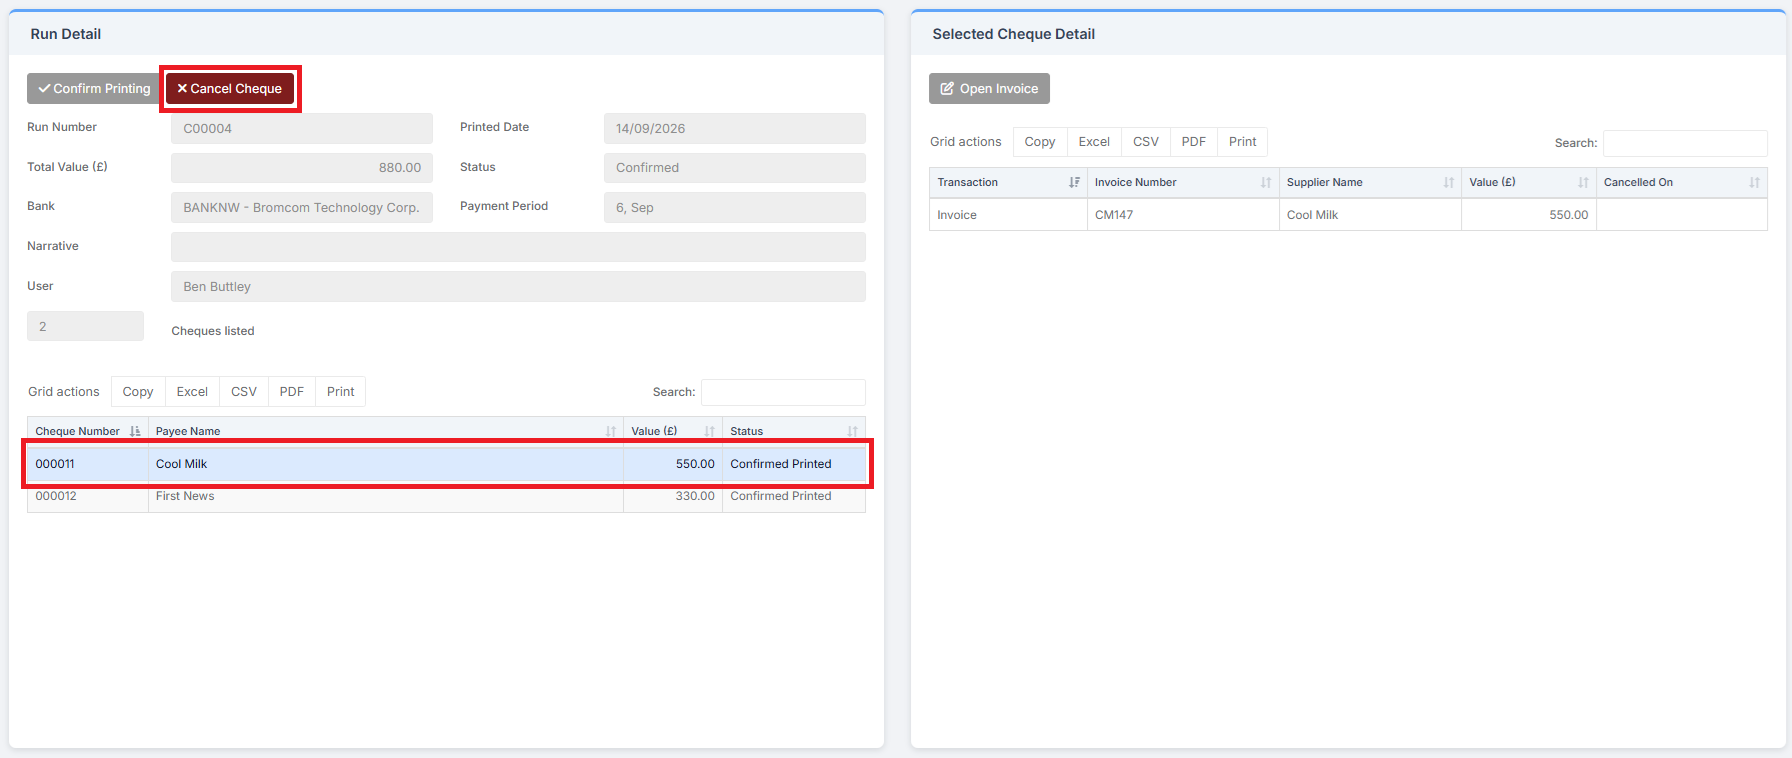
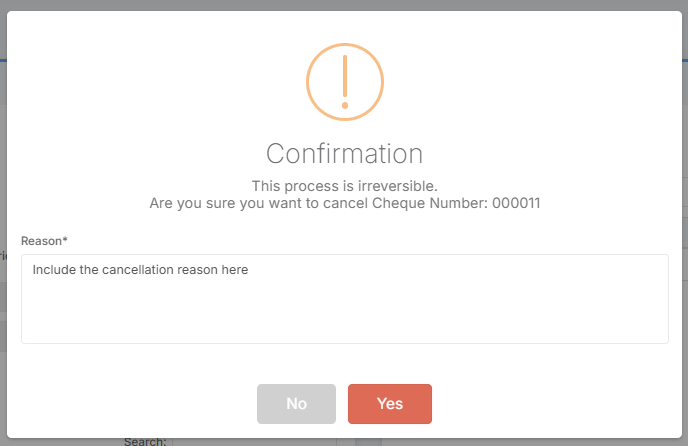
Once the Cheque has been located at the bottom left of the page, highlight it then click the Cancel Cheque button.
Give the reason for the cancellation of the Cheque and the confirm its cancellation.
Remember to cancel the Invoice and Purchase Order if the commitment is no longer required, or raise a Credit Note as appropriate.
Don’t forget to cancel the Cheque with the Bank.
2.3.4.2. Reconcile BACS and Cheque Payments
BACS Runs and Cheque Runs, including those that have contra records, should be reconciled. This does not apply to failed BACS Runs or failed Cheque Runs, as these do not appear on Bank Statements.
2.4. Accounts Receivable
Note: If this part of the Finance Module is not used, please move on to the next section, 2.5. Petty Cash Processing.
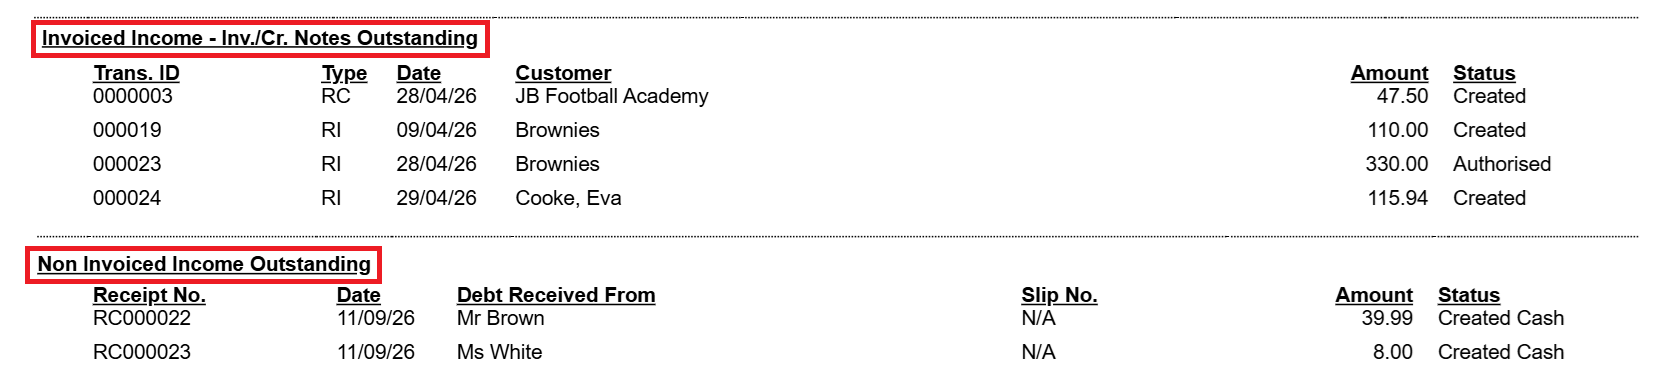
Ensure all Invoiced and Non-Invoiced Income has been dealt with. Use the System Checks Report to identify outstanding items.
2.4.1. Invoiced Income
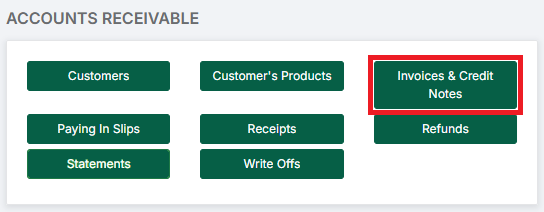
Go to Modules > Finance > Finance Home Page > Accounts Receivable > Invoices & Credit Notes.
Accounts Payable Invoices and Credit Notes should be Authorised and Printed, or Deleted accordingly.
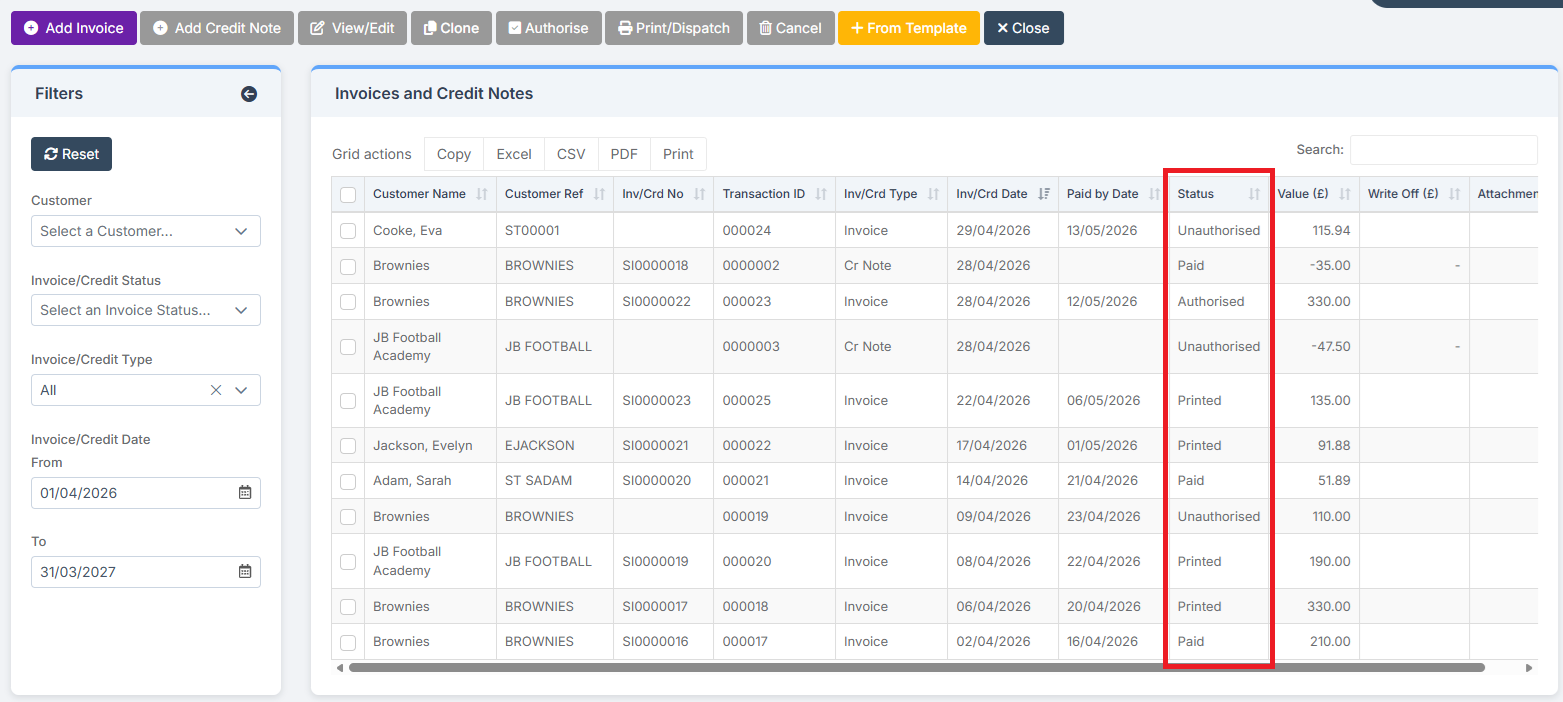
Receipts then need to be issued for the Invoiced Income. See: How to Process an Invoice Receipt in Accounts Receivable.
Invoiced Income that is paid by Cash or Cheque is not automatically posted to the Bank. Paying In Slips need to be created for it. See: 2.4.3. Paying in Unposted Receipts.
2.4.2. Non-Invoiced Income
Receipts need to be issued for Non-Invoiced Income. For guidance, see: How to process a Non-Invoiced Receipt in Accounts Receivable.
Then ensure that all outstanding Non-Invoiced Income Receipts in the System are either Posted or Cancelled.
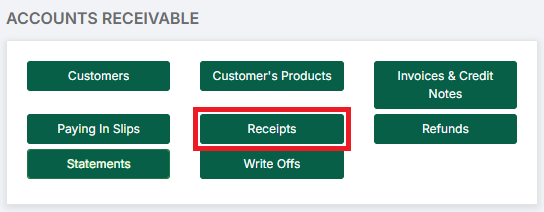
Go to Modules > Finance > Finance Home Page > Accounts Receivable > Receipts.
Check the Type column for Invoiced Income Type and the Status column to determine what action needs to be applied to the Receipt.
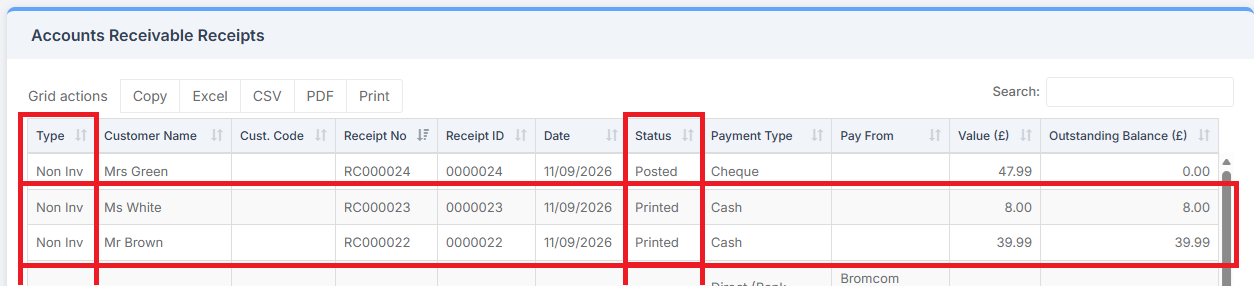
Non-Invoiced Income that is paid by Cash or Cheque is not automatically posted to the Bank after the Receipt has been produced. Paying In Slips need to be created for it. See: 2.4.3. Pay in Unposted Receipts.
2.4.3. Pay in Unposted Receipts
If there are any unposted Receipts in Accounts Receivable, they will need to be paid in before the Financial Year End.
Go to Modules > Finance > Finance Homepage > Accounts Receivable > Paying in Slips.
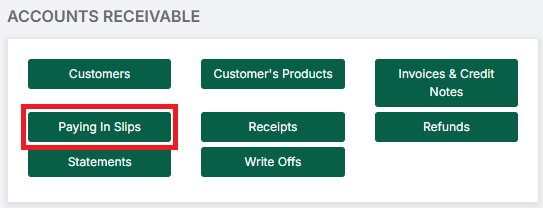
For guidance on processing Paying In Slips, see: How to Process Paying In Slips in Accounts Receivable.
2.4.4. Debtor Review
Review the Aged Debtor Report. Any debts that are considered unrecoverable should be written off with the correct authorisation. Note: the Aged Debtor Report will not identify outstanding transactions brought forward in opening balances from a previous financial year, as this report is defined by financial year.
Go to Modules > Finance > Finance Home Page > Reports > Aged Debtor.
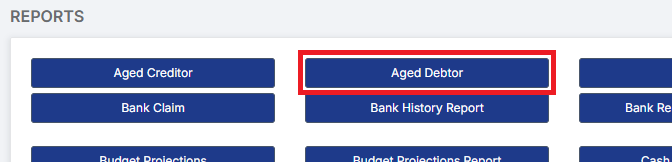
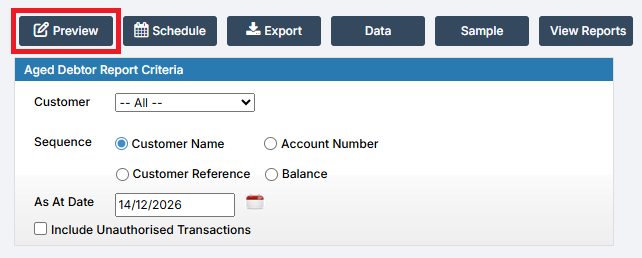
Select an As At Date and tick whether any Unauthorised Transactions should be included. Click Preview to display the report.
Write Offs can be accessed from Modules > Finance > Finance Home Page > Accounts Receivable > Write Offs.
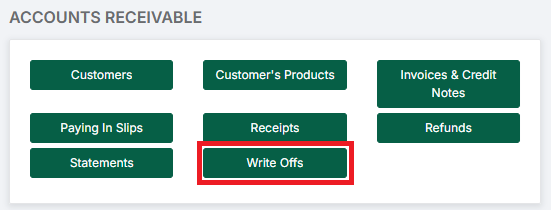
Follow this guide on Write Offs for further information: How to Manage Write Offs.
2.5. Petty Cash Processing
Note: If this part of the Finance Module is not used, please move on to the next section: 2.6. Bank Reconciliation.
All unposted Petty Cash Expenditure needs to be posted or deleted. In addition, the cash in hand figure in Bromcom should match the value of the actual Petty Cash.
Go to Modules > Finance > Finance Home Page > General Ledger > Petty Cash Processing.
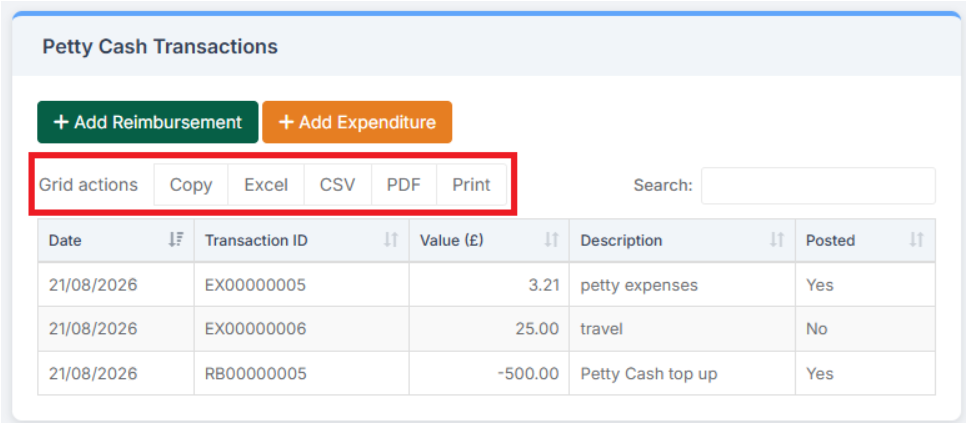
A list of transactions will be displayed. To Print the list, in Grid Actions, select Print for all types of transactions.
In the example below, two of the transactions have been posted. The unposted transaction needs to be actioned. Follow this guidance on Petty Cash: How to Manage Petty Cash.
2.6. Bank Accounts
2.6.1. Bank Reconciliation
All Bank Reconciliations must be up to date by the end of period, and the Actual Bank Statement balance must match the statement balance within the Bank Reconciliation screen in Bromcom. A Bank Statement that goes up to the last day of the month is required. It may be possible to download a statement from the internet bank up to this date rather than having to wait for paper copies to arrive.
For instructions on how to perform a Bank Reconciliation, See: How to Use Bank Reconciliation.
Once the Bank Reconciliation is complete, create a Report of all the unpresented transactions.
Go to Modules > Finance > Finance Home Page > Reports > Unreconciled Bank Transactions.
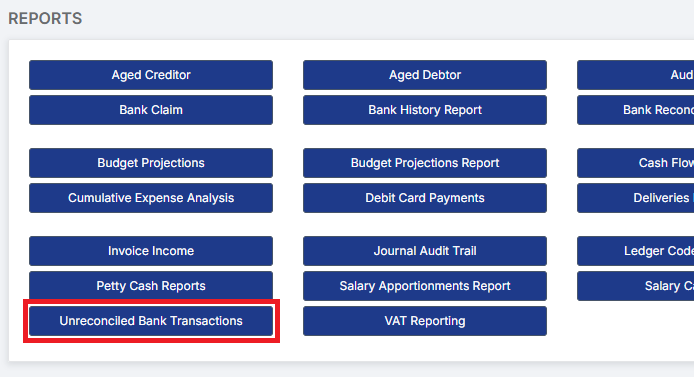
Select the Bank Account if necessary and ensure that the Transaction Date is set to the last day of the Period. Then click the Preview button to produce the Report.
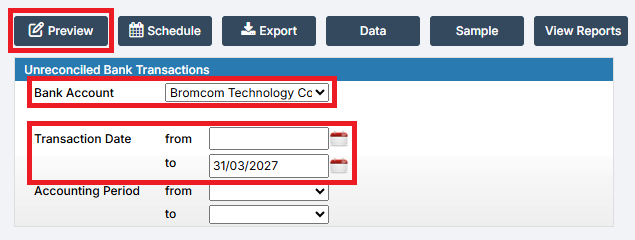
Any unreconciled items will be transferred to the next Period.
2.6.2. Review the Bank Ledger Code
Once the Bank Reconciliation has been completed, the Bank Ledger should be the sum of the Closing Balance on the Bank Statement and the Unreconciled Items. If this does not match, check the Chart of Accounts Enquiry, and review the Bank Ledger Code.
Go to Modules > Finance > Finance Homepage > General Ledger > Chart of Accounts Enquiry. Search for the Bank Ledger Code.
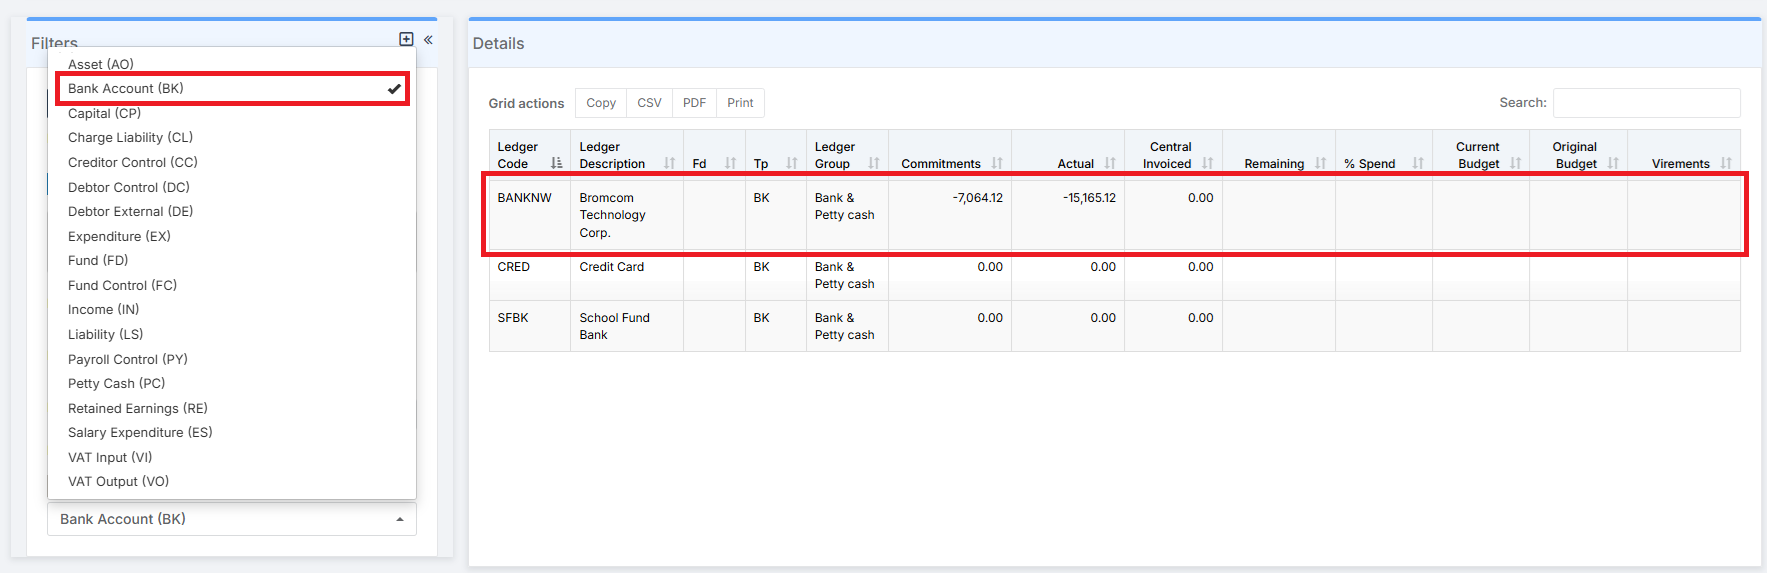
Double-clicking on the relevant Ledger Code gives a list of items for the Bank Account, along with the Statement Number they are reconciled against. If there are any unreconciled items, this column is blank.
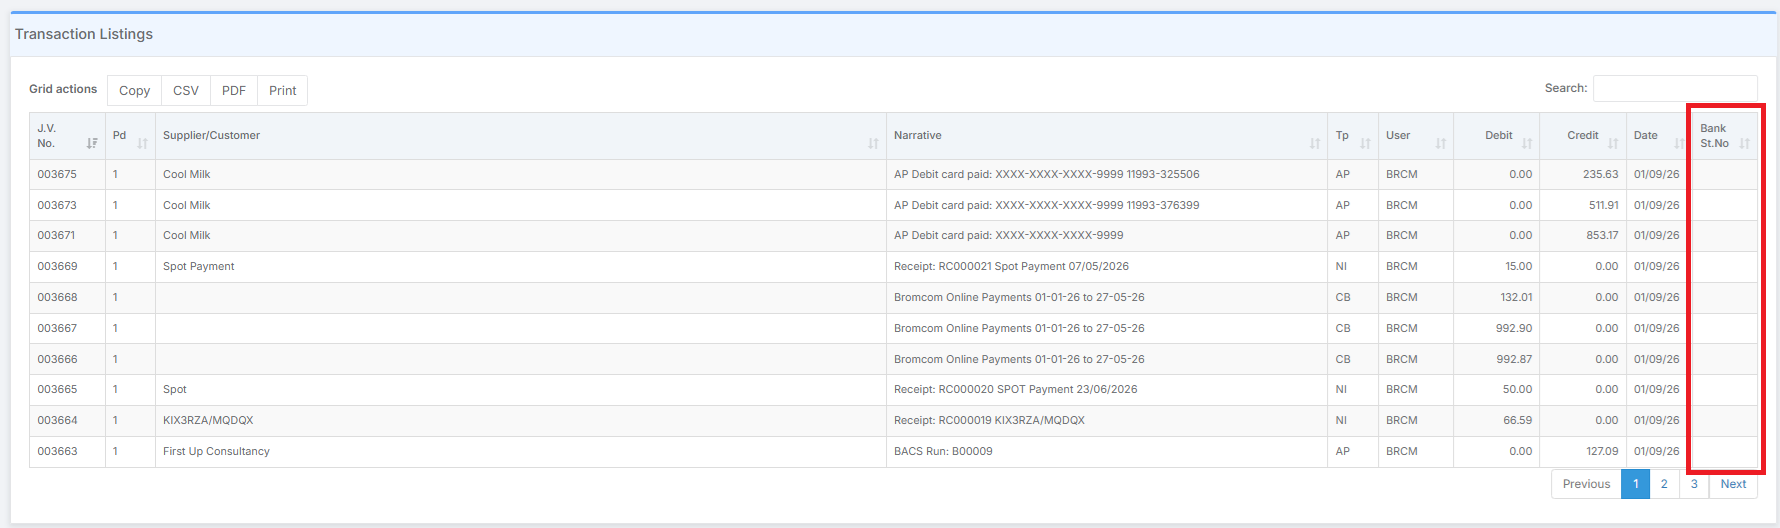
Check this against the Bank Statements and Unreconciled Transaction Report to identify any differences.
2.7. Salaries and Payroll
2.7.1. Clear Salary Commitments
Go to Modules > Finance > Finance Homepage > Staffing > Salary Projections.
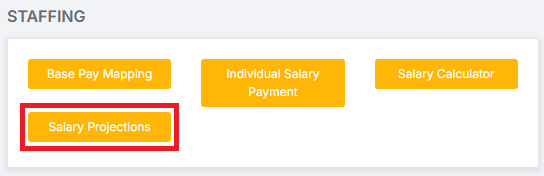
Select Actions > Amend Commitments. Select the Period where commitments remain, using the multi select tool in the grid to select all, then click Clear Commitments and Save.
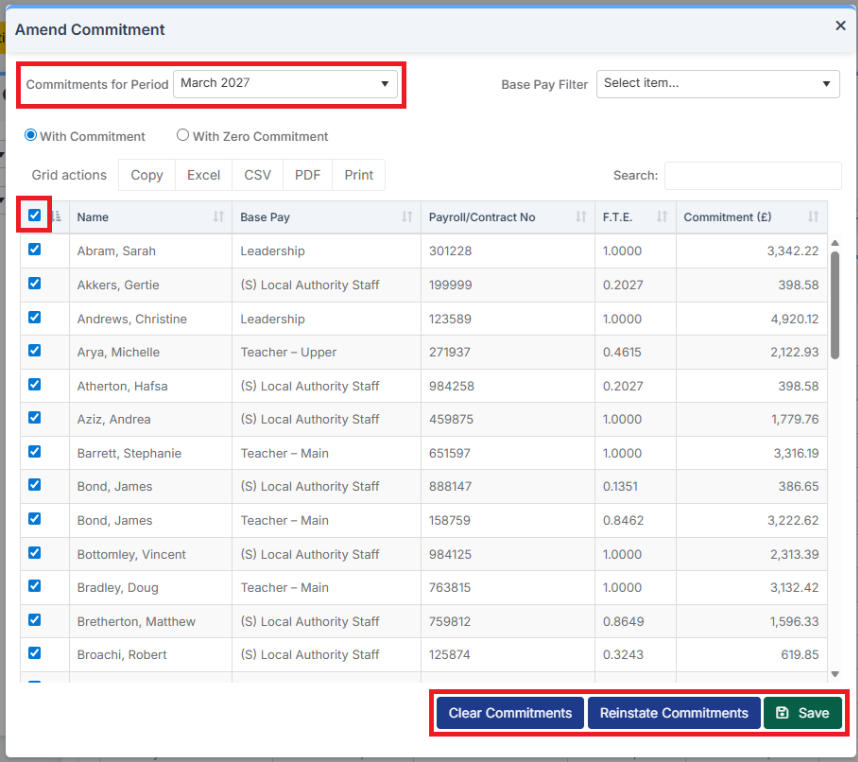
Repeat the above for all Periods that are showing Commitments.
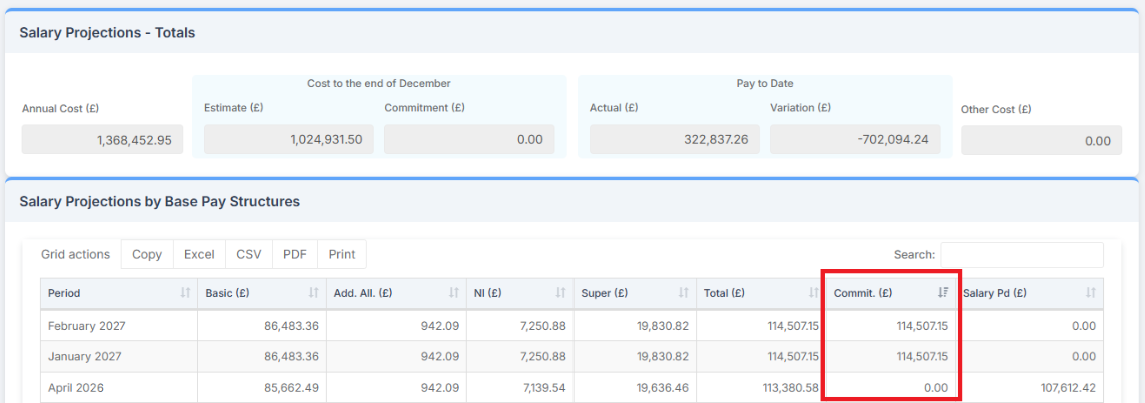
See How to Clear Salary Commitments for further guidance.
2.7.2. Process and Post Payroll Journals
If the School processes its Salaries by using Journals, then Process and Post any outstanding Payroll Journals. Guidance can be found here
2.7.3. Import Reconciliation Files and Clear any Unreconciled Transactions
If the School processes its Salaries by using Reconciliation Files, then ensure the Reconciliation Files have been imported and any unreconciled transactions have been cleared. Guidance can be found here:
- How to Process Journals Using Automatic Reconciliation
- How to Complete Automatic Reconciliation of Salaries
2.8. Journals
Review any Unposted Journals that need to be dealt with. These can either be Posted or Deleted.
2.8.1. Post or Delete Unposted Journals
Go to Modules > Finance > Finance Home Page > General Ledger > Journals.
If there are any unposted or incomplete Journals, they will be visible. Items marked in Green are ready to be posted, any in Red have an error and cannot be posted.
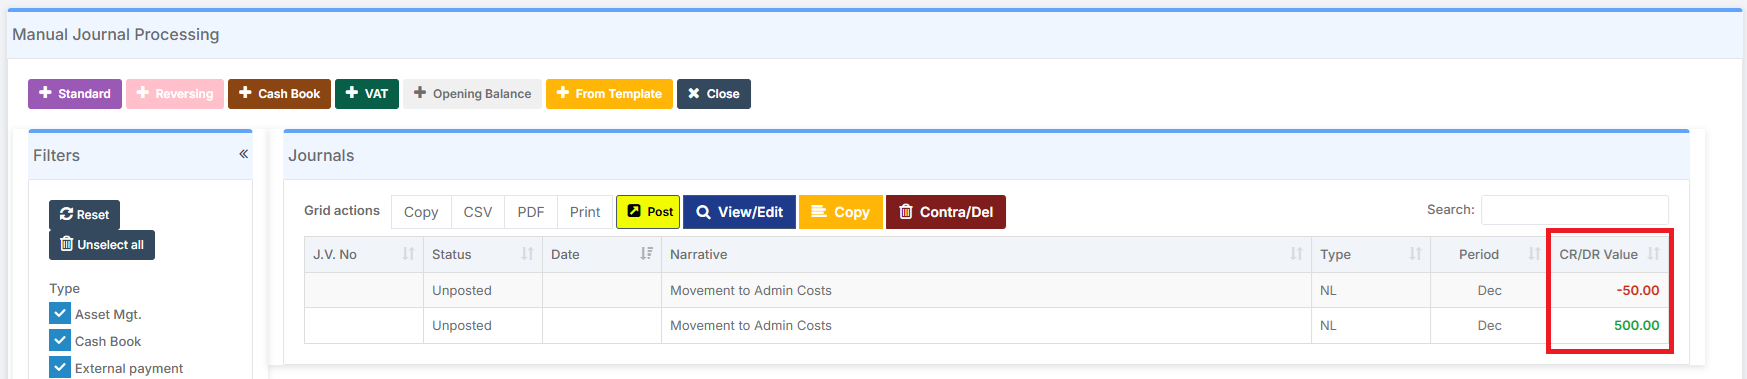
To correct an unposted Journal with an error (a Journal marked in Red), double click on the Journal line and make the necessary corrections before posting it.

To post a Journal, highlight it and select the Post button.

If an unposted Journal needs to be removed, for example it was started in error, highlight the unposted Journal, and click the Contra/Del button. As the Journal is unposted, this action Deletes it.

2.8.2. Check the Journal Browser for Errors
Go to Modules > Finance > Finance Home Page > General Ledger > Journal Browser.

In the Search Bar for Note, type err to pull up any errors.
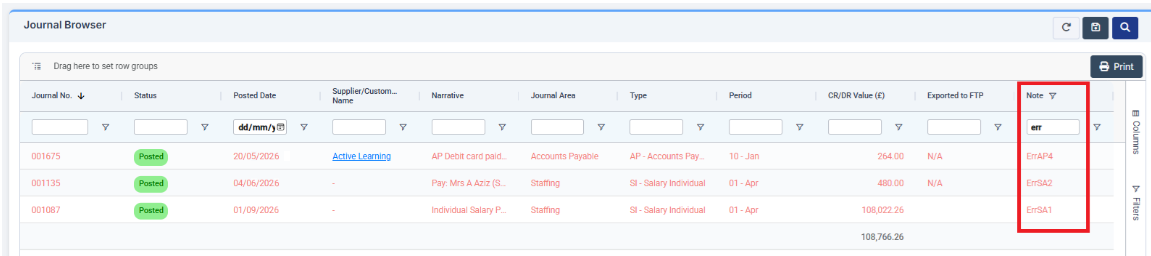
Note: All Journal Errors should be referred to the support team for investigation.
2.9. Consider Adding Reversing Journals
These can be done in Period 12 or early on in the New Financial Year. Reversing Journals can be used to set up Accruals and/or Prepayments to keep an accurate track of items spread across the Financial Years.
In each period, a transfer is affected from a Ledger Code/Cost Centre to an Accruals / Prepayments account, which will have been set up specifically for the purpose. Please consult LA/Reporting Bodies/Accountants guidance on this. When the journal is posted, the transaction is reversed out to the relevant Period so that when the invoice is processed, the figures reflect the true cost in the Periods in which the expense was incurred.
The use of Reversing Journals will debit or credit the Ledger Code/Cost Centre combination in the Old Financial Year and credit or debit the same Ledger Code/Cost Centre combination in the New Financial Year.
The following table demonstrates the effect of a Reversing Journal:
Old Financial Year – Period 12:
| Ledger Code | Cost Centre | Debit | Credit |
|---|---|---|---|
| Telephones | Admin | 900.00 | |
| Year End Creditors | 900.00 |
When the Reversing Journal is created, the period that defaults for the Journal to be reversed is period one in the New Financial Year, but any other periods can be selected.
New Financial Year – Period 1:
| Ledger Code | Cost Centre | Debit | Credit |
|---|---|---|---|
| Telephones | Admin | 900.00 | |
| Year End Creditors | 900.00 |
The LA/Reporting Bodies/Accountants can advise on the requirements for Accruals and Prepayments.
For further guidance on creating Reversing Journals, see 3.4.1. How to Create a Reversing Journal.
3. End of Year Processes
Guide Navigation:
- Jump back to: Overview
- Jump back to: 1. Set Up the New Financial Year
- Jump back to: 2. Prepare for the End of Year
- This section is: 3. End of Year Processes
- Open in a new tab: Finance End of Year Checklist
Well done on having completed sections 1. Set Up the New Financial Year and 2. Prepare for the End of Year. Once the Financial Year has actually ended, and having received the go-ahead from the LA/Reporting Bodies/Accountants, it’s time to Close the Old Financial Year.
3.1. Check Bank Reconciliation
Revisit section 2.10 Bank Reconciliation to ensure all Bank Reconciliations are up to date at the end of year, and the Actual Bank Statement balance matches the statement balance within the Bank Reconciliation screen in Bromcom.
For instructions on how to perform a Bank Reconciliation, See: How to Use Bank Reconciliation.
3.2. Check VAT Claims
Once all transactions have been entered on the system, and as close to the end of the final period of the year as possible, the appropriate VAT Reports should be run and the final VAT Claim of the year produced.
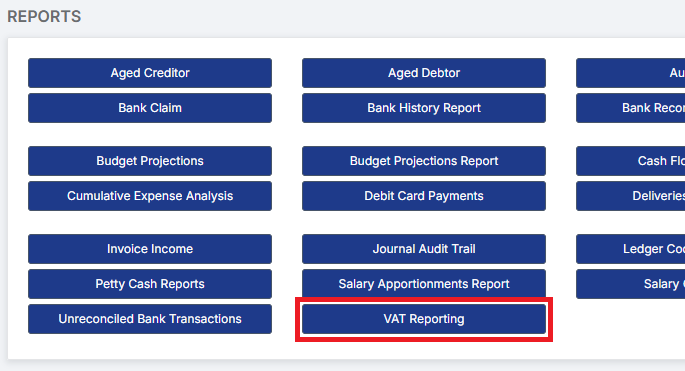
For the various VAT Reports, go to Modules > Finance > Finance Home Page > VAT Reporting.
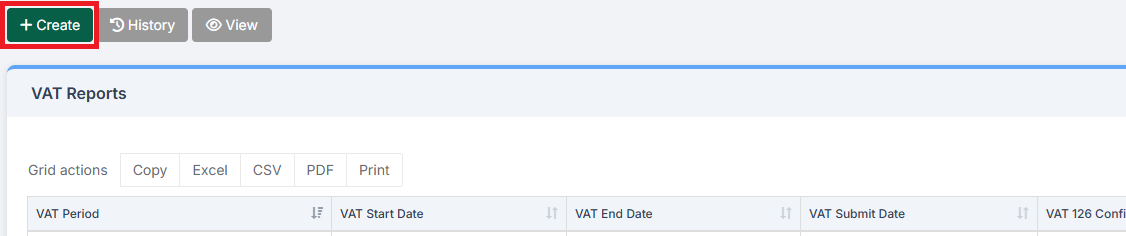
Click Create to create a new report.
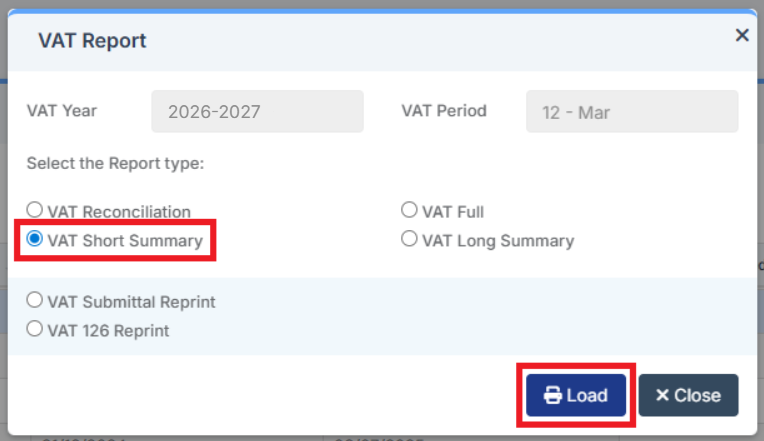
Initially, run the Short Summary Report by choosing VAT Short Summary then clicking on Load.
Preview the report.
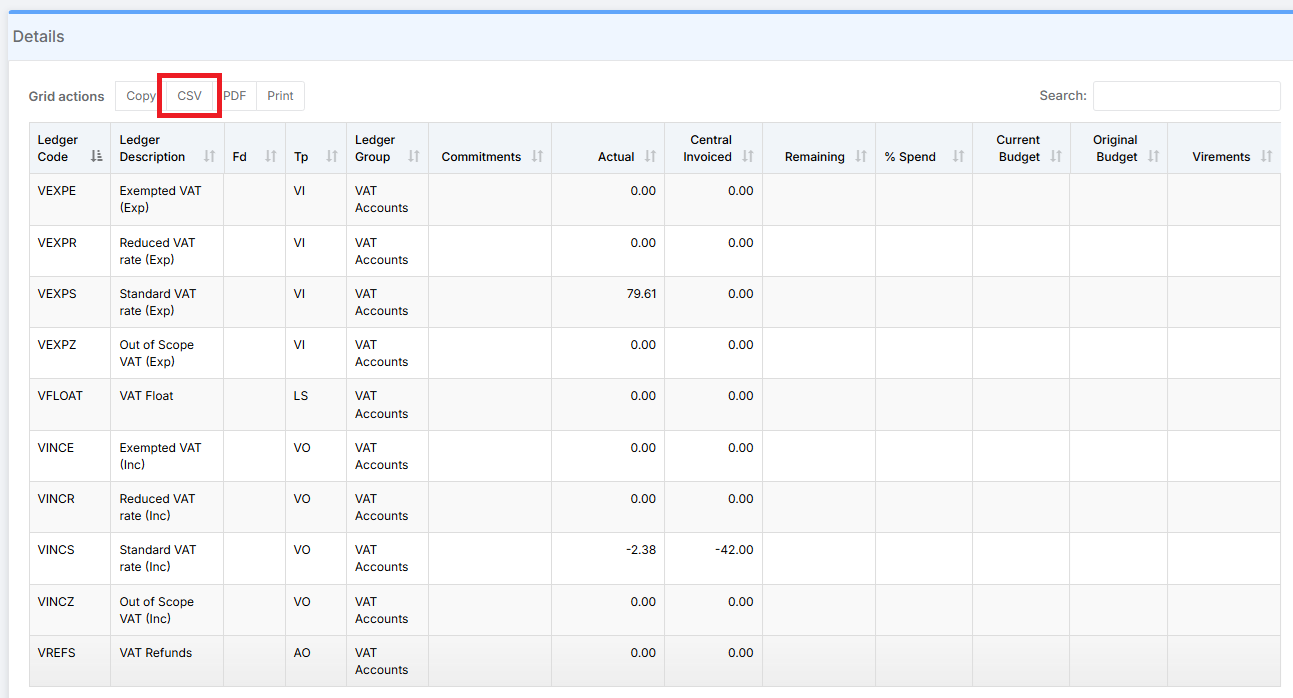
In a new tab, go to Modules > Finance > Finance Home page > General Ledger > Chart of Accounts Enquiry.
Select the VAT Accounts from the Ledger Groups filter on the left-hand side. It’s a long alphabetical list with VAT Accounts right at the bottom.
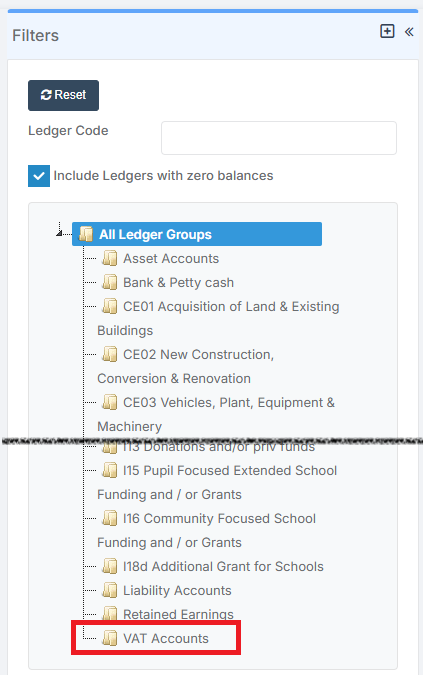
From here, the Total figure of Actuals (minus the VAT Float line if used) is required. It may be easier to export this to CSV. If VAT is collected quarterly, the Total values may include any previous claims not yet received.
Delete the VAT Float Line, if used.
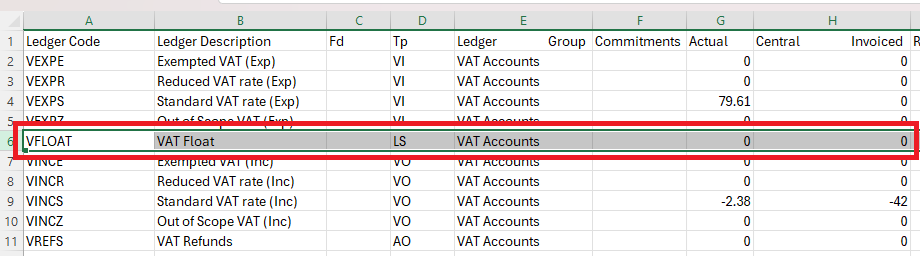
Add the totals of the Actuals for the remaining lines and check the figures in the Excel match the figures in the VAT Short Summary Report. Check each VAT Ledger Code against the VAT Return.
If needed, Export the information from the Chart of Accounts and cross reference this to the VAT Reconciliation Report.
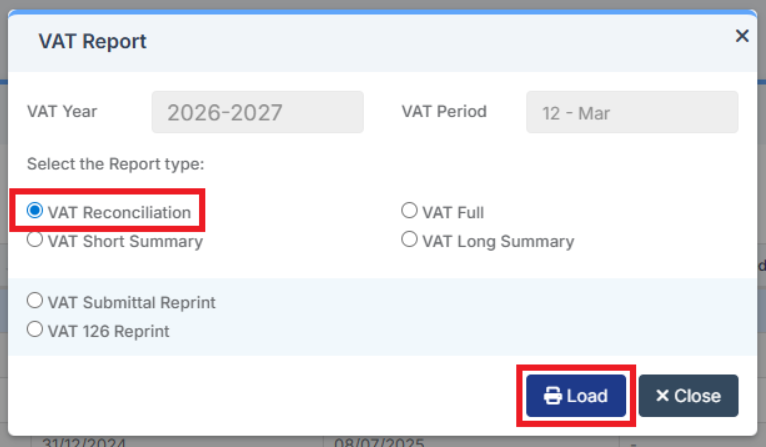
Go to Modules > Finance > Finance Home Page > Reports > VAT Reporting.
Select the VAT Reconciliation report to investigate any issues.
The Reports and Ledger Code listing can be exported to Excel to assist with this.
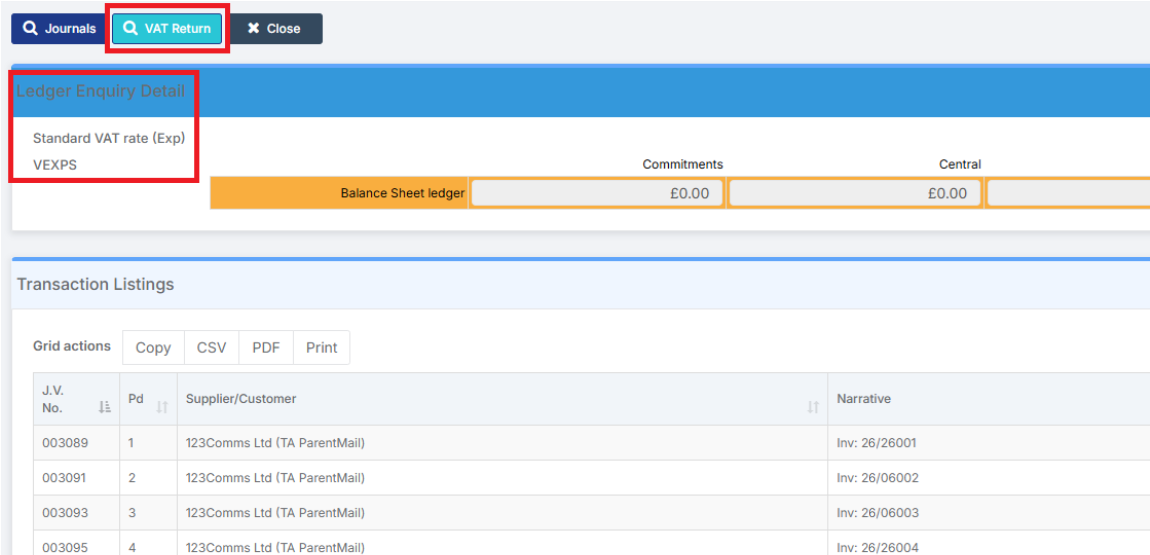
An area to check for any discrepancies is the VAT Post Date and the VAT Posting Period. These can often be different if something has been posted at the start of a new period that relates to the previous quarter, especially for journals, and may account for any differences.
3.3. Run Analysis Reports and Complete Adjustments
Run the monthly reports for Period 12, as agreed with the LA/Reporting Bodies/Accountants. If any adjustments are required, these reports may need to be re-run. See: How to Run Monthly Reports.
Run any End of Financial Year reports required by the LA/Reporting Bodies/Accountants. Make any required adjustments.
3.4. Add Reversing Journals
These can be done in Period 12 or early on in the New Financial Year. Reversing Journals can be used to set up Accruals and/or Prepayments to keep an accurate track of items spread across the Financial Years.
In each period, a transfer is affected from a Ledger Code/Cost Centre to an Accruals / Prepayments account, which will have been set up specifically for the purpose. Please consult LA/Reporting Bodies/Accountants guidance on this. When the journal is posted, the transaction is reversed out to the relevant Period so that when the invoice is processed, the figures reflect the true cost in the Periods in which the expense was incurred.
The use of Reversing Journals will debit or credit the Ledger Code/Cost Centre combination in the Old Financial Year and credit or debit the same Ledger Code/Cost Centre combination in the New Financial Year.
The following table demonstrates the effect of a Reversing Journal:
Old Financial Year – Period 12:
| Ledger Code | Cost Centre | Debit | Credit |
|---|---|---|---|
| Telephones | Admin | 900.00 | |
| Year End Creditors | 900.00 |
When the Reversing Journal is created, the period that defaults for the Journal to be reversed is period one in the New Financial Year, but any other periods can be selected.
New Financial Year – Period 1:
| Ledger Code | Cost Centre | Debit | Credit |
|---|---|---|---|
| Telephones | Admin | 900.00 | |
| Year End Creditors | 900.00 |
The LA/Reporting Bodies/Accountants can advise on the requirements for Accruals and Prepayments.
3.4.1. How to Create a Reversing Journal
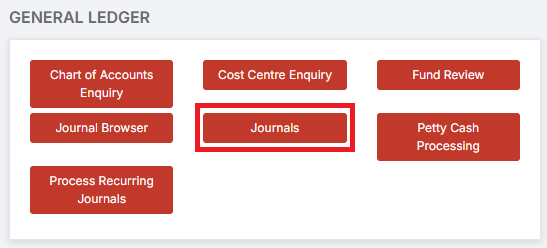
Go to Modules > Finance > Finance Home Page > General Ledger > Journals.
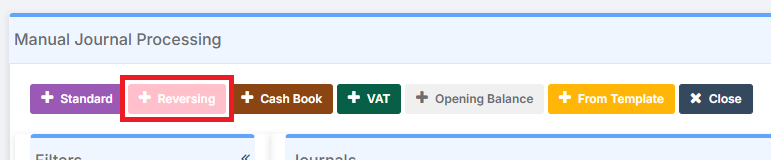
Select the Reversing journal option.
Select the relevant periods and enter a brief description in the Narrative field provided. Select the reversal year and period.

To continue entering the journal, click Save. Now enter the journal line details.
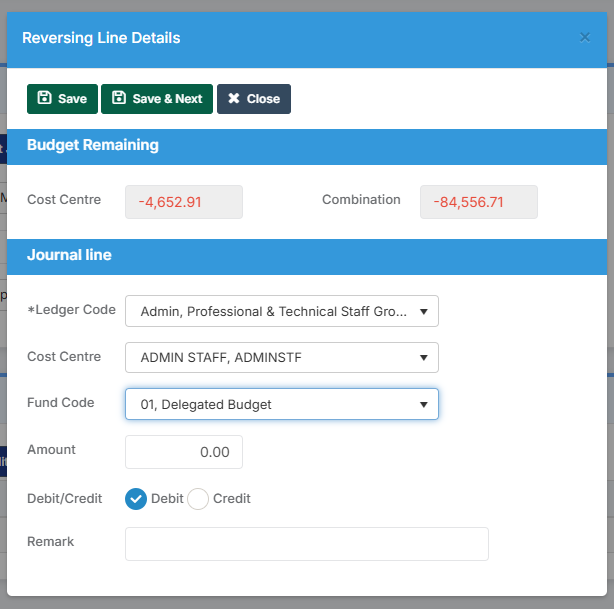
Select the required Ledger Code and the Cost Centre. If the Fund Code has not been entered automatically, select the Fund code required. Enter the Amount to be debited from the chosen Cost Centre and credited to the Accruals account. Select the Debit button. In the Remark field, enter a brief description to explain the type of transaction the journal has been created for.
Select the Save option to continue entering the double entry at a later date, or click the Save & Next option to enter the other side to the journal line to balance the journal. When ready, Post the Journal. Now re-run any Reports to reflect these changes.
3.5. Final Check Before Proceeding
Before closing, do a final check within Bank Reconciliation. Check that all items in the statement that should have been reconciled have been.
Before carrying out a Preliminary Close, produce a System Checks Report to once again check that everything has been dealt with.
From this report, identify if any further changes need to be made, for example if there are still some unauthorised Purchase Orders. If there are, make the changes. Be aware that if there are any Purchase Orders still unauthorised, the ordering facilities need to be switched back on temporarily whilst authorising the final orders.
The System Checks Report also lists any transactions that need decisions.
3.6. Closing the Year – Preliminary Closure
Go to Modules > Finance > Finance Homepage > Routines > Close Financial Year Process.
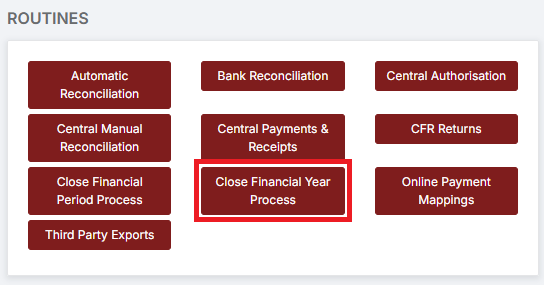
Read the information displayed on the page to understand the process, and when ready click Confirm Readiness.
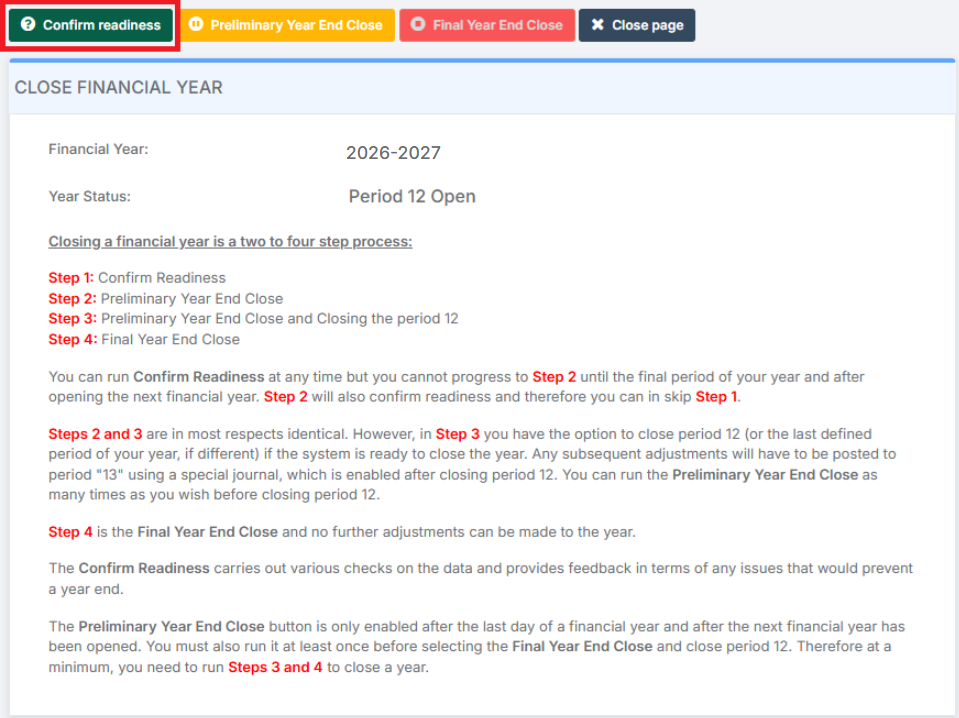
3.6.1. Step 1 – Confirm Readiness
Within the items bought to the user’s attention, there are three categories of severity:
- Error: Where any Errors are displayed, they must be resolved before the Old Financial Year can be closed. When dealing with Errors, the Confirm Readiness process can be run as many times as required until all errors are resolved
- Attention: It is recommended that all items requiring Attention are also resolved or dealt with before proceeding further through the process
- Advice: Where the system is reporting Advice, this is a reminder to run reports
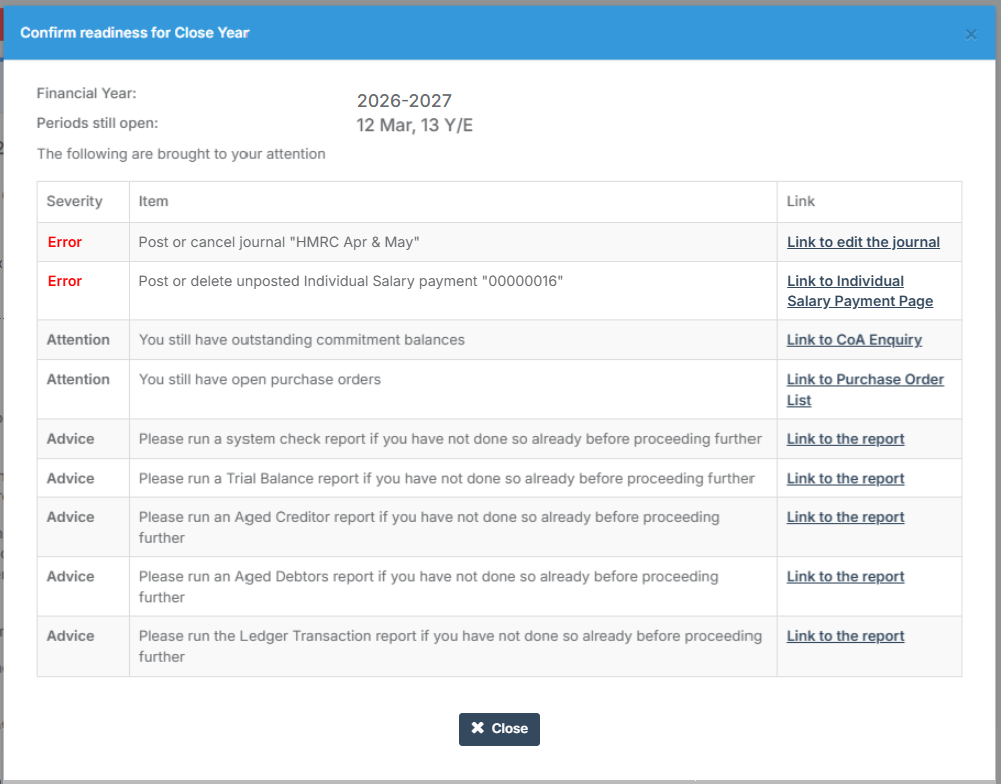
When all the necessary Reconciliations, VAT submittals and Reports have been completed, the first Preliminary Close can be considered.
3.6.2. Step 2 – Preliminary Year End Close
When the Errors have been resolved, Attention tasks have been dealt with, and Advice items accepted, then the next stage is to run the Preliminary Year End Close.
Note that when doing so, another screen will show that reminds users of the tasks that may still need to be done. If some of the tasks require attention, then the process can be abandoned via the Abandon button. If all tasks have been done, continue by selecting the Continue with Preliminary Close button.
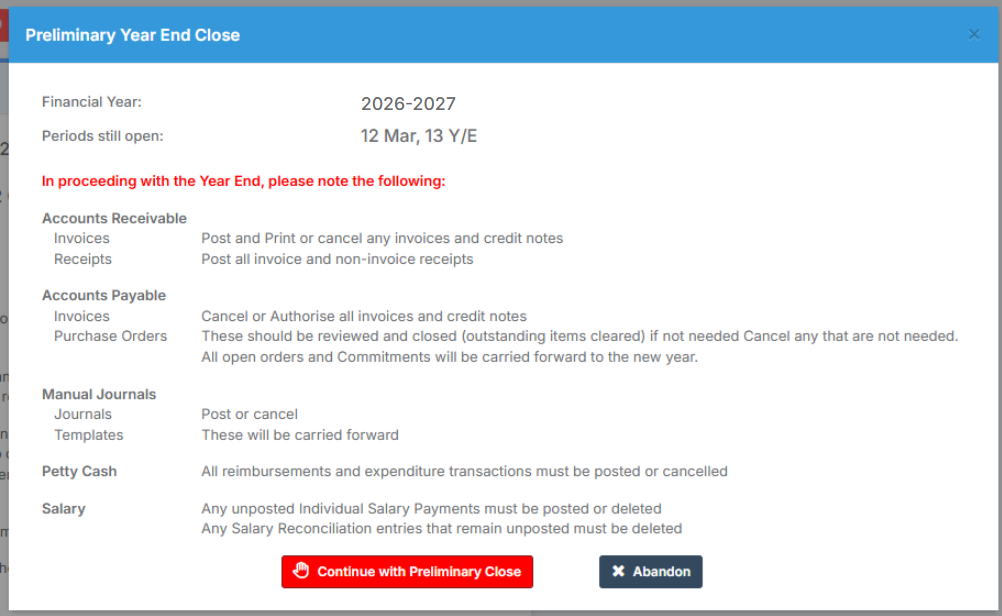
3.6.3. Step 3 – Preliminary Year End Close and Closing Period 12
The first Preliminary Year End Close will automatically close all periods and automatically create a Period 12 if periods have not been closed on a monthly basis. After this first Preliminary Close, Year End Adjustment transactions can still be completed. This may involve audit/accounting adjustments where necessary.
Following on from Step 2, the system asks to Close Period 12 and leave Period 13 open for further adjustments. Adjustments may be required if transactions have been missed or if there are any Post-Close audit changes to be made.
The system also asks for a Ledger Code to be selected to be used when creating the Balance Sheet for the surplus or deficit for the year. In this case, Retained Earnings has been used.
Note that transactions should only be posted to Period 13 if they are material. This means that only transactions that are large values, or where they will significantly impact the Balance Sheet or the Carried Forward items, should be processed. The LA or accountants will be able to provide advice on this.
When the required selections have been made, continue with the closure. Select the Continue with Preliminary Close option.
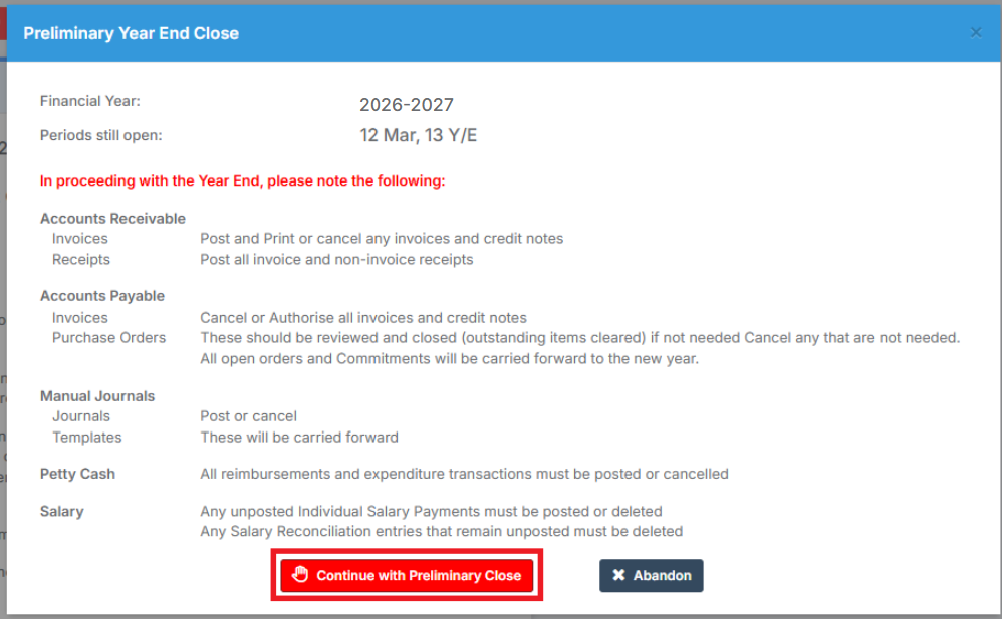
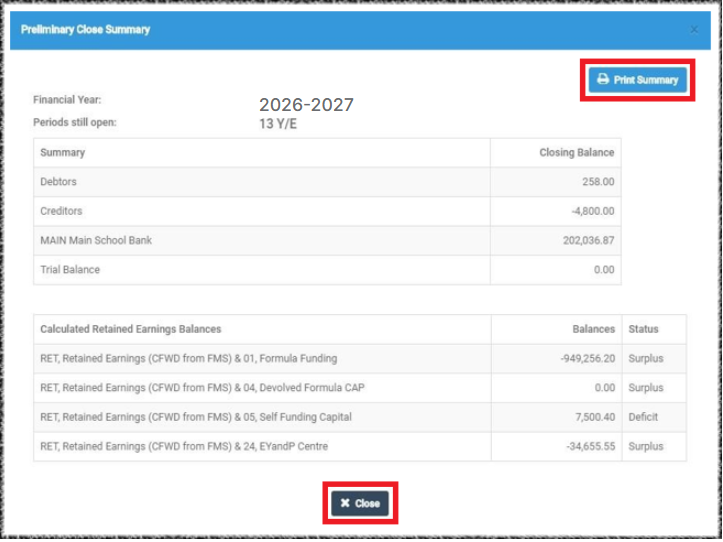
The system then presents a pop-up showing the balances to be carried forward to the Balance Sheet in the new year, together with the surplus and deficit by fund. This can be Printed and then Closed.
Transactions to Period 13 can now be posted. There are two types of journal:
- Y/E Adjustments: these can be used to process transactions that do not need to reverse
- Reversing: these are the same as the standard reversing journal and remain available
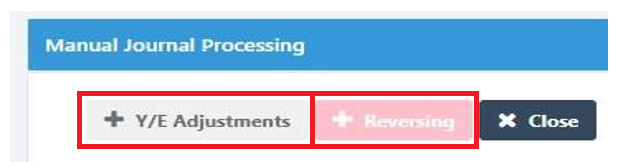
Each journal type can now only be posted to Period 13.
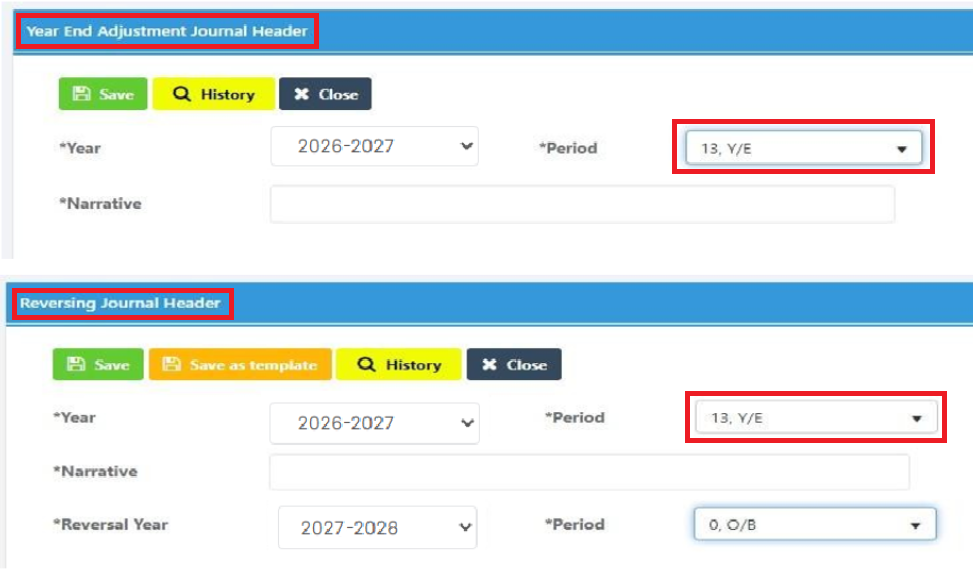
In the example of the Reversing Journal above, this can be reversed into any period of the New Financial Year. For instance, if an Invoice has been accrued in the Old Financial Year and will not be posted until Period 2 of the New Financial Year, then the reversing period should also be Period 2 of the new year. This is so that the Accrual and Invoice can net to zero in the same period of the New Financial Year.
3.6.4. Post Preliminary Closure Checks
Once the Preliminary closure has been completed, check the results of the process.
Go to Modules > Finance > Finance Home Page and select the New Financial Year (2027-2028).
Check the results of the Preliminary Year End, for example that Orders & Invoices have been carried forward into the New Financial Year.
Go to Modules > Finance > Finance Home Page > General Ledger > Journals. In the Filters on the left hand side, tick Posted. Locate the Opening Balance Journal. It will have a period of 0, O/B.
Check the Opening Balance Journal corresponds with the New Financial Year’s Chart of Accounts balances. This checks the Surplus/Deficit position in Retained Earnings or Fund Allocation.
3.7. CFR Return
Note: If this part of the Module is not used, please go to the next section: 3.8. Final Close.
Note: A Preliminary Close must be completed before the CFR Return can be accessed and completed. If a Preliminary Close has not been completed, the CFR Return is not visible within the system and it therefore cannot be completed.
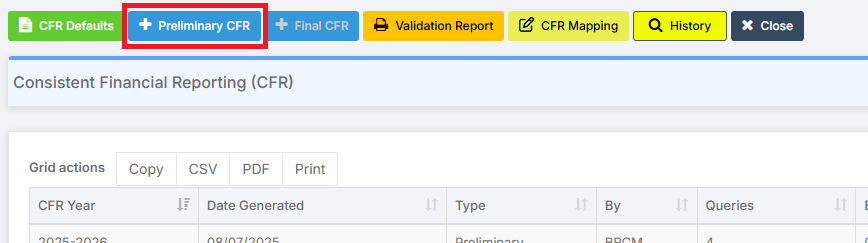
To run a CFR return, go to Modules > Finance > Finance Home Page > Routines > CFR Returns.
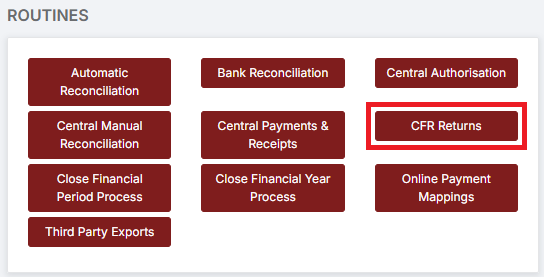
Select + Preliminary CFR.
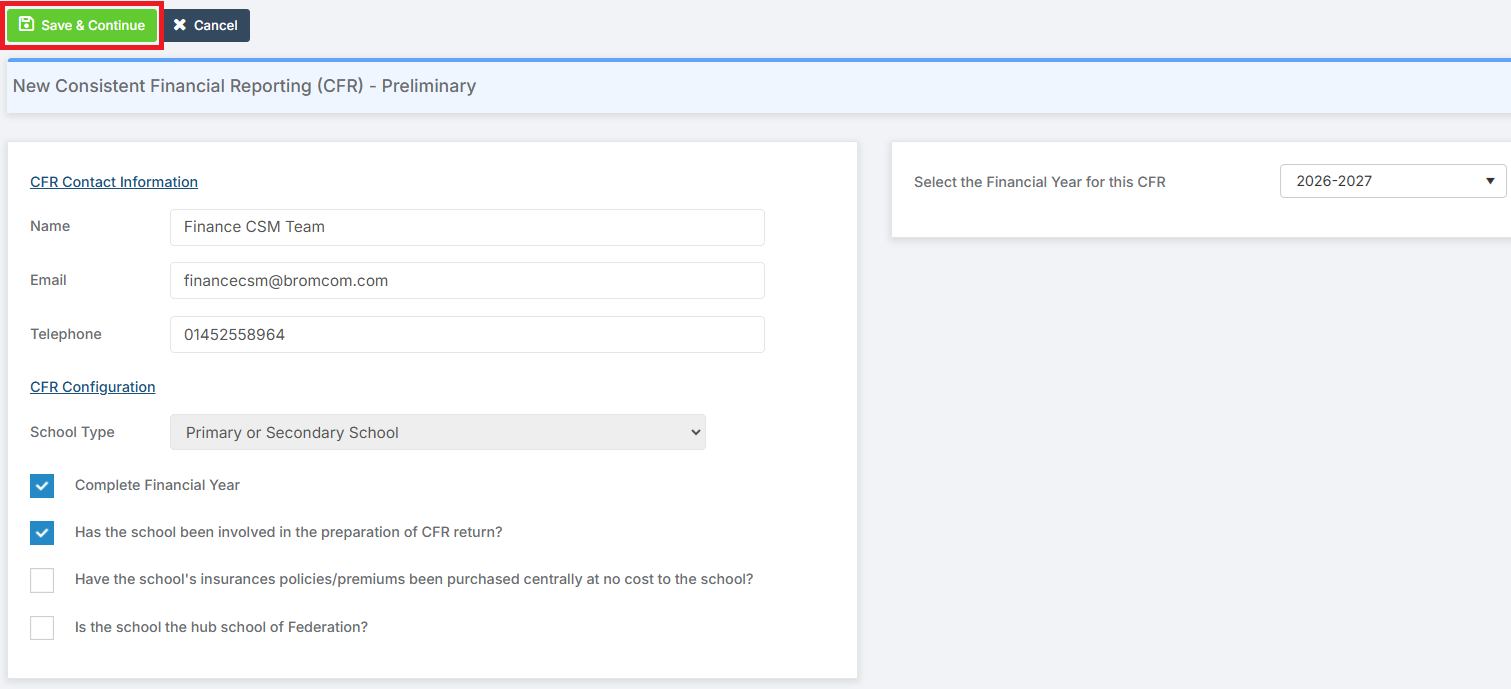
Fill in the relevant parameters and select Save & Continue. Place ticks in the correct boxes.
This will then show any Errors or Queries.
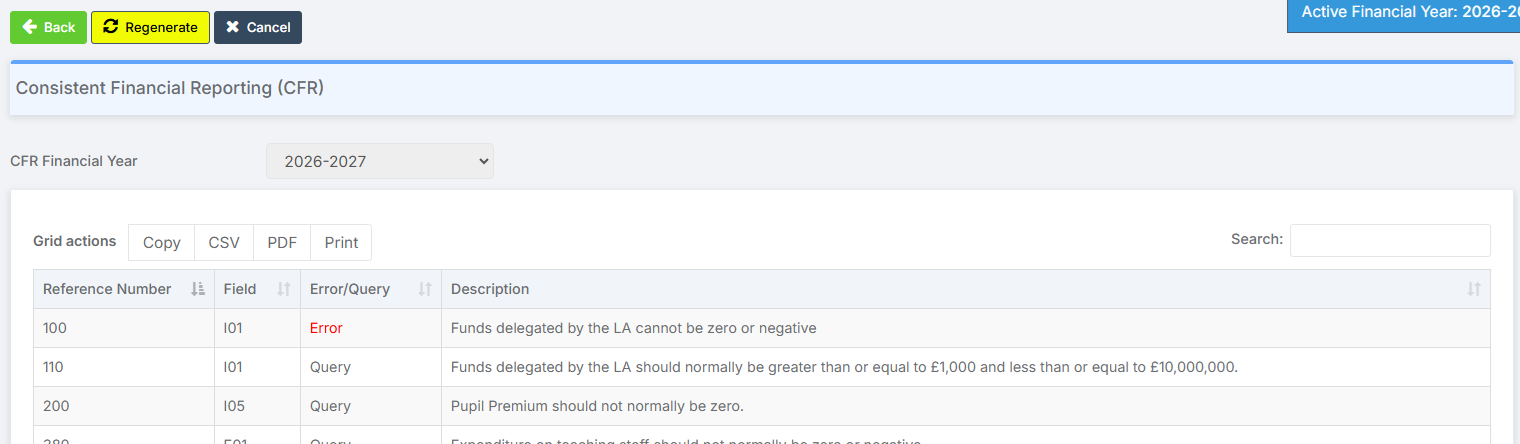
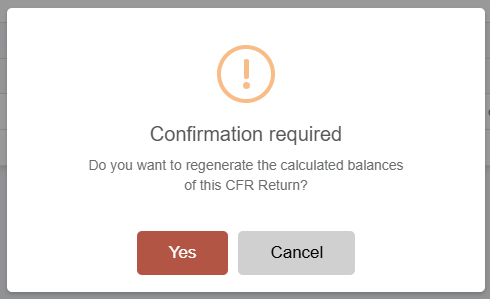
Any issues can be resolved in the database, as instructed. Duplicate the tab to keep this list up to work through. When complete select Regenerate.
Select Yes in the pop-up.
All the figures can be checked by going through the tabs on the left-hand side. To close press Cancel.
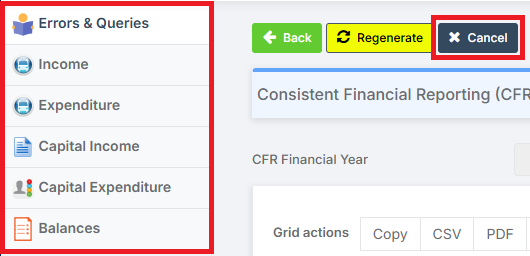
When the information is correct, run the Final CFR Return using the same parameters as before. Ensure there are no Errors.
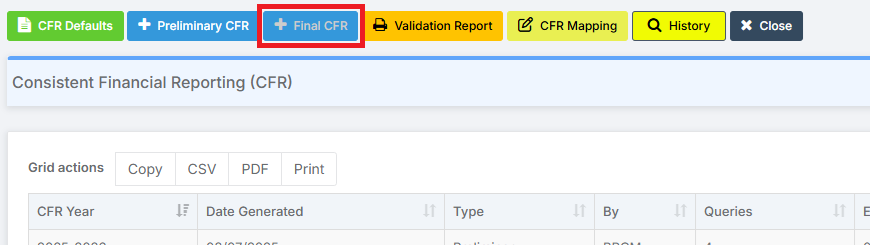
Then Authorise this by highlighting the relevant CFR return and selecting Authorise Return from the right-hand side.

To create the file, highlight the relevant return and select View File from the righthand side. This creates a .xml file in the downloads folder.

3.8. Final Close
Do not complete the final close unless permission has been given by the relevant reporting bodies.
When all the Old Financial Year transactions have been processed, together with any material Period 13 adjustment, then the Old Financial Year can be closed. Further reports may need to be submitted to the LA/Reporting Body at this stage and permission sought to perform the Final Close.
Once a Final Closure has been performed, the Old Financial Year cannot be reopened, and no further transactions can be processed. The Final Closure closes the Financial Year completely, and will carry forward any remaining outstanding invoices, including any that have been accidentally processed in the wrong year. Previous Opening Fund Balances will be reversed out and replaced with the final Fund Balance journals.
The same checks as for the Preliminary Closure are completed. The system then prints a report and changes the status to Finalised.
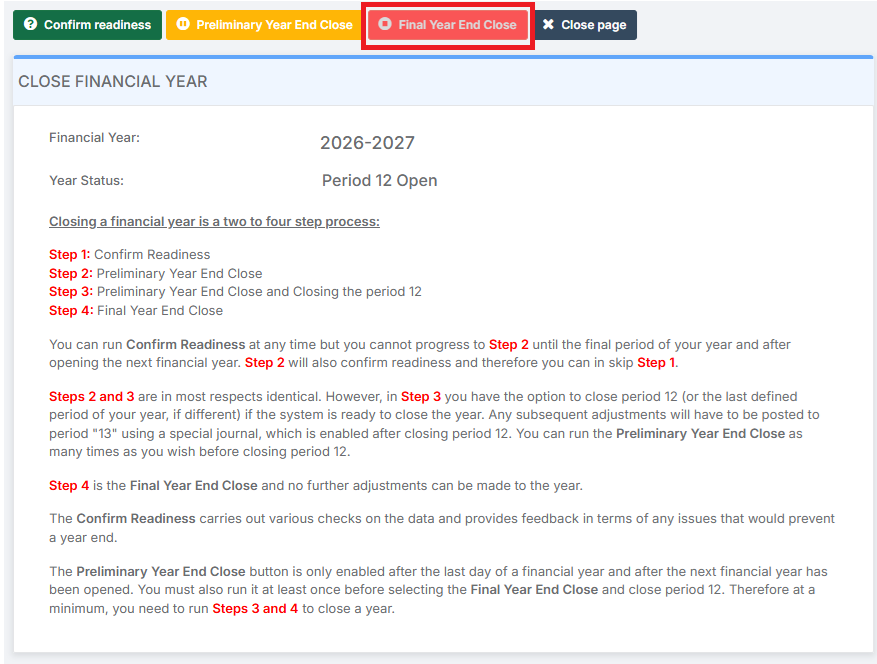
Go to Modules > Finance > Finance Home Page > Routines > Close Financial Year.
Make sure the correct year is being closed then select the Final Year End Close option.
Select Continue with Final Close. Note the chance to Abandon the process.
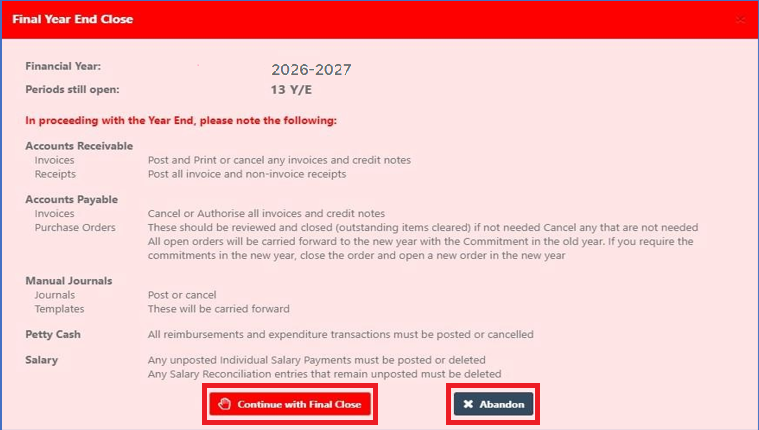
Select Continue with Final Year End Close. Note the second chance to Abandon the process. The system will confirm the entries to be made in the new year Period 0 and confirm that the Old Financial Year has been closed. This cannot be undone.
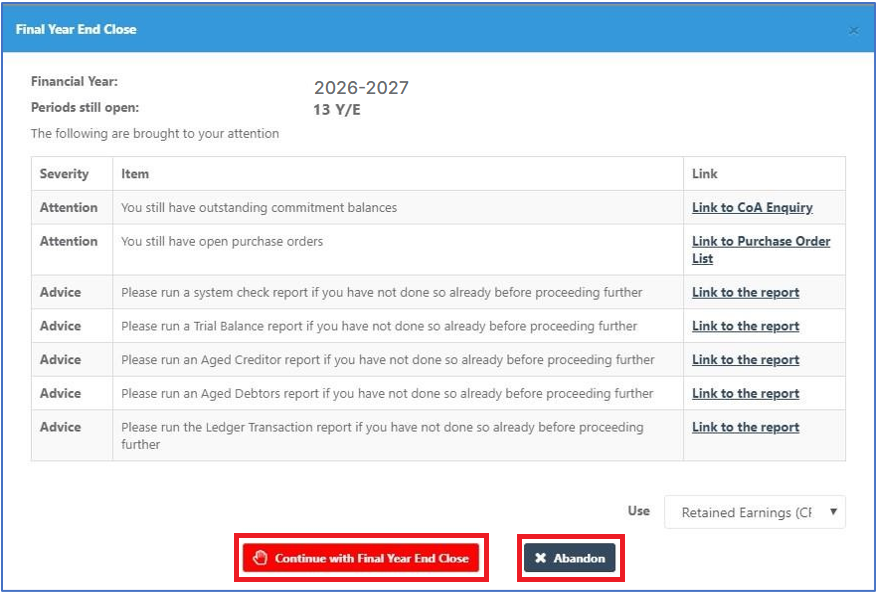
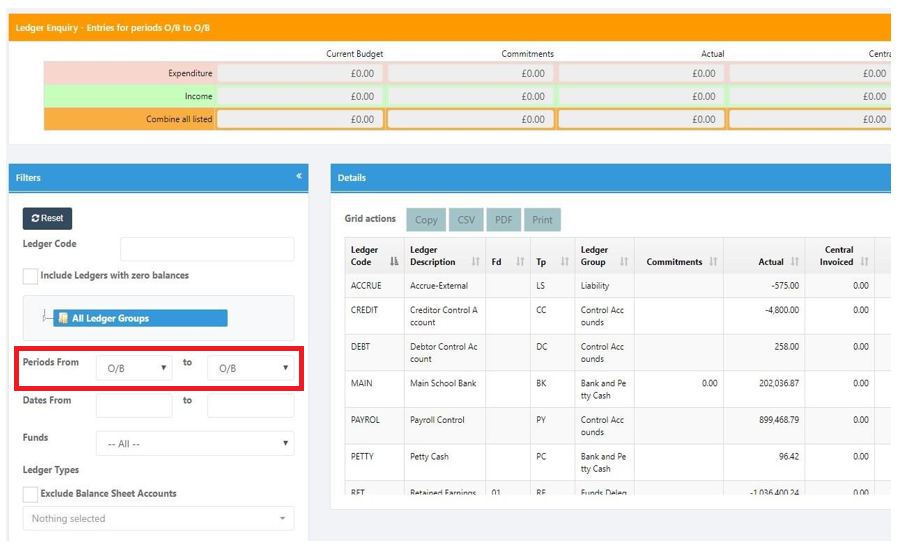
At this point there will be an Opening Balance Sheet in Period 0 (O/B) of the New Financial Year. At the end of the process, a Chart of Accounts Enquiry can be run for the new year. This should balance to zero.
Go to Modules > Finance > Finance Home Page > General Ledger > Chart of Accounts Enquiry. Select the Opening Balance period from the filters on the left.
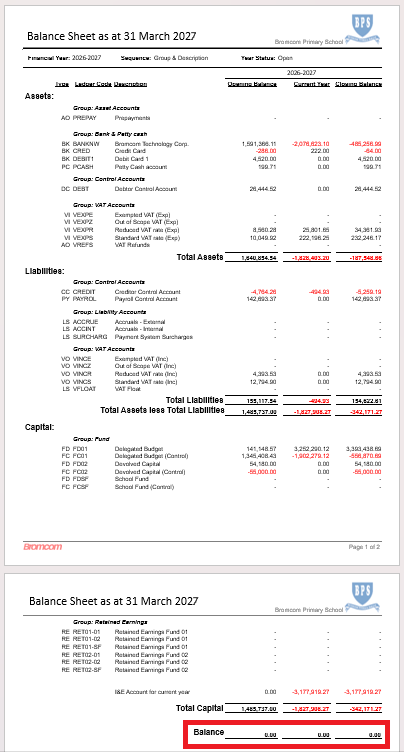
As a further check, the Balance Sheet Report can be run.

This demonstrates that for the New Financial Year in Period 0 the system correctly balances.
At this point, all Cost Centres and Ledger Codes that are no longer in use can have their timeline managed. See: 1.4.2. Managing Timelines.
3.9. Add the Budget for the New Financial Year
If the Budget for the New Financial Year is ready, it can be added to the system. If it has been Approved, it can be Fixed. For guidance on Bromcom’s Budgeting Module, see: BUDGETING MODULE USER GUIDE.
3.10. Status of Final Closure
Once the Old Financial Year has been finalised, it will only be possible to report on or archive the year.
Guide Navigation:
- Jump back to: Overview
- Jump back to: 1. Set Up the New Financial Year
- Jump back to: 2. Prepare for the End of Year
- Jump back to: 3. End of Year Processes
- Open in a new tab: Finance End of Year Checklist