
IMPORTANT: This guide is only applicable to schools in Northern Ireland. Schools in England & Wales should instead read How to Add Pre-Admission Students Using ATF and CTF Imports
Note: The contents of this guide are only applicable for Students in Year 2 and up.
This guide has been created to outline to process of adding Pre-Admission Students to your system using CTF Imports.
See also:
Create Pre-Admission Group
If you have already setup your Pre-Admissions Group, skip to the next section in this guide.
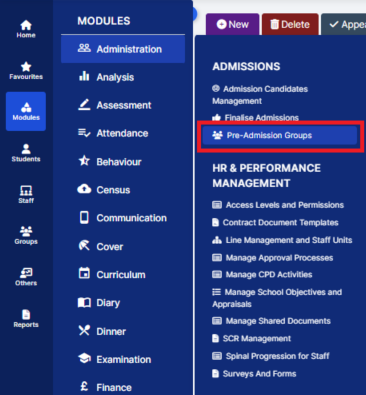
Select Administration and click on Pre-Admission Groups from within the Admissions menu.
Once on this page, click on New to setup your New Admissions Group.
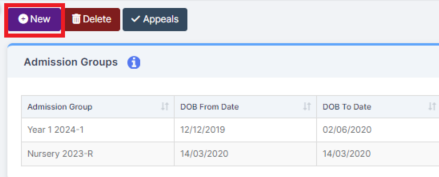
This will open the Admission Group Definition page.
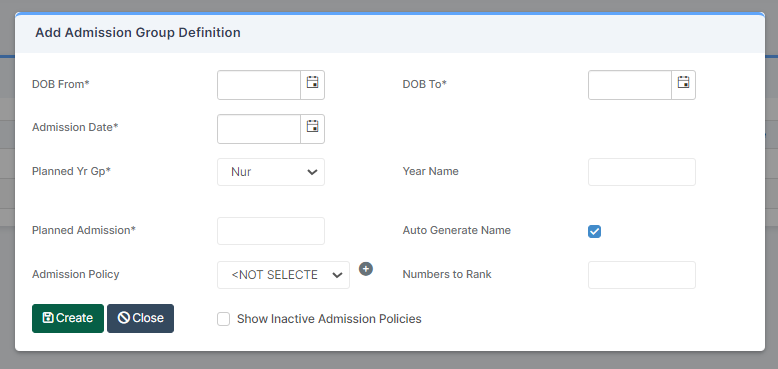
Complete the information:
- DoB Range – From – To this is the DoB Range of the Students expected in this Group
- *if the Students in your file fall outside of this range, they will not be Imported
- Admission Date – this is the planned Date of Admission – you can change this while your admitting your Students later
- Planned Year Group – this is what Year Group you’re expecting to add the Students in to
- Year Name – you can manually set this, but if the Auto Generate Name option is selected, it will name the Group based on the Planned Year Group and Admissions Date (e.g. 07-2021)
- Planned Admission – this is how many Students you’re planning to admit/have in the Planned Year Group
- Auto Generate – will Generate the Admission Group Name
- Admission Policy – If you would like to apply an Admissions Policy to the Pre-Admission Group select it from the dropdown.
- Numbers to Rank – This need to be completed even if you are not managing your own admissions. Note this number must be at least 25% more than Planned Admission i.e. planned admission = 100 , Number to Rank = 125
- Show Inactive Admission Policies – will show both Active and Inactive Admission Policies
ATF and CTF Import Handling
May 2026 Update ; Improvements to how pre‑admission students are handled when they are imported via ATF (Admissions Transfer File) and CTF (Common Transfer File).
- Previously, these imported students did not become active until the Admission Date set in their Pre‑Admission Group, which limited their ability to be added to Groups, access MCAS functionality, and appear correctly in the Student List.
- They will now be treated as active from the date of import, matching the behaviour of manually created pre‑admission students and allowing earlier access to Groups, and MCAS.
What’s New
- Start Date: Pre-admission students are now assigned a start date equal to the date of import, allowing them to be recognised as active immediately.
- Groups: Pre‑admission students can now join Groups (clubs, trips, reporting groups, etc.) and parents of these students can purchase through MCAS as soon as they are imported – even if their Admission Date has not been reached.
- Student List: Pre‑admission students now appear from the date they are imported when using filters such as the Active Date filter or Pre‑Admission status.
Note: If a student is already recorded as a pre‑admission, re-importing them will not overwrite their existing start date.
Import CTF
From the left Menu click on the Students then go to Actions > CTF Import. You do not need to select any Students.
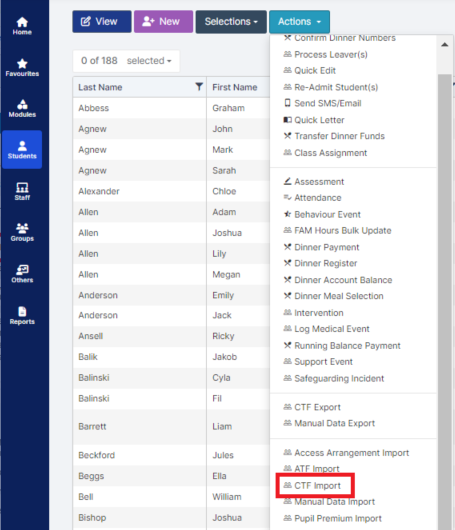
This will open the CTF Import page.
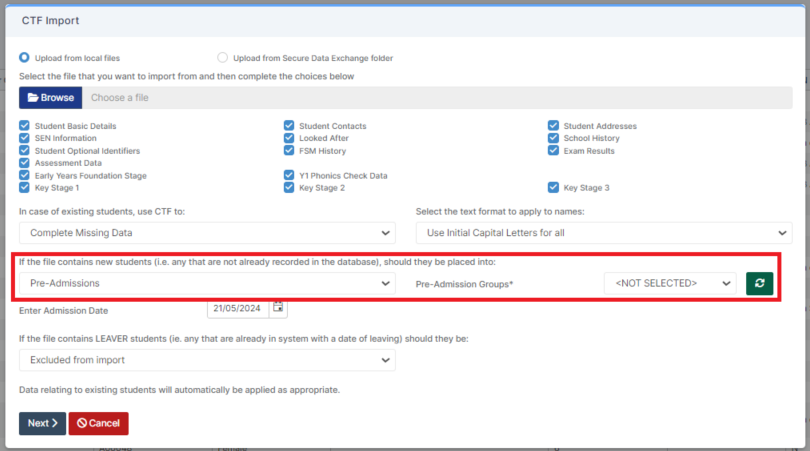
This will open the CTF Import page.
Click on Browse to select your CTF File.
By Default, all information is Imported, but you can deselect any of the options as needed.
If Student Contacts are being imported please see the section on Duplicate Contacts in How to Import CTF/ATF
You will need to change the option with If this File contains New Students, to ensure that you are selecting Pre-Admissions, you can then select your Pre-Admissions Group.
Click Next and you will see a Table of your Students to Import and whether they have been Matched to Existing Students or not.
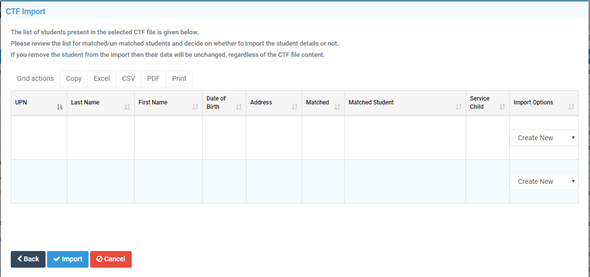
If they are all New Students, matched will say No and Import Options will default to Create New.
If there are any matches, then this table will reflect that.
Please review the information in the Table, and once you’re happy click on Import to Import the File.
If you encounter any issues, please contact the usual support channels