
In this guide, you will be shown how to create a Club or Trip from within the Groups page.
A Club is usually a reoccurring activity/service like Breakfast Club or Basketball, while a Trip is a one off activity/occurrence like Ski Trip or London Aquarium.
In Bromcom, there are various types of Clubs or Trips that you can create.
- Free – For a Club or Trip that requires no fee to enrol/attend.
- Paid – For a Club or Trip that requires a fee to enrol/attend.
- Running Balance – For School care taken before or after School times.
Access: The minimum permissions required to create a Club or Trip are found in the Framework Module of Config>Setup>Roles and Permissions.

See also: How to Edit and Maintain a Club, Parent View of Booking a Club or Trip on MCAS – desktop view.
From the left Menu, go to Groups and in the Group Type dropdown choose Club ( Clubs cover Clubs, Trips and Wraparound Care)
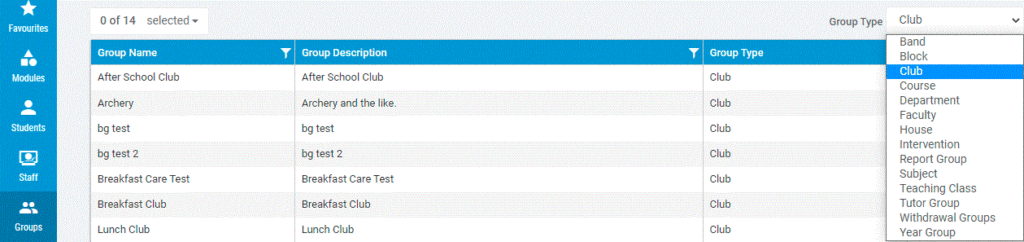
Next, click on New.

This will open the Create New Group window, which provides you with the ability to enter the the following information;
Note: All fields with * are mandatory and must be completed.
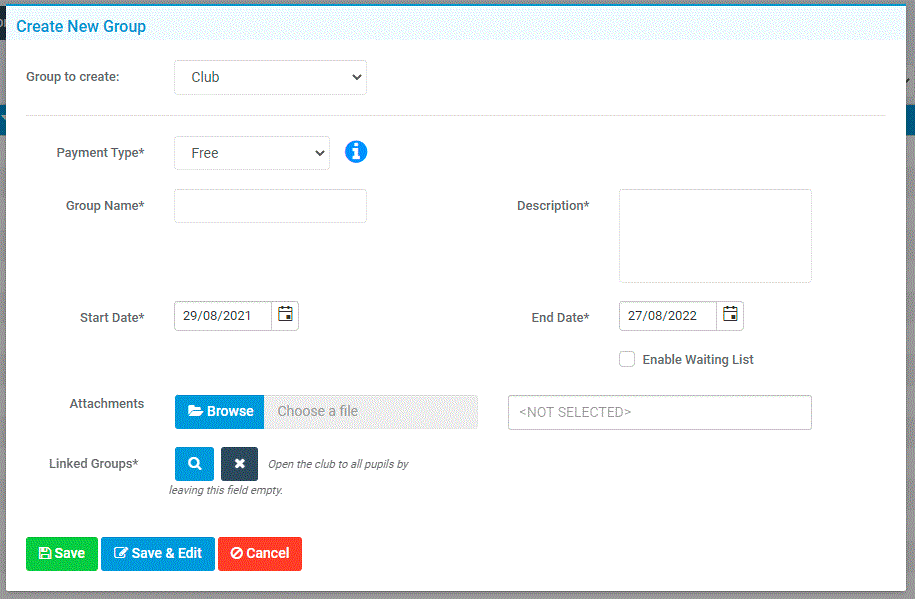
- Club Payment Types – can be either Free, Paid, or Running Balance. With Running Balances students can be assigned to specific sessions either by Administrators if set to Submit Preferences or Parents if set to Enrol to Sessions. Parents then pay off the Running Balance over time.
- The Start and End Date – refer to the dates when the Club will be running, you can timetable this further on to specific times. These dates are the dates the club is active on the groups page. This is not just the date the trip or club is happening on. We advise that this is set to today as a start date and the end date must be at least the date of the trip schedule. With larger trips that have instalment plans, we would suggest allowing yourselves some additional time after the trip has run, just in case.
- Membership Limit and Reserved Spaces – is how many people you wish to have in the Group and how many of those spaces can be Reserved in advance. You can reserve places in the example you have parents who do not have access to a computer but you know they will want to book on the club
- Waiting List – whether you wish to run a Waiting List in case anyone drops out or leaves the Club. The parents will be able to add children to the Waiting List on MCAS
- Attachments – are associated documents about the Group, such as Flyers or an Itinerary. These can be Uploaded as a Document
- Linked Groups – clicking on the Linked Groups button opens the Group Selector page where you have the option to select who the Club or Trip is for – Classes, Year Groups or other Types of Groups. Once you have selected the Group type (if needed – you can just leave it for the whole Group), select the further sub Groups within that area, then when you’re finished click Done, if you want a Trip to be for a select group of Students create a Report Group first with the selected students. So in the example you are running a Year 6 Film Club selecting Year 6 in the Groups will mean this club is only available to parents of Year 6 children
- Important Note: leaving the Linked Groups empty will open the Club/Trip up for all Students. – If you wish to restrict the Club/Trip to specific Students, you would select a Group here and only the Students in it would have access to the Club/Trip. For example if you wanted to create a Club/Trip for just PP Pupil Premium Students then one option is to select the (V) Pupil Premium Group

If the Group Selector is open, click on the desired Group/Groups and press Done.
This will take you back to the previous screen (unless you did not add a Linked Group).
Now, click on the Save & Edit button.

You have now created your Group and you will be redirected to the Groups Details area of it, where you can add further information for the Club/Trip.
Alternatively, you can press Save and resume creating the Club/Trip later.
Group Details
After pressing Save & Edit, the Club will be displayed where additional information can be added.
Alternatively, if you selected Save earlier and navigated away from the Club, you can return to it from Groups > Group Type > Club.
Once you find it, press View to open the Group Details area shown below;
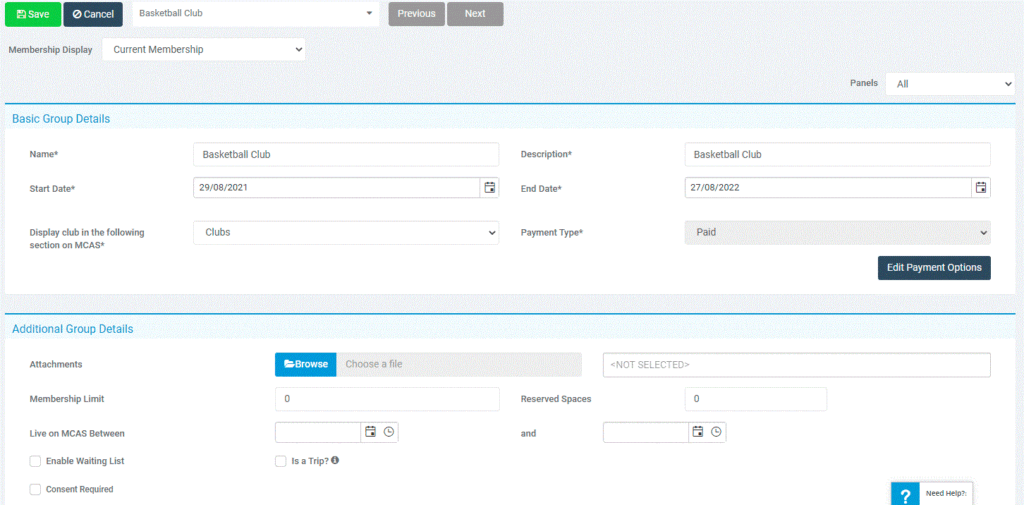
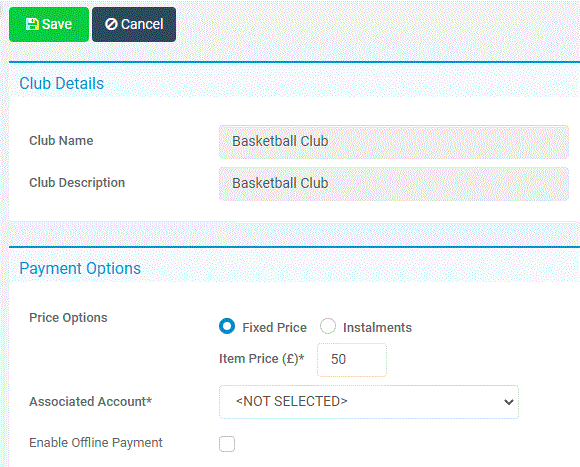
Basic Group Details
This area allows you to amend the Name, Description, Start Date and End Date at any time.

The Display club in the following section on MCAS is a mandatory selection and will display the Club under the Clubs, Trips or Wraparound Care sections on MCAS.
The Payment Type is dictated by which option you selected previously and the Display on MCAS section is for you to choose where you want the Club to Display.
If the Club is Paid, you will have an Edit Payment Options.

Under Payment Options, you have Variations.
If you set this to Yes, you have the option to create Variations of the Club/Trip with different prices and assign them to a Group of Students. For example, a discounted version for PP/Disadvantaged Students and a full price version for non PP/Disadvantaged Students.

Parents of Students in one Group will not be able to see the Club/Trip under the other pricing and vice versa.

- Fixed Price allows you to set a Price that must be Paid in one transaction
- Instalments allows you to set a series of Payments split over a period of time.
- Enable Part Payment is only accessible within Instalments but they are separate, Part Payments allows Parents to make flexible payments of their choice as and when they want towards the total price.
If needed, the Payment Option you select can be changed once the Club/Trip is live and there are Orders against it. So if the Club/Trip is initially charged in Instalments, you are able to then change it to a Fixed Price Club/Trip should you wish.


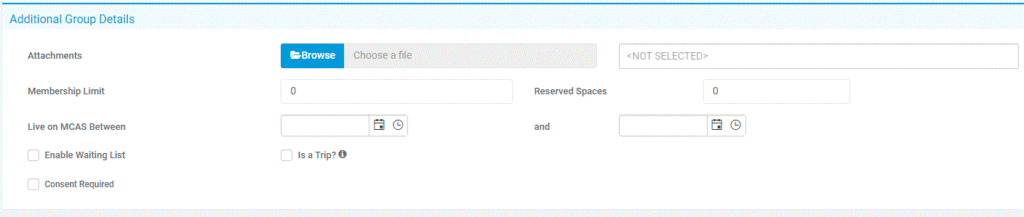
Additional Group Details
This section allows you to set a Membership Limit and Reserved Spaces.
Membership Limit dictates how many Students can Purchase/Enrol to the Club/Trip, while the Reserved Spaces automatically deducts spaces, potentially so that you can add Students who’s families don’t use MCAS.
Live on MCAS dictates the Dates the Club/Trip is visible in MCAS. Clubs and Trips can be configured in Config>MCAS>Clubs and Trips Settings.
Group Discounts – Running Balance Clubs only
A new feature has been added to the Additional Group Details section for Group Discounts when creating Running Balance Clubs called Group Discounts. This provides you with the ability to apply different Charges to different Students by linking the Charges to an Associated Group, which only Students in those groups will receive/have access to.
For example, you could have two Reports Groups, one for PP Students and Non PP Students. If the PP Students should pay less, you can link the lower Charge to their Report Group while linking the higher Charge to the Non PP Students Report Group.
This negates the need to re-create a Club just so you can make a cheaper version of it for other Students, which was previously the case.

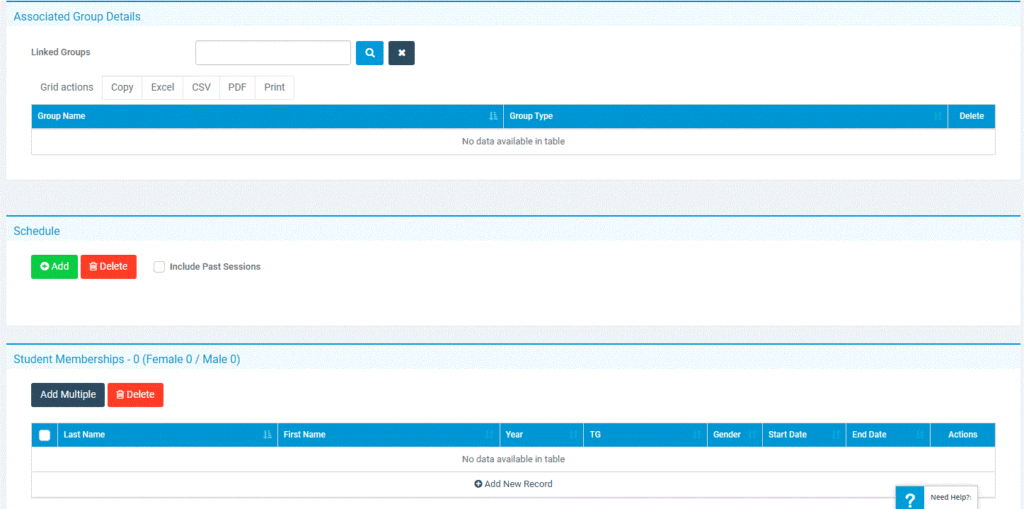
Associated Group Details
This section allows you to add or amend any Linked Groups that have been linked to this Club/Trip.
Linking a Group to the Club/Trip means that only Students from that Group will have access to/be able to enrol to the Club/Trip.

Schedule
The Schedule is very Important when it comes to Clubs and Trips. This is how you outline when/where the Club takes places and the Schedule being present is a big part of how Students can see/enrol to it on MCAS.
Important: a Club/Trip will only become available for parents to book on MCAS if there is a future Schedule. This is time linked, so if a trip starts at 8am. By 8:05 it will be considered a past trip.
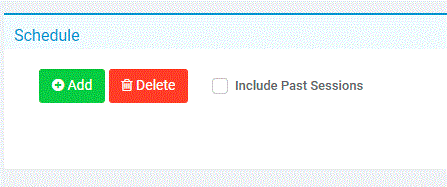
When you press Add, you will be required to populate the following information;
- Weekday: For example if the Club is on a Wednesday type Wednesday into Weekday, you can choose more than one day
- Start Time and End Time: if for example the Club starts at 3.15pm and finishes at 4.15pm then either type the time in or use the clock
- Session length: this will populate automatically from the Start and End Time
- Main Teacher : select the Teacher responsible for the Club
- Location: select the Room/Location for the Club, if this is offsite for a Trip click Unknown
All the above can be amended once the Schedule is Saved. For example if you have a club every Wednesday but for some weeks its on a Thursday in a different room with a different teacher this can be amended once you click Save Schedule.
Another new feature has been added to allow you to add Sessions for past dates in the Schedule area of Clubs. Previously this feature was not available and would cause issues if a Club was created but the first few Sessions were not in the Schedule for example.
When editing a Club, Past Sessions can be added via the Schedule.

Student Memberships
The final section of the Group Details is Student Memberships.
In general, you do not need to add Students manually to a trip/club, if the Club is chargeable we would usually advise that you allow the Parents to enroll the Students via MCAS. However, if the Club is Free you can add and remove students through the Student Memberships panel with no impact.
This is where you can view, amend or add Student Memberships to this Club/Trip. If the Club/Trip has been made available to Parents on MCAS and Parents have booked on to the trip you would see them in Student Memberships
If you add Students in this section you are adding them to the Club/Trip and if there is a charge then this will create an order

When you press Add Multiple, you will be presented with a Student Selector and Start Date.
These allow you to select which Students you wish to add to Club/Trip and from which Date.
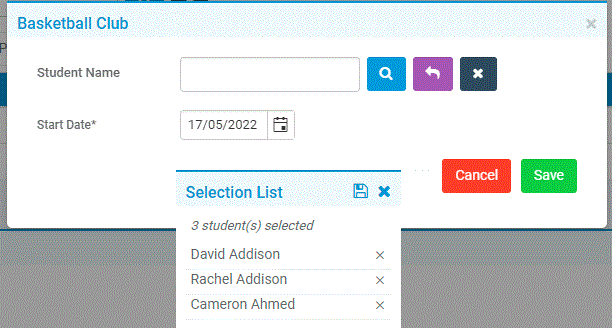
This could be useful in situations where a family does not have MCAS but they want their Child to attend, meaning you could add the Student manually on their behalf.
Adding a student manually in Student Memberships gives you the option to create an order. If you add student memberships manually then you will need to create an order for each instalment needed. If you add all instalments in the single order, then parents will need to pay all in one checkout.

If you choose Create an order you will be asked to confirm the charge you wish to apply to the selected Students and this will now show as Outstanding in the Student Memberships

If you choose Do not create then the selected Students will be added to the Club but with no charge added.