
In this guide, which includes a video demonstration, you will be shown how to Schedule a Report to be sent to Staff/Departments etc via email, as well as how to manage Scheduled Reports.
Access: The ability to Schedule a Report comes from having general access to running Reports, which are found in the Reports Module of Config>Setup>Roles & Permissions.

Use this guide to watch a short training video on scheduling a report plus;
Schedule a Report
You can Schedule any Report within the MIS. In the example below, the Student Attendance Report has been selected from Reports>Attendance.

You can also schedule an Adhoc Report by going to Reports>Adhoc>View Reports and pressing Run once you have highlighted a Report. On the next screen, you can press Schedule.
After you have selected a Report, set the Parameters to look at the data you need such as the date, students and any relevant tick boxes.

Once you have set your Parameters, instead of previewing the Report press Schedule.
Pressing Schedule will take you to the next screen where you will have 3 Export options;
- Export to file – This will Export the Report to your PC when the Schedule runs
- Email – This will send the Report via Email when the Schedule runs
- My Reports – This will store the Report in your ‘My Reports’ area
For this process, select the Email option.

The Format dropdown is for you to select which type of File you wish to send the Report as, while the DMS options control other functions:
Single Document – If multiple Students are selected, ticking this keeps all of the data together in one file. Note: Please ensure to UNTICK this if Publishing to MCAS or Student Portal otherwise the collective data in the Report will be published to each account.
Multiple Documents – If multiple Students are selected, ticking this will split the data in to multiple Reports based on each Students unique ID. Note: These Reports will show in the DMS with a Focus against the Student.
Save DMS Copy – This will be greyed out but required for this process as the Reports will store in the DMS so you can ignore this. DMS means Document Management Server , these documents are saved in the My Account area ( click on your photo on the top right of Bromcom and click My Documents)
Publish to MCAS – If ticked, this will publish the Report to Parents MCAS Accounts when you finish the next step.
Publish to Student Portal – if ticked, this will publish the Report to Student’s Student Portal accounts when you finish the next step.
Save Local Copy – This will store a copy of the Report on your PC locally out of Bromcom. Note: This will be greyed out as we are not generating the Report in this process so there is nothing to save.
Underneath the DMS Options, you will have some additional boxes (To, Cc, Bcc, Subject & Message which you can type in to. Note: Subject & Message are optional but To is required.

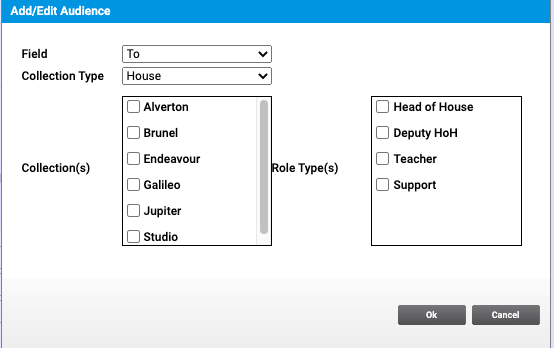
You will also see there are Add/Edit/Delete buttons.
Pressing Add will allow you to choose from some system generated recipient options such as Head of House, Deputy Head of Department or Head of Year.
Using Edit/Delete you can amend/remove those that you previously added.
Once you are happy with this section and have set your recipients, press Next.
You should now have a new page with some Schedule options as seen below;

The Schedule dropdown at the top of the page is for setting how frequently you want this Scheduled Report to run, Daily or Weekly would be the most common/practical.

Selecting Daily or Weekly will leave you with a Start Time box and Include in Schedule from/until selectors.
You would set these as the desired time/date you want this process to begin and provide an end date or leave it open so that it runs continuously.
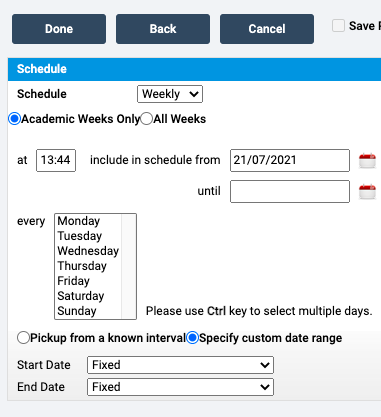
Lastly, at the bottom of the page you have Start Date and End Date fields with Fixed set by default in the dropdown.
If these are set to Fixed, the Report will look at the data purely based on the Parameters that you set in the earlier steps.
You have the ability to change this by selecting Relative to the Academic Day/Week.

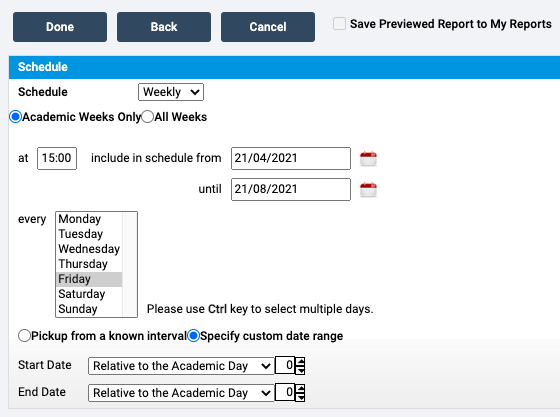
Relative to the Academic Day or Week offer the most flexibility. When you select either of these you now then see a Number Selector appear to the right/ Please see below;

These selectors work in the following way;
Relative to the Academic Day 0, would be today’s data.
Relative to the Academic Day -2, would be data from 2 days ago.
Relative to the Academic Week -4 would be data from 4 weeks ago.
Note: These can be affected by your earlier Schedule choice and the include in Schedule from/until dates so make sure the dates you want are covered/included.
An example would be if I want the Report to send out every Friday at 3pm, this is how I would configure the Report;
Once you have chosen your settings, press Done and this will confirm your selections which will now set the Schedule based on the settings you selected prior.
Manage Scheduled Reports
To delete a scheduled report go to My Account>Scheduled Reports

Note: Scheduled Reports by default will load any Reports that you have personally Scheduled, you can tick Show All Users Scheduled Reports to find Reports from other users if required.
Once you can see the Report, select it and click Delete.

To amend the Scheduled Report, you would take the same path but press Schedule Settings instead of Delete once you have selected the Report.

This will essentially take you through the editing process of the Schedule, where you determine the recipients etc.
Unless you want to amend anything here, you can just press Next.

You will then be taken to the actual Schedule of the Report which you can amend as desired.
Once you are happy, press Done and this will update the Schedule Settings for the Report.
