
In this guide, you will be shown how you can use the Student List to create simple reports, for example a list of FSM, Pupil Premium Students, a report to show Student Ethnicity or a report on Student Leavers.
Access: For this, the minimum permission that you need is located in the Framework Module of Config>Setup>Roles & Permissions.

To begin, go to the Students list page.

On the top right of the page, you will notice some icons, each of which serve a purpose;
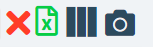
- Red X – This removes any columns filters and selected students to revert the page back to it’s default state.
- Green Paper with X- This allows you to export the Student list below to Excel
- Three Lines – This allows you to add or remove certain columns which can be used to filter the Students list.
- Camera – This will give you a Photo view of the Students list (if the Students list does not exceed 100 students).
For the purpose of this guide, select the Three Lines icon. This will give you a big list containing all of the additional columns that you can add to the Students list and use to filter the data.
If a column is ticked, it will appear on the Students list. If a column is not ticked, it will not appear.

Depending on how they were set up, you can also find User Defined Fields in the list, which you can add as an additional column.
Once all columns you desire have been added, press Save.

You can then use these new columns to filter the Students list as you see fit.
Once you are happy with the data, use the Green Paper icon to export it out in to Excel and carry out any required analysis, distribution or house keeping from there.

Depending on your browser, the data should appear as a download at the bottom of your screen.
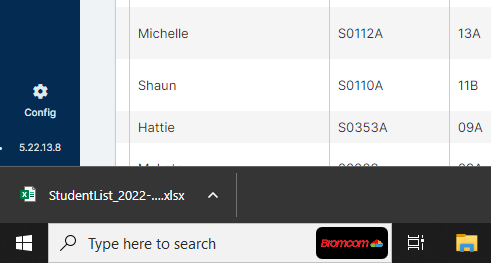
Click on the file to open or find it in your downloads folder to open it.

Important: The download can sometimes be prevented by already having a download window open or a pop up blocker active, so if it is not downloading and is not in your downloads folder these are likely causes.
If the file still does not download/export, then you need to consult with your internal IT team as this will be down to your individual pc/settings/browser and is not an MIS issue.
Leavers Report
For a Leavers Report click on the top right search filters and on the Status drop down choose Leaver

You can then use Add/Remove Additional Columns to add a column for Leaving Date if required.
Click Save
