
This guide outlines how to use the Options Module in Bromcom to build and manage student subject choices.
Pre-Requisites and Permissions
- The Options Module is not licensed within the MIS as standard.
- The module is available at no extra cost to all G Cloud 13 One Stop Shop customers.
- To license the MIS, please either raise a case through the usual support channels or email onboarding@bromcom.com.
Access: The permissions required to use Bromcom Options are found in the Options Module of Config > Setup > Roles And Permissions (once it has been licensed).
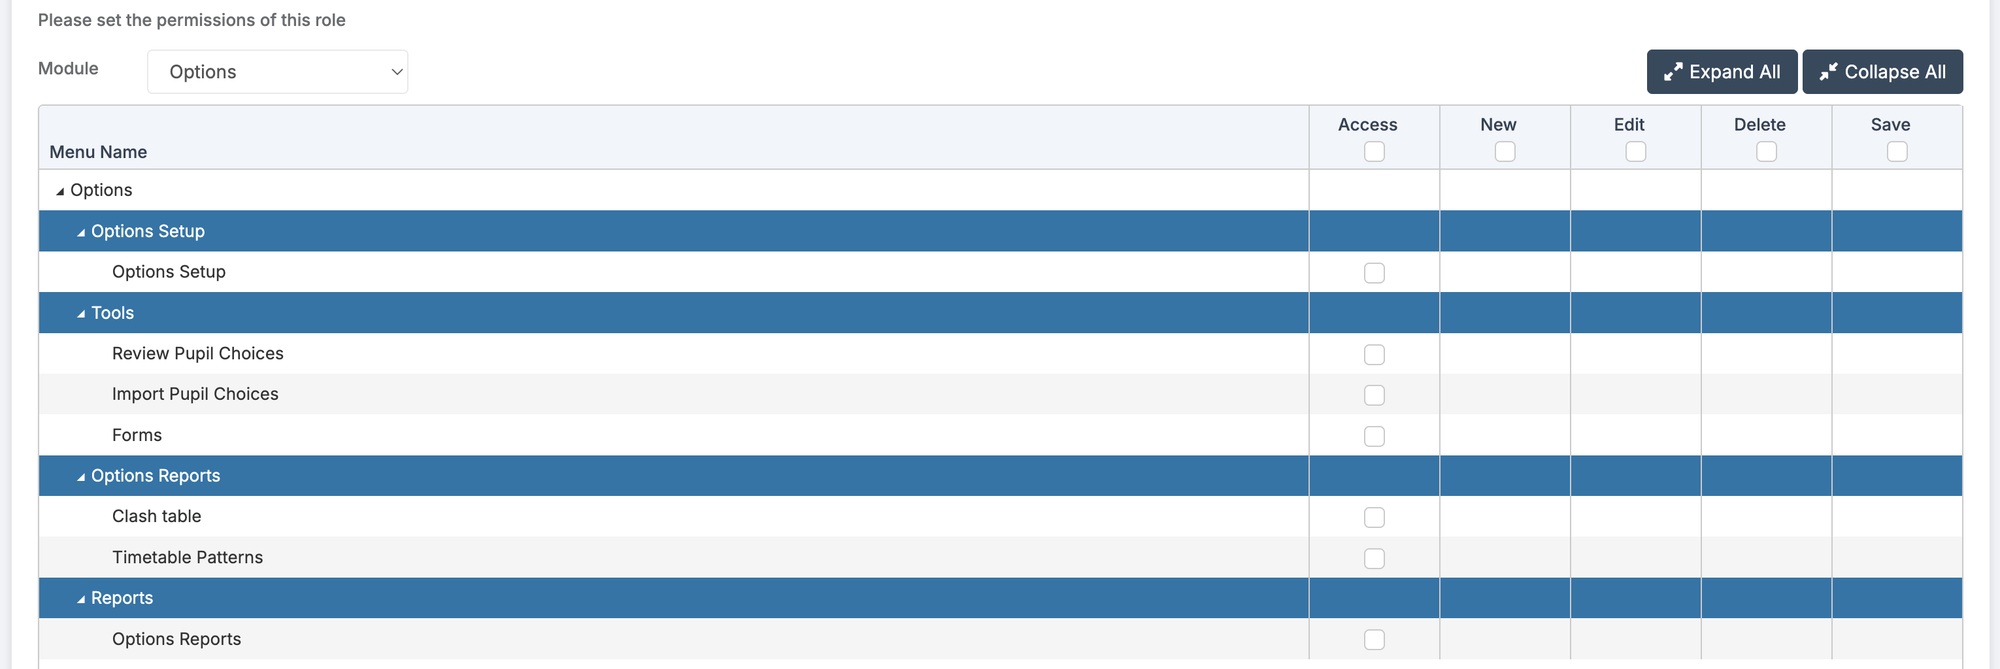
THE SCREENSHOTS USED IN THE GUIDE ARE FOR ILLUSTRATION PURPOSES ONLY AND MAY DIFFER IN A LIVE SCHOOL’S MIS.
- Expand each item for guidance on the various functions within the Options Module in Bromcom.
- To print this as a checklist, click ‘Collapse All’ (button on the right), then right-click the page and select ‘Print’.
- To print this as a full guide, click ‘Expand All‘, then right-click the page and select ‘Print‘.
This section looks at the following in relation to Options Setup;
Introduction
Things to consider before creating a new Options Setup
- Create an Options Setup for a specific cohort to collect students’ option selections within a defined submission window. Choose how students will submit their choices (for example, through a form, email, or the student portal) and specify the number of main and reserve choices each student can make.
- Subjects can be organised into Subject Groups (such as Humanities or Languages). Rules can be applied to each group, for example requiring students to select one subject from the Languages group. You can also define dependent and disallowed subject combinations to enforce curriculum requirements.
- Options Setups can be saved as a draft and published when ready.
- Multiple Pathways can be created as separate Options Setups within the same collection period. Where date ranges overlap, a student can only be assigned to one Options Setup.
Create a New Setup
Navigate to Modules > Options > Options Setup.
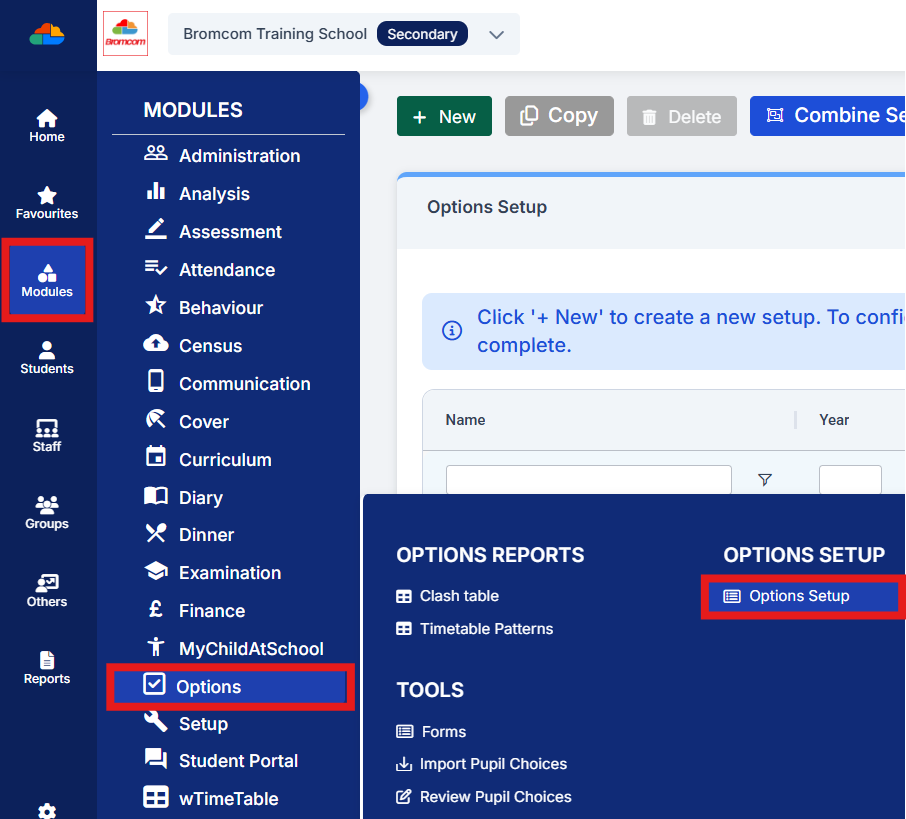
In the top-left of the panel click New.

This opens a pop out wizard, which is made up of five steps.

1 – Setup Details
Step 1: Create the Options Record
Define the following information when creating an Options record (fields marked with * are mandatory):
- Name* – A unique name for the Options record. This will be visible to students and parents, so use a clear and meaningful title.
- Study Type* – Select the study phase that the options apply to:
- Pre-16 – Available for Years 7, 8, 9 and 10 (Years 8–11 in Northern Ireland).
- Post-16 – Available for Years 11 and 12 (Years 12–13 in Northern Ireland), with the option to include applicants.
- Year Group* – The year group to which the options will be offered.
- Options Window Open Date* – The date from which students and/or parents can begin submitting their option choices. This date can be amended later if required. Multiple Pathways can be created as separate Options Setups within the same date range.
- Options Window Close Date* – The date until which students and/or parents can submit their option choices. After this date, choices can still be entered manually within Bromcom. This date can be amended later if required. Once the Options Window has expired, the setup becomes read-only and cannot be deleted.
- Total Choice Count – The total number of main subject choices a student must make.
- Total Reserve Count – The total number of reserve choices a student must make.
Example
If students are required to:
- Choose 1 subject from a Languages block.
- Choose 1 subject from a Humanities block.
- Choose 1 subject from each of 2 additional Options blocks.
- Choose 1 reserve subject from each of the 2 Options blocks.
Configure the setup as:
- Total Choice Count: 4
- Total Reserve Count: 2
Study Type Example
- Select Pre-16 and then choose Year 7, 8, 9 or 10 from the dropdown list.

*Studies Type select Post 16 and choose on roll Year 11 or 12 students with the option in the next screen to add Post 16 applicants.


Student Choices to be made using
- Use this setting to define how students’ option choices will be submitted and recorded. If required, select more than one submission method.
- Import – Student choices are recorded externally and then imported into Bromcom using a spreadsheet.
- Form – Forms can be emailed to the Students, selected by Default, cannot be unticked, however you do not need to use Forms. This will allow a school to have access to the Form customisation adding additional information and hyperlinks, even if the method of collection is through Student Portal or MCAS.
- Student Portal – Students submit their option choices through the Student Portal. Additional Student Portal configuration is required.

- MCAS – tick to unlock the following two options, the MCAS user can only submit the choices once:
- View Only – Means the Options are only visible/for display on MCAS and cannot be submitted.
- Editable – Means the Options are Editable/can be submitted via MCAS.

- Parental Comments will be enabled when MCAS and Editable is ticked.
- Users will need to toggle Parental Comments to ON in the MIS to allow parents to add Parental Comments to the Options form in MCAS to make the school aware of any requests.
- In MCAS, parents will also need to switch the Parental Comments toggle to ON to enable the Parental Comments text box.
- Parents will be able to update the comments after submission, which will overwrite any previous message.
- The Parental Comments will be visible in the school MIS in Modules > Options > Review Pupil Choices page in both the Review Pupil Choices, and the Review Summary popups. Students will be able to see the Parental Comments (read only) via the Student Portal in the Options form.

- Legal Names or Preferred Names – users can choose between Legal Names (default) and Preferred Names for Students. This should be set at the beginning of the process.

- Description – A Description of the Options record. The Description box is not visible to parents or students, this is purely for the school when creating the Setup.
- Save & Close: this allows the user to save the step without having to use the Next button, this will close the popup. (Clicking Next will save before moving to the next step as usual).
Once these details are all entered, press Next.

2 – Select Pupils
This section is used to define the Pupils for the Option Setup
- Note: Students will only appear in Step 2 – Select Pupils if they are not already part of another setup with the same date range.
- It works by ticking the desired Pupils on the left side of the page and then using the right arrow in the centre of the page to move the desired Pupils over to the Selected pupils panel on the right.
- If at a later date Students will be joining the school after creating the Setup then come back in and edit the Setup and add the new Students in from Select Pupils.
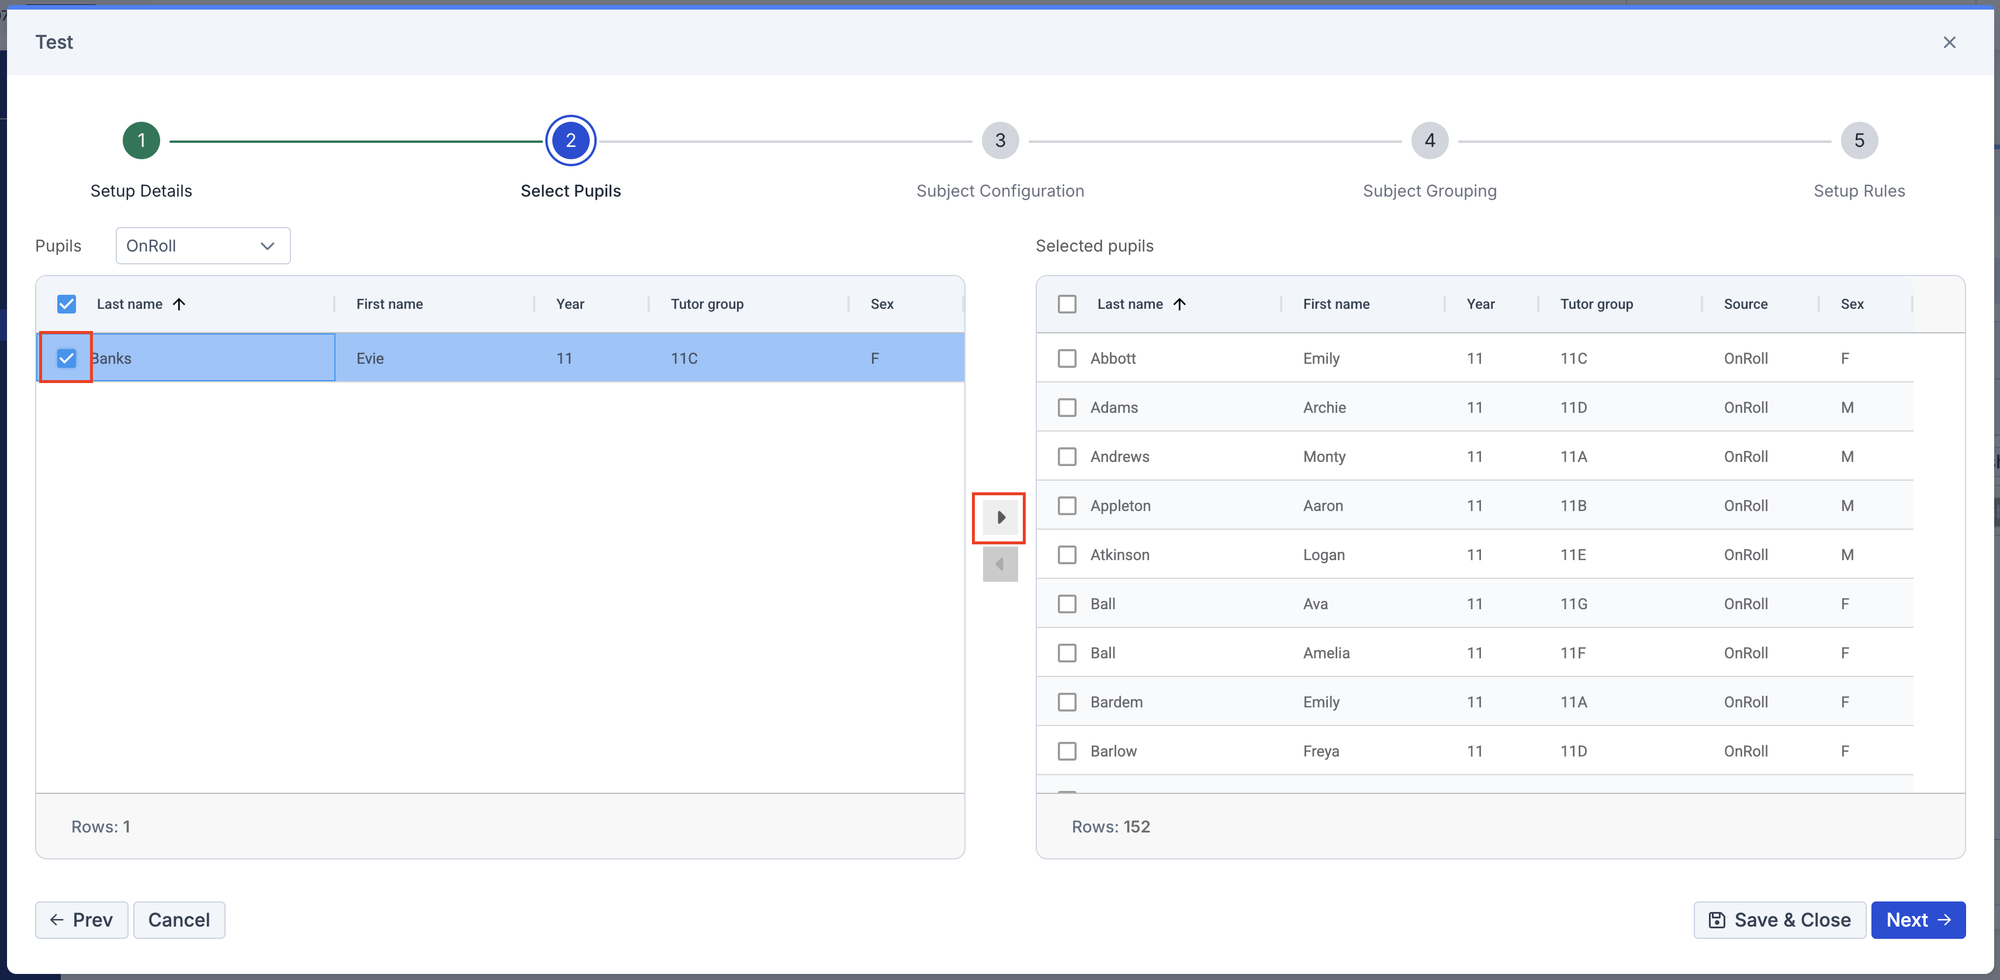
In the Pupils drop down choose either On Roll, Pre Admission or Applicant.

IMPORTANT NOTE:

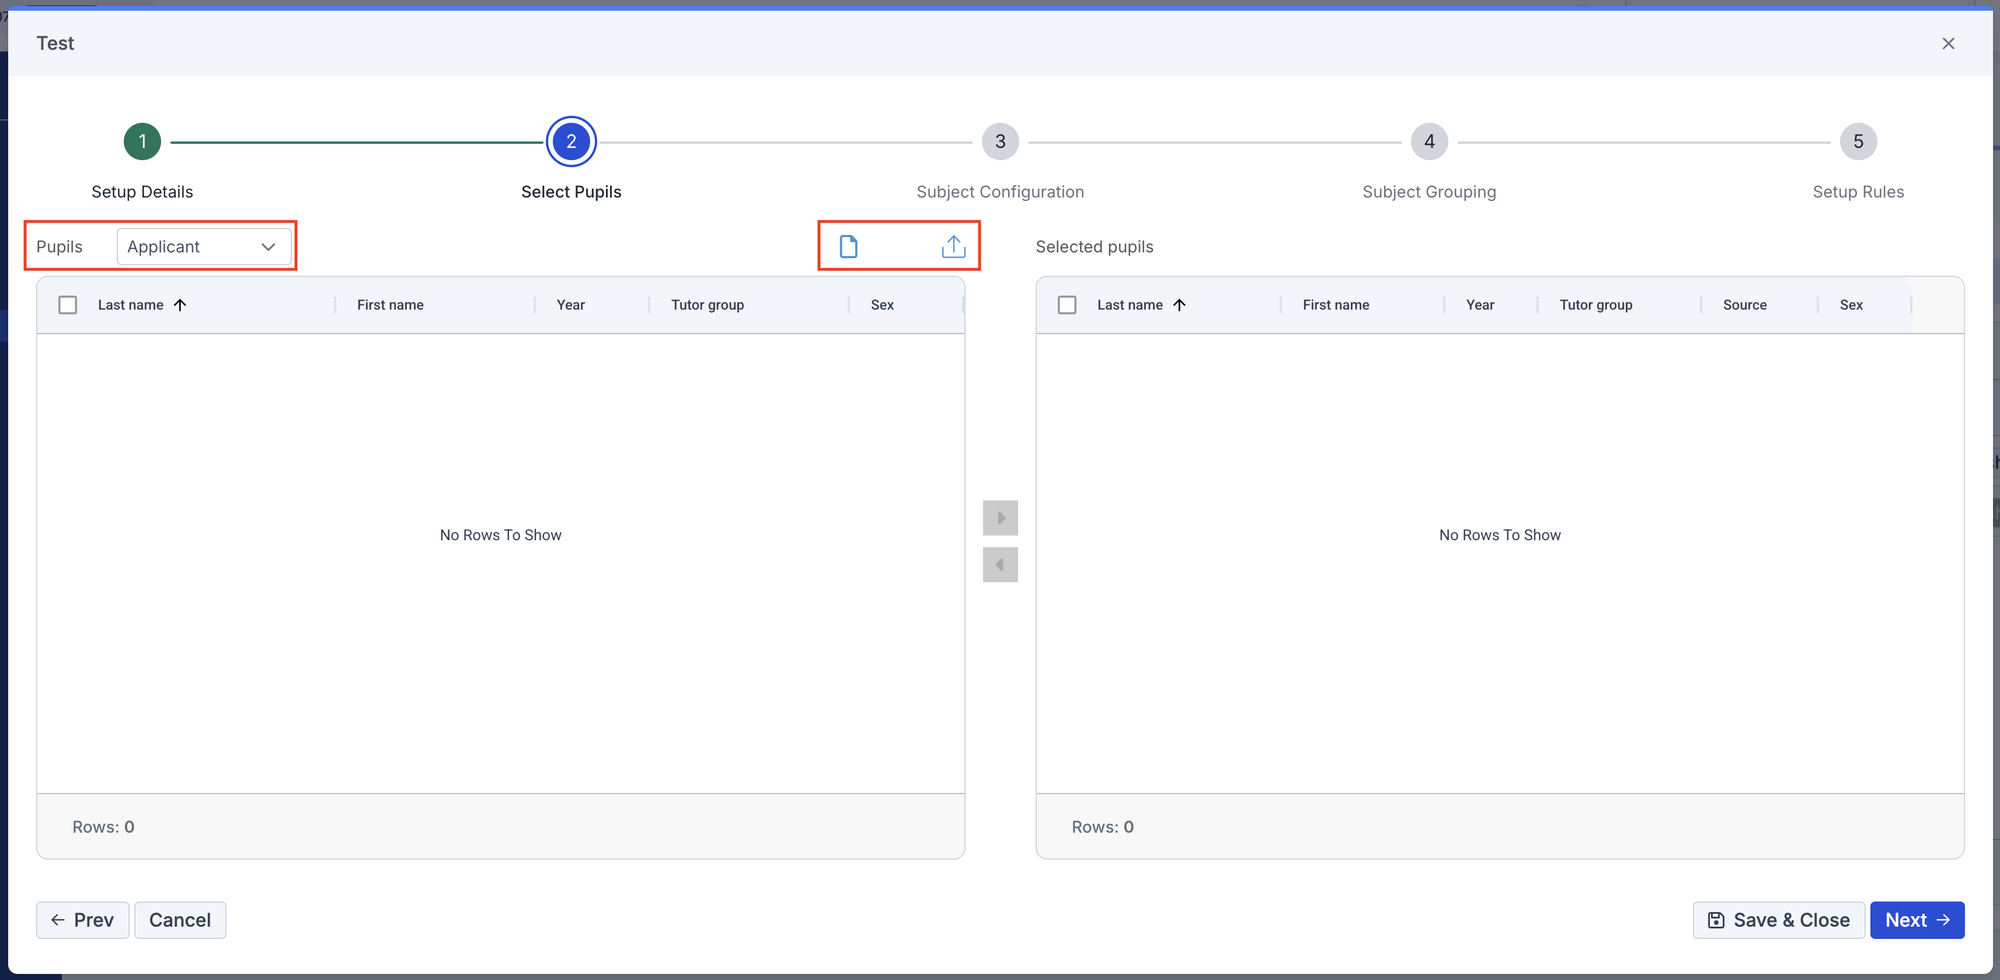
Clicking Download Template will Download a Pupil Import CSV file locally with 3 headings; Last name, First name and Date of Birth.

After entering the data in the 3 columns for the Applicants and saved the file as a CSV click the Import Pupils icon.
Note: The Post 16 – Options Setup process for importing Applicants will only import pupils that are not already in the system, therefore preventing duplicate entries. Only unique Last Name, First Name, and DOB combinations will be imported. Use the Others page to add a new individual Applicant where duplicates are actually different students.
Importing the CSV file will immediately add the Pupils to show in Others > Type = Applicant as per the example below;

The page will now show the Pupils in left hand list ready to selected and added to the Selected Pupils List.
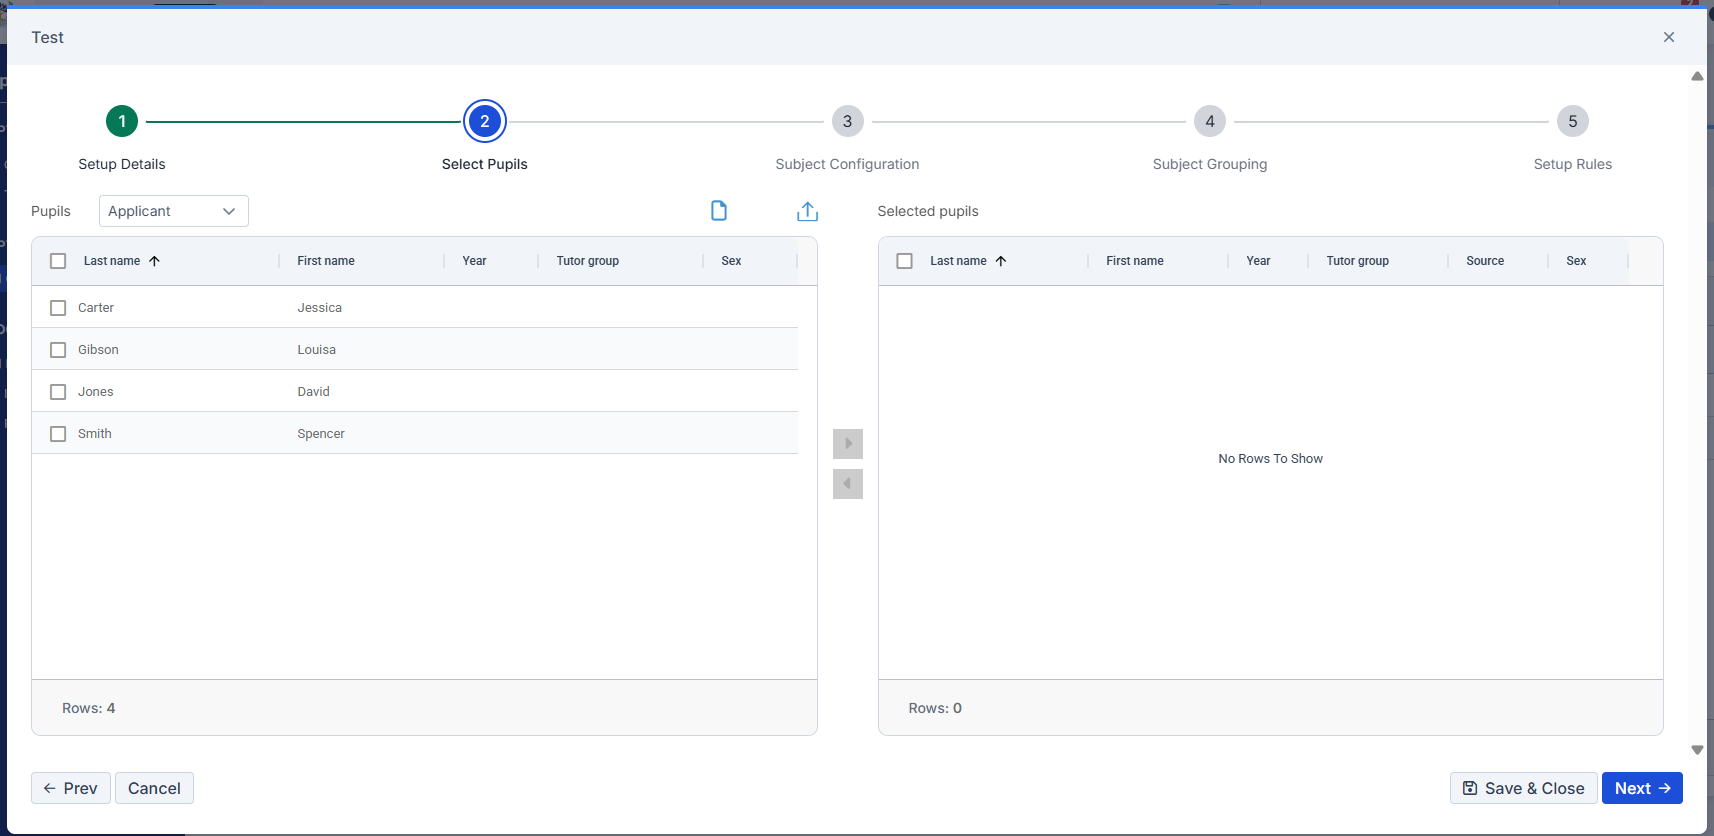
Once the Pupils have been selected, press Next.

Important: If selecting Prev in steps 2-5 before selecting Next, you will be asked if you want to save or discard your changes.

3 – Subject Configuration
This step is used to add the Subjects offered in the Options Setup.
- If adding a new Subject that has not yet been taught at the school first add the Subject in order for it to appear in the Add Subjects list for more information see How to Create a New Subject.
- Users will be able to set up rules when Adding Subjects however, Subject must be added first before setting the rules.
Click Add Subjects.

Then tick the desired Subjects and then click Add Subjects on the bottom right to confirm the selection.
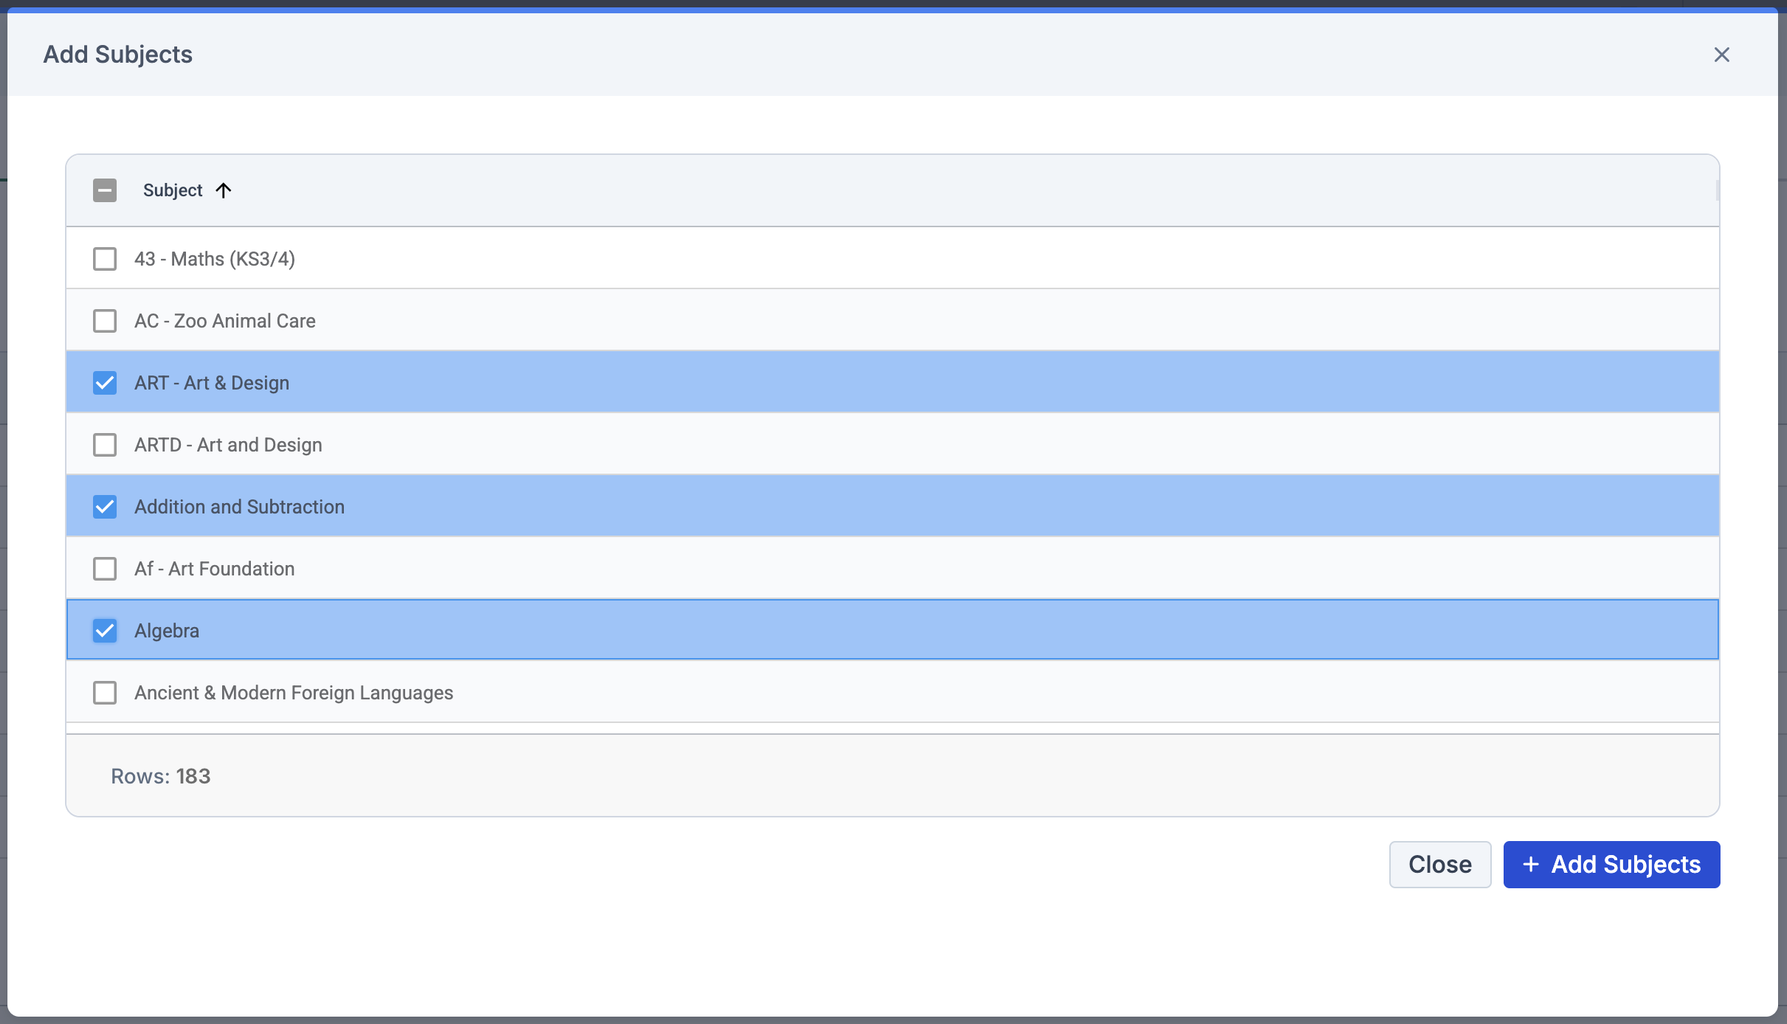
To remove a Subject, use the bin icon under the Actions heading against the Subject.

Weighting
- Users can match the weight of a subject to the number choices that it represents. E.g. a user can increase the weight from 1 to 2 for a subject that will be counted as two choices.
- Simply double click on the Weighting number and enter the new number between 1 and 5.
- Users can tab to the next row to edit more than one Weighting however they must remember to Save & Close in Step 3 or move to the next step which will automatically save the previous steps.
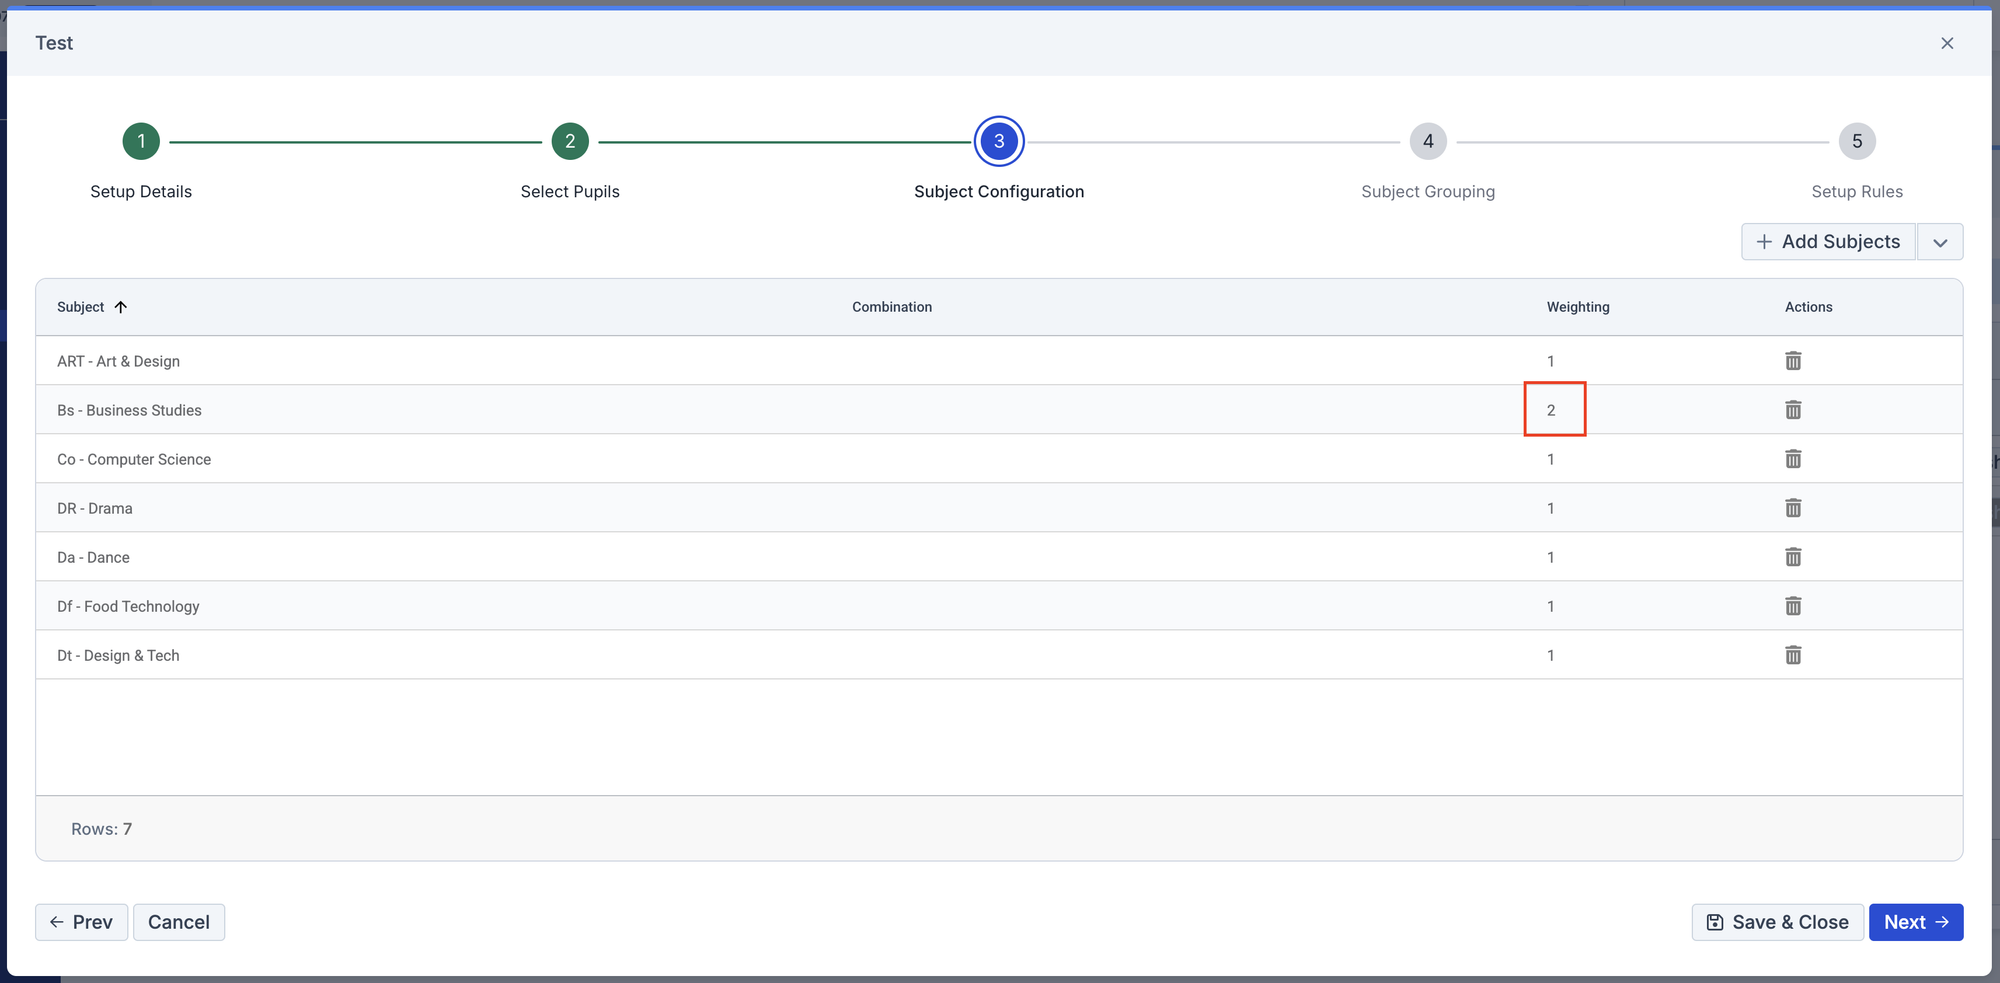
Weighted Subjects behaviour:
- In Options Setup > 5 Setup Rules – rules will treat subjects with an ‘x’ Weighting as ‘x’ choices.
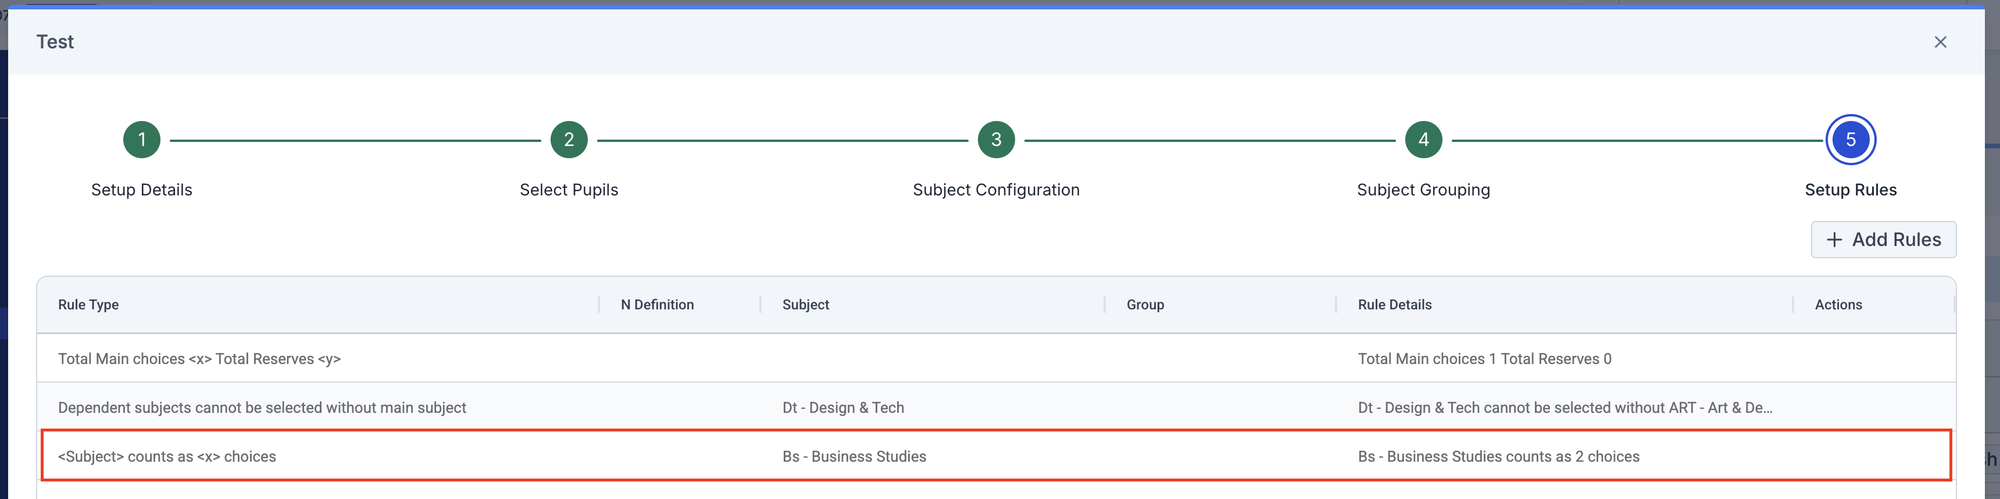
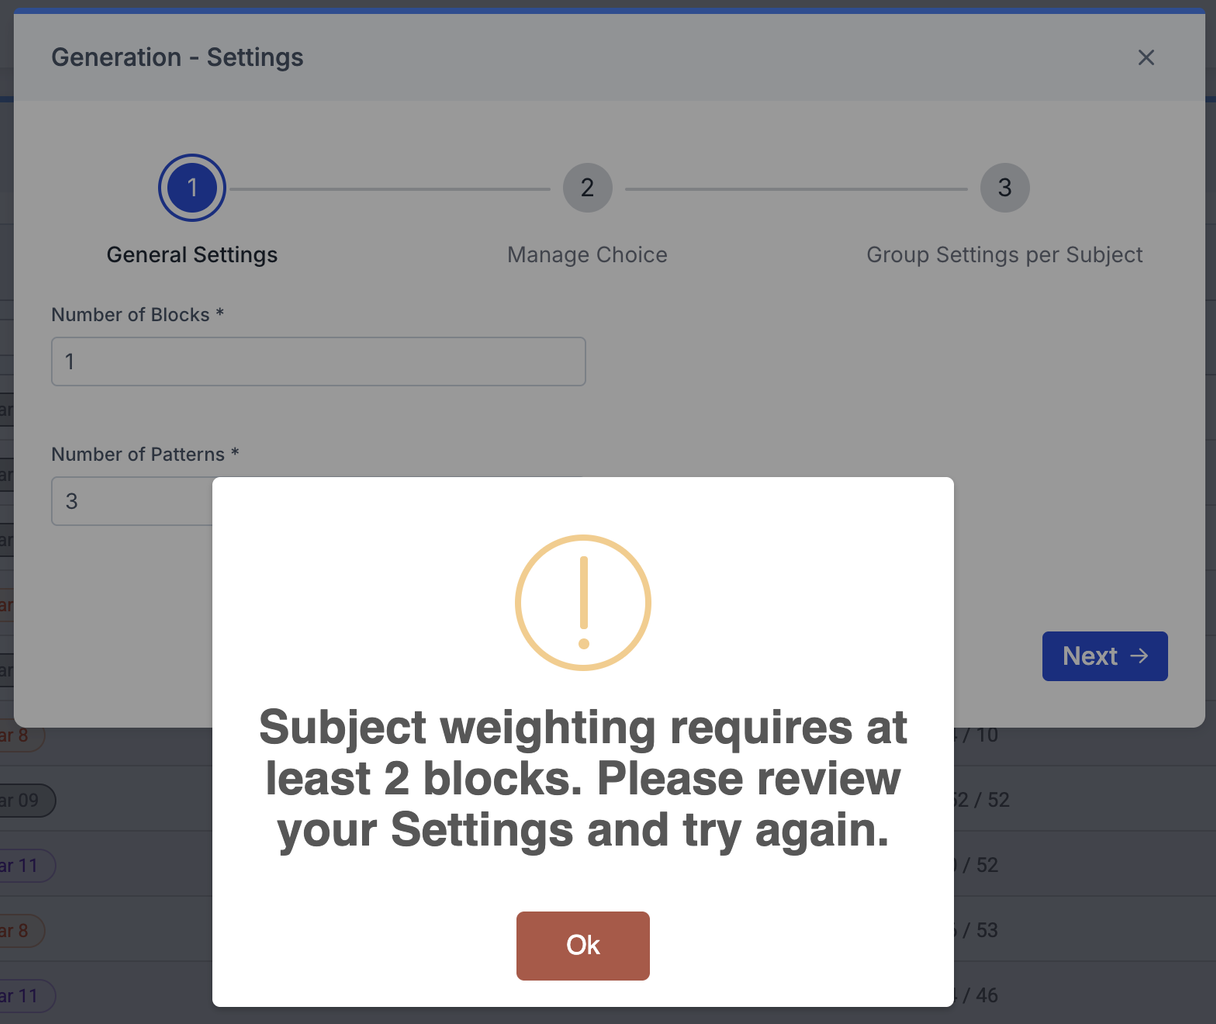
In Timetable Patterns > Timetable Patterns Settings > Step 1 General Settings – the user will see a warning popup if the Number of Blocks is less than the subject weighting requirement.
In Timetable Patterns > Timetable Patterns Settings > Step 3 Group Settings per Subject – subjects will be identified with a blue weighting badge where the number in the badge is equal to the weight.

In Timetable Patterns > View Patterns > View Details > Block Review/Subject Information tabs – subjects will be identified with a blue weighting badge where the number in the badge is equal to the weight.

In Clash table – subjects with a weighting > 1 will be displayed once, and students will only be counted once.

In Timetable Patterns – once the pattern has been generated a subject weighted > 1 will behave in the following way:
- Subject Information tab – subject is displayed only once but will be treated as a cross block subject. Example: subject PE Weight = 2, Block A and Block B subject class name will be for example 10ABPE1. This will then appear in both Blocks automatically when assigned (linked copy).
- Where more Blocks are present than are required for a weighted subject > 1, when allocating manually to a Block a copy will automatically be added to an adjacent block e.g. the user will then be able to move them manually between the blocks but not to have both instances of the class in the same block.
- The process for assigning a student to a subject with weighting > 1, the student will be assigned automatically to all instances of the subject class. If removing, the student will be removed from all instances. Note: A student cannot already have been assigned to a block where the instance of the weighted subject is present as the student may only appear in the block once.
In Review Pupil Choices – users will not be able to Validate student choices if rules have been broken for weighted subjects.
Optional Subject Rules
After adding the Subjects then set up the rules for Option Subjects only. Simply click Add Subjects then choose the required Combination Type from the drop down;

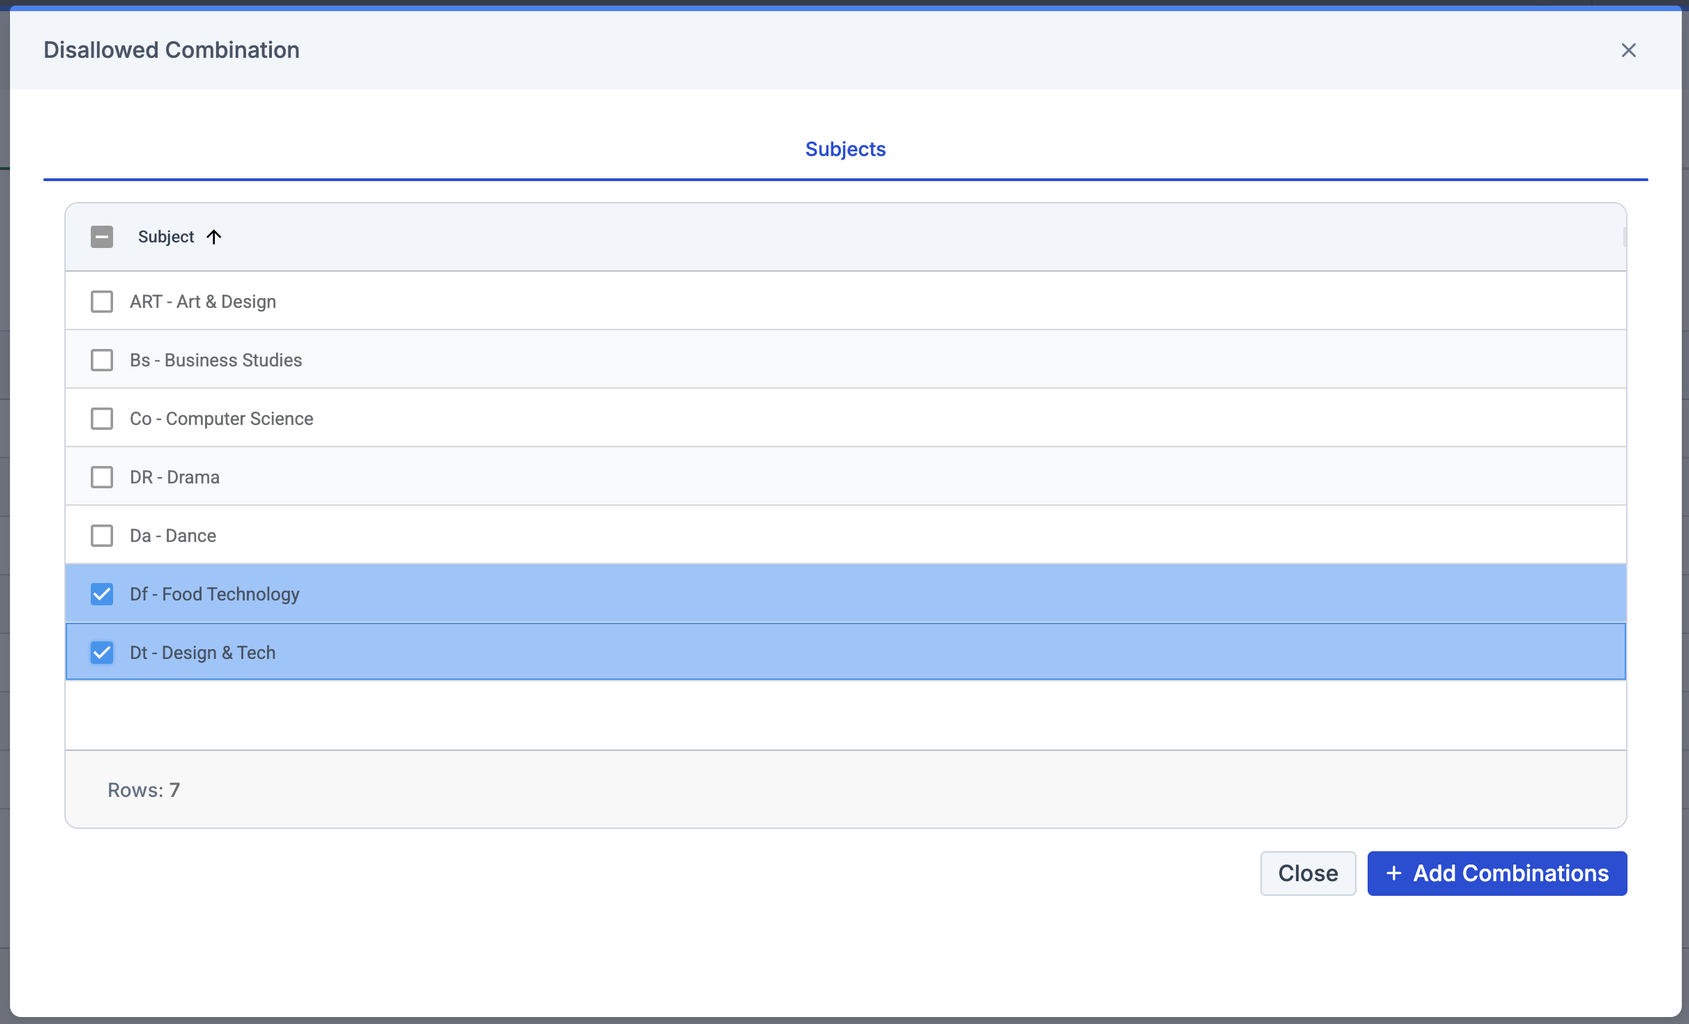
Disallowed Combinations allows the user to create a group of subjects that cannot be chosen together, even if they are in different Subject Groups.
- In the example below – Disallowed Combination has been chosen and Business Studies, and Business Studies Voc have been selected, therefore these subjects cannot be chosen together.
Click Add Combinations to confirm the selections.
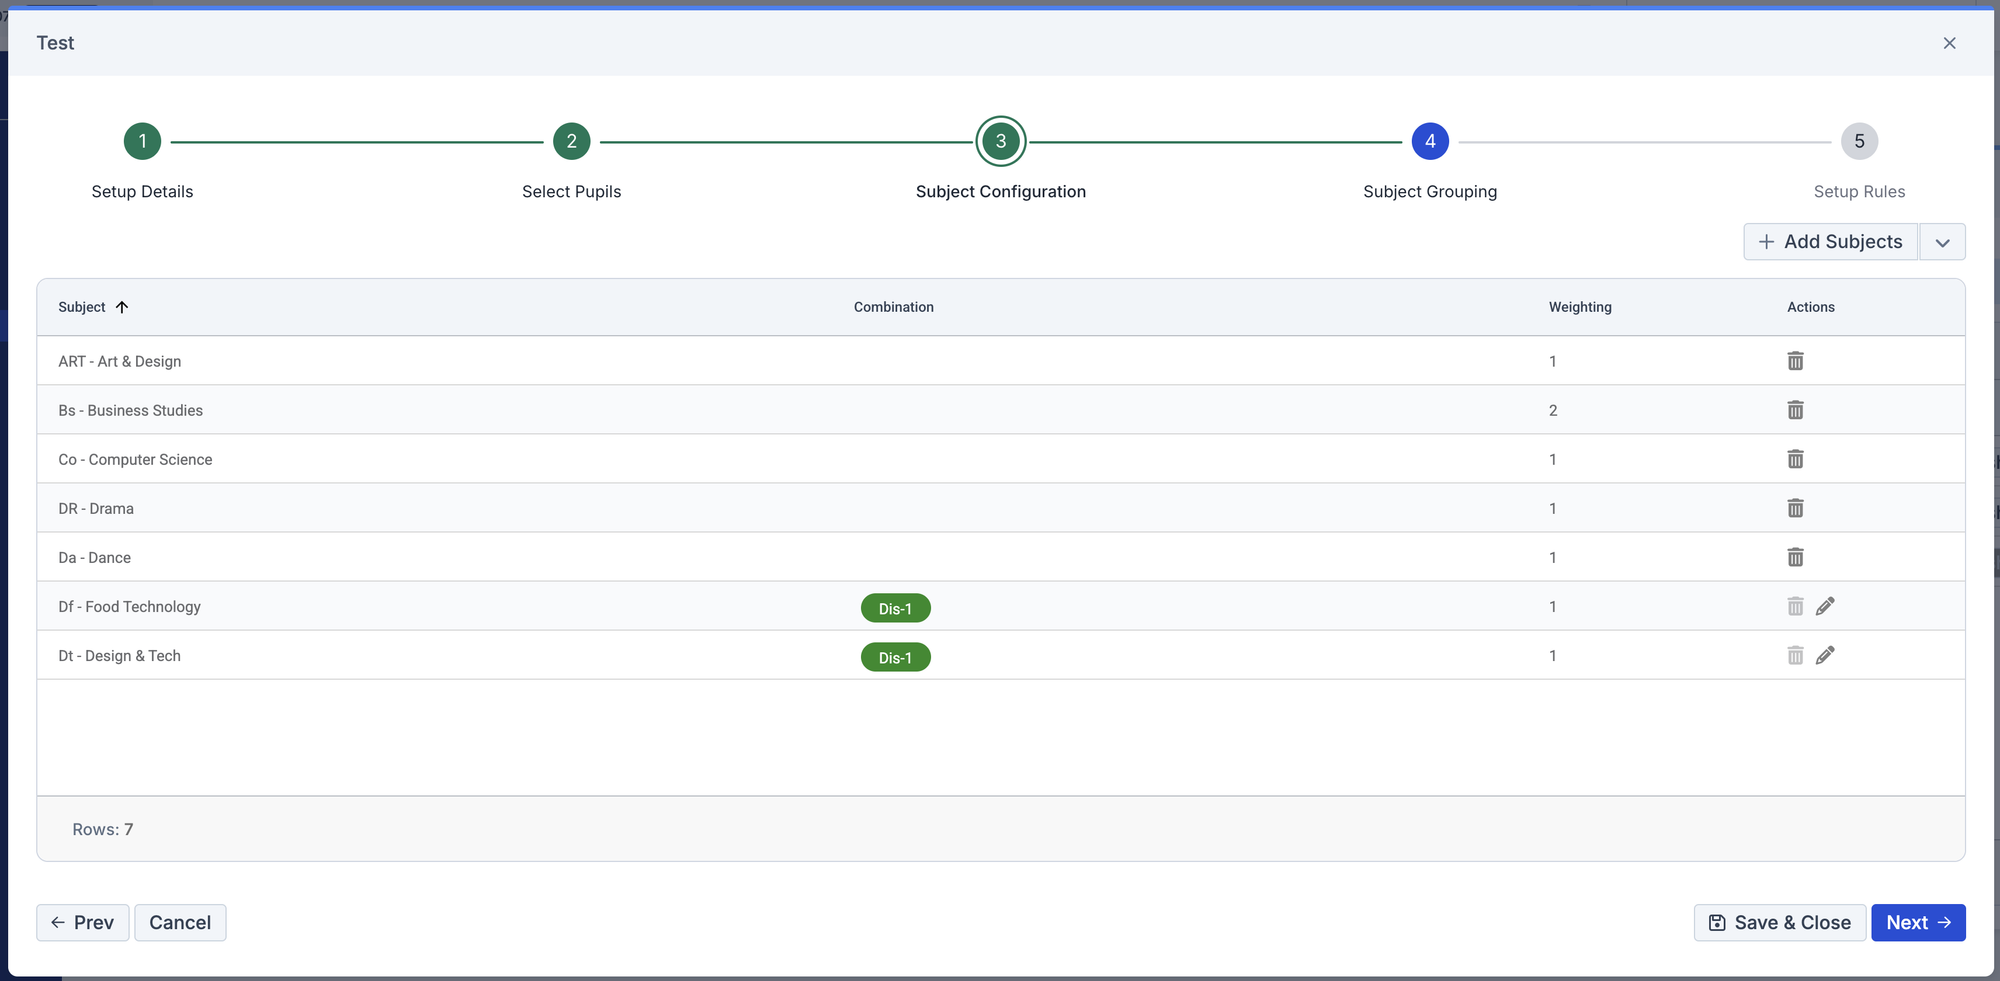
A Disallowed flag will be added to the Combination column for each subject in the group, with a count to distinguish the combination from other groups (e.g. Dis-1, Dis-2,…).
Dependent Combinations allows the user to create a rule where a subject can only be chosen alongside another.
- Select the Main Subject and the Dependent Subject. Multiple subjects could be dependent on the same Main Subject.
- In the example below Further Mathematics is Dependant on Mathematics, so for example for Post 16 Students must have chosen Mathematics if they want to study Further Mathematics.
Click Add Combinations to confirm the selections.

A Dependency flag will be added to the Combination column for the Dependent Subject only, with a count to distinguish the combination from other dependencies (e.g. Dep-1, Dep-2,…).

- Before the setup has gone live, users will be able to edit and add to combinations by selecting the edit icon in the Actions column against a subject in a Combination.
- Combinations can be removed by simply removing the Subjects from the Combination using the edit function.
- Note: Subjects can only be deleted if they are not part of a combination.

4 – Subject Grouping
This section is used to sort the previously added Subjects in to Subject Groups.
- There must be a minimum of one Group and a Subject must be in a Group to be available as an Options choice, for example;
- a Group called Languages where Students have to pick a Language
- a Group called Humanities where Students have to pick a humanities subject
- and then 2 Options Blocks where Students have to pick one Subject
A Subject can be in more than one Group for example a Student wanted to study French and German so they could choose French from the Languages Group and German from one of the Options Groups.
Click the + Add Subject Grouping

Here, users can:
- Enter a Subject Grouping Name
- Select the Subjects
- Indicate whether a Reserve should be set
- Use the Search field in the Subject area
- See a total count of selected Subjects
After saving, users can edit or delete subject groupings via the Actions column.
Note: For existing setups that include Fixed Subject Group Types, the Type column will continue to be displayed to preserve the current configuration and behaviour. Similarly, if a setup containing fixed subject groups is copied, those fixed groups will also be retained in the new setup.
5 – Setup Rules
The final stage of the process is Setup Rules. This is where you would specify how many Options can be picked from the Groups.
The Rule Details column will already display the rules set using Total Choice Count, Total Reserves Count, Disallowed Combinations, and Dependent Combinations.

Users will click the Add Rules button which will open a popup with separate Main Choice and Reserve tabs.
Rules will be specific to the type – Main or Reserve accordingly.
In the Main Choice tab users can select the Main Rule Type, Group, N Definition, and Subject(s) where necessary, before clicking Add Main Rule.
You can choose from a selection of Rules , please keep in mind that Parents may also have access to this if you selected MCAS at the start of the process;
- Select N Subjects from Group X – Allows the student to pick N Subjects from within a Subject Group (N is a number that you can define. You can choose which Subject Group, X refers to).
- Select only 1 subject from Group X – Allows the student to select one subject from the Subject Group (you can have multiple Subject Groups).
- Select 1 subject from each Group – Allows the student to select one subject from each Subject Group (this selection is good if the subjects are grouped by Departments like Sports or Science). If selected this will default the Groups for this rule to be ALL Groups so there is no requirement to set up individually.
- X must be selected in one group – X subjects must be selected in one of the subject groups
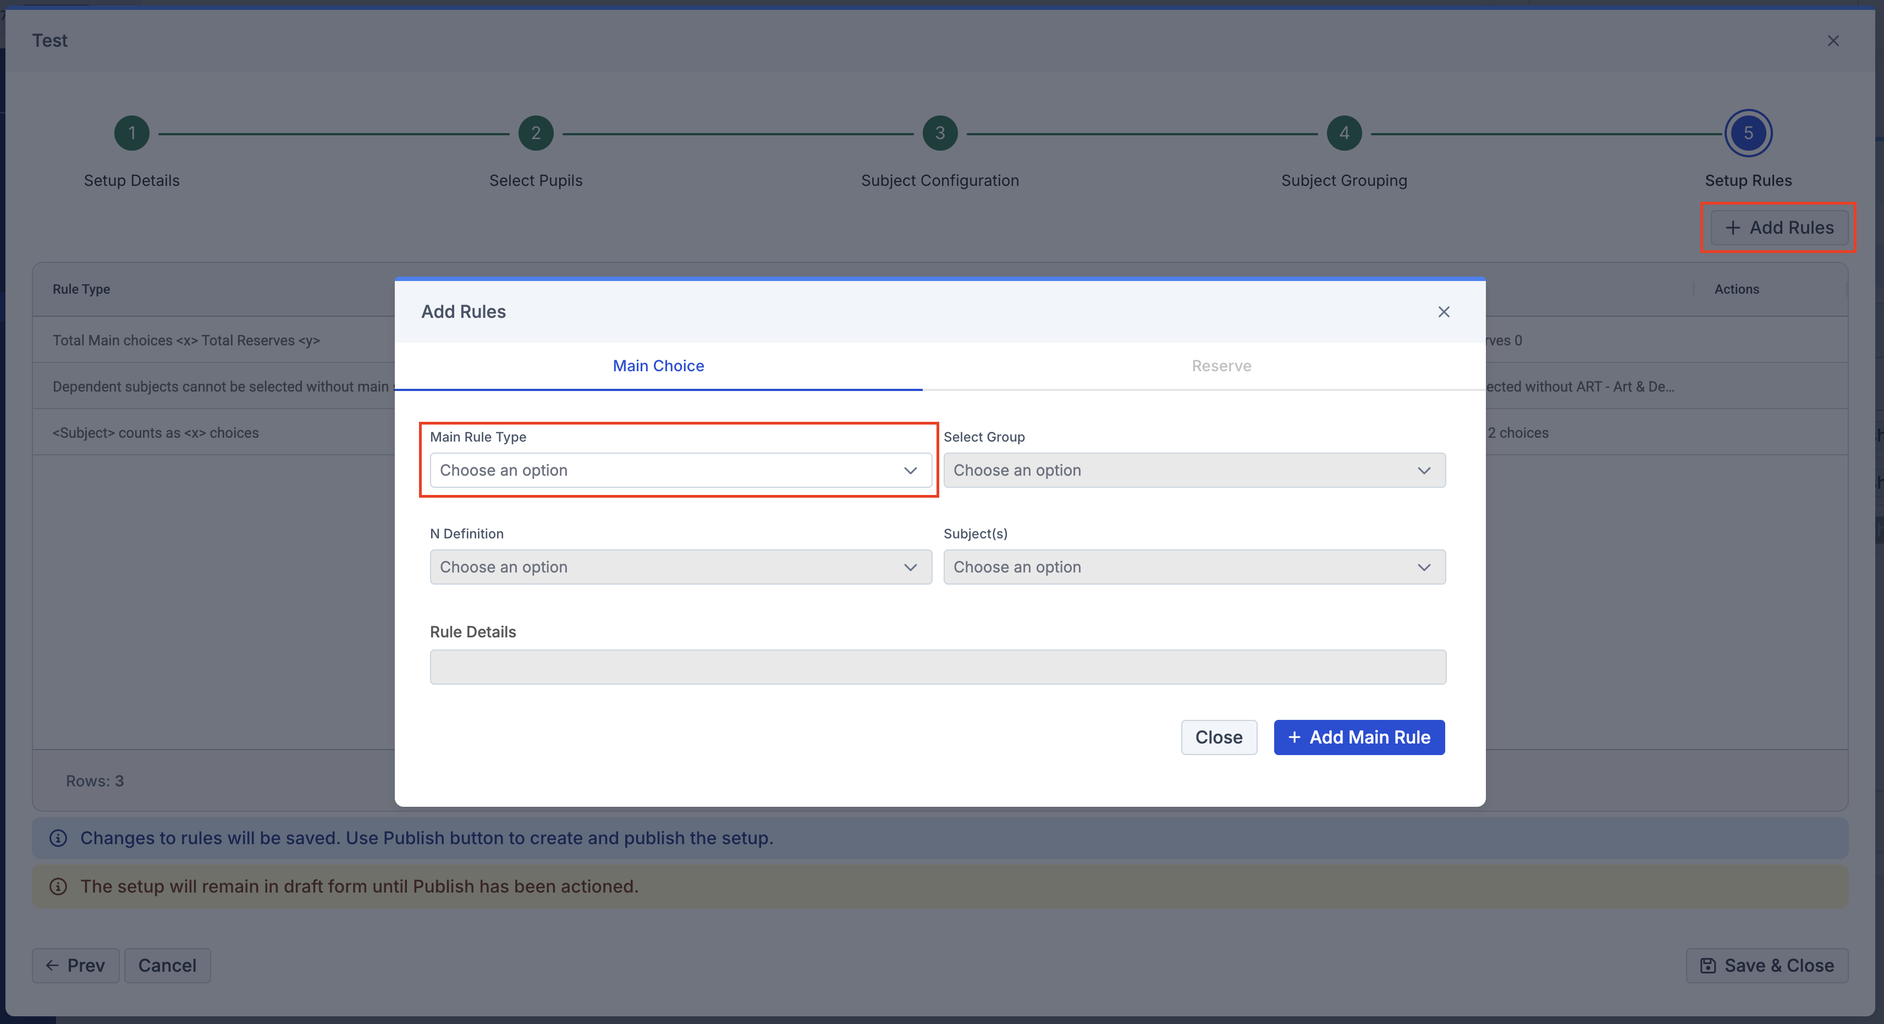
The Reserve tab looks identical and works in the same way to the Main Choice tab, except the labels read Reserve Rule Type and Add Reserve Rule.
Note: Reserves tab will be hidden if not required.
You can choose from a selection of Rules , please keep in mind that Parents may also have access to this if you selected MCAS at the start of the process;
- Select maximum N reserve subjects from Group X
- Select exact N reserve subjects from Group X
Once finished, click Save & Close.

The setup will be saved and remain in draft status until published.

Editing a draft Options Setup
Click the cog icon to edit or complete a Draft setup.

Publish Setups
Once all setup configurations are complete, click the Publish button.

Confirmation message: “Are you sure you are ready to create and publish the setup? You are about to publish an options setup.”
- If Cancel is selected, the setup remains in Draft.
- If Proceed is selected, the setup status changes to Published, and the Publish button becomes greyed out.


Note: If rules are added in step 5 which do not match the setup rules, when a user selects Publish – a message will appear to let the user know that the setup cannot be created. This validation also ensures that all Reserve subjects are assigned to a rule whenever the main choice has a rule assigned.
Because the rules allow multiple possibilities, some combinations may cause problems but may still be possible depending on the combination the student selects, according to groups being created, users may see this warning message.
To Edit a Published Setup if no submissions have been made:
Clicking the cog icon to go to 1 Setup Details to edit the setup.

To close the popup and not save any changes, click Cancel.
A pop up with alert the user that ‘Changes will be lost, do you wish to proceed?‘
To save changes, click Save & Close.
An alert will pop up to say ‘As changes have been made the status will go back to Draft. You will need to publish the setup again once all configurations are complete.‘
If submissions have been made the Submissions column shows how many student submissions have been made (this will be zero initially).
When clicking the cog icon, a pop will say Submissions that have already been made on this setup, only the following can be modified and the setup will remain in a published state.
- Options Window Open and Close Date
- How choices can be made (Import/Form/Student Portal/MCAS)
- Selected Pupils (addition or removal)
Click Proceed to open the Setup wizard.
Combine Setups
Combine Setups gives the user the ability to Combine two or more setups into a single setup so that Timetable Patterns can generate blocks for all students together.
This will work for setups that meet the following criteria:
- Year Group must be the same.
- Start date – End date: Start date must be in the future, and Start date of a setup cannot be after the End date of another setup.
- Status must be Published.
- Students can only belong to one setup being combined.
Click Combine Setups
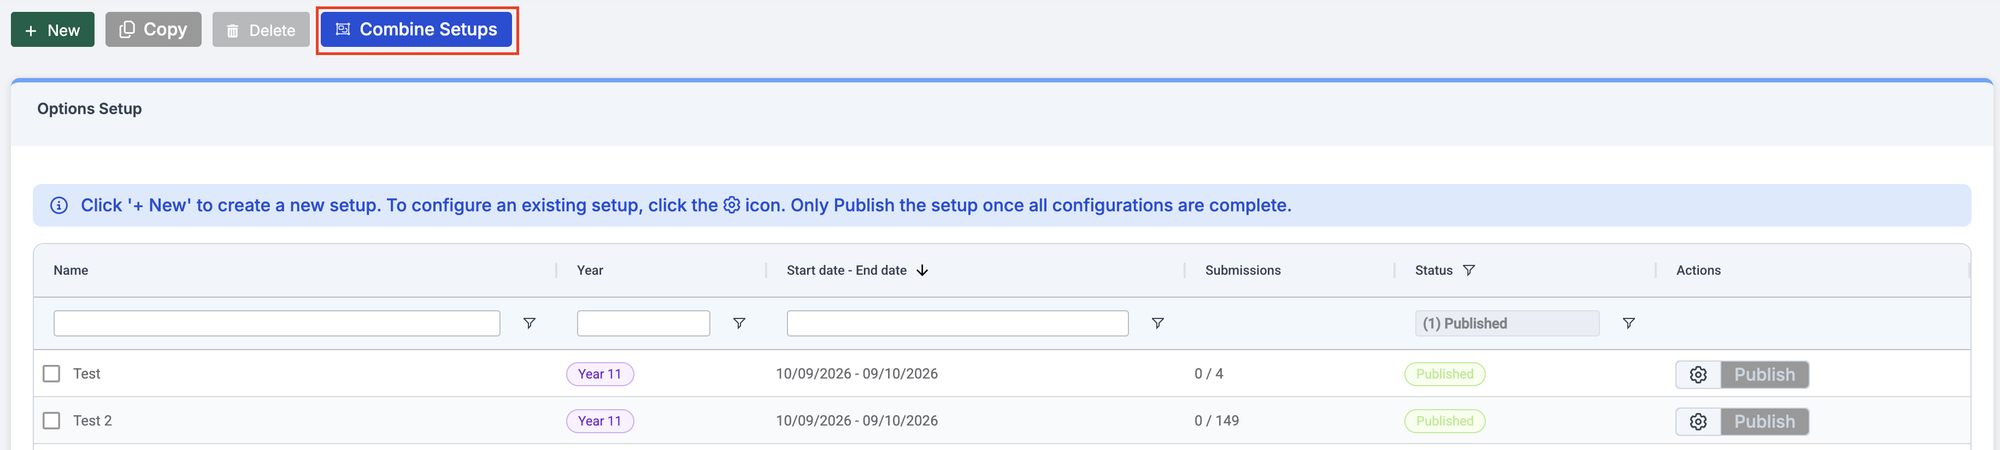
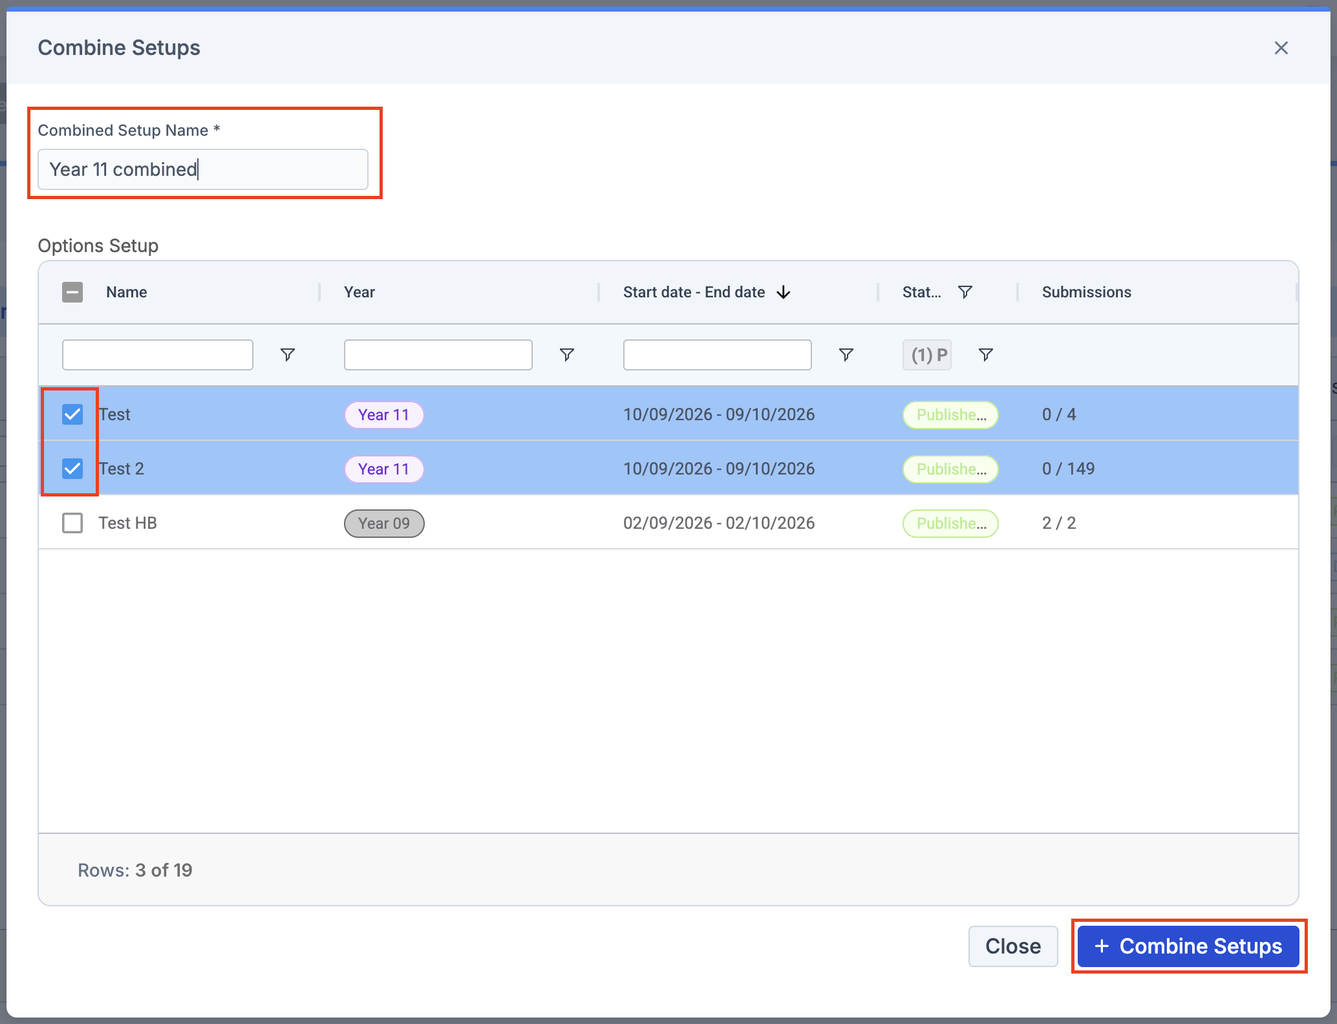
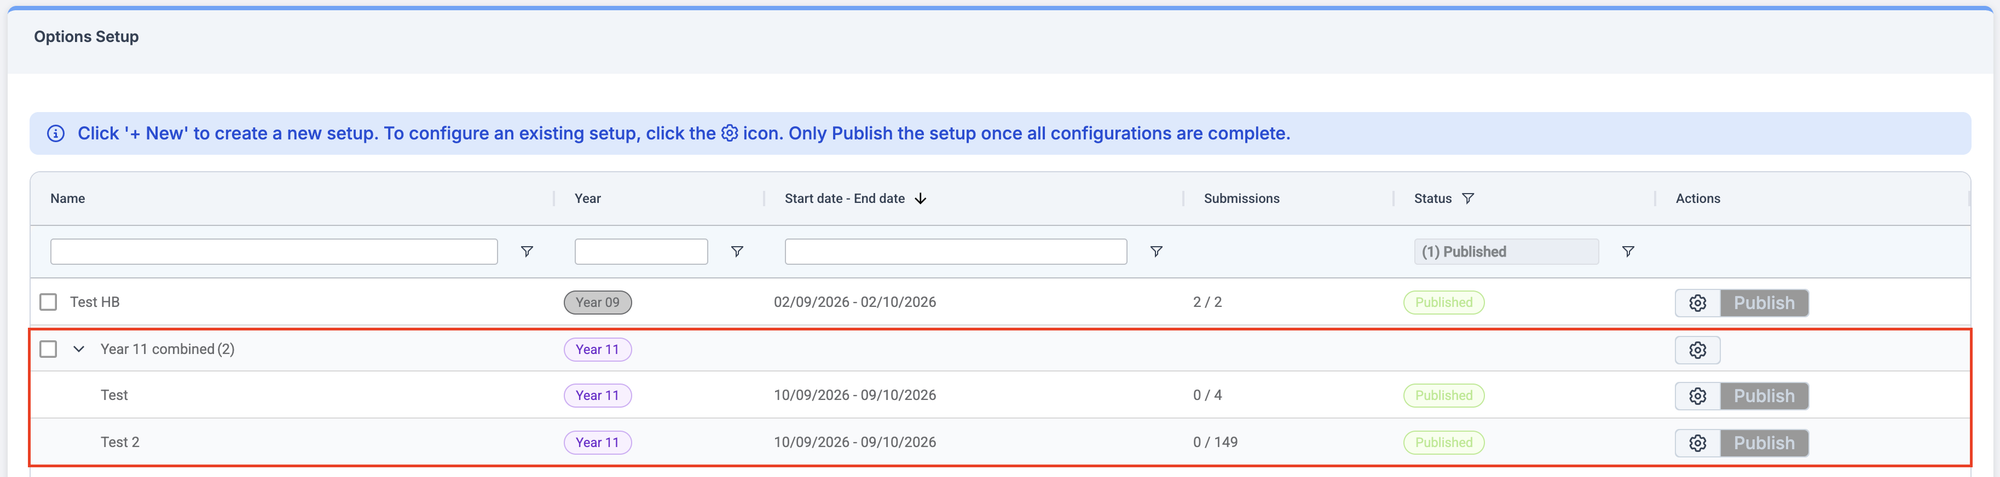
In the popup – provide a Combined Setup Name and tick two or more Options Setups from the table to be combined into one. A combined setup group will be added to the table when the user clicks on + Combine Setups.
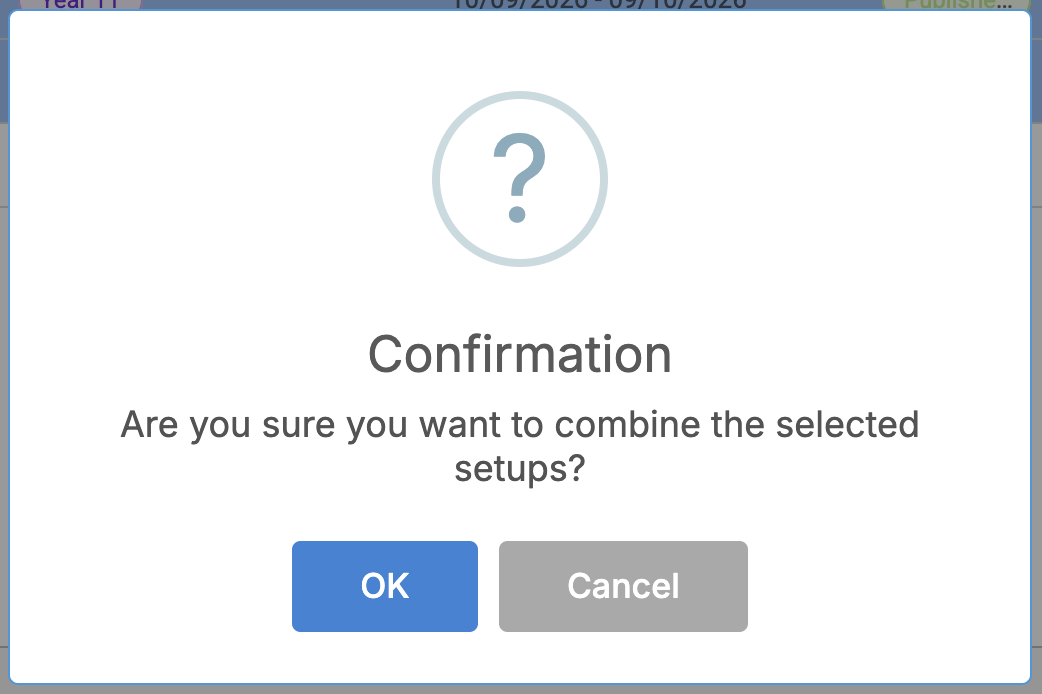
A Confirmation popup appears.
Note: If Options Setups in Draft form are combined, the system will display the following Warning. Drafts should be Published before they will appear in the Clash Table and the Timetable Pattern pages.
A combined setup will appear in the Options Setup table for use with the Clash Table and the Timetable Patterns process. Users can edit the combination and individual setups in the combination as required.
Note: The individual setups will continue to be used for Forms, Importing Pupil Choices, and Review Pupil Choices pages.
Copy and Delete
Only active Setups will be displayed on the main Setup page (Modules>Options>Options Setup)
A filter on the Status column will display all types: Published, Expired, Draft.

Carry out the following actions:
- Copy: Once an Options Setup has been created the user has the option to Copy the Setup e.g. to re-use one with an Expired Status from a previous academic year.
- Delete: PLEASE BE AWARE IF A SETUP IS LIVE AND PUPILS HAVE MADE CHOICES THE DELETE WILL DELETE ALL THEIR CHOICES.

Use Forms to see the number of Submissions against a selected Option Set Up with the ability to customise the Form, submit choices and reserves and send email reminders to Students.
Understanding Forms;
- Even if multiple Methods of Collection of Forms have been added to the Options Setup, a Form can only be submitted once after which the Submit button will be unavailable and a Read only Summary Form displayed in its place.
- All rules must be met before the form can be submitted. Pink highlights and validation messages in red will assist the Student in this process.
- No Form can be submitted AFTER the End Date of the Setup. A Student would have to contact the school for the administrator to add their Choices manually using Review Pupil Choices.
- Hint: Extend the End Date of the Setup before it becomes live to allow late submissions, the removal of leavers or the addition of new Students.
This section looks at the following in relation to Forms
Forms Page
Navigate to Modules > Options > Tools > Forms.

The Forms panel shows a table of Option Set Ups with the columns Name, Year, Start Date – End Date, Number of Submissions and Actions

Search and Filter – use the white boxes to type into plus use the filter cups with a drop down and finally use the Burger Stack symbol on each column with option to Pin, Resize and Hide/Unhide columns.

Manage Forms
Click on the Pencil in the Actions column to open the Manage Forms page.

The pop up shows individual Student information and a Status column.

Form Description
To change the information on the Form click the bottom-right Form Description button.

Make the necessary changes then click Save.

Email Form
Select the required Student(s) and click the bottom-right Send Form/Reminder button to email the form/reminder.

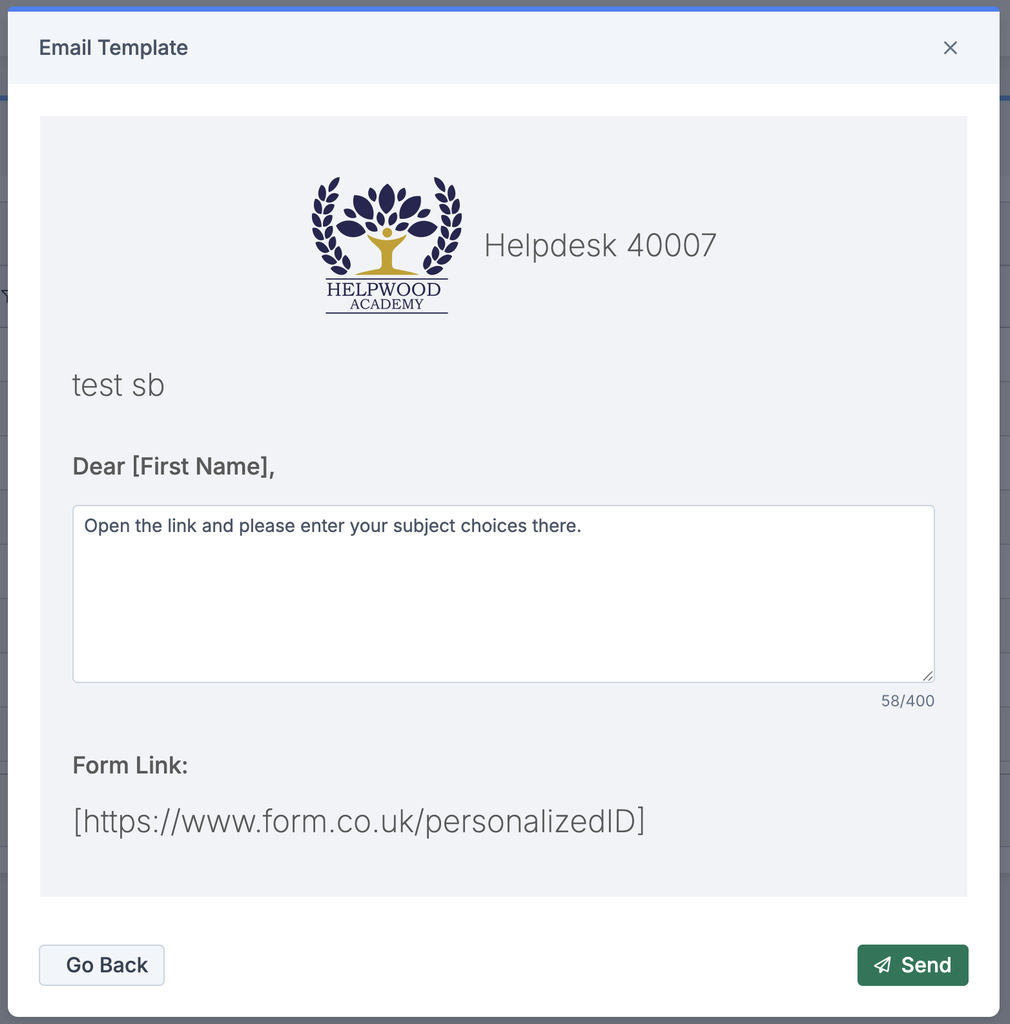
In the pop Email Template edit the Email message if required
Once complete click Send.
The Status will change to Form Sent.
Submit Form
If the Status column is set to Form needs to be sent then the user has the option to click the expand button to View the Form. From there choose to select Subject choices and reserves on behalf of the Student.

Choose Main choices and Reserves
In the Form, choose dropdown selectors for Choices and Reserves. The number of dropdowns depends on the rules selected in the setup.
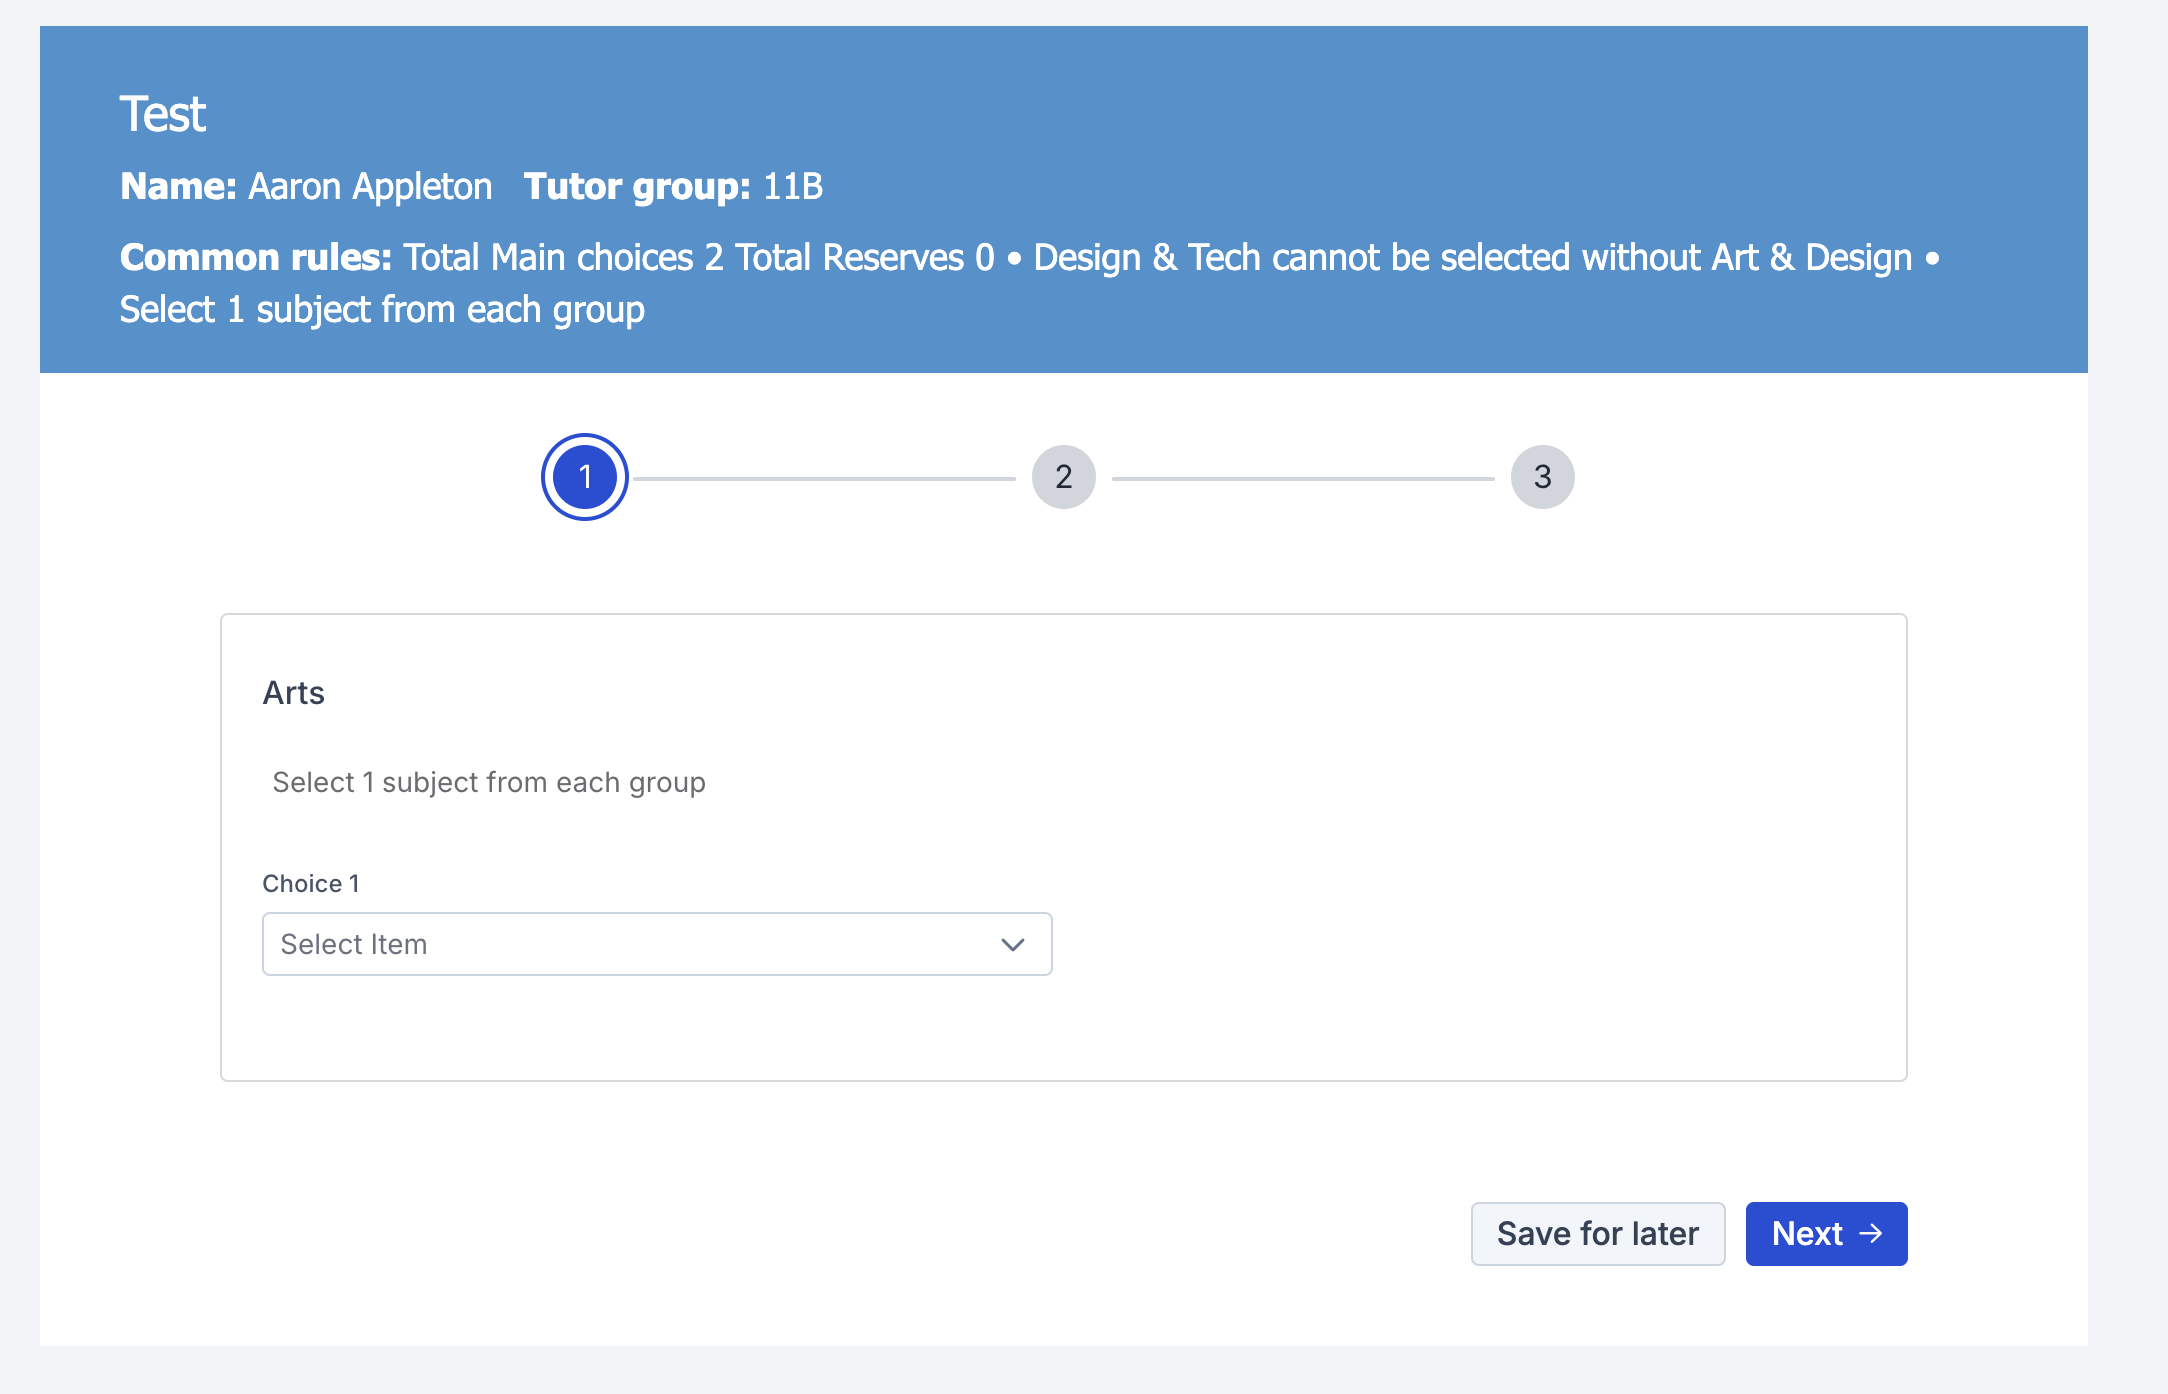
After all the selections have been made, click Next to move to the final step and see the choices made.
In the final step, review the subject order or preferences before submitting.
Click Set Preferences to make any changes.
Once completed choose to Save for later or Submit now.

Click Submit to display a popup showing the selected choices. Click Proceed to continue, or Cancel to make changes.

Click Close Tab

Once the Form is submitted – the Submitted on and Submitted by dates will be updated, and the Status is updated to Submitted.
Note: The page may need a refresh, or wait a while to see these changes on the page.
Form Visibility
Use this section to manage how the forms appears in both the Student Portal and in MCAS (MyChildAtSchool)and see examples of emails received by Students and how they submit choices from the Form.
Both Student Portal, Student App and MCAS (parent portal web and app) have Configurations to control the visibility of the Options Form.
- Student Portal and Student App: Go to Config > Student Portal > Options
- MCAS: Go to Config > MyChildAtSchool > Options
Both these pathways will open an Options Module Setting panel;
- Show Option widget on the Dashboard: If unchecked, the widget will be hidden. When checked, it appears only for Students assigned to a Year Group in the Setup.
- Show Expired setups: This option allows expired setups to be displayed for historical reference.
Click Save if making any changes.

In the case of MCAS, in 1-Setup Details of the Options Setup forms can be configured to allow Contacts to either View Only or Edit the Form. See Options Setup in this guide.

Student receives email
Once the email has been sent the Student will receive an email, below is an example email;
Student clicks on the link.

The Student then enters their school email address to generate a one-time password (OTP) which is sent to the same email address.

The Student then receives another email to their school email address with the OTP.

The form then changes to the OTP page so Student can leave this open ready to add the OTP they have just received.
The Student enters the OTP and then clicks Open Form.

Student completes the Form
The same Form will be available through Forms, Student Portal and MCAS as well as Review Pupil Choices. When a Form is active, students can edit their Choices, and Save for later. If multiple Subject Groups exist, a step-by-step process guides the student through each group.

The final step page allows further Edit options prior to Submission.

Pre-requisites: In order to use the Import Pupil Choices page, an Options Setup must have been setup, published and had the Import ticked within the 1 – Setup Details.

This section covers the two methods of Importing Pupil Choices
Using the template
Navigate to Modules > Options > Import Pupil Choices.

The Import Pupil Choices page will show active Options Setup which had Import ticked within the Setup Details will be visible.

Once a setup has been Published, it can be downloaded as a blank template.
Click the top-right How to Import button to see instructions/requirements for the Import.

Please read the information in How to Import carefully so that the data is entered correctly based on which Rules were set up. The template must be in CSV format to upload.
After reading the requirements provided click the Download Template Button to export the Pupil Choices Template.

As long as there are no pop up blockers active or download windows open, the Template will download as an excel spreadsheet.

- Once the Pupil Choices have been entered, save the Template on the PC as a .CSV File.
- Now return to the Import Pupil Choices page
- Under Actions click Import > Import Template.
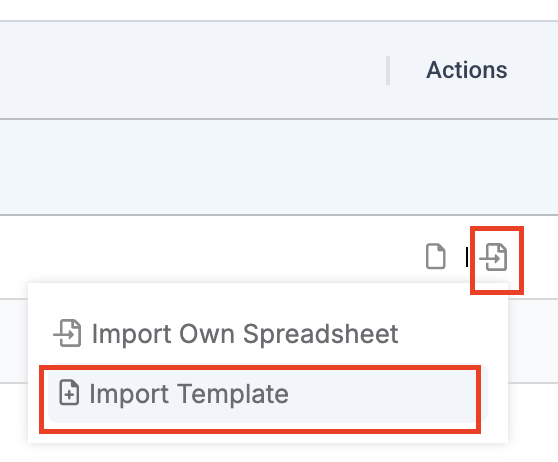
Select the Template and wait a few seconds for the Import to complete.
A success notification will confirm the Import.

An Information popup informs the user that the choices require validation to update the submission. Please see the section on Review Pupil Choices in this guide.

Using a spreadsheet
Navigate to Modules > Options > Import Pupil Choices.
The Import Pupil Choices page will show active Options Setup which had Import ticked within the Setup Details will be visible.
If Pupil Choices have been collated using a spreadsheet the school or trust has created themselves then click How to Import to view instructions for How to Import Your Own Spreadsheet.

IMPORTANT: Please read this information carefully to ensure the data is entered correctly based on which Rules were set up.

Structure of the spreadsheet
- Add required headers in the first row:
- First Name, Last Name, Tutor Group, DOB (Post 16 only), Subject and Reserve Subject Choices as required.
- Where no Tutor Group is available – leave blank.
- Subject Choices example: Group 1 – Choice 1, Group 1 – Choice 2, Group 2 – Reserve 1, Group 2 – Reserve 2.
- First Name, Last Name, Tutor Group, DOB (Post 16 only), Subject and Reserve Subject Choices as required.
- Add optional headers in the first row (if required):
- UPN, Admission Number, NCI Number, and ULN.
- Enter student details and their subject choices under the correct headers.
- All student details must correspond precisely with the entries in the Options setup. Any variation in spelling or formatting may prevent the system from matching and importing the information.
- Save the file as CSV with comma as a separator.
Note: External Applicants can be added when importing your own spreadsheet.
After following the instructions navigate to Actions, click Import and Import Own Spreadsheet.
In the pop up step 1 Upload, add the csv file, then select Next.
In 2 Spreadsheet mapper select which row the data starts from in Data start from row dropdown. Match the First Name, Last Name and Tutor Group to a column in the spreadsheet.

In the Optional Columns dropdown, selecting one or more of these will enable corresponding dropdowns to select a column for mapping. Note: 6th Form: Gender is available for 6th form only to add this field when creating new applicants.
Note: 6th Form: A mandatory dropdown labelled Date of Birth will also be displayed to select a column for mapping only for 6th form.
Click Next.
In the final step 3 Choices
- Ensure that each subject choice column is mapped to the relevant Subject Group.
- Select the subject from the dropdown.
- If a Subject Group has multiple subjects, select and add each one individually.
Click Import to complete the process.
Users will need to go to the section in this guide on Review Pupil Choices page to validate the choices.
Note: When setting up any year group, External Applicants must be imported during the Options Setup stage before importing their choices
Import Validations
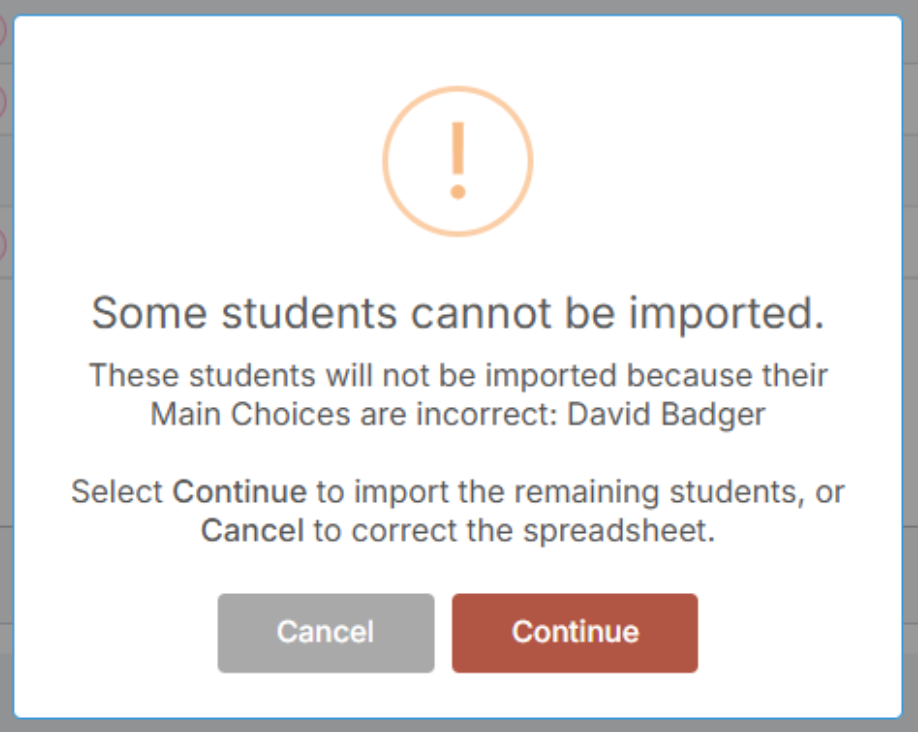
If any students in the import file have made too many selections, they will be clearly identified in a validation message, allowing you to quickly review and correct the data.
Valid records within the same file will continue to import successfully, reducing the need to correct and re-import the entire dataset.
Note: to Review Pupil Choices an Options Setup must be in place.
This section covers how to use the Review Pupil Choices page and covers the following steps to complete the Review.
- Review Choices
- Validate
- Submit
- Choice Summary
Note: The imported pupil choices must be validated at this stage to ensure accuracy and that all rules have been met.
Navigate to Modules > Options > Tools > Review Pupil Choices.

This page will display all active Options Setups.

Find the correct Options Setup (if there is more than one) and press Review Pupil Choices in the far-right Actions column.

This will open the Review Pupil Choices popup.
The Rules Met column highlights if students have met the import validation rules with either;
- A green badge (Yes)
- A red badge (No)
- A yellow badge (Yes – validated but rules have been broken).
Choose the required student and click Actions.
This opens the selected Student’s Choices.

Validate individual pupil choices
Users can edit these choices if needed and then click the bottom-right Validate.
Example of a student’s choices that meet the validation rules:

Users can click on Set Preferences and change the Order of Preference by dragging and dropping the subjects in the preferred order using the six dot icon to the left of the Subject name.
Example of a student’s choices that break the validation rules:
- Rules which apply to weighted subjects appear in black.
- Choices that meet the validation rules are displayed in green.
- The student’s choices that break the validation rules are displayed in red. They will need to be amended and finally validated.
When you are done editing Pupil Choices, press Validate.

The order of preference is displayed in a popup. Click Proceed.

Validated choices that meet the rules will show a green badge in the Rules met column.

Note: Users can edit these choices and validate them for pupils, even if they still break the rules. Validated choices that break the rules will be alerted to the user with the following popup and the status will be denoted in the table with a yellow badge.

Click Submit when all of the status’ are a combination of green and yellow.

Once submitted, an information popup will alert the user if some student choices do not meet the rules.
Note: Another spreadsheet could be imported (with the validation process being repeated), and this will overwrite anything in the holding table, meaning duplicates will not be created of anything that has already been imported.
After clicking Submit the user will be returned to the Review Pupil Choices page
Click Review Summary in the Actions column

This will open the Choice Summary table which will show Pupil’s Choices in bulk.
Note: The Choice Summary can be exported if needed by clicking the dropdown arrow next to the top-right Export.

The Clash Table is used to review how many students have chosen each subject and determine how many classes are required based on class size. It also shows which subjects have been selected in combination with one another.
This section looks at the following functions in the Clash Table.
Navigation
Navigate to Modules > Options > Options Reports > Clash Table.

Below is an example of the Clash Table panel.
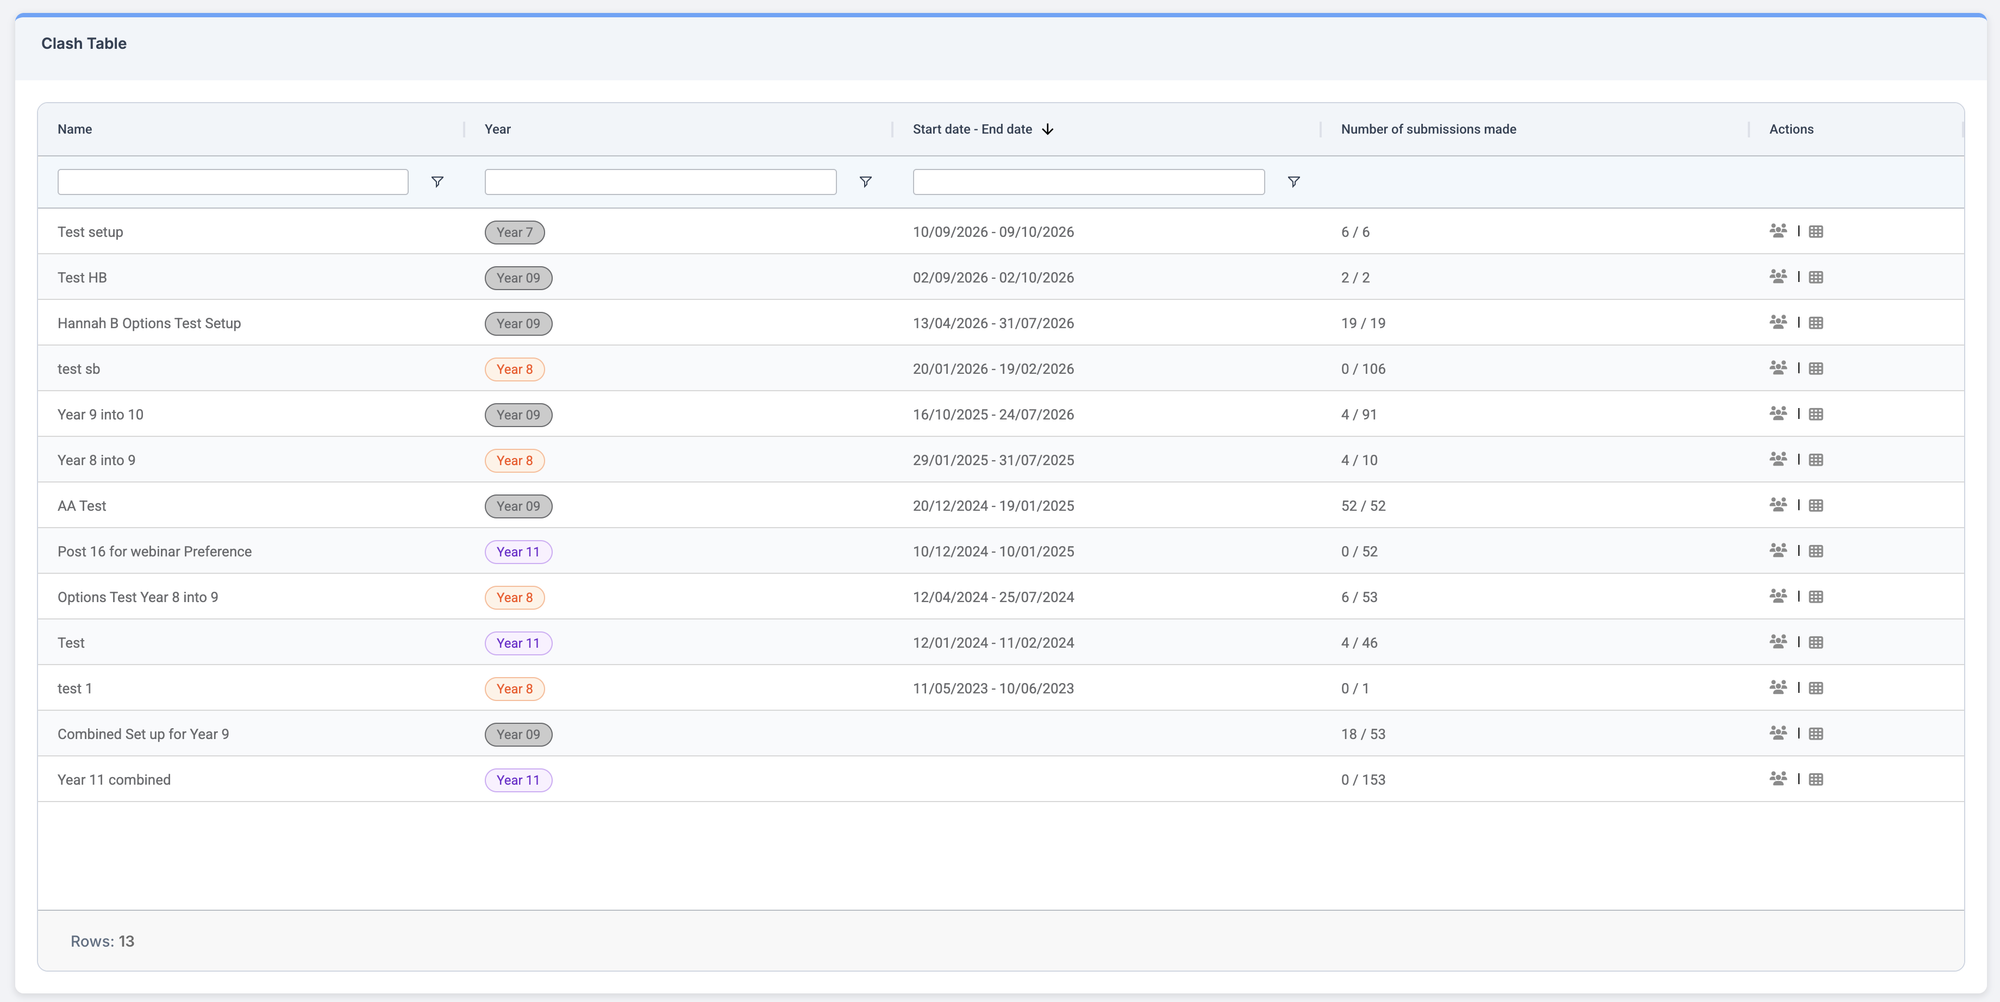
Column headers
Columns display the Name of the Options Set Up, Associated Year Group, Start Date and End Date, Number of Submissions made against number of Students, and Actions.
Use the Column Headers to filter if required. In this example Group has been typed into the Name Column Header.
The example below shows the 3 Option Set Ups with the word Group in the Name.
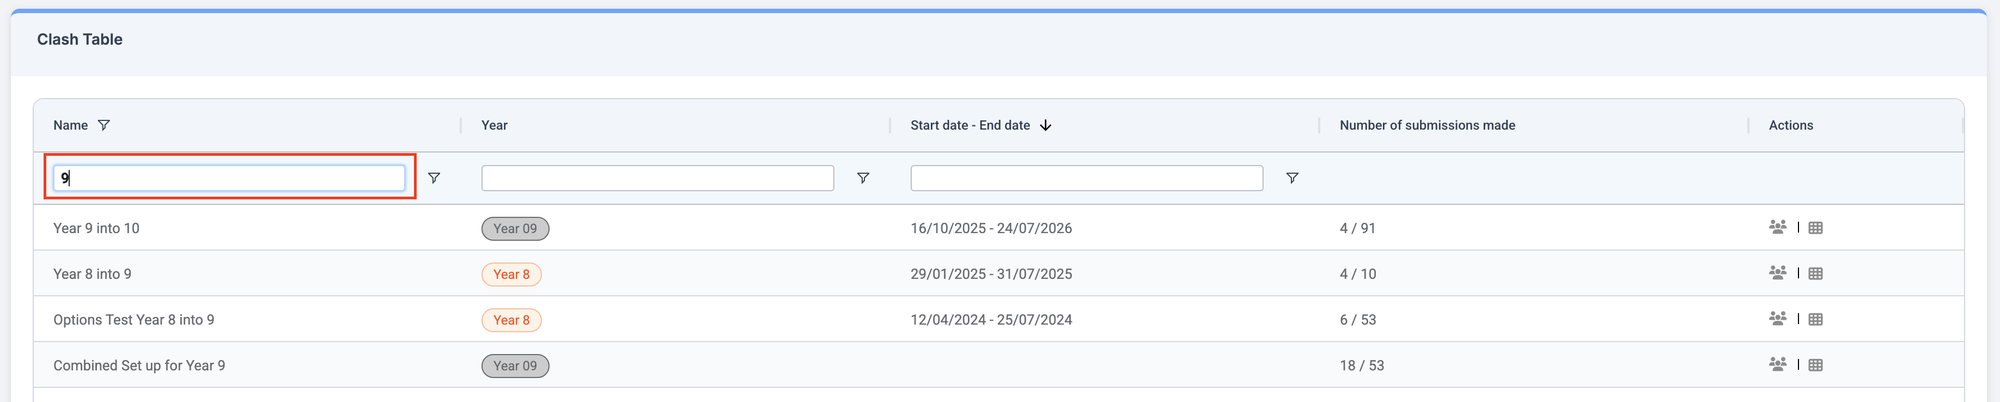
Filters: click on the filter cup to the right of Name, Year, and Start Date – End date to see further filter options using the dropdown.


Click the burger stack symbol to the right of each Column Header to Hide/Unhide columns, Pin, Autosize or Reset

Click the Grid Symbol to Hide/Unhide Columns.
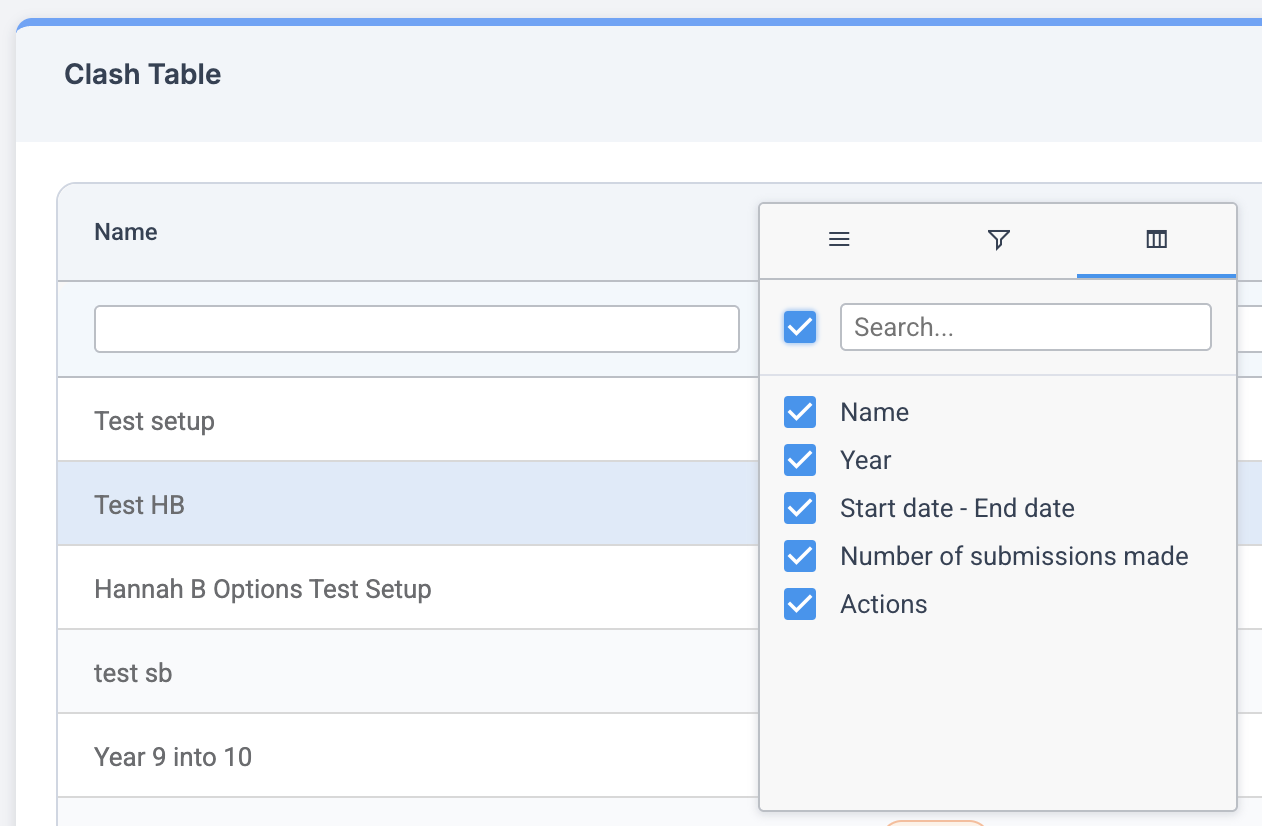
Click the three bars to Pin, Autosize and Reset columns.
- From Pin Column choose Pin Left, Right or No Pin
- Choose to Autosize This Column or All Columns
- Or Reset Columns

Actions
The Actions column has two functions; Set Subject Parameters, used to define the size and number of Groups and View Clash Table which shows which subjects have been selected in combination with one another.
Click on the three person symbol to Set Subject Parameters for the selected Options Set Up.

The default is:
- Min Size of Groups = 15
- Max Size of Groups = 30
- Min Number of Groups = 1

Click in the Min Size of Groups, Max Size of Groups and/or Max Number of Groups to edit if required.
Tip: Use the search feature in the Subject column to go straight to the necessary subject.


Click Save to complete.
Click the Grid symbol under Actions to select View Clash Table for the selected Options Set Up.

- Choose to Order Subjects by : Popularity or Alphabetical.
- Switch the View Choices By to Main Choice only, Reserves only, or Overview Total.
- Set Parameters is a shortcut back to the Set Subject Parameters popup.
- The Clash Table can be exported to excel in one click.

The blue numbers show the total number of Students who have made choices for the Subject. For Example 19 Students have chosen Gg (Geography).

The numbers either side show the total number of Students who have chosen the 2 Subjects in the Grid, for example 6 Students have chosen Gg (Geography) and Fd (Food).
Number of Groups
The No of Groups column reflects the number set in Module>Options>Timetable Patterns > Generation Settings.
- The Groups Needed column shows the required number of groups.
- If the Average Size exceeds the maximum, or falls below the minimum ‘Size of Groups’ the conflict will be highlighted in red, as per existing behaviour.
- Users can edit the No of Groups column directly in the table for all subjects, not just those with conflicts—even setting it to zero if needed.
- To apply changes, go to Timetable Patterns to Create a Manual Pattern or Generate an Automatic Pattern.
- All changes made here automatically sync the Set Parameters (Clash Table) and Generation Settings (Timetable Patterns) popups and vice versa, eliminating the need for duplicate updates.
Timetable Patterns are ‘alternative suggestions’ for how to assign classes to the blocks, with the levels of Satisfaction for each alternative pattern shown.
- Timetable Patterns are used to create blocks for timetabling.
- Patterns can be designed manually, automatically, or using a combination of both.
- Choose the number of blocks and the number of patterns you want to explore.
- Each pattern is assigned a satisfaction level, and the user will ultimately select one pattern as the final version.
This guide looks at the following functions and features in Timetable Patterns
- Navigation of the Timetable Patterns Page
- Create an Automatic Pattern
- Create a Manual Pattern
- Pattern Generation
- View Patterns
- Set as Final
- Publish Final Allocated Subjects
- How to in Block Review and Subject Information
- How to in View Patterns
Navigate to Modules>Options>Timetable Patterns

Navigation of the Timetable Patterns Page
The column headers in the page shows the Name, Year , Start Date – End Date, Number of submissions made, Status, and Actions.

The Name, Year and Start date – End date columns can be filtered by clicking on the copy in the column heading

In the example below we have clicked to filter by the Year column

In this example we only want to see Year 08 so we untick Year 09
Now we can just see Year 08 and the (1) in the column header indicates there is a filter

Click the Burger Stack which is present in the top right on all columns to see options to Filter, Pin, Autosize, Reset and Search

Pin, Autosize and Reset

Filter

Search

Actions
- There are 3 possible icons in this column
- Cog Icon : for Timetable Patterns with a Status Settings Required, users will need to click the Timetable Pattern Settings cog icon to begin to create the pattern.
- Eye Icon : Once patterns have been created, the Status will show Complete, and users can View Patterns (eye icon)
- Circle Arrow Icon : Once patterns have been created, the Status will show Complete, and users can Reset Patterns (circle arrow icon).

For more information on using Actions and these icon please read on in this guide.
Create an Automatic Pattern
Click the Cog icon in the Actions column and select Automatic Pattern. This icon is only available for Patterns with the status Settings Required

This will open the Generation Settings wizard which has 3 steps

1 General Settings
Use this step to amend the following;
- Number of Blocks (>1)
- Number of Patterns (this must be between 1 and 6)
- For Subjects in Blocks see next section.
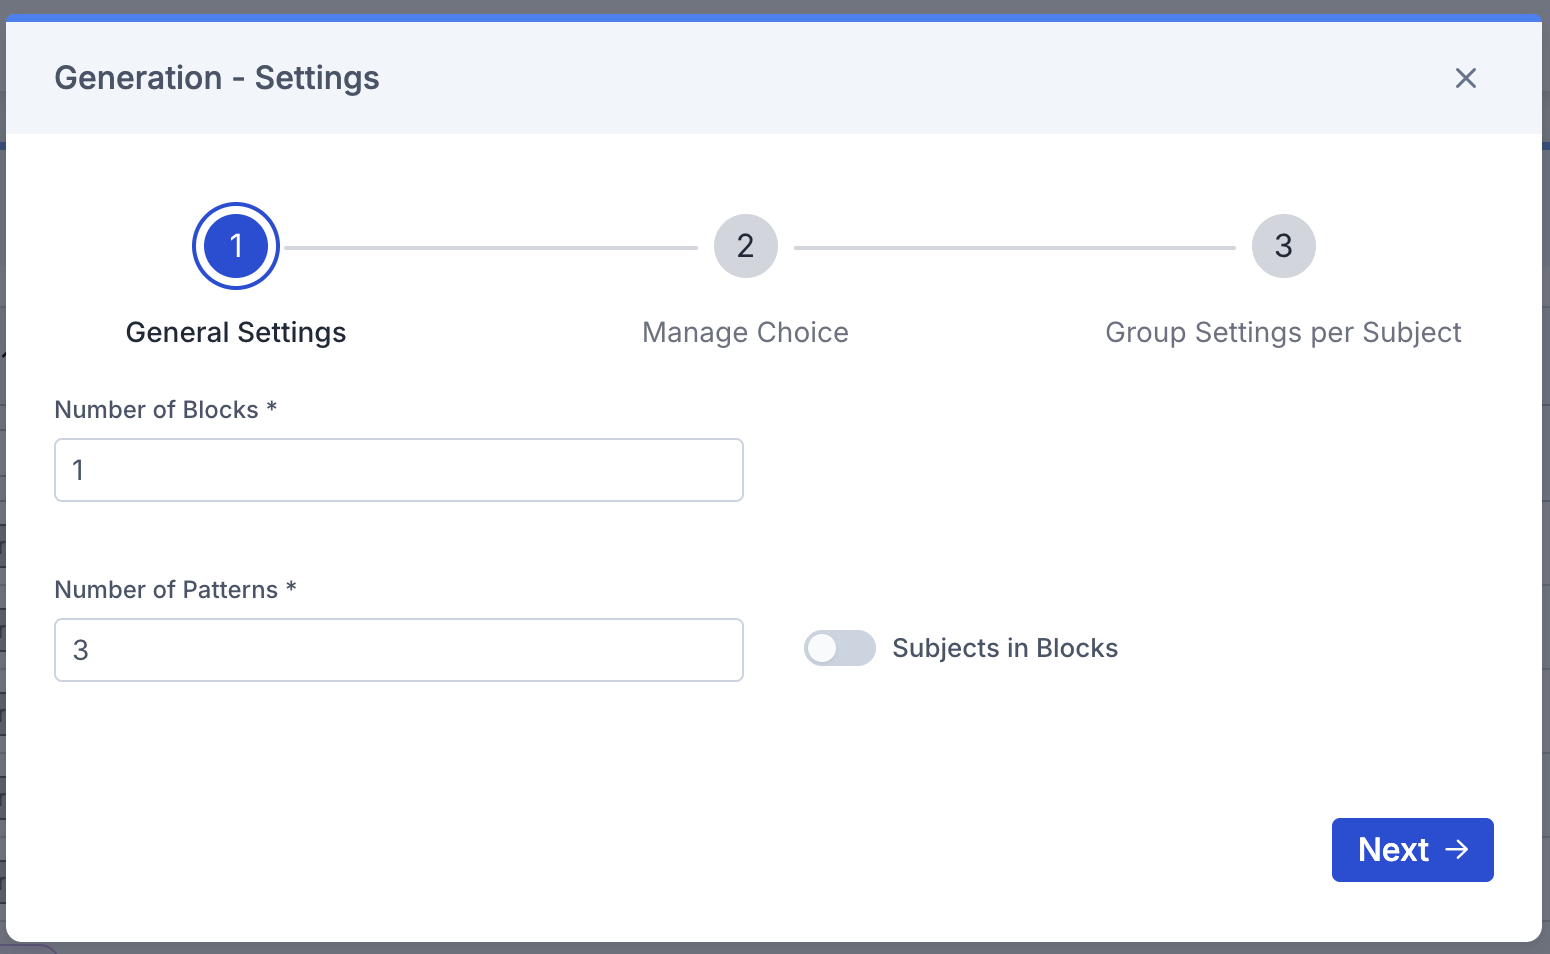
Subjects in Blocks
These are only available in Automatic Patterns.
In 1 Generation Settings the toggle Subjects in Blocks is defaulted to off. When the toggle is switched on – the pattern generation will keep chosen Subjects in different blocks to each other, to prevent staffing issues later in the process.
Switch the toggle to ON. The popup expands to reveal the Subject Relationship table.
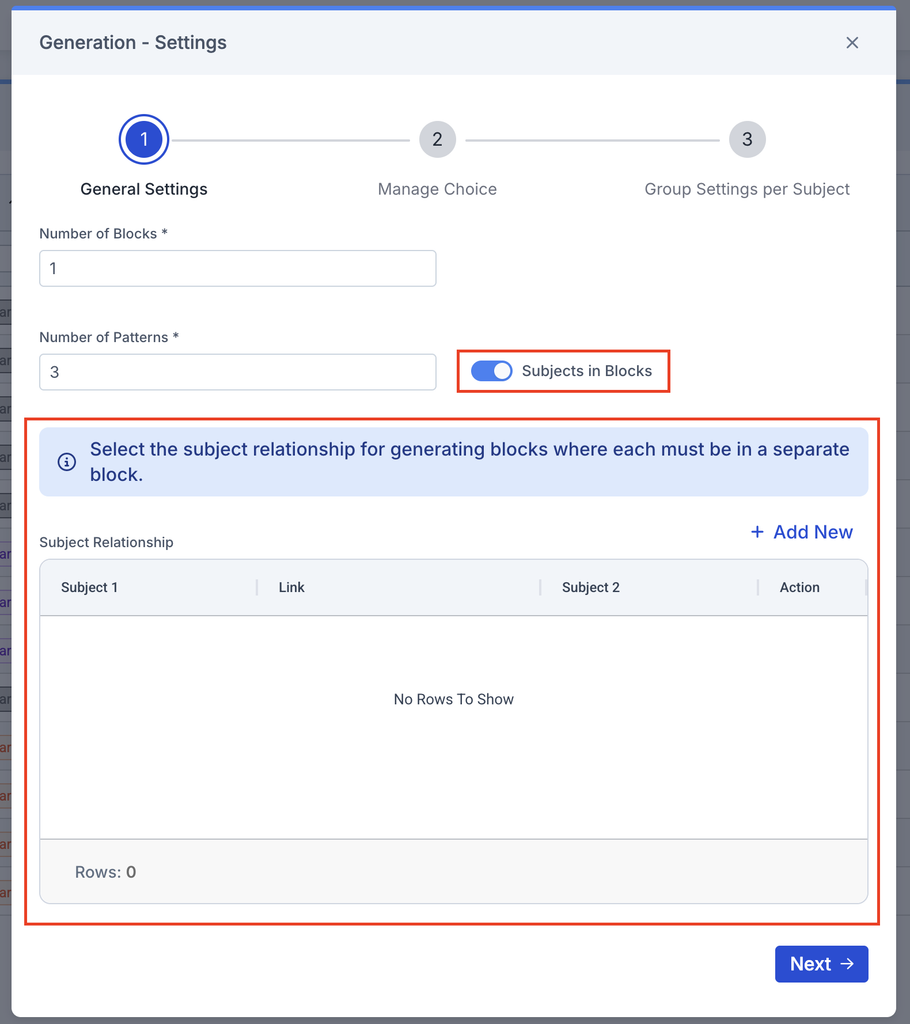
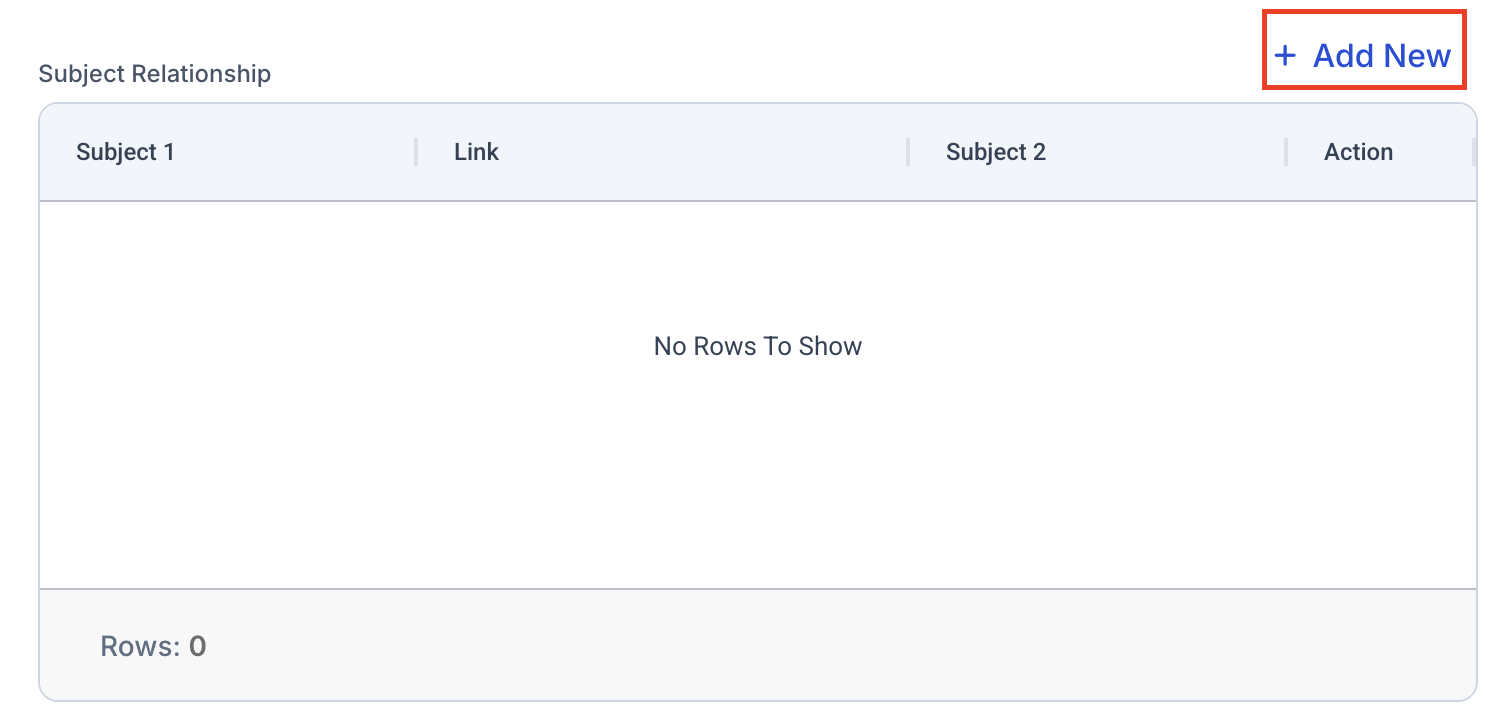
Click Add New.
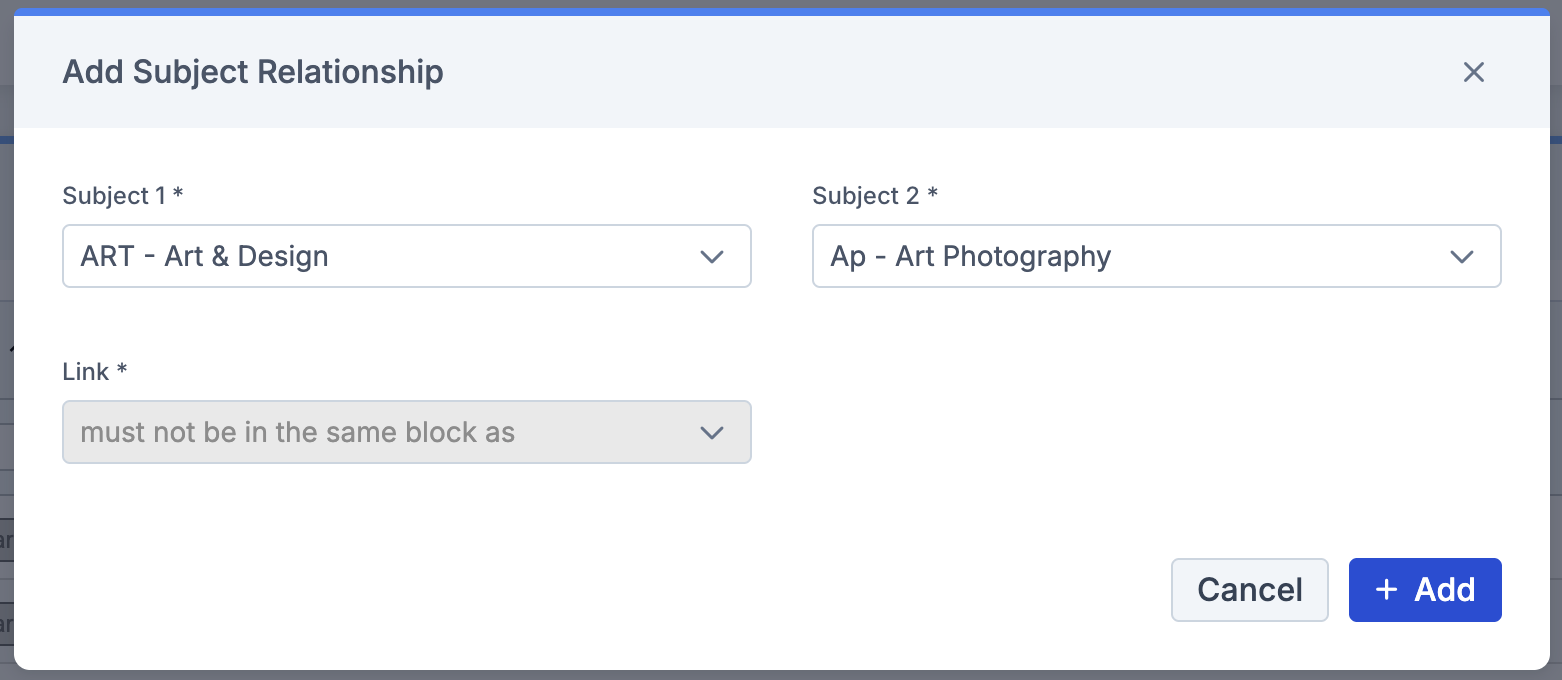
Another popup opens – Add Subject Relationships where two subjects are selected to be linked, where Subject 1 must not be in the same block as Subject 2.
Note: For Subjects in Blocks:
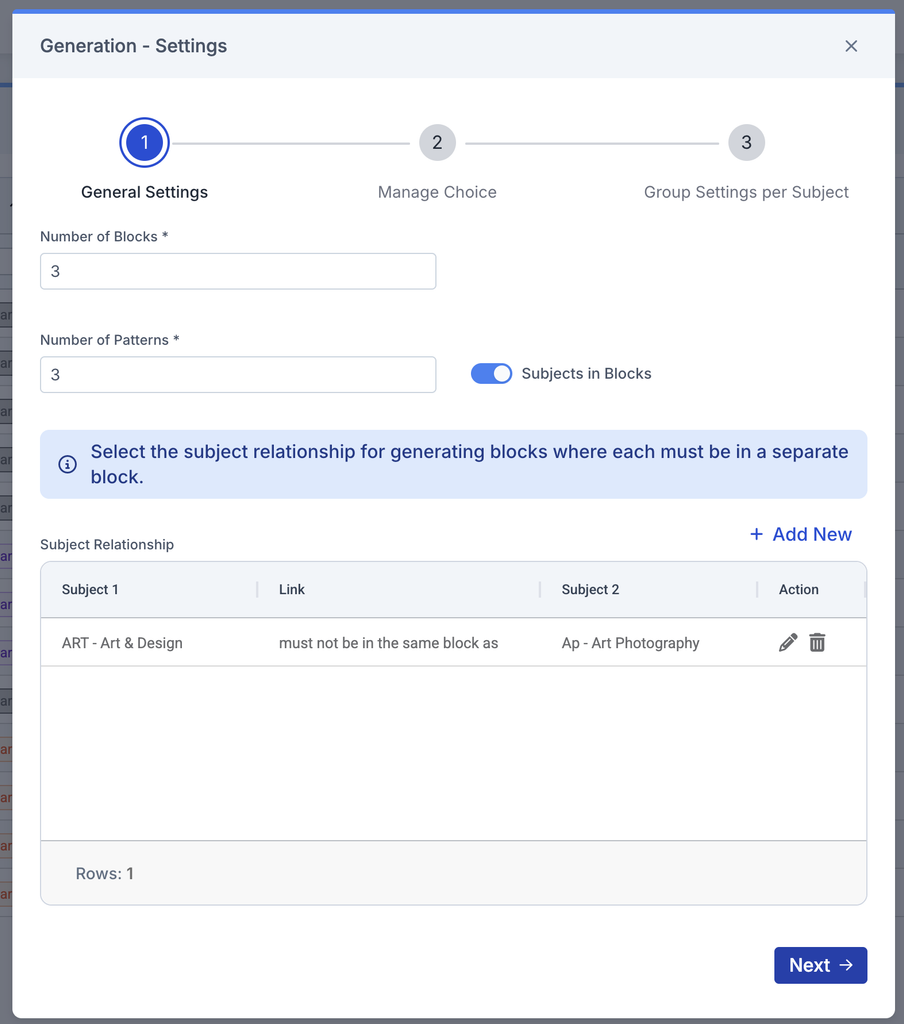
- The Number of Blocks should be set to greater than 1.
- Multiple Subject Relationships can be added.
- Where a Subject has multiple classes the Subject can be selected for Subject 1 and Subject 2, so that they are automatically added to different blocks.
Click +Add.
Once the Timetable Pattern has been created, users will see the Subjects chosen have been added to different blocks.

When you are happy with the Generation Settings Click Next.
2 Manage Choice
In this step users can include student’s reserves in the Timetable Pattern generation.
Users will manipulate the following fields to manage Reserves in Timetable Patterns:
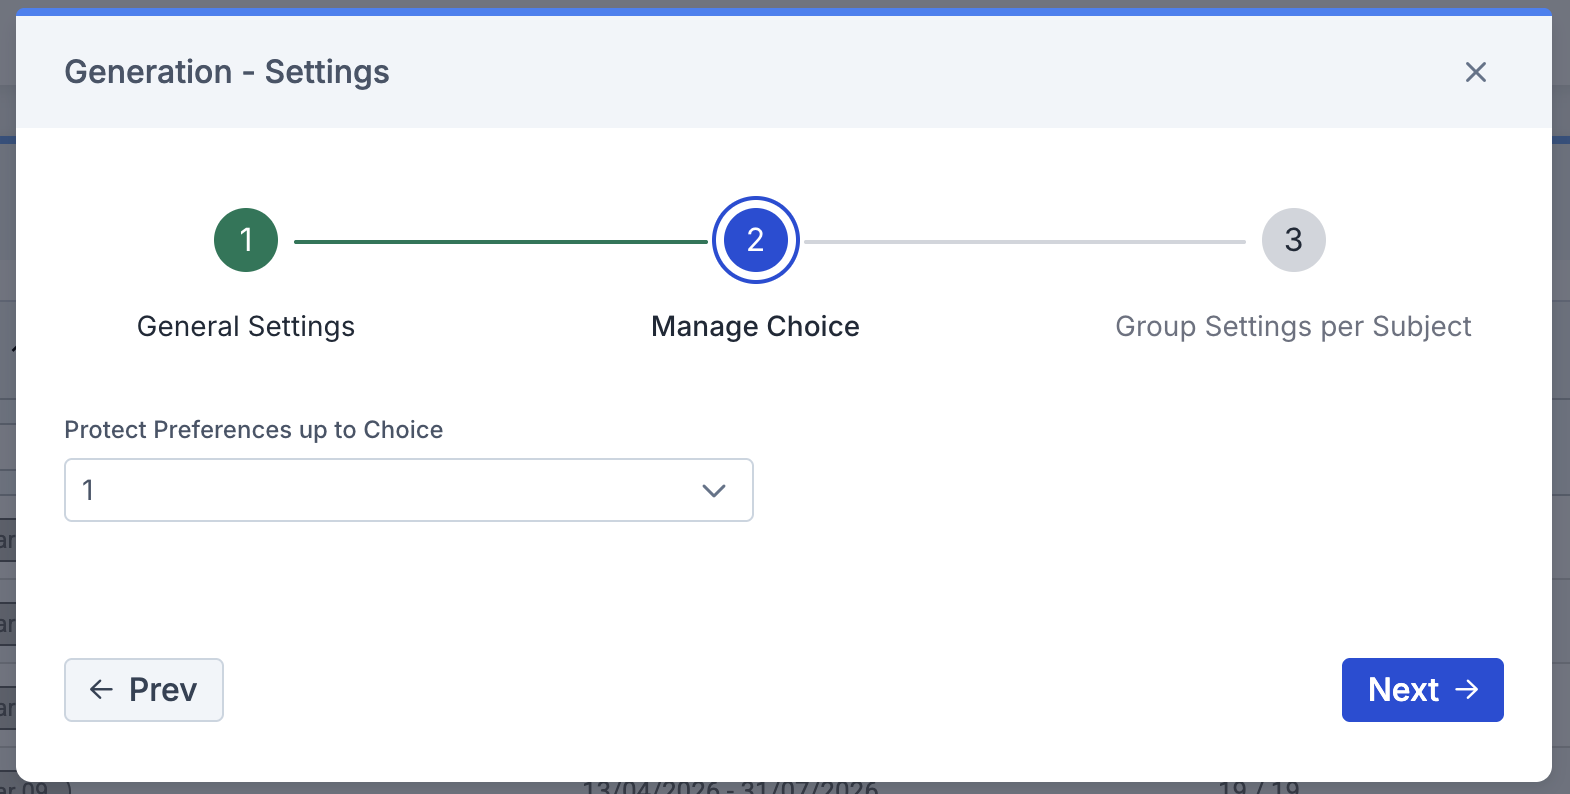
- Protect Preferences up to Choice – ranges from 1 up to the Total Choice Count (found in Options Setup wizard Step 1 Setup Details). Users will select the number of Main Choice preferences that they want to protect for example; some schools only guarantee the first choice preferences, others may wish to guarantee the first two choice preferences. Note: We would not recommend setting this to the maximum choice count available as this will restrict the permutations for satisfying allocations.
Click Next.
3 Group Settings per Subject
In this step users can amend the following for each subject:
- Min Size of Groups (default 15)
- Max Size of Groups (default 30)
- Max Number of Groups (default 1)
By default, the Clash Table Subject Parameters will pull into this step but these can be adjusted as required.
- The Subjects can be fine tuned just before generating if for example you need a 2nd Chemistry Group.
- Tip: Use the search field in the Subject column.
Click Generate to start the process.
Note: This will be a background process so logging out will cancel the action.

The Generation – Settings popup will close and the Success popup will let the user know that the process will be carried out in the background.

When finished a notification will appear in the MIS and the Patterns will be ready to View. The Status will also change to Complete.


If generating an Automatic Pattern for the second time or more, a Confirmation popup will alert the user that generating the pattern again will reset the block names and subject information table class names. Click OK to continue.

A success message will notify the user that “Generation is done.
Create a Manual Pattern
In Timetable Patterns click the eye icon and select Manual Pattern, note the Status must be Settings Required to see the eye icon.

This will open the Generation Settings wizard
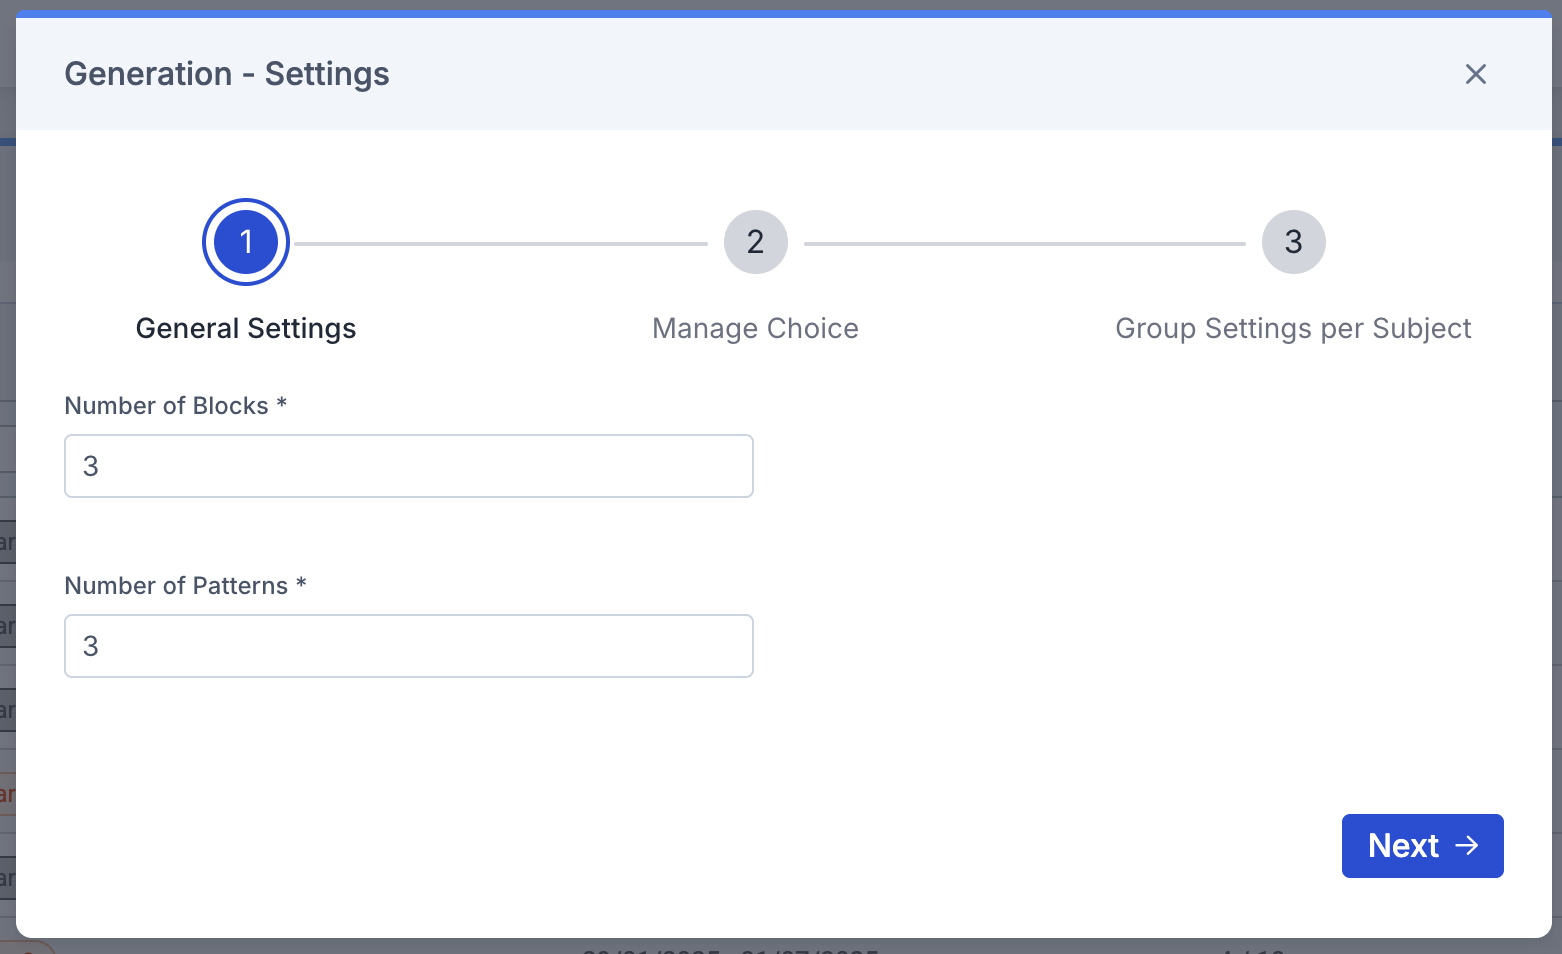
1 General Settings
Use this step to amend the following;
- Number of Blocks (>1)
- Number of Patterns (this must be between 1 and 6)
Once complete click Next.
2 Manage Choice
In this step users can include student’s reserves in the Timetable Pattern generation.
Users will manipulate the following fields to manage Reserves in Timetable Patterns:
- Protect Preferences up to Choice – ranges from 1 up to the Total Choice Count (found in Options Setup wizard Step 1 Setup Details). Users will select the number of Main Choice preferences that they want to protect for example; some schools only guarantee the first choice preferences, others may wish to guarantee the first two choice preferences. Note: We would not recommend setting this to the maximum choice count available as this will restrict the permutations for satisfying allocations.
Once complete click Next.
3 Group Settings per Subject
In this step users can amend the following for each subject:
- Min Size of Groups (default 15)
- Max Size of Groups (default 30)
- Max Number of Groups (default 1)
Tip: The Students column is read only and displays the number of students who have chosen that subject as a main choice and will aid the user to set up the appropriate number of classes for the students.
The Subjects can be fine tuned just before generating if for example you need a 2nd Chemistry Group.
Tip: Use the search field in the Subject column.
Once complete click Create.

Creating a manual pattern will overwrite any existing pattern. Click OK to continue.

Pattern Generation
Block Review: For both automatic and manual pattern generation, the process will aim, as a minimum, to generate an appropriate number of classes for each block to ensure all students can be allocated to a class without exceeding the maximum class limit.
Note: In certain circumstances the system will allow a tolerance of 10% +1 for class assignments.
- For example, 100 students selecting 3 subjects in 3 blocks with a class size of 20 min and 30 max. The system will aim to generate between 4 and 5 classes to allow students to be assigned, according to the distribution of student choices.

Subject Information: For both automatic and manual pattern generation, the distribution of student gender allocated to classes for a subject, where multiple classes exist, will be balanced but not to the detriment of the assignment of the students if this improves the overall satisfaction rate.
- For example, a subject has 60 students across 2 classes, of which 40 are girls and 20 boys, the target = 20 girls and 10 boys in each class.

Pupil Review: For both Automatic and Manual pattern generation, the distribution to classes will be balanced by key attributes: Gender, SEN, PP, and EAL so that no classes are overloaded with a particular type of student. (England and Wales only)

View Patterns
After creating an Automatic or Manual Pattern and clicking OK this will take the user to the View Patterns page (Timetable Patterns) which in the example below lists a possible three Patterns where the user will need to assign the Subjects within each Block and review the levels of Satisfaction.
In the far-right Actions column click the eye icon to View Details.

This opens the Pattern design page which is used to start to build the Manual pattern or review the Automatic Pattern.
- The pattern information is split into three separate tabs: Block Review, Pupil Review, and Subject Information.
- The pattern number and number of pupils is displayed in the top left-hand corner in the page header.
- The Satisfaction levels are displayed in the top-right corner in the page header.
- In each of the three tabs, an information bar in blue provides instructions to the user.

Satisfaction Calculations
- Allocation Satisfaction will calculate the student allocations as a percentage of possible student allocations for all subjects including reserves.
- In the example below, the administrator has overridden the number of choices rule for some students, for example:
- Student 1 has an Allocation 3/3
- Student 2 has an Allocation 4/4
- Student 3 has an Allocation 2/4
- The Allocation Satisfaction for all students= allocated subjects as a percentage of possible allocated subjects = 9/11 which would show as 81%
- In the example below, the administrator has overridden the number of choices rule for some students, for example:
- A second metric Main Choice Satisfaction will calculate student allocations as a percentage of possible student allocations for Main Choices only.
- For example:
- Student 1 has an Allocation 3/3 where all main choices have been met = 3/3
- Student 2 has an Allocation 4/4 where 3 main choices and 1 alternative have been chosen =3/4
- Student 3 has an Allocation 2/4 where 2 main choices have been chosen =2/4
- The Main Choice Satisfaction for all students = 8/11 which would show as 72%
- For example:
Subject Information
Assign Subject Classes – For Manual Patterns
In the Subject Information tab, assign Subject classes to Blocks as required.

Double click in the Block cell and then selecting a Block from the dropdown.
Note: The Class Name column updates as Blocks are assigned.

Once complete click Apply Changes

A popup will prompt the user to confirm OK that “Subject classes with Blocks will be added to the Block design”

Reassign Subject Classes – For ALL Patterns
- Users can reassign a subject/class to a different block by double-clicking the block’s cell and selecting a new block from the dropdown list.
Note: The system will relocate the class to the new block whilst aiming to assign students to their original choices. If moving between blocks creates conflicts and prevents students from being assigned to their original choices, those students will be unassigned within the original block.
- Users can now save their changes to the block column by clicking the Apply Changes button. This will save all changes made before leaving the Subject Information tab.
- A pop-up message titled Apply Selected Blocks will appear, prompting the user to confirm. It will also notify the user that, if any conflicts arise when moving classes between blocks, the affected students will be marked as unassigned pupils in the new block.
- If a user tries to leave the tab without clicking Apply Changes, an Unsaved Changes pop-up message will appear, prompting them to save their changes.
Block Review
Assign Pupils – For Manual Patterns
In the Block Review tab, assign Pupils to classes for each Block.
Each Block has the following column headers Subject (code), Class (code), and Count.
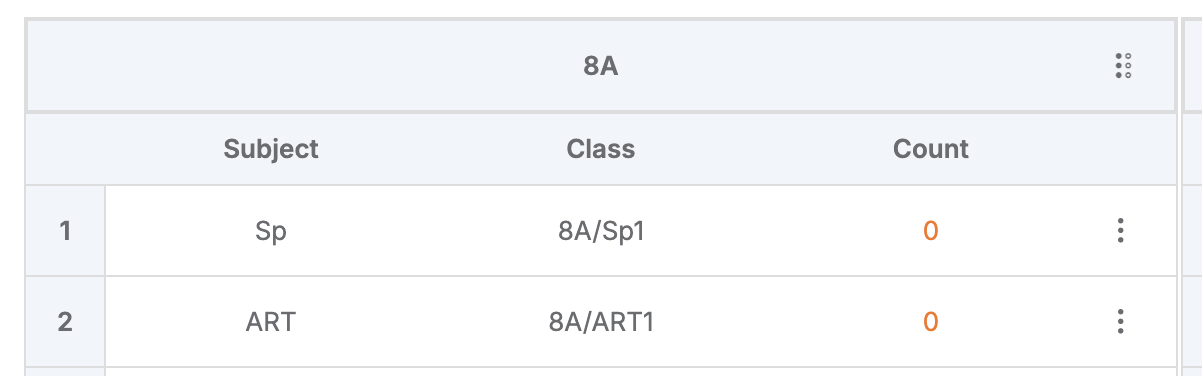
Click on Pupils Unassigned, for each Block one at a time.
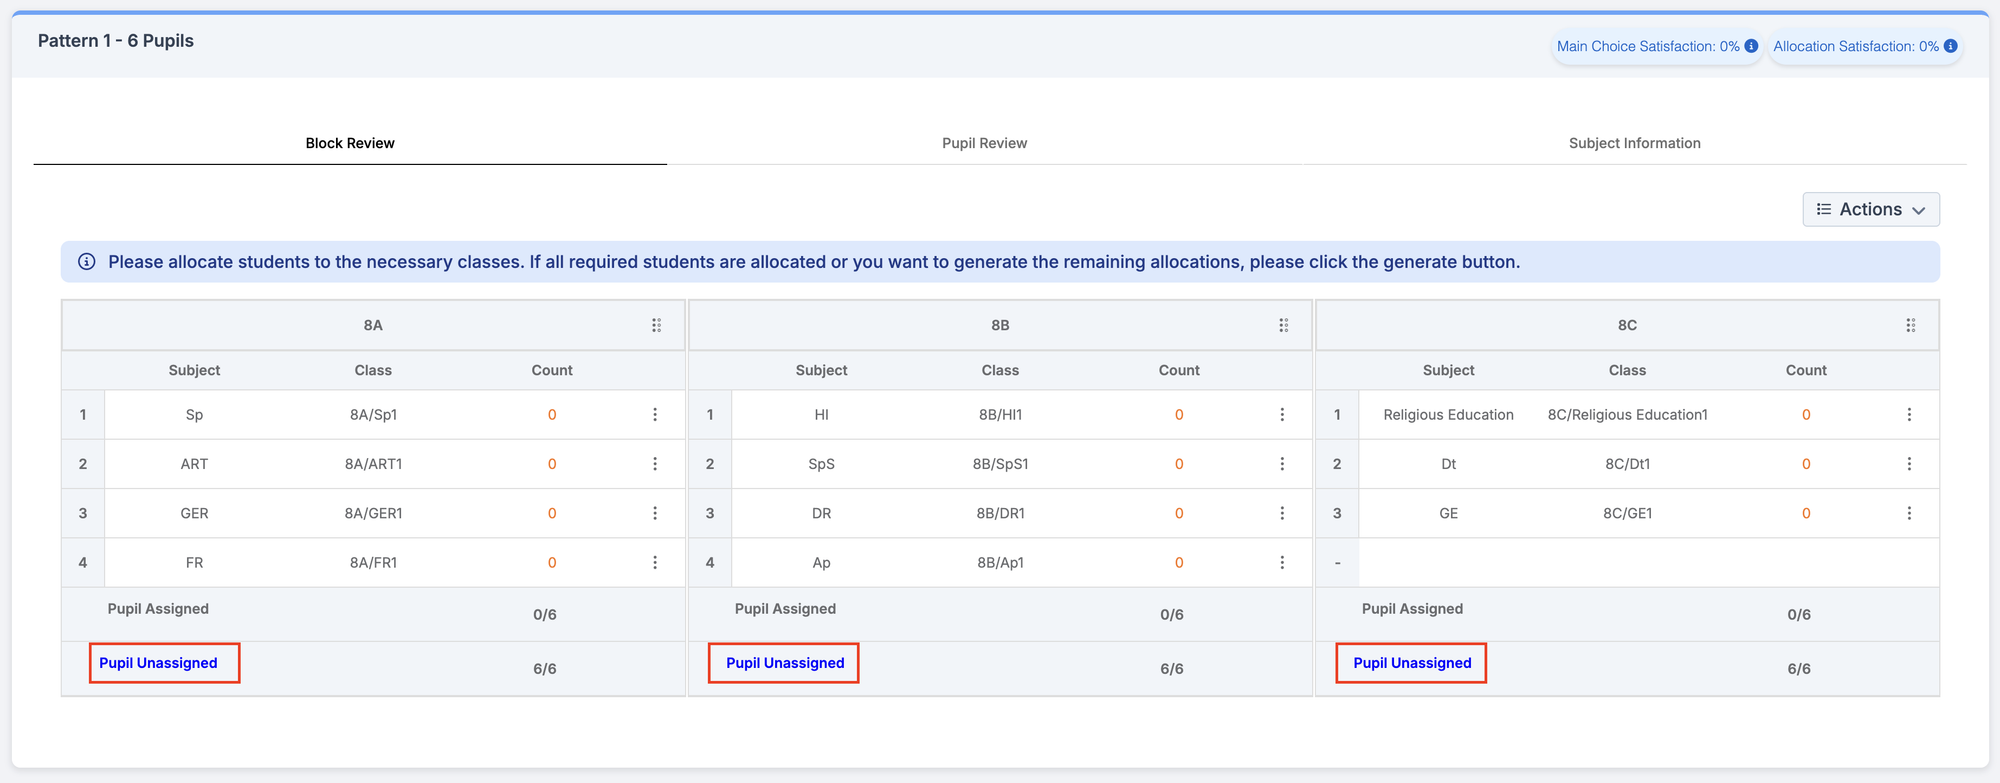
After clicking on Pupil Unassigned, click on the red text in the Unassigned Subjects column, one row at a time to assign Students to Subject Classes from the Unassigned Subjects column and to lock them into the class and protect them.
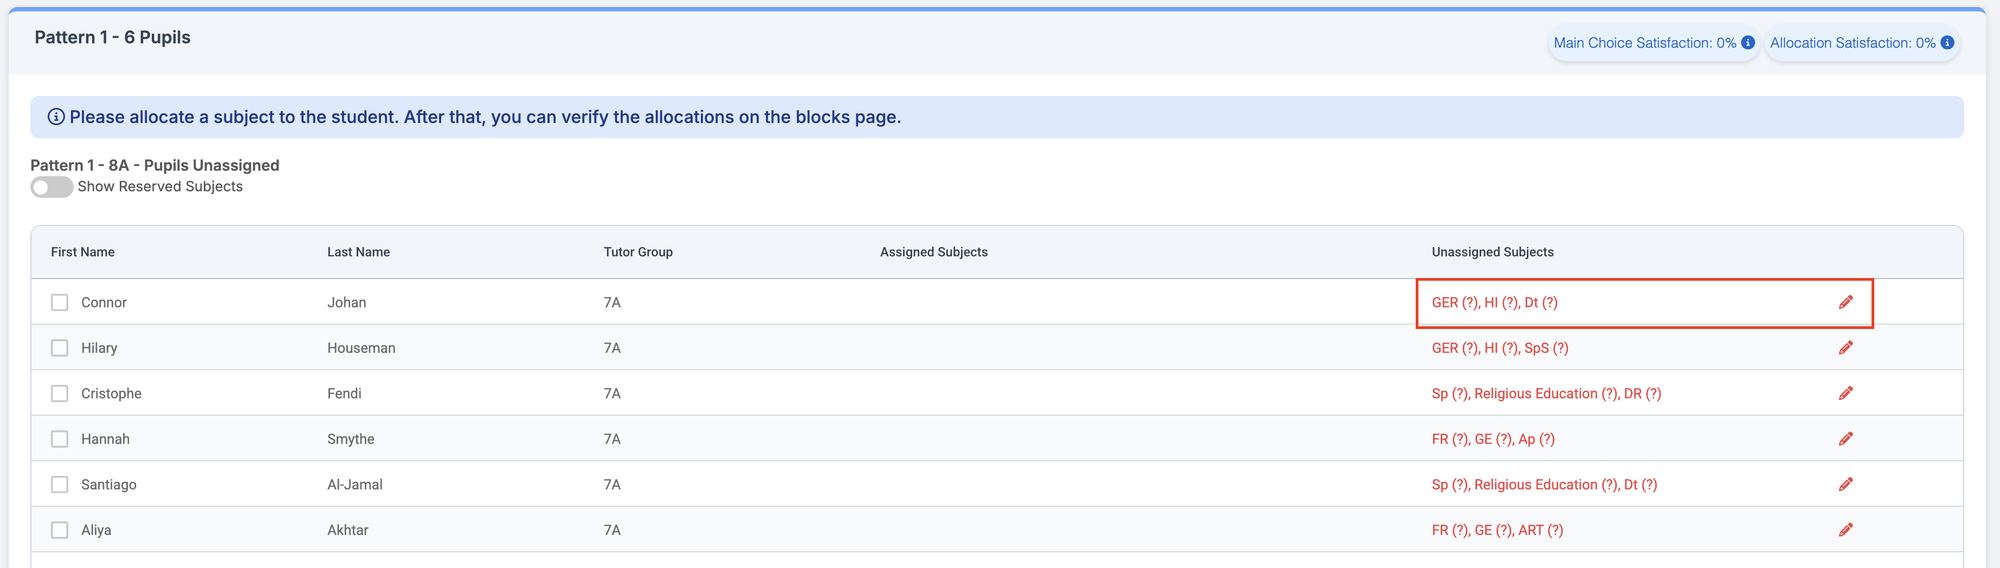
Select a Subject from the dropdown and click Save.
Note: Students who have Subjects assigned to them will drop off the Pupils Unassigned list.

Click Back to repeat for the next Block.
Reassign Pupils – For ALL Patterns
For all patterns in the Block Review tab users can reassign a subject/class to a different block by clicking on the three dots, selecting Move to, and choosing the new block.
Note: The system will relocate the class to the new block whilst aiming to assign students to their original choices. If moving between blocks creates conflicts and prevents students from being assigned to their original choices, those students will be unassigned within the original block.
Generate a Manual Timetable Pattern
Each pattern can be designed independently. Simply click the Generate button, and a new pattern will be created specifically for the one you’re working on.
Any Subjects unassigned to a Block will be added and populated automatically during this process. When Generation is complete, the Generate button is greyed out, click View Others to generate the remaining patterns.
Important: We recommend that users do not log out whilst the pattern is being generated.
Pupil Review
In the Pupil Review tab, users can see class assignments by block for each student, where they can:
- Assign Subjects to Blocks
- Unlock a class
- Remove a class
- Export
- View subjects and classes for each block
- View student choices in order of preference
- View student’s original choices
- View the number of allocated subjects
- View Choice Satisfaction
Assign Subjects to Blocks by clicking on the pencil icon for the relevant block, selecting a subject from the dropdown and clicking Save.

If a subject is linked to multiple classes, each class will appear individually and in sequence. This update makes it easier for users to distinguish between classes when a subject is associated with more than one.
Unlock a class (Shuffle ignores locked classes) by clicking on the blue padlock icon.

Remove a class (unlocked classes only) by clicking on the bin icon.

Export the table to PDF by clicking on Export.
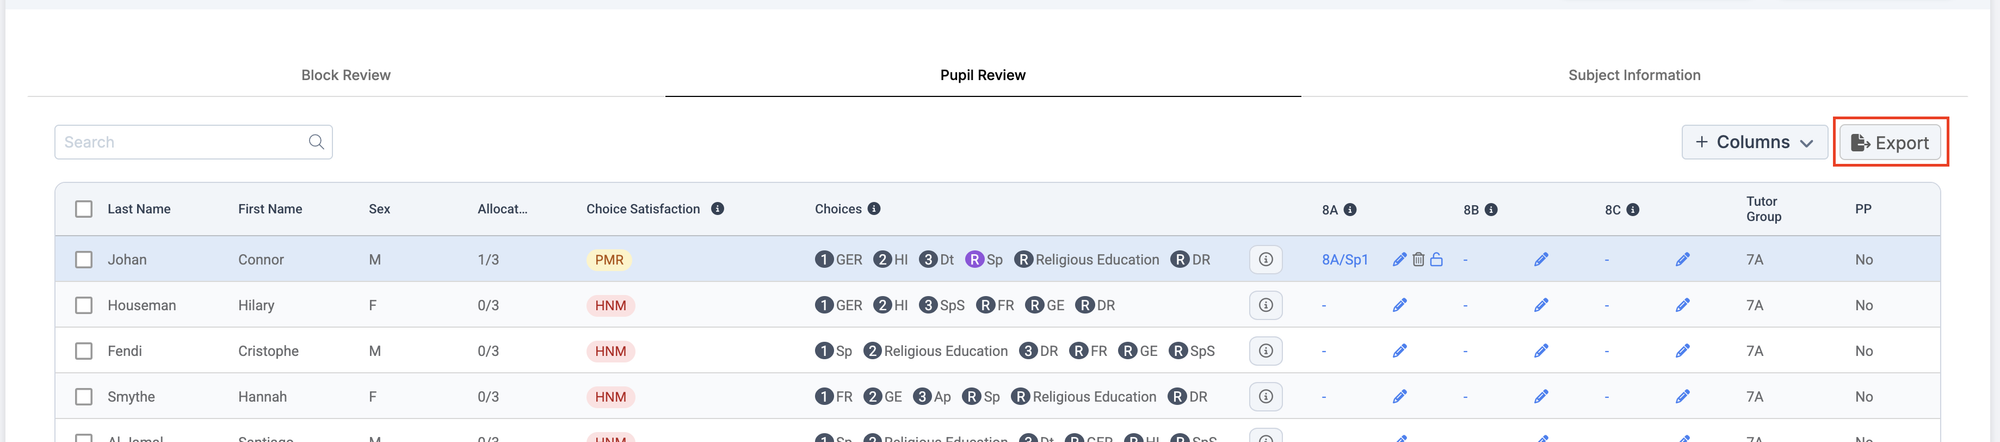
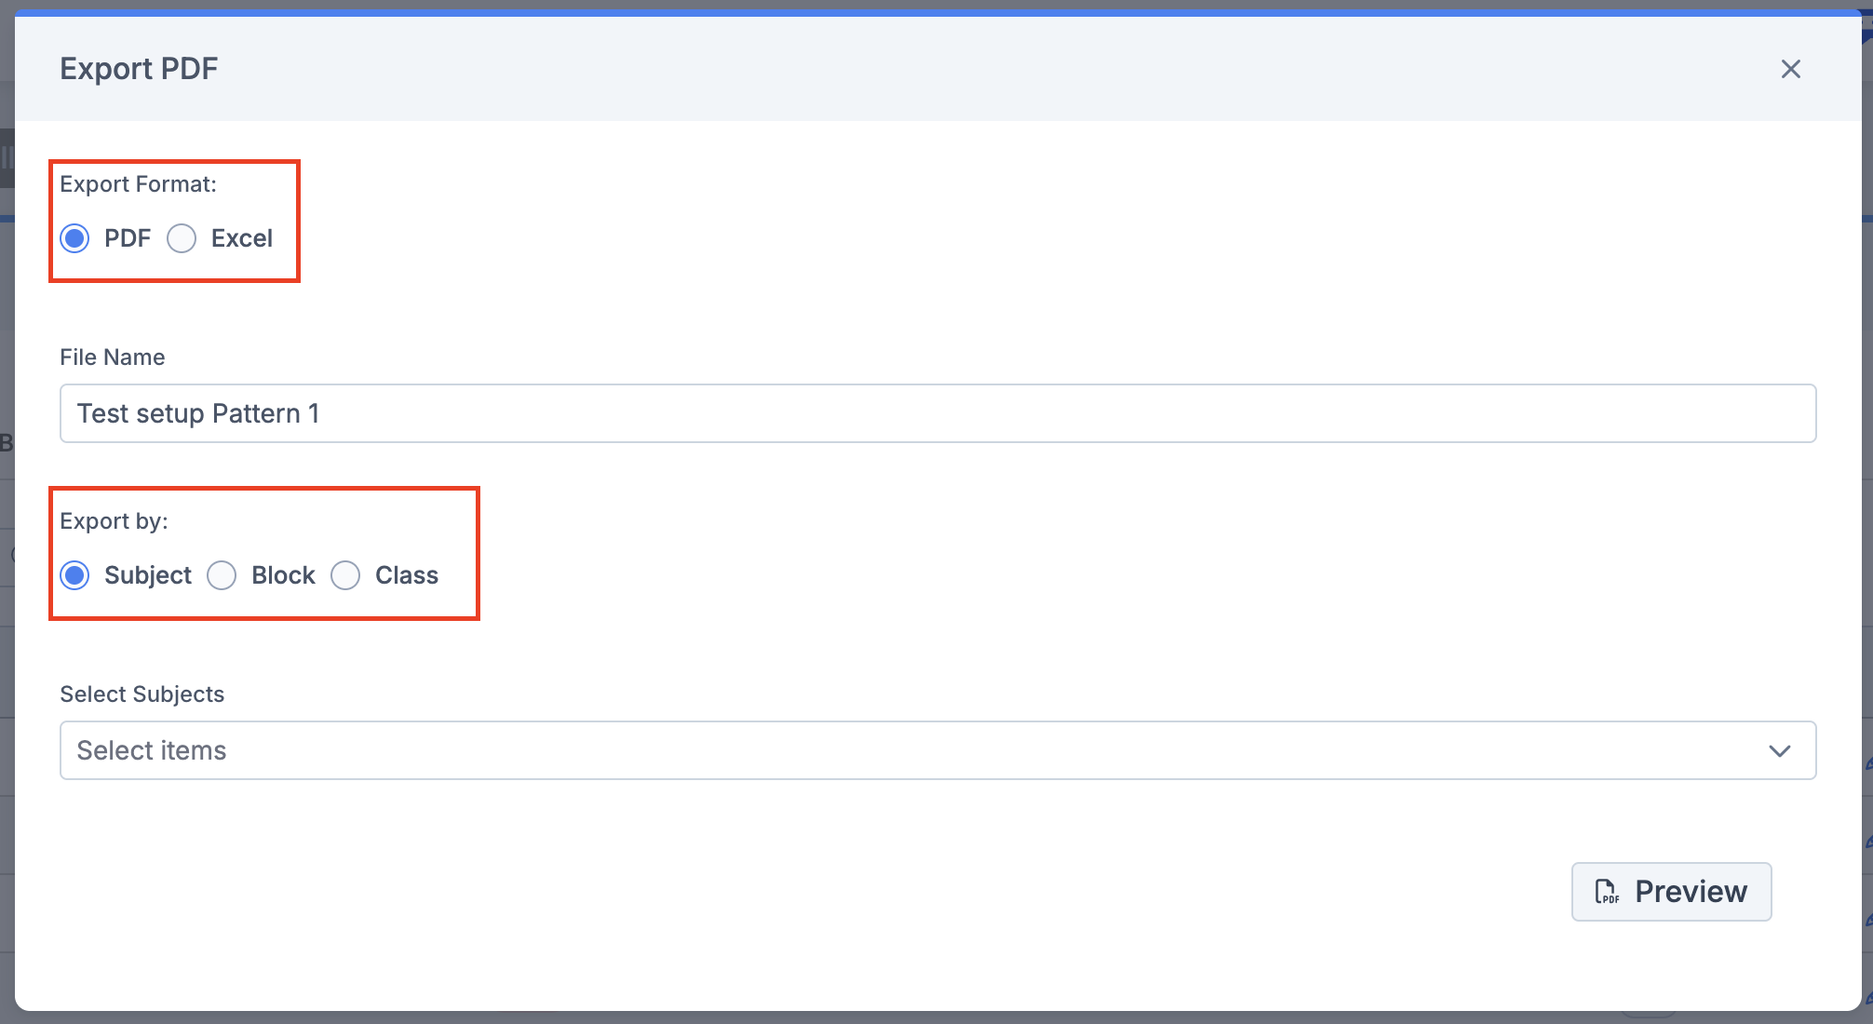
Clicking on Export, users can choose to export a PDF or Excel file, enter a label for the File Name (this defaults to the Timetable Pattern Name), and choose whether to Export class lists by: Subject, Block or Class – and selecting one or more options from the dropdown list. You can also Preview before exporting.
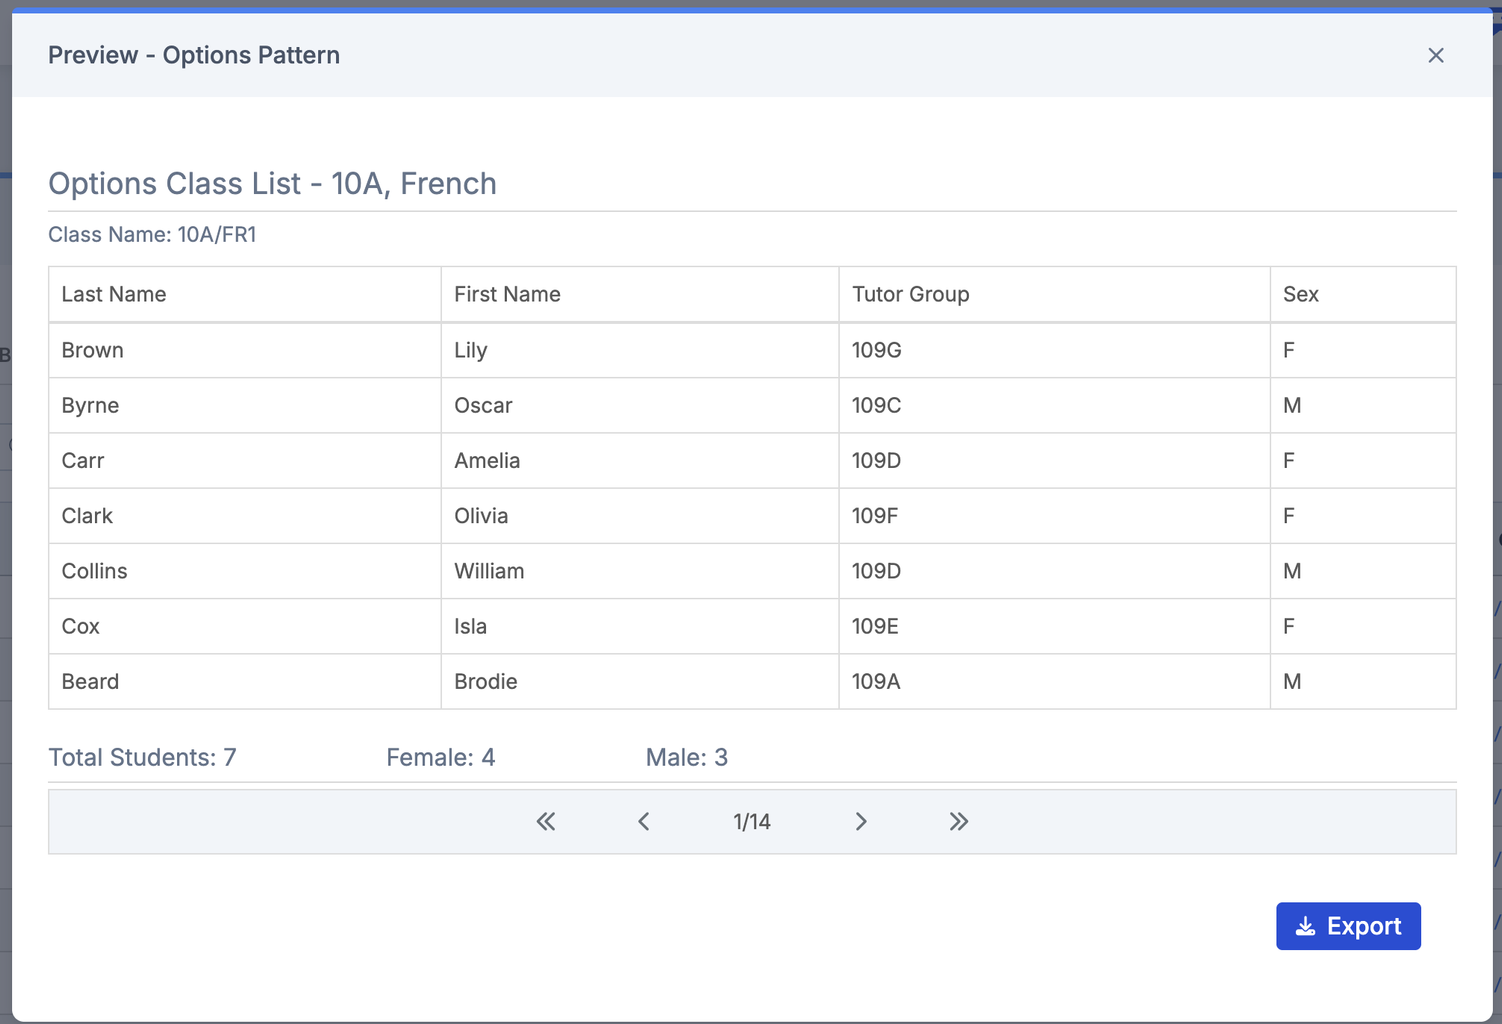
Clicking Preview opens the Options Class List for the chosen Subject and Block, with one class (up to 30 students) per page. Users can click Export PDF from here.
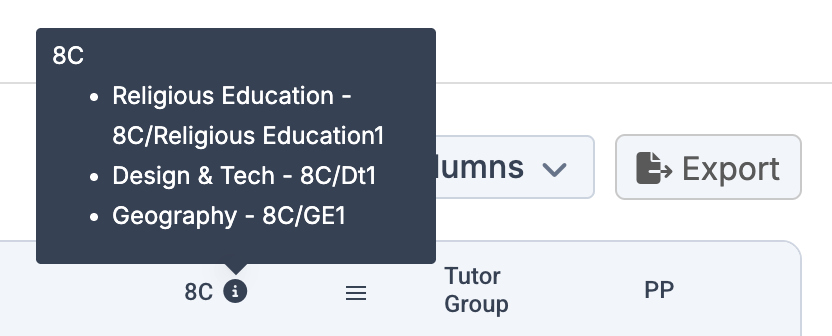
View subjects and classes for each block by hovering over the i icon for each block.
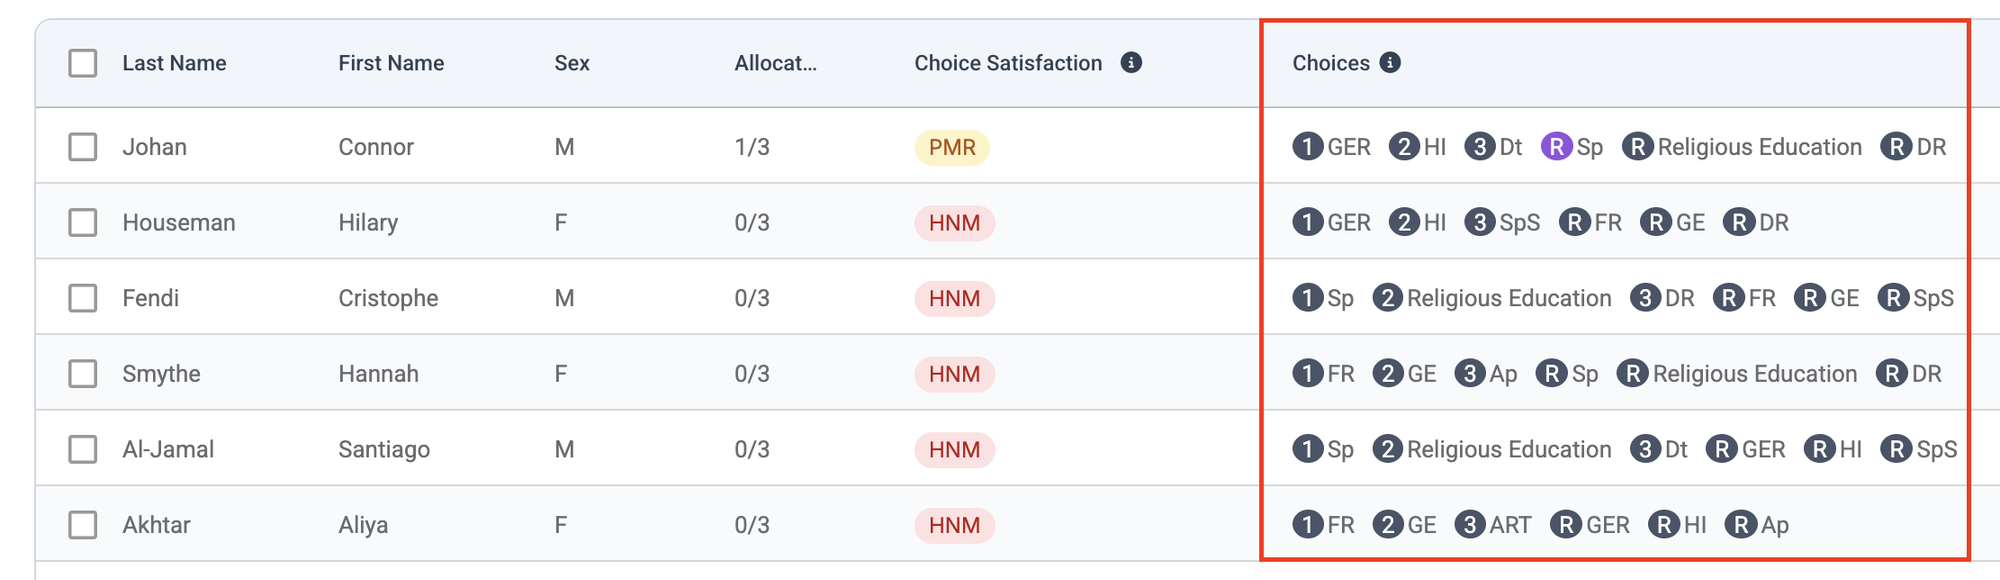
View student choices in order of preference in the Choices column which displays the main choice subject codes in order of preference. The circular badge displays the choice number, and highlights whether the allocation matched the pupil’s choice using colour coding.

View student’s original choices by clicking on the i icon in the Choices column users will see subjects listed with their corresponding classes.

View the number of allocated subjects in the Allocation column which displays the number of allocated subjects and the number of chosen subjects (this new column replaces the Count and Choice Total columns).

View Choice Satisfaction in the colour coded column (filterable) which displays the success of the allocations.
- Colour coded green:
- All – All choices met e.g. Allocation 4/4
- Colour coded yellow:
- PM – Partially met e.g. Allocation 2/4 (only main choices)
- PMR – Partially met including reserves e.g. Allocation 3/4 and at least one of the allocations is reserve
- PMA – Partially met including alternatives e.g. Allocation 3/4 and at least one of the allocations is alternative
- PMAR – Partially met including reserve and alternative e.g. Allocation 3/4 and at least one of the allocations is a reserve and one is an alternative
- Colour coded purple:
- ALLR – All OK includes reserve e.g. Allocation 4/4 and at least one of the allocations is reserve
- Colour coded blue:
- ALLA – All OK includes alternative e.g. Allocation 4/4 and at least one of the allocations is alternative
- ALAR – All OK includes reserve and alternative e.g. Allocation 4/4 and at least one of the allocations is a reserve and one is an alternative
- Colour coded red:
- HNM – No choices met e.g. Allocation 0/4

Auto Allocate
Users can reallocate students within a timetable pattern using the Auto-Allocate feature.
Auto-Allocate assigns students to subjects fairly and consistently, using these key factors as intended:
Auto-Allocate assigns students to subjects fairly and consistently, using these key factors:
- Preferences: Auto-allocate is to use submitted student preferences to ensure that the students receive their choices as per their preference order.
- Balancing Students: When a subject has multiple classes, the system spreads students as evenly as possible across them, both within the same block and across different blocks.
- Balancing is applied when multiple classes of the same subject exist within the same block.
- Balancing is applied when the same subject is available across different blocks
- Preferences always take priority.
- ‘Weighted Subjects’: Weighted subjects span multiple blocks, and when a student is assigned to one block, they are automatically enrolled in all blocks for that subject as a single package.
This allows for greater flexibility and optimisation of student placement, whether to reassign all students or only those currently unallocated—based on their preferences and system allocation rules.
This function allows users to modify a pattern’s allocations, and compare the results with the original or other patterns.
The Auto-Allocate button is available on individual Pattern pages.
- Manual Patterns: Button is disabled until a pattern is generated.
- Automatic Patterns: Button is enabled once the pattern is generated.
When clicked, users are presented the following popup:

After proceeding, users will receive a success message indicating that the process is running in the background and may take a few minutes. A notification will confirm when the process is complete.
Set as Final
In Timetable Patterns > View Patterns, select the pattern and click Set as Final.
Once a Timetable Pattern has been Set as Final it can then be imported into the wTimetable > Subject Information tab and in Reporting can be used to create a Web Merge Report based on the final allocation.

Where 100% student assignment is not achieved in the selected pattern, users will be asked if they want to continue, click Proceed.
A Final badge is displayed next to the pattern. To remove Final status, users should select the pattern where Final is already set, and click Remove Final.
Note: A pattern should only be Set as Final once all Students have been assigned and the user is satisfied this will be the final pattern. Where set ups need to be combined to produce the final pattern, future development will also provide a single cohort to this end.

A Final flag is also visible in the Status column in the Timetable Patterns screen, making it easy to identify which patterns have a pattern marked as Final.

Note: The system allows only one Final timetable pattern per year group per academic year. When a user attempts to set a timetable pattern as final, the system will validate that no other Final pattern already exists for that year group within the same academic year. If a Final pattern is already present, the system will display a warning message. Selecting Proceed updates the Final pattern; selecting Cancel leaves everything unchanged.
Publish Final Allocated Subjects
Go to Reports > Quick Reports.
- The Data Item Final Allocated Subjects, appears as a set of columns showing the choices assigned to each student in an Options Setup. These columns directly reflect the allocations displayed in the Pupil Review tab of Timetable Patterns.
- These fields can be used in Web Merge to create accurate personalised Word or PDF documents that can then be published to students (via Student Portal) and parents (via MCAS).
- The Final Allocated Subjects includes up to ten columns, labelled Subject A to Subject J.
- Allocated subjects appear in the same order as shown in the Choices column of the Pupil Review tab.
- If the timetable pattern includes fewer than ten subject choices, select only the number of columns required; any remaining columns will remain blank.
- Double‑ or triple‑weighted subjects will be shown only once in the Final Allocated Subjects columns.
To create the Quick Report above, follow the following steps:
- Navigate to Modules > Options > Timetable Patterns:
- Make a note of the “Complete” Timetable Pattern Name and the “Final” Pattern Name.
- Navigate to Reports > Adhoc > Quick Report:
- Open the Options domain:
- Switch the dropdown “Students (Basic)” to Options.
- Add Data Items to the Report.
- Filter by Options Setup:
- Select All Date Intervals & Filters. Select Filters tab. Click Add Filter. Select ‘Filter Items: Options Name‘, ‘Operations: equals‘, and ‘Filter Value: Timetable Pattern Name‘. Click Add.
- Filter by Timetable Pattern:
- Select ‘Data Item: Options Patterns’. Select Filters tab. Click Add Filter. Select ‘Filter Items: Pattern Name‘, ‘Operations: equals‘, ‘Filter Value: Final Pattern Name‘. Click Add.
- Click Save.
- Open the Options domain:
Combined Setups
- The combined setup pattern must be Set as Final.
- Users must select all single setups within the combined setup in Options Name, using the ‘in’ operation.
- Where multiple patterns exist, users must also apply a filter for the Pattern Name that has been Set as Final.
Note: Combined setups will not display any student data in Quick Reports unless the timetable pattern is Set as Final.
Follow the Help Centre guide to create a Web Merge How to use Quick Reports to Create a Web Merge Document.
How To in Block Review and Subject Information
This section looks at the following How To’s in Block Review and Subject Information
- Block Review: View and Amend Students, Subjects and Classes
- Block Review: Move class to another block, Remove Subject and Remove Student
- Block Review: Remove all students/ Remove all subjects
- Block Review: Remove all students from all blocks / Remove all subjects from all blocks
- Block Review: Remove Students from a Subject
- Block Review: Copy Class Without Pupils
- Block Review: View Unassigned Pupils
- Subject Information: Export
- Subject Information: Assigned and Unassigned Student list
Block Review: View and Amend Students, Subjects and Classes
View and Amend Student Choices – Click on any subject count (number will be in red if it is over the subject setting but within 10% by default) to see Students and amend choices. Click Save.

Block Review: Move class to another block, Remove Subject and Remove Student
Click on the 3 dots to the right of each class to Move the class to another Block , Remove Subject, Remove Students, and Copy Class Without Pupils.

Block Review: Remove all students/ Remove all subjects
Click on the 6 dots to the right of the Block to Remove all students or Remove all subjects from the block.

Remove all students
- Removes all students from the selected block.
- All students will be moved to the Pupil Unassigned section.
- Weighted Subjects and Dependent Combinations: If a student is removed from a class in one block, they will also be removed from any linked classes in other blocks.

Remove all subjects
- Removes all subjects from the selected block.
- All students will be moved to the Pupil Unassigned section
- All subjects will appear in the Subject Information tab with no block association.
- Weighted subjects and Dependent Combinations: If a subject is removed, students will also be removed from any linked classes in other blocks.

Block Review: Remove all students from all blocks / Remove all subjects from all blocks
To remove across all blocks, click the new Actions button to select whether to remove students or subjects:
Note: A confirmation popup will appear asking if you want to proceed.
- Remove all students from all blocks
- Removes all students across all blocks.
- All students will be moved to the Unassigned Pupils page.
- Remove all subjects from all blocks
- Removes all subjects across all blocks.
- All students will be moved to the Pupil Unassigned section within each block.
- All subjects will be listed in the Subject Information tab without any block association.
Block Review: Remove Students from a Subject
Students can be removed from a Subject in a Block by clicking on the row in the Student count column.
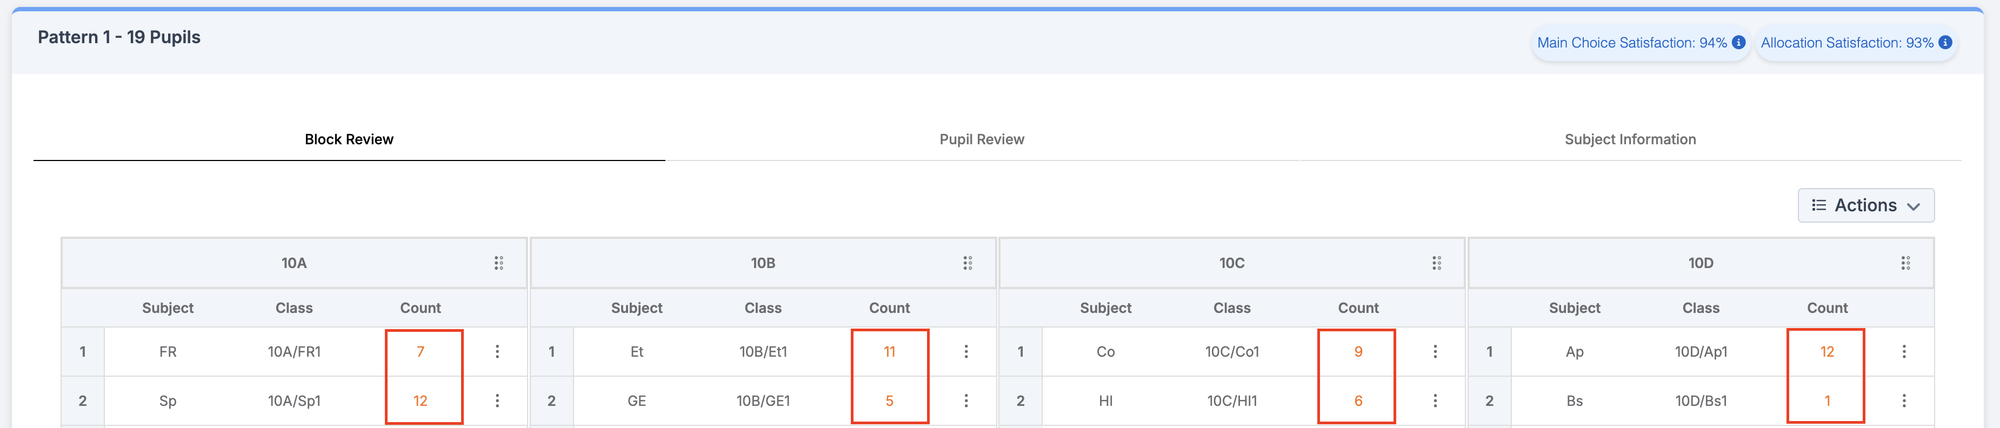
Tick the check box against the Student’s name and click Remove. Those Students will be added back to the Pupils Unassigned list for that Block.

Block Review: Copy Class Without Pupils
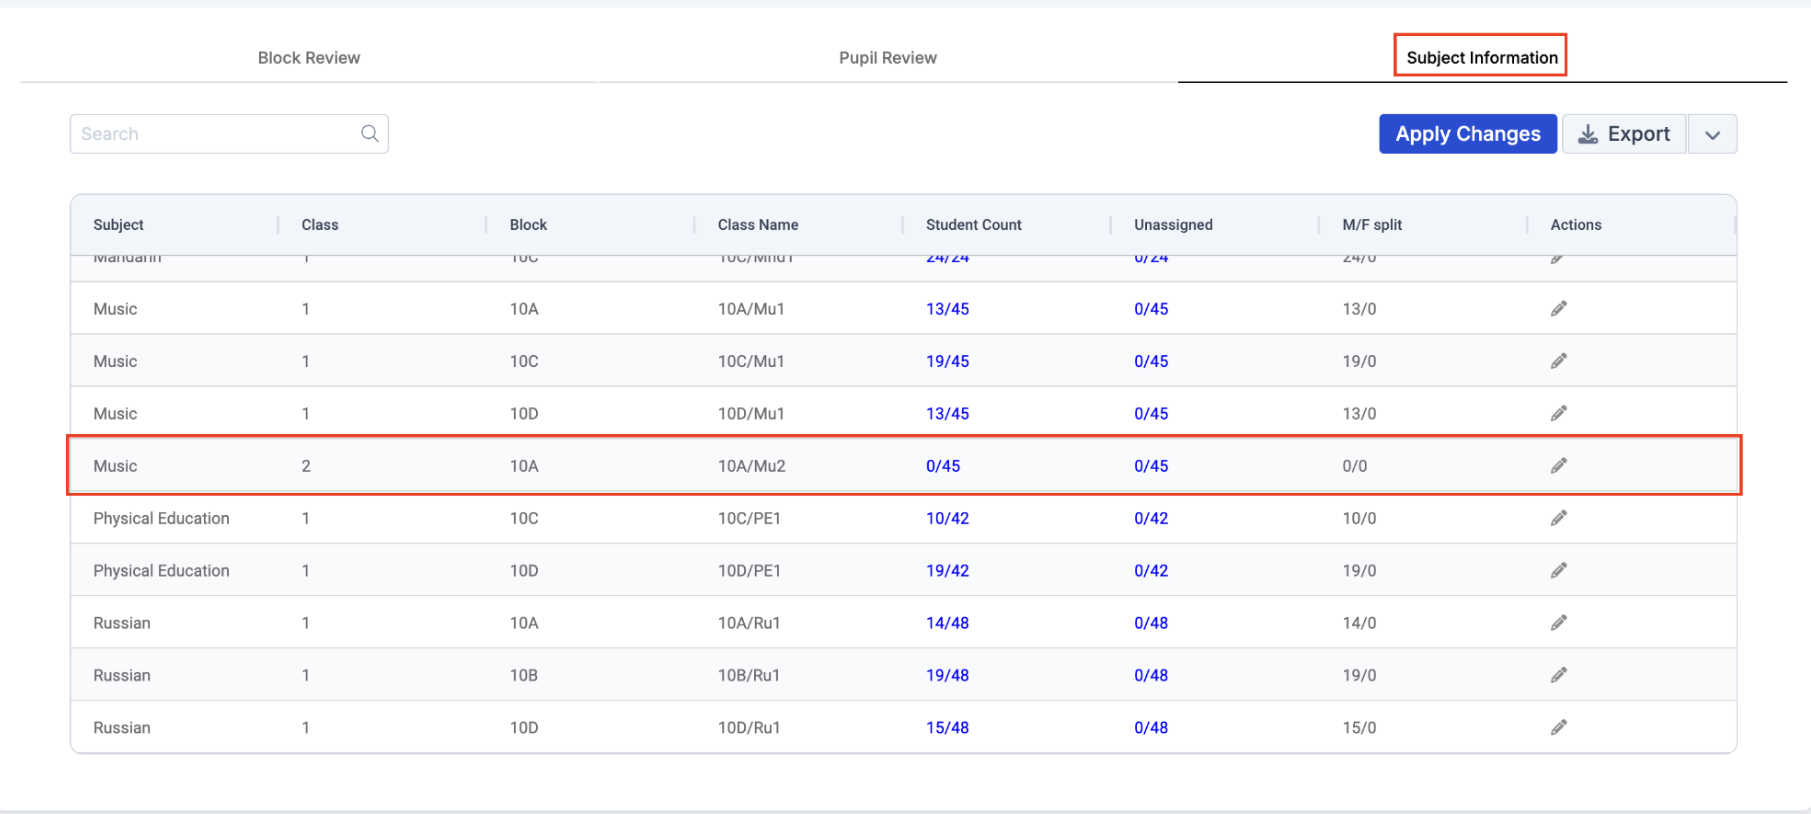
This feature allows users to create a copy of a class in the Block Review tab when viewing patterns. Clicking on thethree dots and the option Copy Class Without Pupils will create a copy of the Subject, Class andBlock, without pupils.
Exceptions: The ability to copy a class does not apply currently for weighted subjects which is an additional development.
Users will be asked to Confirm the copying of the class.
The class will be added to the bottom of the list in the Block tab and labelled appropriately. E.g. Class 10A/Mu1 was copied in Block A and a new class 10A/Mu2 was added to the list in Block A.
The new class will be added to the Subject Information tab.
Block Review: View Unassigned Pupils
This will display all the Students whose choices cannot be fulfilled in that block

Subject Information: Export
In Subject Information in the selected Pattern, select Export dropdown arrow and Export Allocations.

Export Example

Subject Information: Assigned and Unassigned Student list
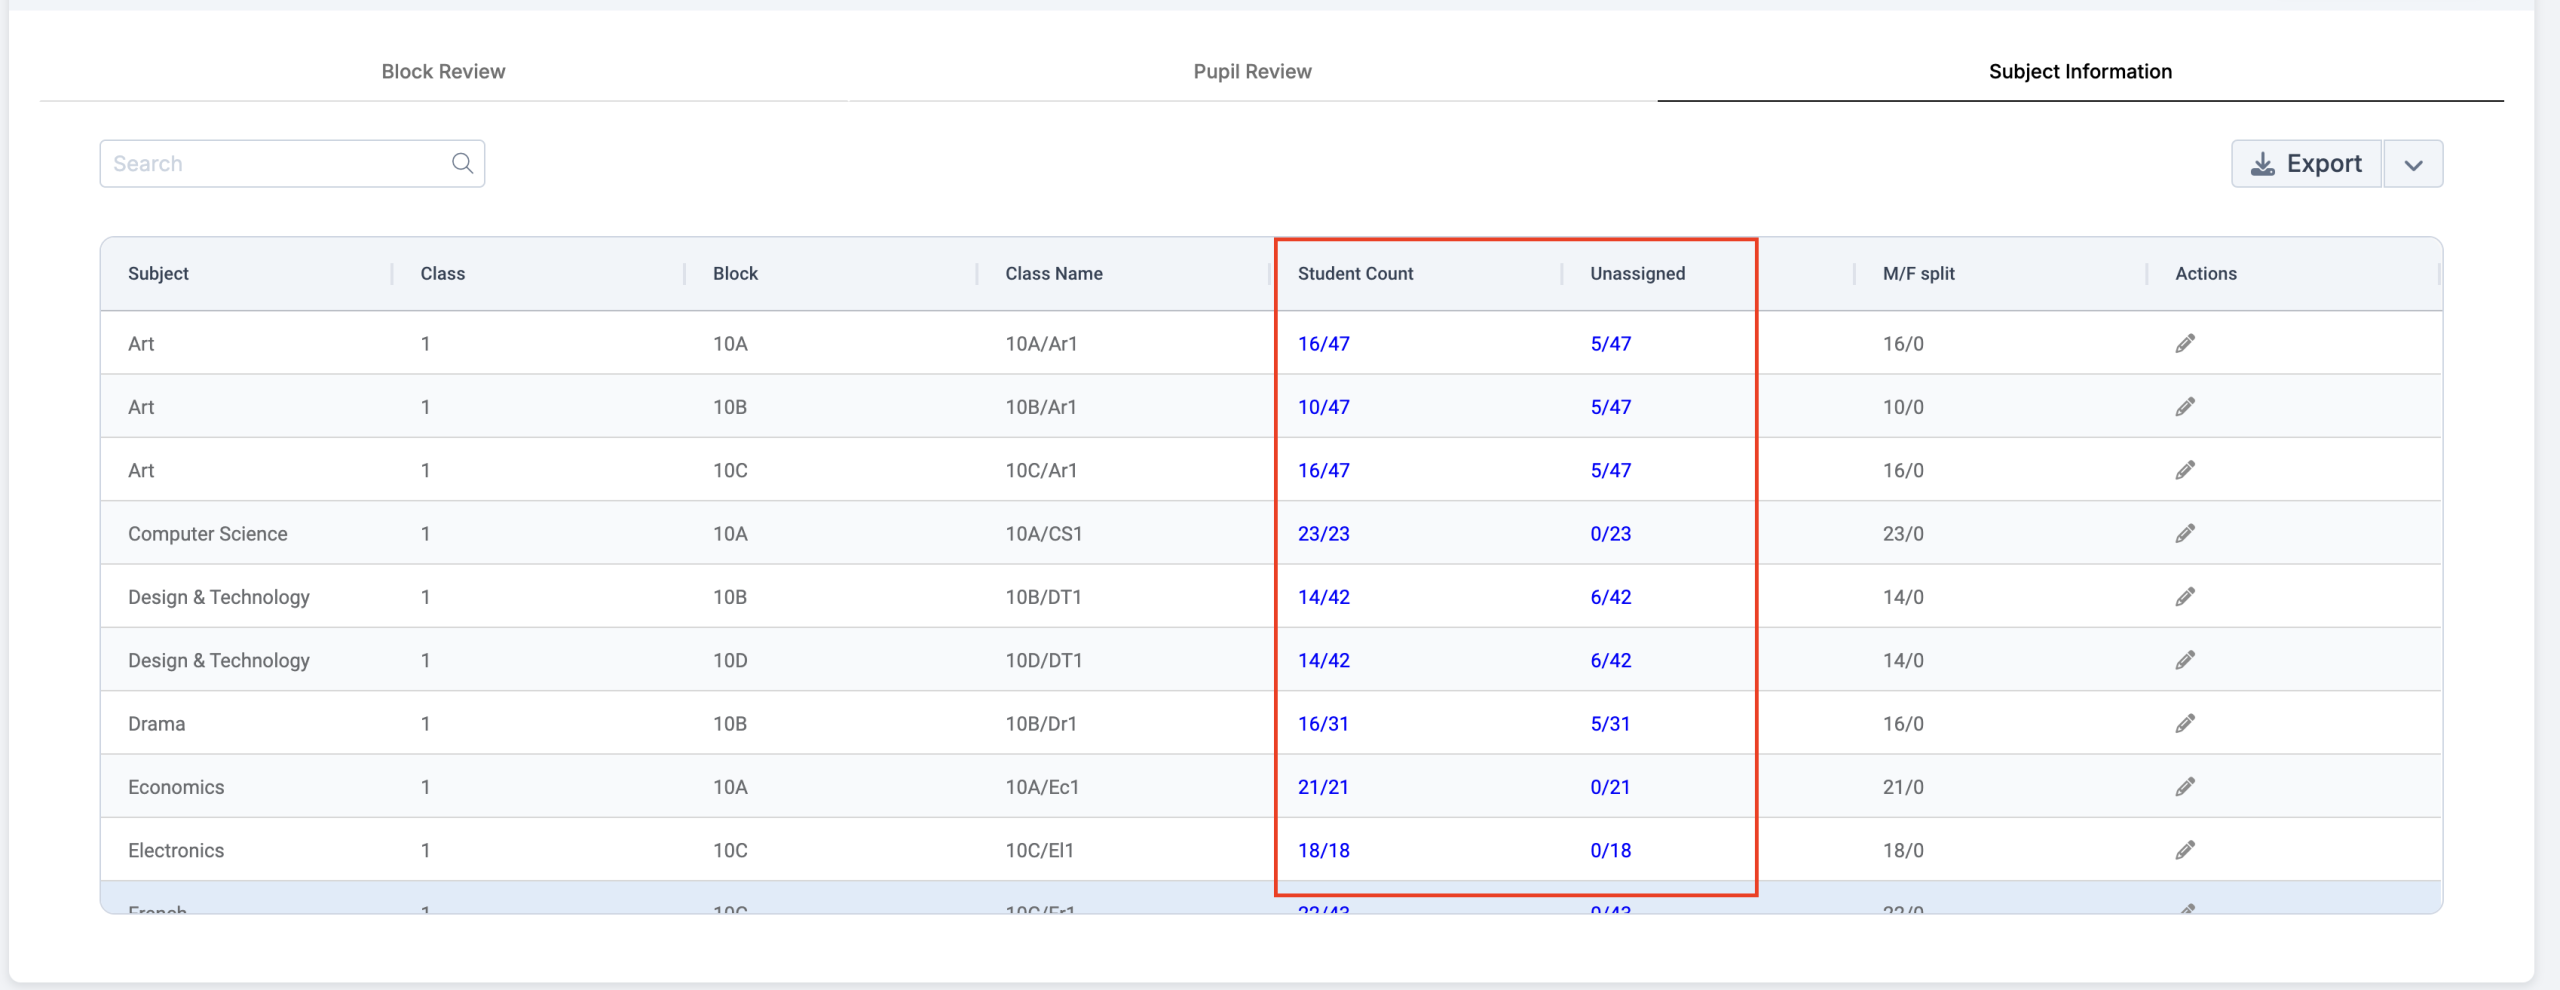
In Subject Information, click on Student Count or Unassigned to see a Student list.

How to in View Patterns
- View Subjects per Block
- Copy, Rename and Delete Patterns
- Create New Patterns
- Reset Timetable Patterns
View Subjects per Block
Hover over the Pattern Name to reveal the full name and a table of Subjects per Block.
Copy, Rename and Delete Patterns
In the Actions column, users can now Copy, Rename, and Delete patterns, in addition to the existing option to view them.
- Rename pattern (Pencil icon): Rename a pattern with a unique name.
- View Details (Eye icon): Opens Block Review, Pupil Review, and Subject Information.
- Copy pattern (Paper icon): Creates a duplicate of the selected pattern, including blocks and subjects only. The copy is automatically named “Copy of [Pattern Name]” but can be renamed. If the original pattern is marked Final, that status will not carry over.
- Delete pattern (Bin icon): Allows multiple patterns to be deleted with a confirmation prompt. Patterns marked as Final must be unmarked before they can be deleted.
Create New Patterns
When the New button is selected, a pop-up allows the user to name the timetable pattern. The system then creates a blank template, enabling users to build a new pattern from scratch, and saves it in the table. Users can click View Details in the Actions column to make manual changes using the existing functionality.
Reset Timetable Patterns
Back on the Timetable Patterns page, the Actions buttons have been updated based on pattern status, with a new Reset option available when the status is Complete:
- Complete: View Patterns and Reset Patterns are enabled; Timetable Patterns Settings is disabled.
- Settings Required: Only Timetable Patterns Settings is enabled; View and Reset are disabled.
The new Reset Patterns icon allows users to clear all previous configurations and revert the pattern/setup to a Settings Required status. From there, users can start fresh by choosing Manual or Automatic setup and proceed through the process as usual.
When Reset Patterns is clicked, a confirmation message appears:
After resetting, only the action is enabled, allowing users to restart the Timetable Pattern setup.