This page contains the following guidance for completing the Wales Post 16 Data Collection 2026. It will be updated as and when we receive updates from the Welsh Government.
- Important Dates
- Pre Data Collection Checks
- Updating Existing Programmes and Learning Activities
- Post 16 Data Collection Process
- Post 16 Setup for the New Academic Year
For further information, documentation and links to live training for the Post 16 Data Collection see here.
IMPORTANT: It is the school’s responsibility to review the Welsh Government guidance to ensure all required information is submitted as part of the data collection.
- For Welsh Government documentation and guidance on Post 16 Data Collections, please see here. (Note: the Welsh Government has not yet released the 2026 guidance).
Important Dates
- Data on Post-16 Pupil Learning Activities is required for the previous academic year (2025/26).
- DEWi opens for Post-16 data submission on Tuesday 15th September 2026.
- Deadline for data submission is Friday 9th October 2026
THE SCREENSHOTS USED IN THE GUIDE ARE FOR ILLUSTRATION PURPOSES ONLY AND MAY DIFFER IN A LIVE SCHOOL’S MIS.
- Expand each item for guidance on preparing the Post 16 Data in Bromcom.
- To print this as a checklist, click ‘Collapse All’ (button on the right), then right-click the page and select ‘Print’.
- To print this as a full guide, click ‘Expand All’, then right-click the page and select ‘Print’.
Pre Data Collection Checks
The Post 16 Data Collection collects data for pupils who:
- Are taught in National Curriculum (NC) Years 12, 13 or 14 in secondary and middle schools with designated sixth forms in Wales.
- Have an Enrolment Status of:
- C – Current (single registration at this school)
- M – Current main (dual registration)
- Are 19 years of age or younger on 31 August 2025.
The following School Identifiers are included in the return:
- Local Authority Number
- School Number
- School Name
- School Phase
To check the Local Authority Number, School Number and School Name navigate to Config>Administration>Core Details

Please note, the example below is for illustration purposes only and the information may differ from the School Details panel within a live school MIS.

Click Save to update any changes made.
To check School Phase navigate to Config > Administration > Characteristics

School Phase* is displayed in the School Characteristics panel. Use the drop down to amend if required.

Click Save to update any changes made.
For more information, see How to Update School Details and How to Manage School Characteristics
The following Pupil Identifiers are collected in the return:
- Unique Pupil Number (UPN)
- Former UPN
- Surname
- Forename
- Middle Name(s)
- Date of Birth
- Sex
To review and, if necessary, update the UPN and Former UPN, navigate to Student Profile > Enrolment > Key Data.

The Key Data Panel can be found on the right-hand side of the page. Click the Edit button in the top-right corner.

UPN and Former UPN can be found on the Key Details tab.

Click Save to update any changes made.
To review and, if necessary, update Surname, Forename, Middle Name(s), Date of Birth and Sex, navigate to Student Profile > Edit Student Details

All fields can be found on the Basic Details Tab.

Click Save to update any changes made.
For more information, see How to View the Student Profile and How to View the Student Details Enrolment Panel>Key Data.
The following Pupil Status data is collected in the return:
- Enrolment Status
- Date of Entry to Current School
- Part Time Indicator
- Pupil National Curriculum Year Group
- Pupil Postcode
To review and, if necessary, update the Enrolment Status and Date of Entry, navigate to Student Profile > Enrolment > Enrolment Status.

Use the + icon to add new information.


Use the pencil edit icon to amend existing information.


Click Save to update any changes made.
To review and, if necessary, update the Part Time Indicator and Pupil National Curriculum Year Group, navigate to Student Profile > Enrolment > Key Data.
The Key Data panel can be found on the right-hand side of the page. Click the Edit button in the top-right corner.
The Part Time Indicator can be found on the Attendance Modes tab.

Pupil NC Year Group can be found on the Key Details tab.

Click Save to update any changes made.
To review and, if necessary, update Pupil Postcode, navigate to Student Profile > Edit Student Contact Details, click the pencil icon to the right of the email address.

Pupil Postcode can be found and updated within the Address tab.


Click Save to update any changes made.
For more information, see How to View the Student Details Enrolment Panel and How to View the Student Profile.
The Student List page provides a useful overview for identifying and updating any gaps in student data.
Reports on student data – such as Date of Birth and Enrolment Status – can be generated quickly. In the example below, a column for Enrolment Status has been added, followed by a column filter set to “Current (single registration at this school)”. To export the filtered data, click the green X icon at the top right to download it as a CSV file.

For more information, see How to use the Student List page to create Simple Reports.
In addition, the Quick Edit function on the Student List page can be used to update student data in bulk.

For more information, see How to use Quick Edit in the Student List Page
Updating Existing Programmes and Learning Activities
The Post 16 Data Collection requires QWAD data to be current and up to date. The current and archived qualification data can be downloaded from the Qualifications in Wales website.
Once the relevant file has been downloaded locally, navigate to Config > Curriculum > QWAD Data.

Select the Update QWAD Data button in the top-left corner of the screen to begin the process.

Select Browse to locate the CSV file saved to the local PC, then click Import.
Once Import has been selected, the pop-up will close and the import will start automatically.
Users will receive a notification once processing is complete:
- Success: “QWAD Data Update complete”
- Failure: “Error importing QWAD data. Please try again”
Note: If new files are uploaded later, they will overwrite existing QWAD data to ensure the latest information is always available.
Programmes are used to record the programmes of study undertaken by post-16 pupils for the Welsh Post 16 Data Collection. Programmes link pupils to their courses of study and provide the information required for the return. It is important to ensure they are current and up to date before submission.
Programmes can be updated in one of two ways:
Updating Programmes for Individual Students
To update Programmes for individual students, navigate to the Student List page by selecting Students in the left-hand menu.
Select the required student(s), then click View.

Note: When multiple students have been selected from the Student List page, a Next button is available to navigate between their profiles.
Within the Student Profile, select the Enrolment tab on the left-hand side.
Use the All dropdown in the top-right corner to navigate directly to the Programmes With Learning Activities panel, or scroll down to locate it manually.

To edit a Programme, select the pencil edit icon on the right-hand side.

Make any required updates to the programme details, then select Save.

Updating Programmes in Bulk
To manage Programmes in bulk, navigate to Modules > Curriculum > Manage Programmes.

Select Choose Students and select the students requiring updates.

In the Manage Programmes pop-up, select the 2025/26 Academic Year, then select either All Post-16 to include all students or Student to select individual students.

Note: If Student is selected, the Student Name field is displayed. Select the magnifying glass to open the Student Selector list, then select the required students.
Make any necessary updates to the required student(s) Programme by selecting the relevant student(s) and clicking Edit.

Click Save to update the changes made.
IMPORTANT: Bromcom cannot provide guidance on the appropriate Programme dates. Please refer to the Welsh Government Guidance for details on how to determine these dates.
Note:
- A student can have only one of each Programme type. For example, a student cannot have two 16-19 Study Programmes.
- Re-takes: If a student retakes a year, extend the Planned End Date of the Programme via Modules > Curriculum > Manage Programmes.
- Leavers: When processing a leaver from the Student List page, the Programme End Date is automatically updated and the status changed to Completed.
Learning Activities form part of the data required for the Welsh Post 16 Data Collection and are used to record the courses undertaken by Post-16 pupils, with the aim of achieving a particular qualification.
Learning Activities can be reviewed and updated in bulk via Modules > Curriculum > Manage Learning Activities
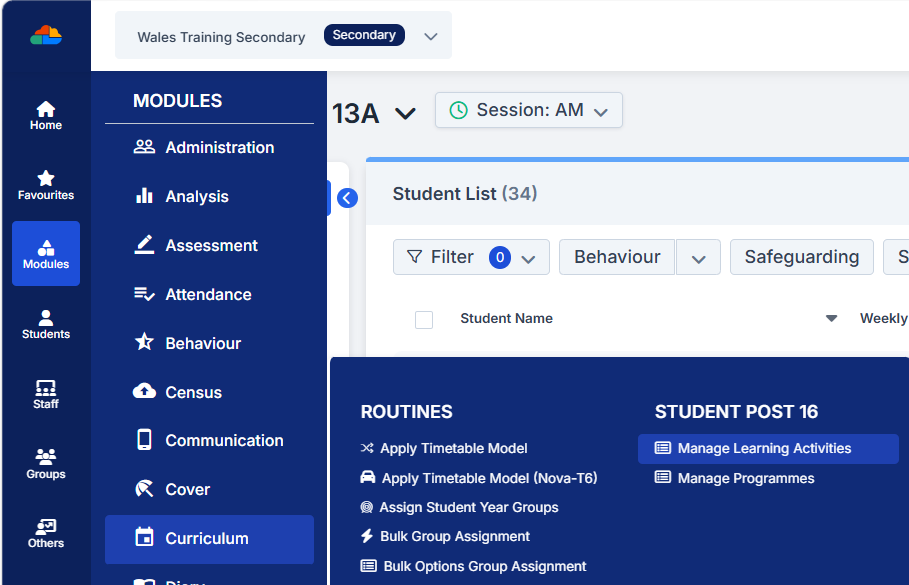
Click Choose Students

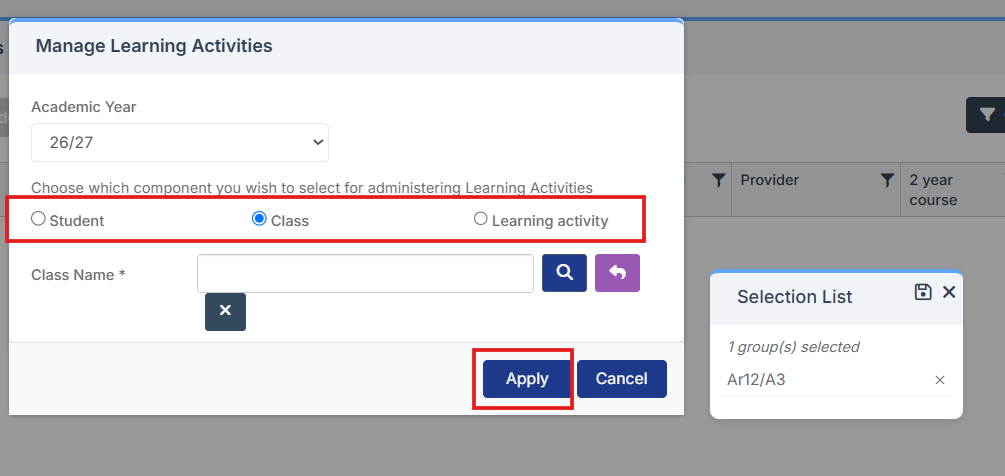
In the Manage Learning Activities pop up select the required records for the update by selecting the relevant radio button: Student, Class or Learning Activity, then select Apply.
Note: Class has been selected in this example.
Click the magnifying glass next to Class Name to open the Group Selector list. Select the required Teaching Class(es), then click Apply.
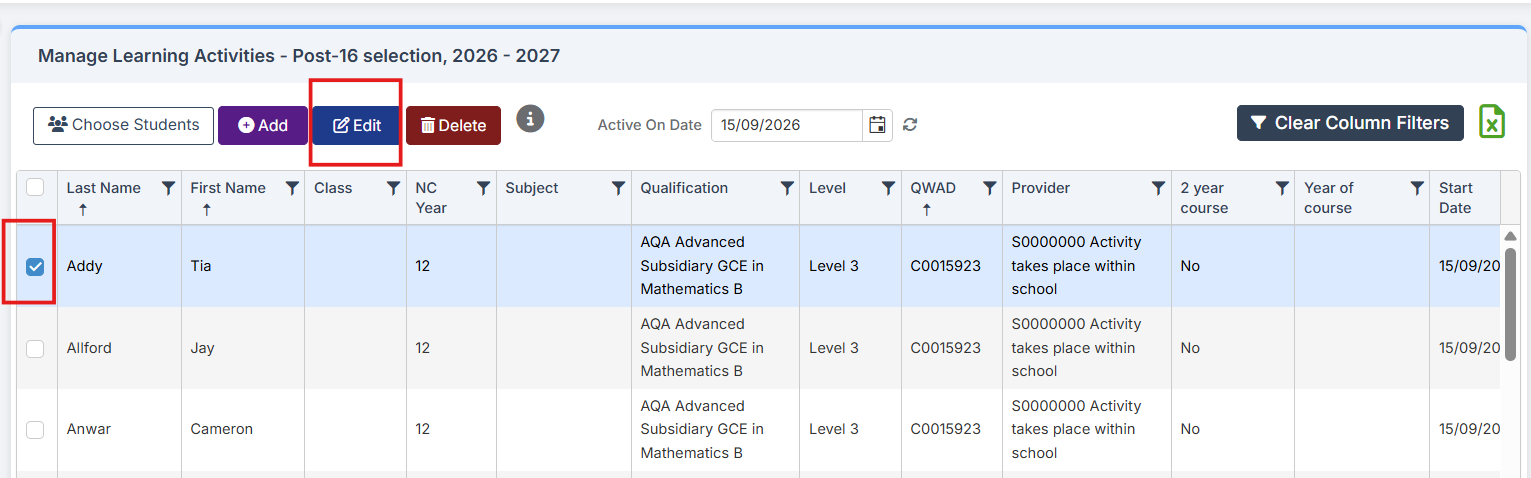
Make any required updates by selecting the relevant student(s) and clicking Edit
It is also important to ensure that all Learning Activities are correctly linked to a Programme. This can be reviewed via Modules > Curriculum > Manage Programmes.
An unlinked Learning Activity can be identified by the red exclamation mark displayed in the Learning Activity Counter column.

Hover over the red exclamation mark to display a message indicating that one or more Learning Activities are not correctly linked to a Programme for the selected student.

Click the icon to open the Student Record, where the affected Learning Activity can be reviewed and amended via the Enrolment tab.

Note: If Learning Activities appear in the Learning Activities (Not Attached to a Programme) panel within the Student Enrolment tab, this usually indicates that the Start Date or End Date of the Learning Activity falls outside the date range of the associated Programme.
For example, if the Programme has a Planned End Date of 31/07/2026, but the Learning Activity has an End Date of 30/07/2027, the system will not link the Learning Activity to the Programme. As a result, the Learning Activity is displayed as Not Attached.

To link the Learning Activity to the Programme, select the pencil edit icon and update the Planned End Date to ensure that it falls within the Programme date range.


Note: If necessary, edit and save the Programme without making any amendments to ensure the Learning Activity displays as linked.


Post 16 Data Collection Process
To run the Census, navigate to Modules > Census > Post-16.

In the top right of the screen ensure the correct year is selected, this should be correct by default.

Click the top left New button to create a new Post 16 Return.

Census Parameters & School Details
The Post16 Census Parameters and School Details panels are now displayed. The information is prepopulated, but please check the information displayed within the School Details panel is accurate.

The right-hand panel shows the School Details stored in the MIS for the school.
Ensure that the School Details are accurate, paying particular attention to the LA ID and Establishment Number. Additionally, ensure the School Phase and School name are correct. Inaccurate details may result in issues with the Census Return.
All details on the School Details page can be modified by selecting the Edit buttons, which will navigate to either Core Details or Characteristics. Be sure to click Save if any changes to the Core Details or Characteristics are made.

If any changes are made to Core Details or Characteristics, be sure to save them. Upon returning to this page, click the Refresh button at the top right of the School Details panel to view the updated information and ensure the changes are included in the Census file.
For more information, see How to Update School Details.
Generating the Return
Once the details have been confirmed as correct, the Census Return can be generated by clicking the Generate button at the top left.

Survey Details
After pressing Generate, the Time Spent by Role panel is displayed.

At least one role must be added to this panel before continuing.
Select Add, choose the required Role from the dropdown list, enter the Time Spent in whole hours, then select Save.
Note: There will be one row for each role, and these rows can be edited.

Validate the Census
The next step is to validate the Census by clicking the Save & Validate button. This action will complete the generation of the Census file and initiate the validation process, which will identify any errors or queries within the return.

The validation process may take a few moments – please wait while the process completes.
After validation, the system will return to the Census Post16 page, displaying the generated file(s) and the following options:
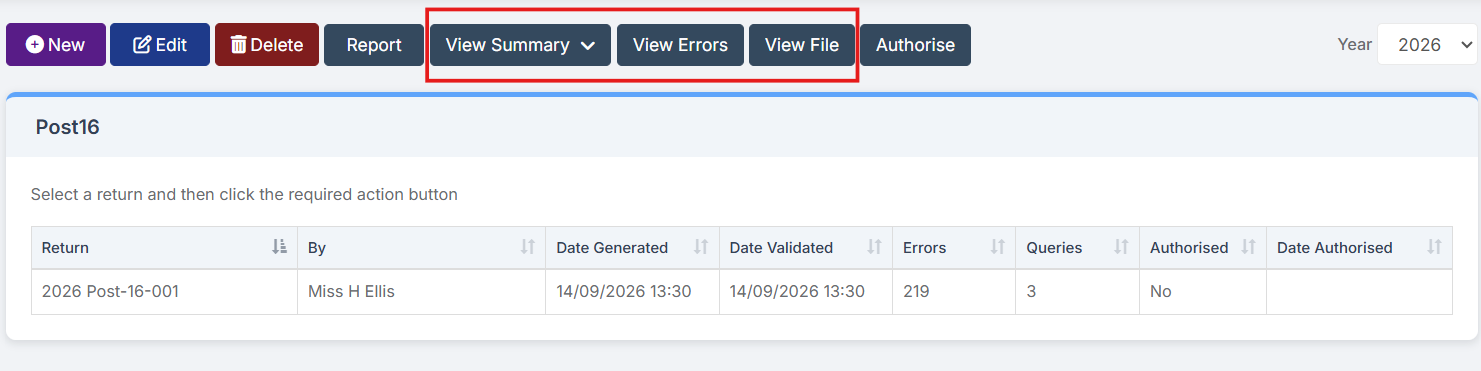
View Summary – Displays the summary page for the return. This can be printed and used as a starting point for reviewing data (available in both English and Welsh).
View Errors – Lists any errors or queries identified during the validation process.
View File – Allows the generated Census XML file to be viewed and saved. This step is only necessary when submitting the return to DEWi.
To view the summary file, select the appropriate return – if multiple returns have been generated – then click View Summary.
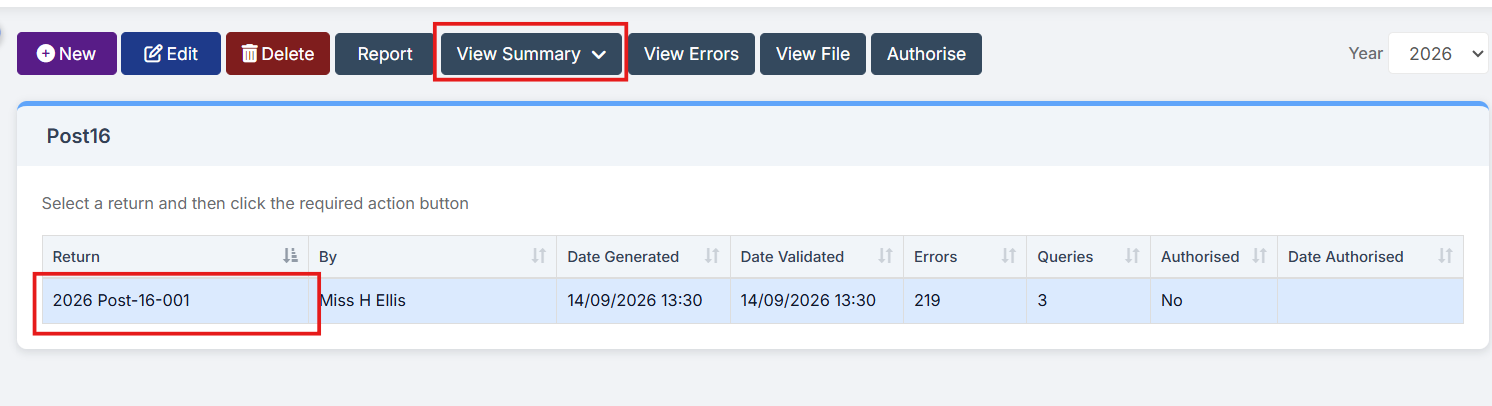
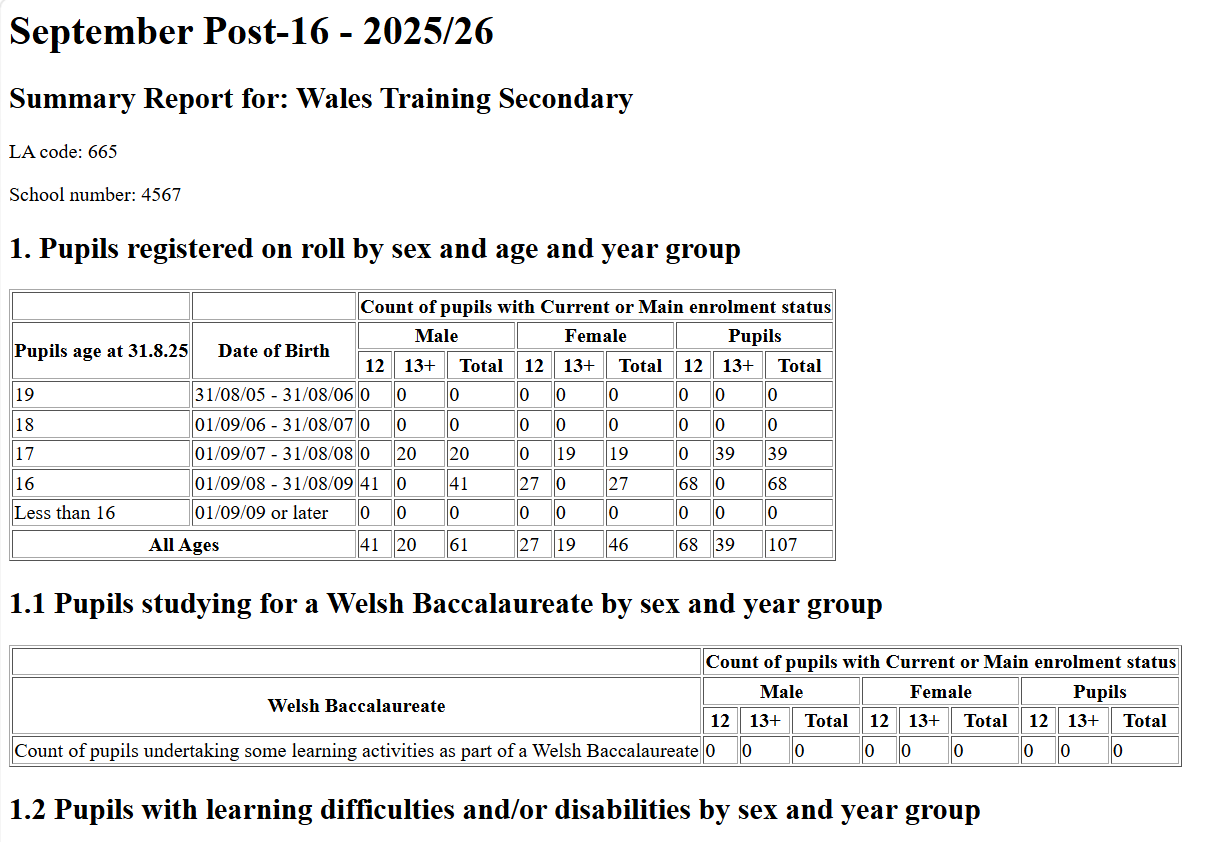
This will download the Census Summary file to the local computer, allowing it to be viewed or printed as needed.
Note: To view the Summary file in Welsh, adjust the Web Browser Language Settings.
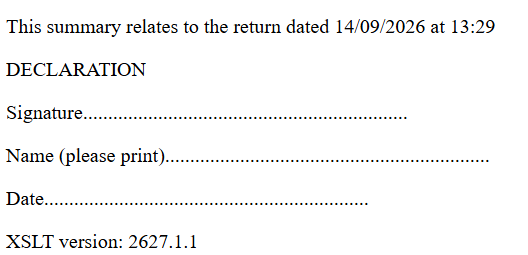
Scroll down to the bottom of the Summary Report to see the DECLARATION which shows the date and time matching the corresponding XML return.
In order to run Reports, a Post 16 Return must have first been generated.
Select the required return, then select Report.
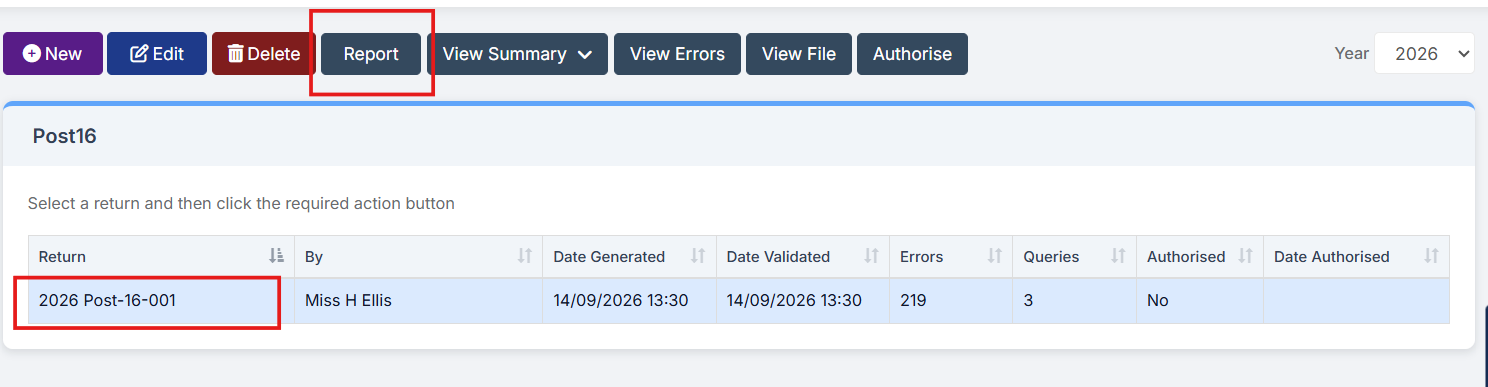
The Data Check Report consists of the following tabs and column headers:
- Pupil Identifiers – UPN, ULN, Former UPN, Surname, Forename, Middle Name, DOB, Sex
- Pupil Status – UPN, Surname, Forename, DOB, Enrolment, NC Year, Part Time, Post Code
- Programmes – UPN, Surname, Forename, DOB, Programme Reference, Programme Start Date, Programme Expected End Date, Programme Actual End Date, Guided Contact Hours, Length of Programme, Year of Programme, Learning Activity ID
- Learning Activities – UPN, Surname, Forename, DOB, Programme Reference, QWAD, Discount Code, Learning Activity Category, Learning Activity Start Date, Learning Activity Expected End Date, Learning Activity Actual End Date, LLDD, Welsh Medium, Provider, Completion Status
Users can:
- Use the Search field to filter data in each tab.
- Export the data within each tab to an Excel file.
- Hover over a column header to access filtering options for that column.
Once the Post16 Return has been generated, any errors must be addressed before the return can be authorised and submitted. Select the relevant return and click the View Errors button. The screen will then update, as shown in the example below.
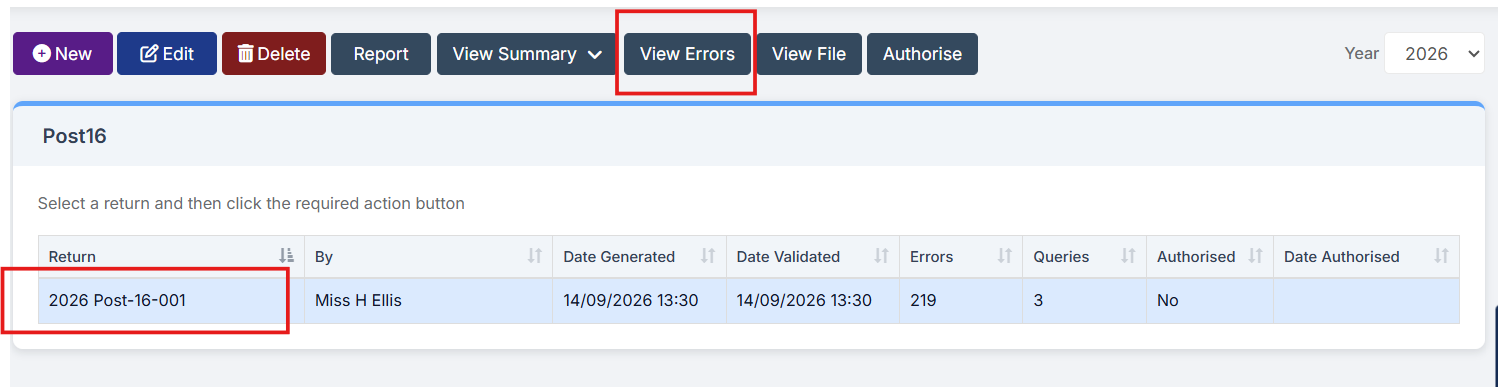
Each Query and Error will now be displayed ready to be dealt with.
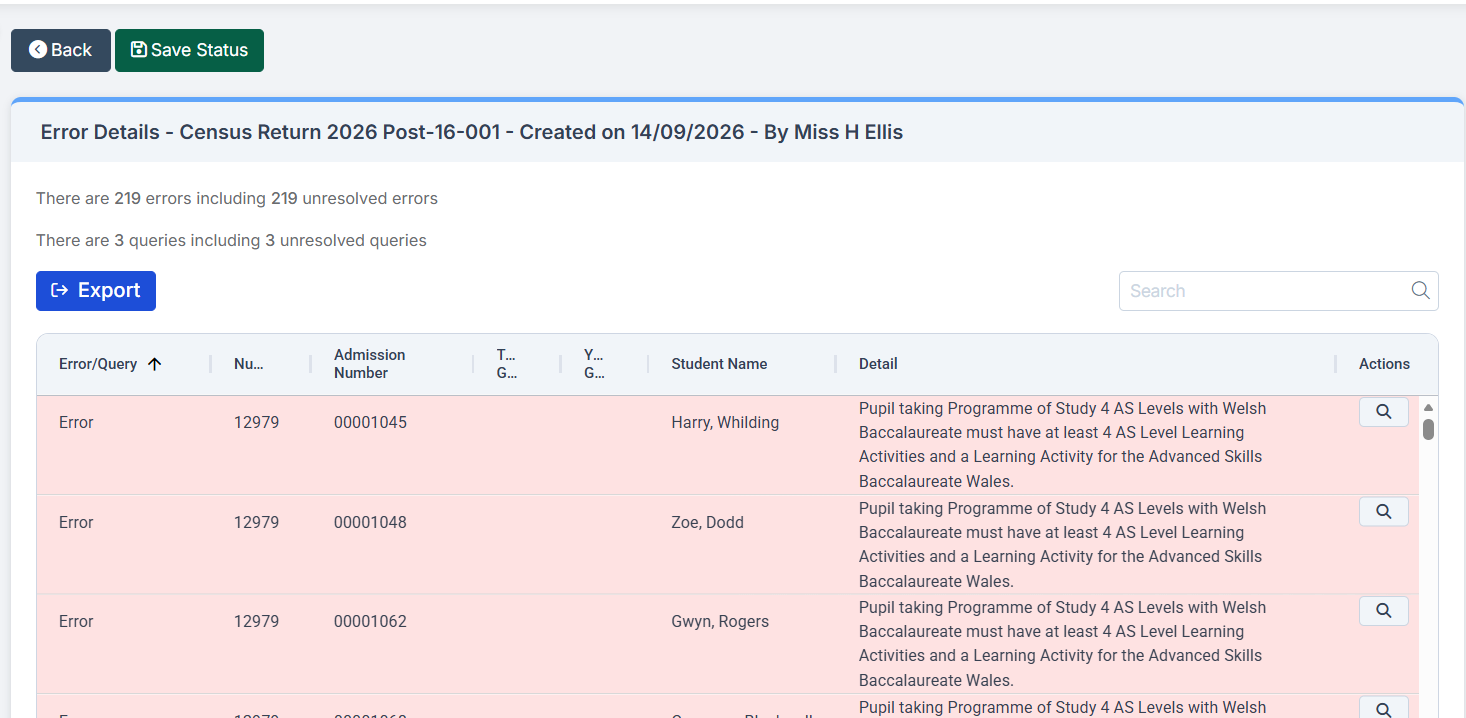
For full guidance on using the error summary screen, along with a comprehensive list of errors and queries, see here.
Once all errors have been resolved and any outstanding queries reviewed and accepted, it is important to re-run the Post16 Return to ensure all updates are included.
After re-running the census, select the appropriate return (if multiple returns exist) and click the Authorise button.
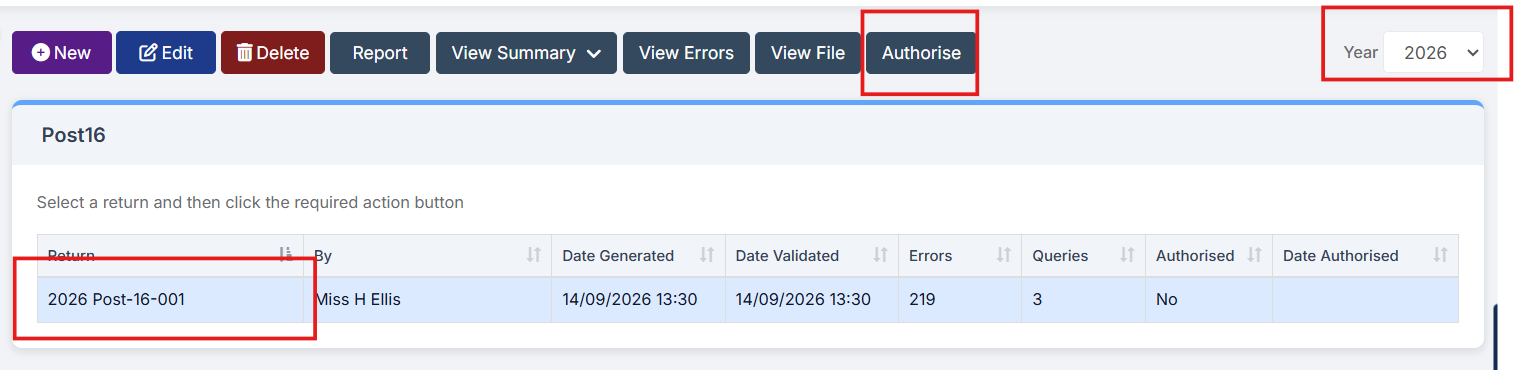
This process converts the Post 16 Return file into the correct XML format for uploading to the DEWi website. Multiple authorised files can be retained, each date-stamped to assist in identifying the correct version for submission.
The Post 16 Return file is now ready for submission and can be exported by clicking the View File button, which will save a copy to the downloads folder on the local machine.

Post 16 Setup for the New Academic Year
This section outlines the key actions required when setting up Post 16 data for the new academic year. It is important to ensure that Programmes and Learning Activities are set up and maintained correctly throughout the year to support accurate data for the following year’s Welsh Post 16 Data Collection.
At the start of the new academic year, Programmes need to be assigned to new Year 12 students to ensure that their Post 16 data is set up correctly from the beginning of the year. Programmes can be assigned to multiple students in bulk where students are undertaking the same Programme.
Navigate to Modules > Curriculum > Manage Programmes.

Note: Programmes can also be added individually via Student Profile > Enrolment > Programmes with Learning Activities.
Select the Year 12 Students
In the Manage Programmes panel, click Choose Students.

Ensure the new academic year is selected from the dropdown.
Select the Student radio button, then select the blue spyglass icon next to Student Name to open the Student Selector.

Use the Year Group dropdown to select Year 12, then click Find to display the Year 12 students.
Click Select All to select all displayed Year 12 students.

The selected students will be displayed in the Selection List.
Click Apply to confirm the selection.

Assign Programmes
The selected students will now be displayed in the Manage Programmes panel.
Tick the checkboxes in the left-hand column to select the students requiring the same Programme, then click Add.

Note: Where students are undertaking different Programmes, complete the process in separate batches.
Enter the required Programme information and enter the Start Date, Planned End Date, Status, Guided Contact Hours, Programme Length and Programme Year.
Note: The Status will default to Continuing the programme.
Click Apply.

The added Programmes will now be displayed in the Manage Programmes panel. To make any amendments, select the required students and click Edit.

Important: Bromcom cannot provide guidance on the appropriate Start Date and Planned End Date. Refer to the Welsh Government Guidance for information on determining these dates.
With the Programmes assigned, add the appropriate Exam Levels to the Teaching Classes for the new academic year.
Navigate to Groups > Group Type = Teaching Class.

Display Exam Level Column
Select Add/Remove Additional Columns in the top-right corner, tick Exam Level, then select Save.

The Exam Level column will now be displayed on the Groups > Teaching Class page, allowing the assigned Exam Levels to be reviewed and any required updates to be identified.

Tip: Adding Year Group as an additional column can help identify and filter the relevant Year 12 classes.
Assigning Exam Levels
The Quick Edit function can be used to assign Exam Levels to multiple Teaching Classes.
Select the required Post 16 classes, then select Quick Edit from the Actions dropdown.

Select Exam Level from the Attribute dropdown, then the required Exam Level from the Value dropdown.

If all classes require the same Exam Level, select Update. Alternatively, select Review to check and amend the Exam Level for individual classes before applying the changes.

In the Review screen, use the Amended dropdown to select a different Exam Level for individual classes where required.
Once the Exam Levels have been checked and confirmed, select Update.

The Groups page will display the updated Exam Levels for the selected Teaching Classes.

With the Programmes and Exam Levels assigned, the final step is to assign Learning Activities.
This can be completed by:
- Adding Learning Activities to Teaching Classes
- Assigning Learning Activities to Individual Students in Bulk
Adding Learning Activities to Teaching Classes
Navigate to Groups > Group Type = Teaching Class.
Filter the classes by Year Group > Year 12, select all classes using Select All from the Selections dropdown, then click View.

Note: Once the Teaching Class records are open, the Previous and Next buttons appear at the top of the screen to allow navigation between class records.

Scroll down to the Learning Activity Details panel, then click Add New Record.

Enter the required Exam Option Code within the Description field, set the Planned End Date, then select the tick to confirm.

The Learning Activity is now assigned to all students associated with the Teaching Class.
Assigning Learning Activities to Individual Students in Bulk
Navigate to Modules > Curriculum > Manage Learning Activities
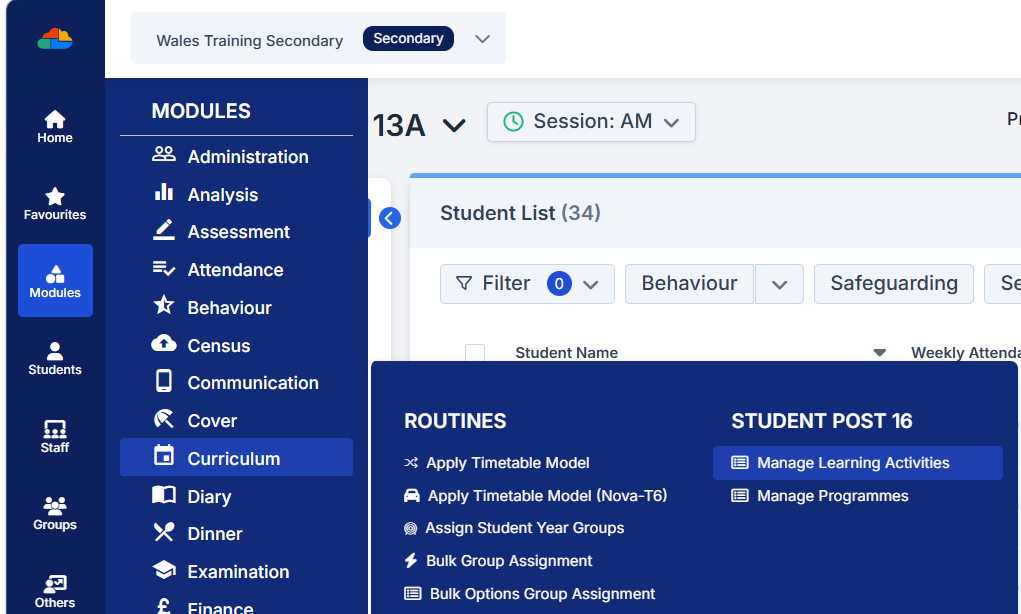
In the panel click Choose Students

In the Manage Learning Activities choose from Student, Class or Learning Activity.
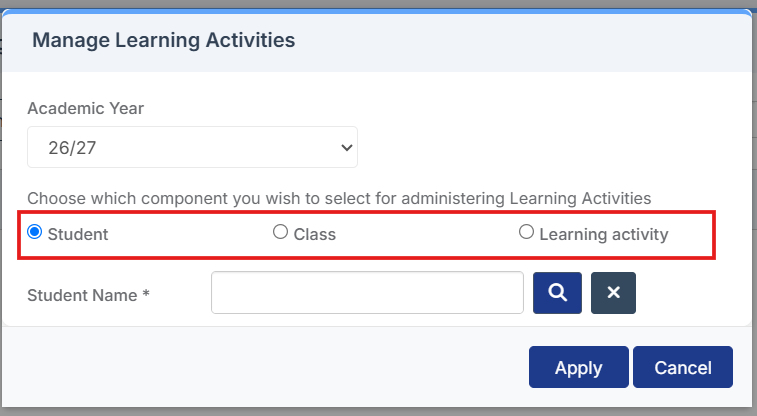
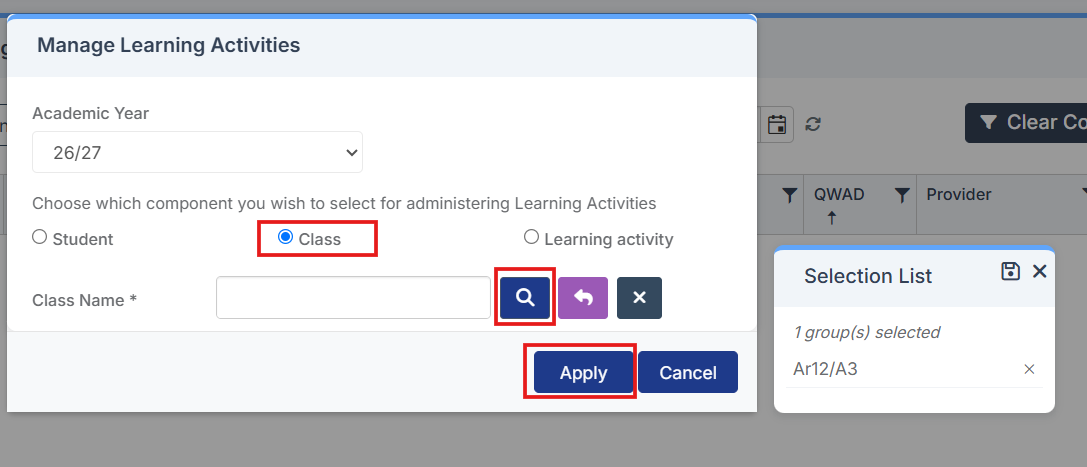
Note: Class has been selected in this example.
Click the magnifying glass next to Class Name to open the Group Selector list. Select the required Teaching Class(es), then click Apply.
Assign Learning Activities
The selected students will now be displayed in the Manage Learning Activities panel.
Tick the checkboxes in the left-hand column to select the students requiring the same Learning Activity, then click Add.
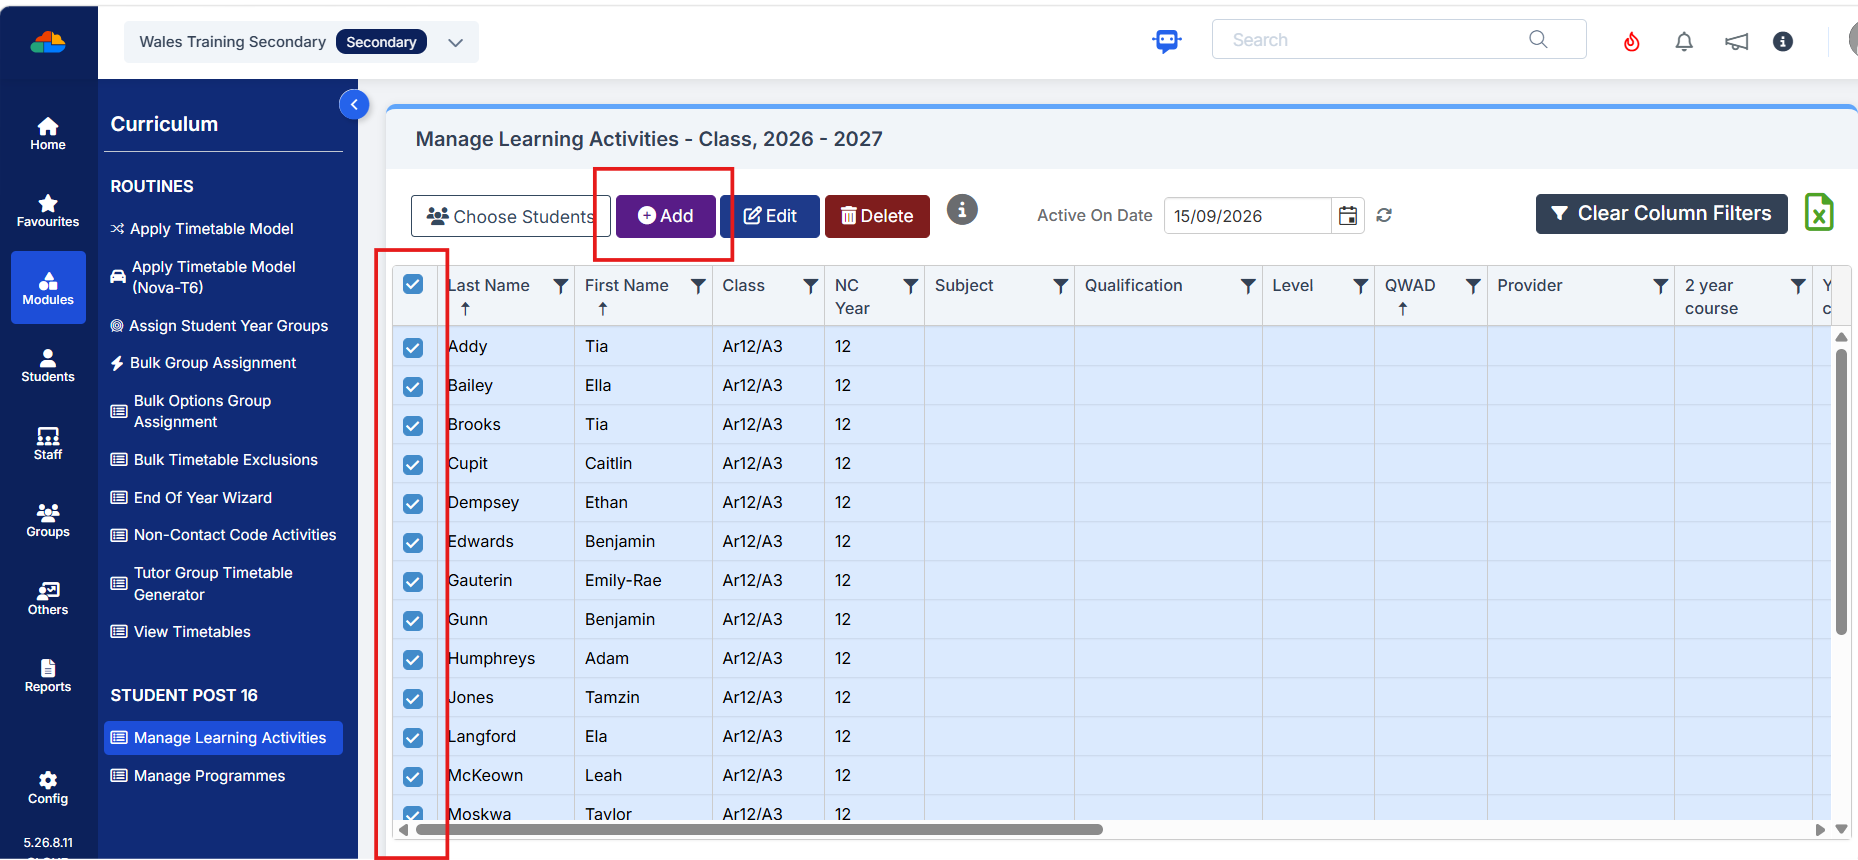
Note: Where students are undertaking different Activities, complete the process in separate batches.
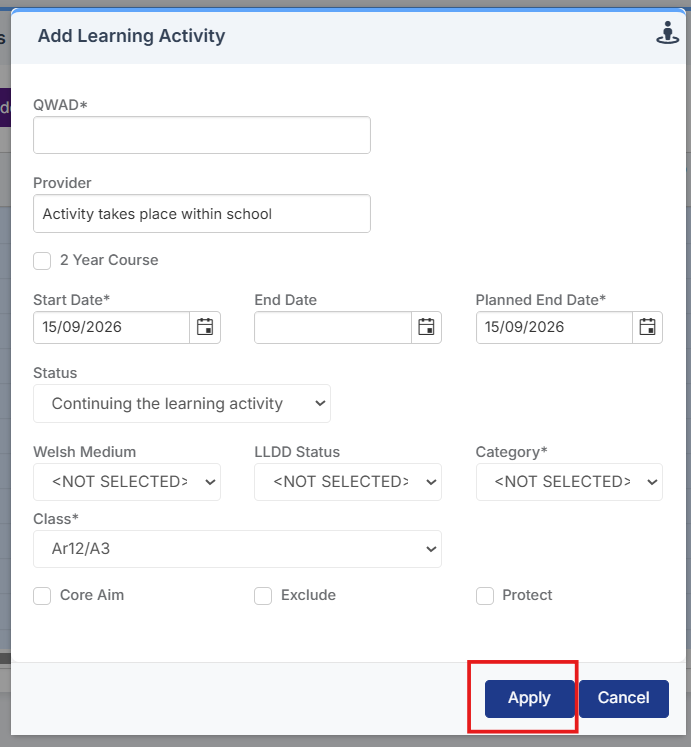
In the Add Learning Activity pop up complete the required fields, all fields marked with an *asterisk must be completed to apply the record.
Note: If 2 Year Course is selected, then Year of Course must be completed, choosing from Year 1 of 2 or Year 2 of 2
Click Apply.