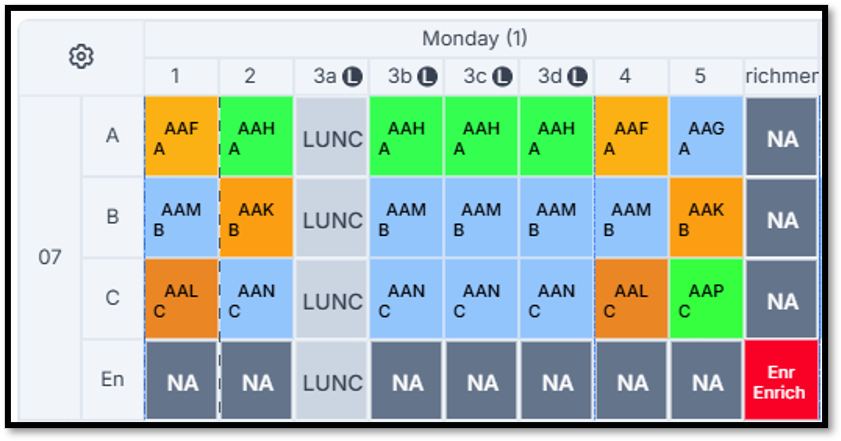
This guide is designed to build on the knowledge gained through the standard wTimetable training and documentation, supporting timetablers in navigating a range of scenarios that may be encountered during the timetable build process. Each scenario addresses a specific challenge and provides clear, structured guidance to help create, modify, and optimise effective timetables.
The guide is organised into the following sections:
Access: The permissions required to use wTimetable are found in the Timetable Module of Config>Setup>Roles and Permissions. Each tick box on the right determines which functions are visible/available on the page for users with the selected Role.

Curriculum Complexities
This section outlines the steps required in wTimetable to support the scheduling of classes spanning multiple year groups.
Pre-Requisites:
- The user is aware of the classes and blocks within each year group that require teaching together.
- The user has prior knowledge of how to build bands and blocks in wTimetable.
This scenario can be managed by first creating a class within each year group and linking the associated blocks together so they are always scheduled at the same time.
Note: The example below demonstrates a Textiles class taught across Years 12 and 13.
Navigate to Curriculum Plan and create the required blocks for each year group.
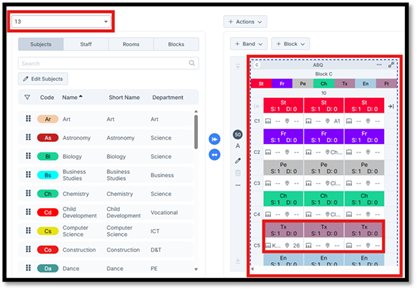
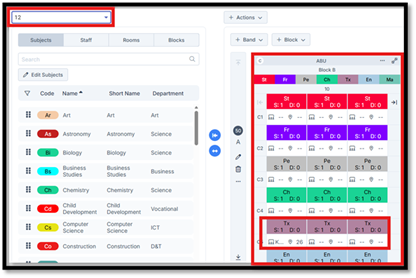
Click the three-dot menu icon for one of the blocks and select Link Blocks.
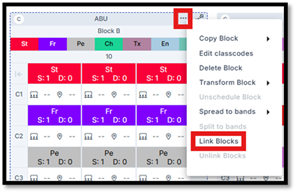
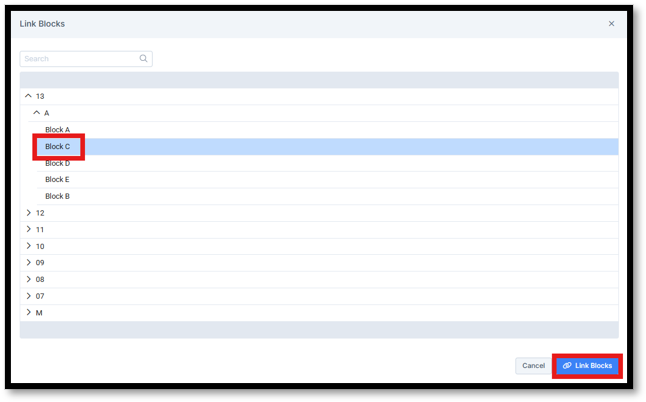
Select the other required block from the list and click Link Blocks.
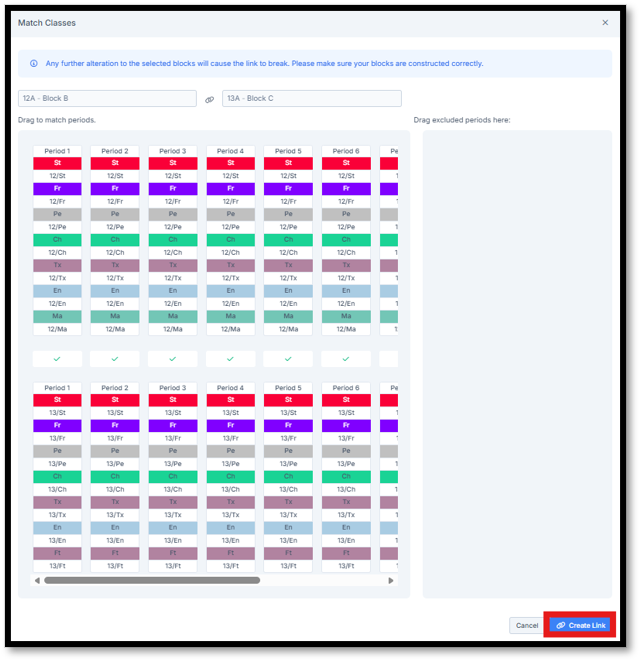
In the next step, leave all periods linked and click Create Link.
The two blocks are now displayed as linked and will be scheduled at the same time.
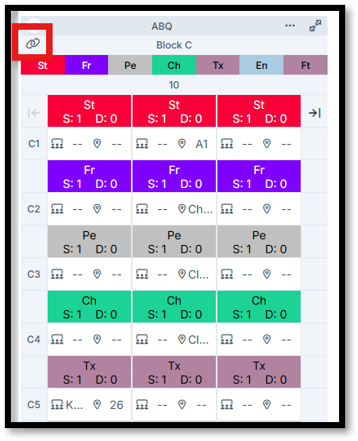
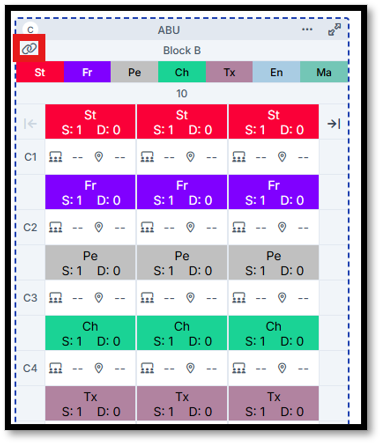
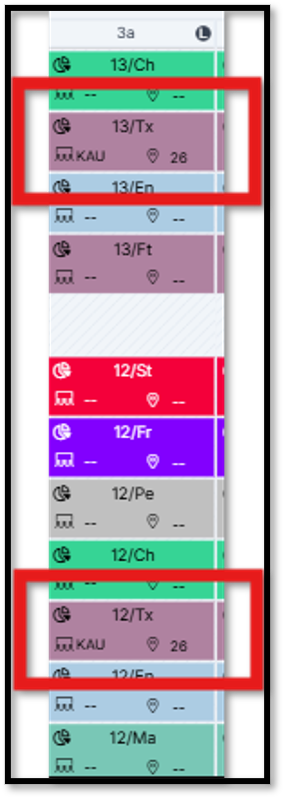
The standard Auto-Schedule process can now be used to schedule the timetable, which will ensure linked blocks are timetabled at the same time so students from multiple year groups can be taught together in a single class.
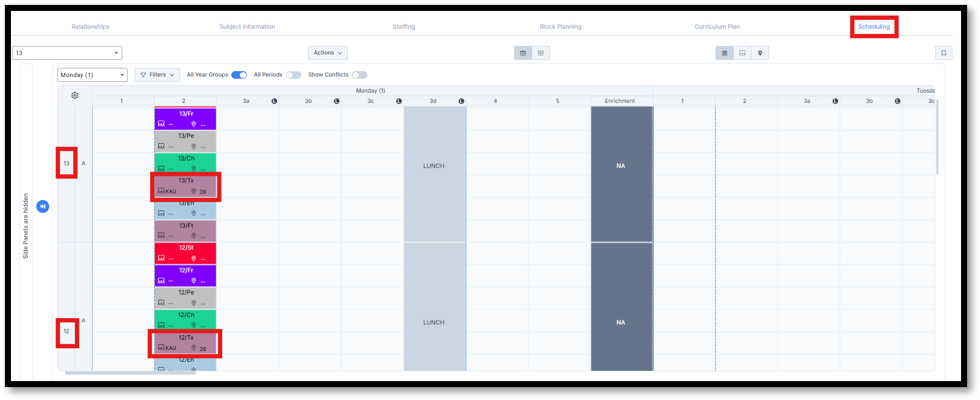
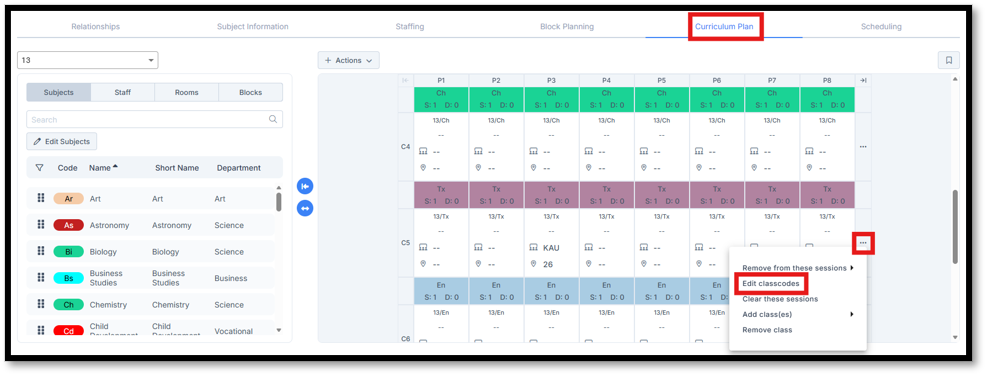
Important: To ensure that only a single class is created when the timetable is imported into the MIS, the class name must be identical across both blocks/year groups.
This can be achieved via Curriculum Plan, using Edit Classcodes, available from the three-dot menu for each class.
This section outlines the steps required in wTimetable to support SEN and Alternative Provision delivery models, where a specialist teacher delivers some or all of a group’s curriculum within a consistent setting.
Pre-Requisites:
- The user has an established SEN/Alternative Provision model and understands the intended staffing and curriculum structure.
- The relevant pupil groups and their curriculum requirements have already been defined.
- Any specialist teaching requirements have been agreed in advance.
Note: This guide explains two scenarios:
- SEN students are taught separately for all subjects.
- SEN students are taught separately for some subjects and access mainstream classes for others.
Scenario 1
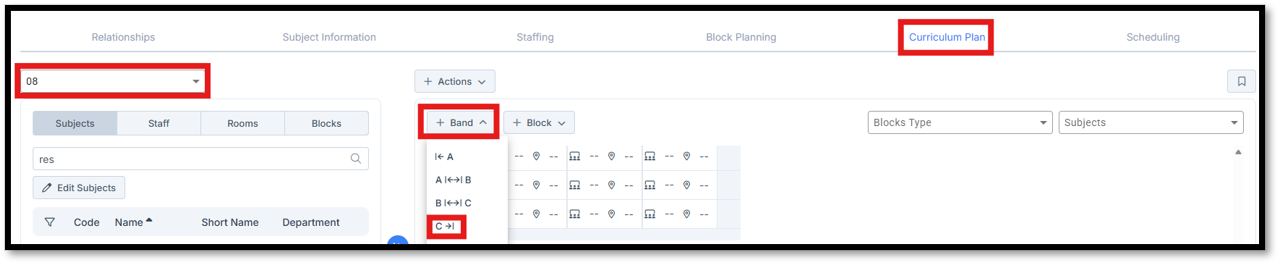
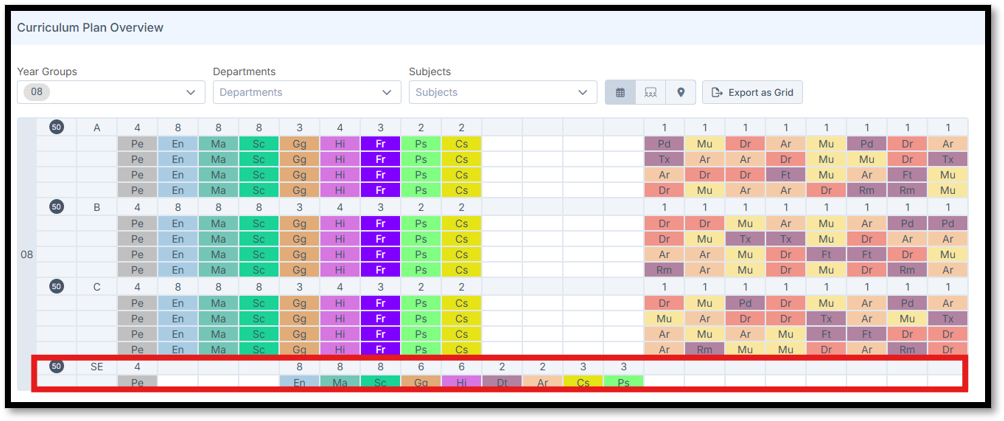
Where SEN students are taught entirely separately, this can be managed by adding an additional band within the year group.
Navigate to Curriculum Plan, select the required year group, and from the Band drop-down menu add an additional band.
The SEN model can then be created following the usual process and allocated the required staff and rooms.
Scenario 2
Where SEN students require access to a mixture of specialist and mainstream classes, this can be managed by adding an additional class/set into the mainstream blocks of a band.
Navigate to Curriculum Plan, select the required year group, and use the arrow icon in the top-right corner to expand the first block as needed.
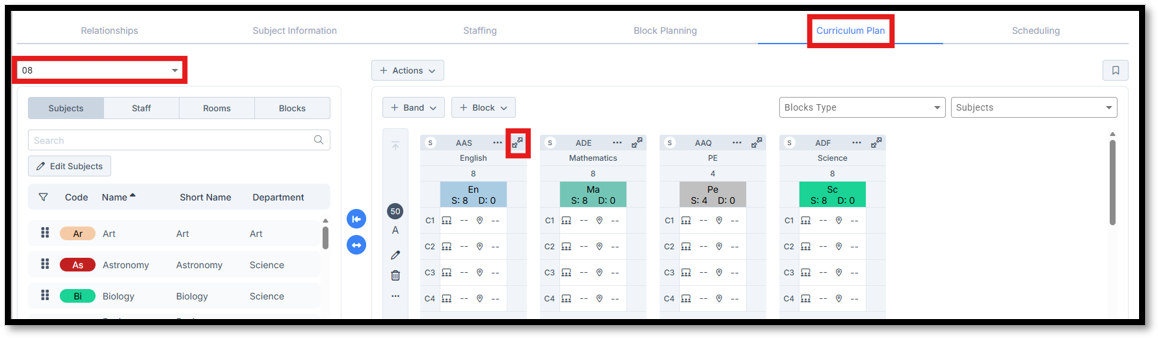
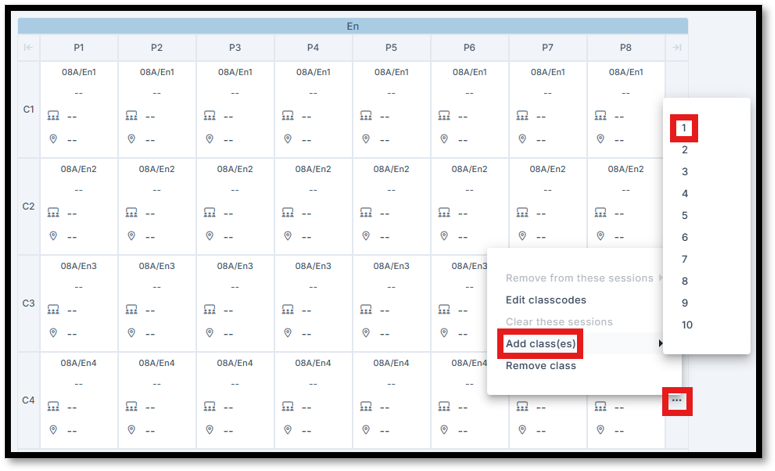
Add an additional class using the three-dot menu icon on the right-hand side of the final class in the block.
The class can be renamed by selecting Edit classcodes from the three-dot menu.
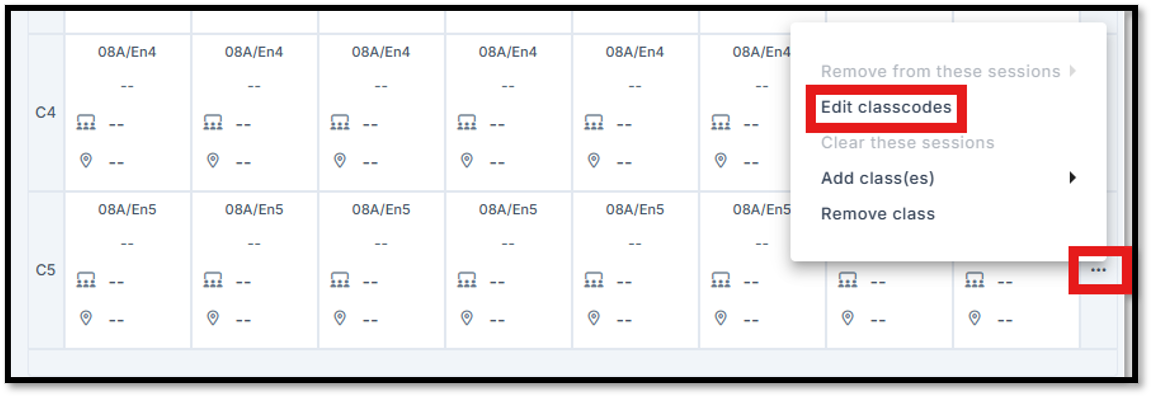
Update the Band, Class Number, and/or Free Text fields (if in use) to create a unique name for the SEN class within the block.
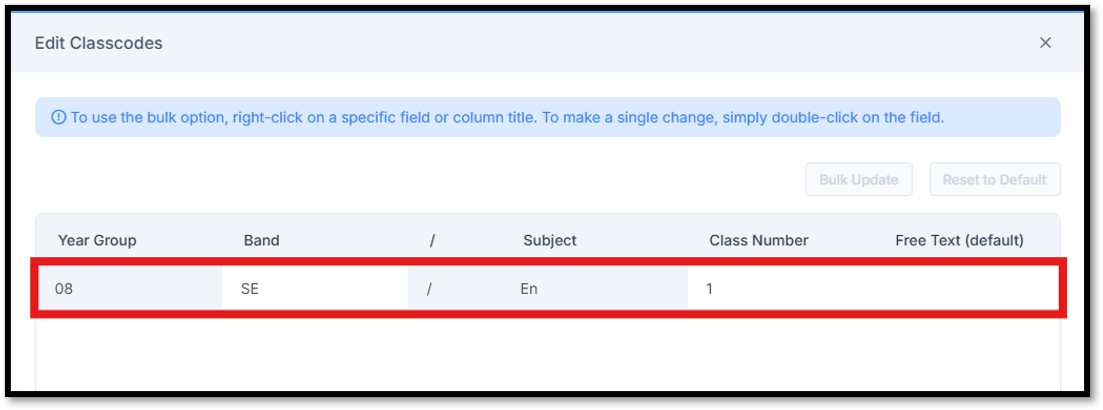
Once updated, the appropriate staff and room can be applied.
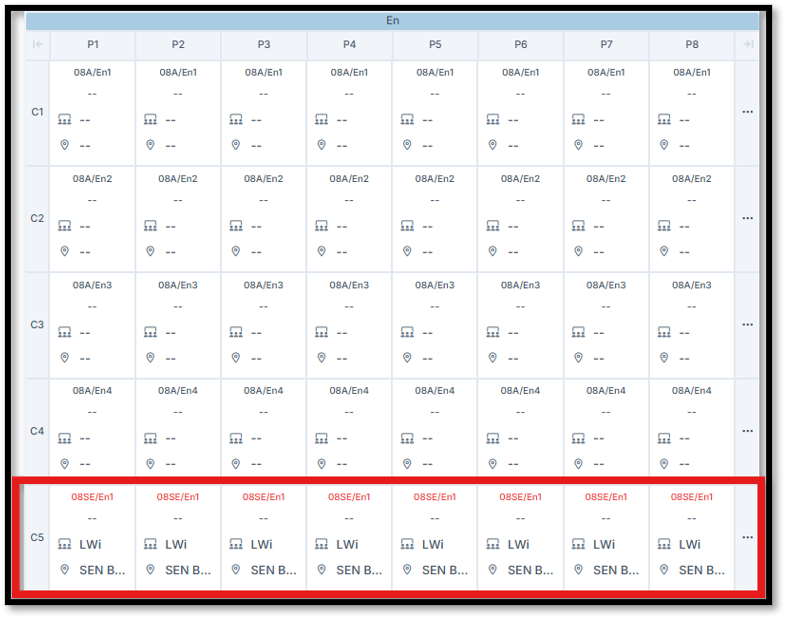
Note: The same process can be followed for other blocks where SEN students need to be taught separately. Otherwise, they can be added to a mainstream class within the block (via the MIS) where appropriate.
This section outlines the steps required in wTimetable to support courses where a student’s timetable is split between school-based learning and work placement activities.
Pre-Requisites:
- Work placement timings have been agreed with the external provider.
- The user has prior knowledge of how to create subjects and add them to a block.
Navigate to Curriculum Plan and select the required year group to begin building a model.
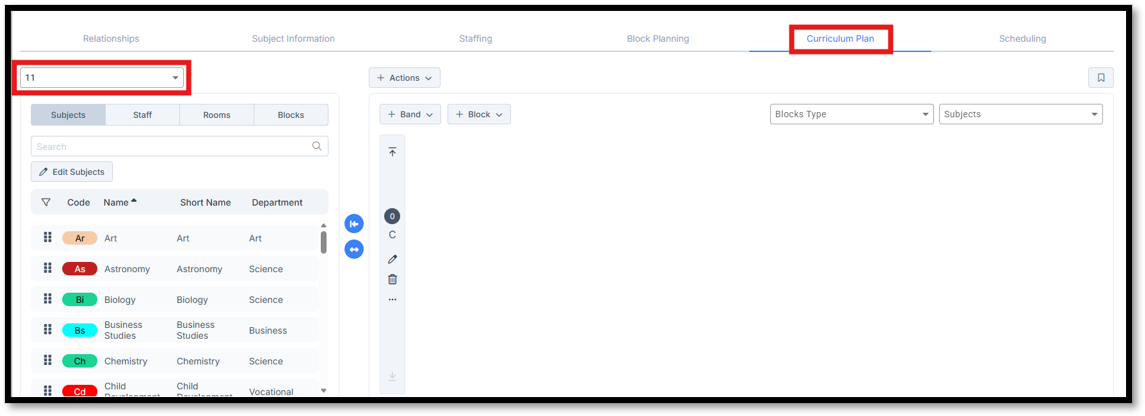
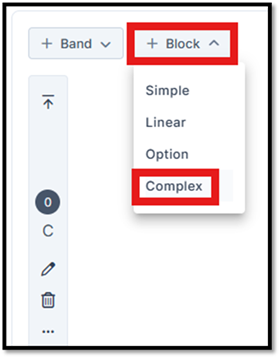
From the + Block drop-down menu, select Complex.
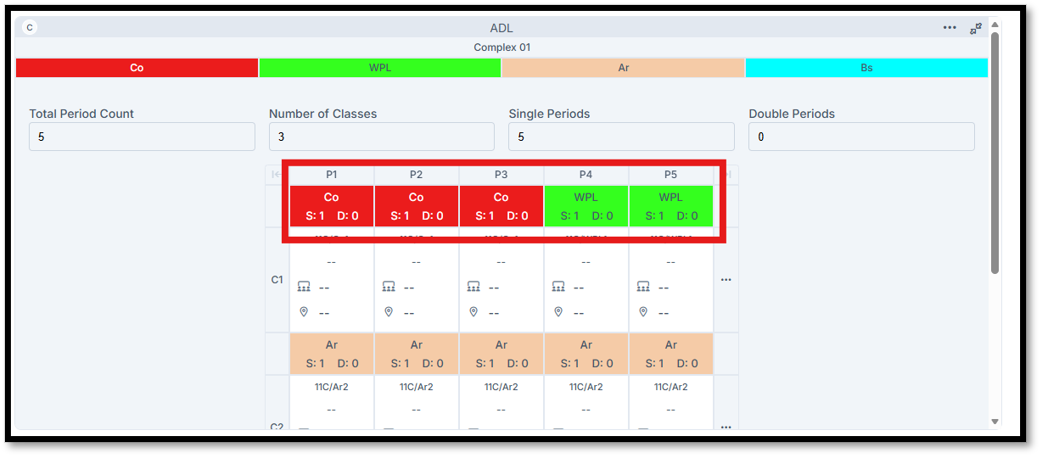
Add the relevant subject(s) to the block for the required number of periods. Where a subject is combined with a work placement, add a Work Placement subject alongside the main subject for the appropriate number of periods.
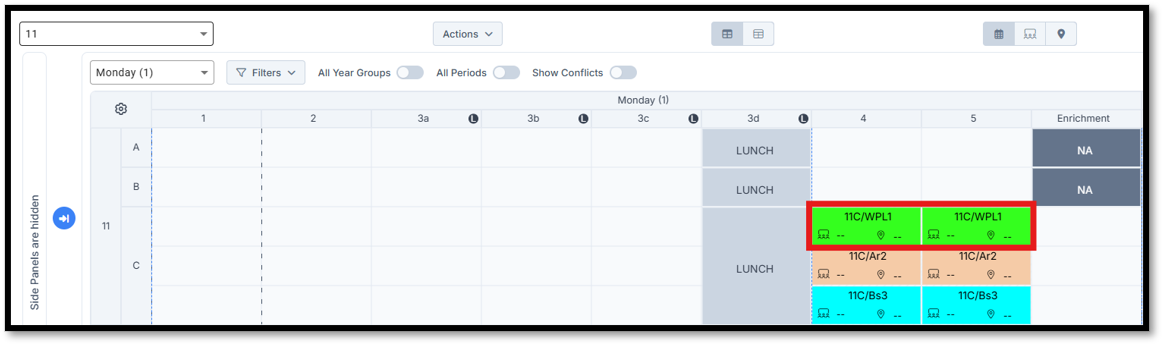
Navigate to Scheduling and manually place the Work Placement period(s) into the required slots.
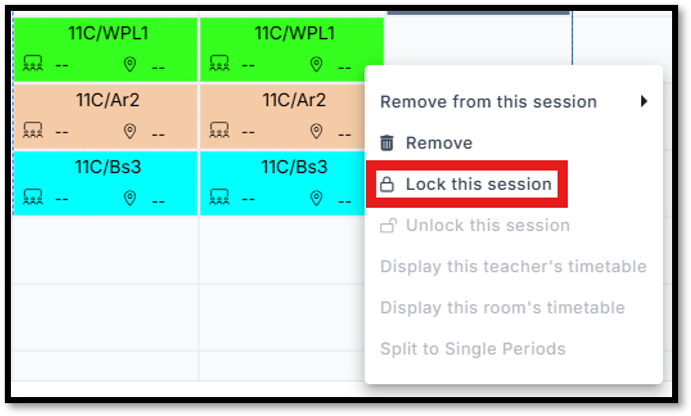
To prevent the period(s) from being moved during Auto-Scheduling, left-click each period and select Lock this Session.
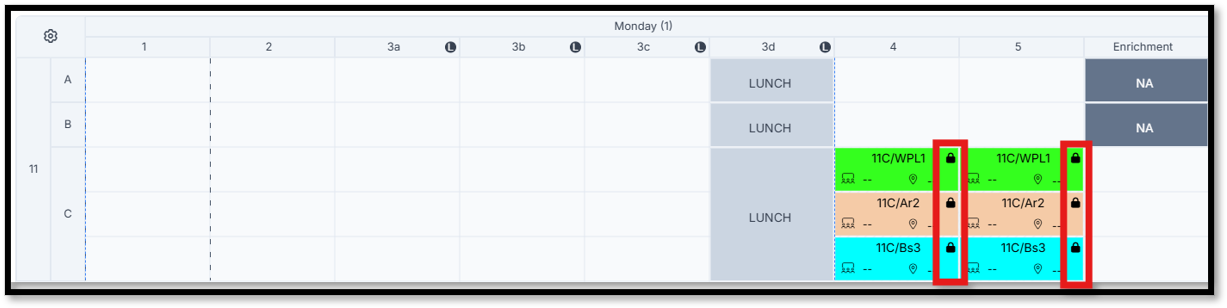
The standard Auto-Schedule process can now be used to schedule the rest of the timetable, while ensuring the work placement period(s) remain fixed.
This section outlines the steps required in wTimetable to support scenarios where a teacher is unavailable for all periods of a class within a single block.
Pre-Requisites:
- The user, after partially scheduling the timetable, has identified an available slot within another block where both the teacher and students are available.
- The user has prior knowledge of how to build bands and blocks in wTimetable.
Navigate to Curriculum Plan and select the required year group to create a new model.
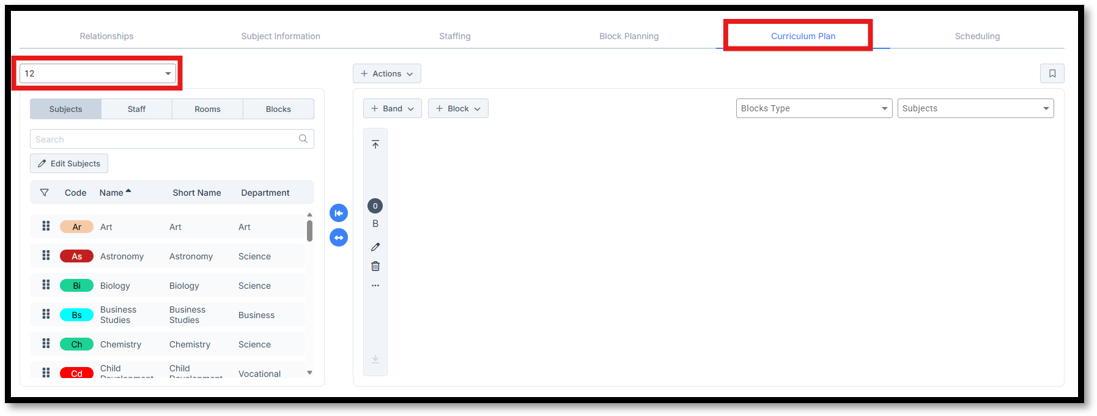
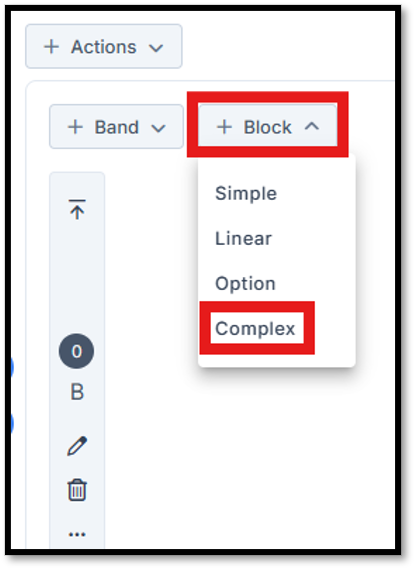
From the + Block drop-down menu, select Complex.
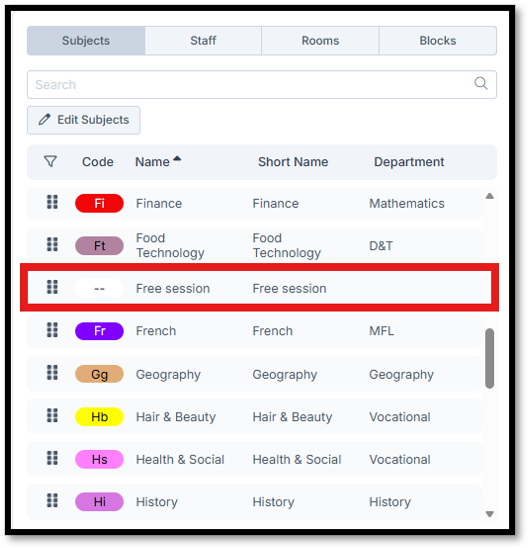
Add the relevant subjects into the block for the required number of periods. Where one or more periods need to align with other blocks, the Free Session subject can be used to complete the block.
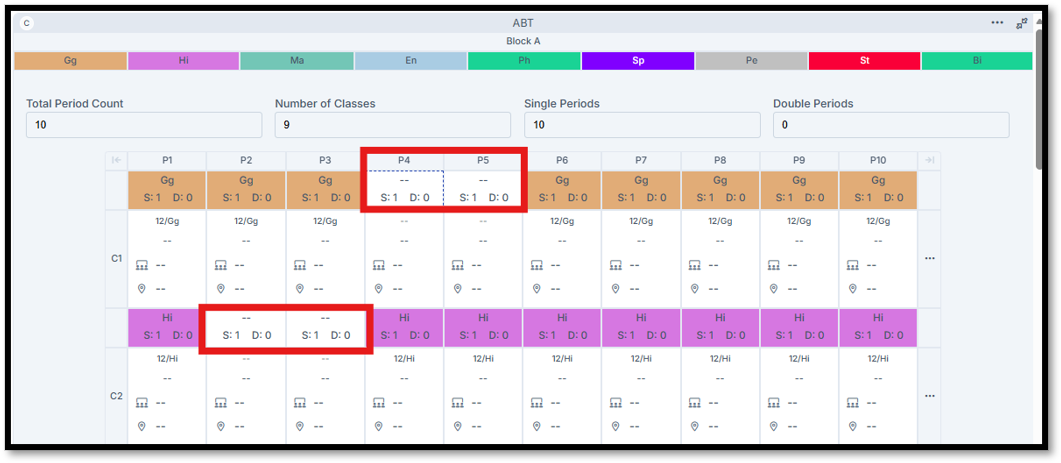
The remaining periods for the class/subject can then be added to the other identified block(s) using the same process.
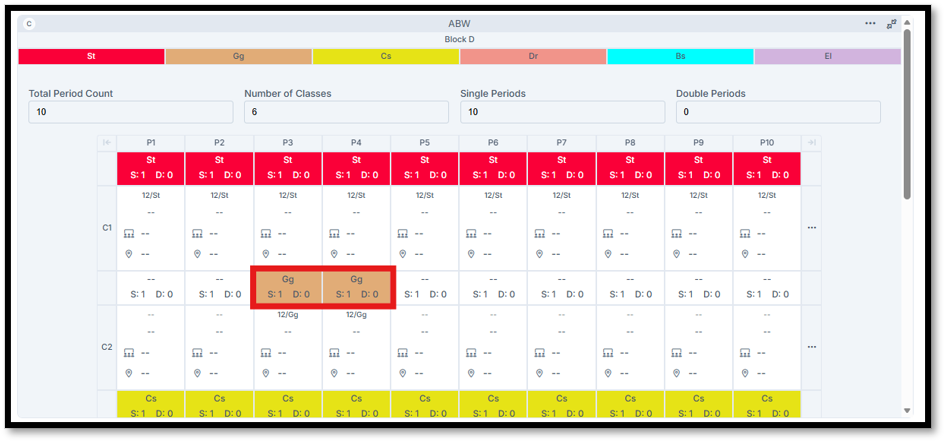
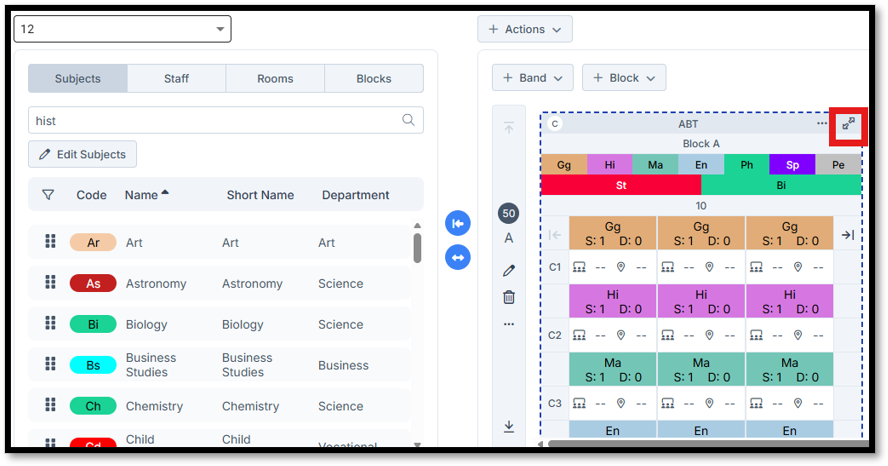
To move a period from one block to another, navigate to the relevant year group, band, and block in Curriculum Plan, then click the arrow icon to expand the block.
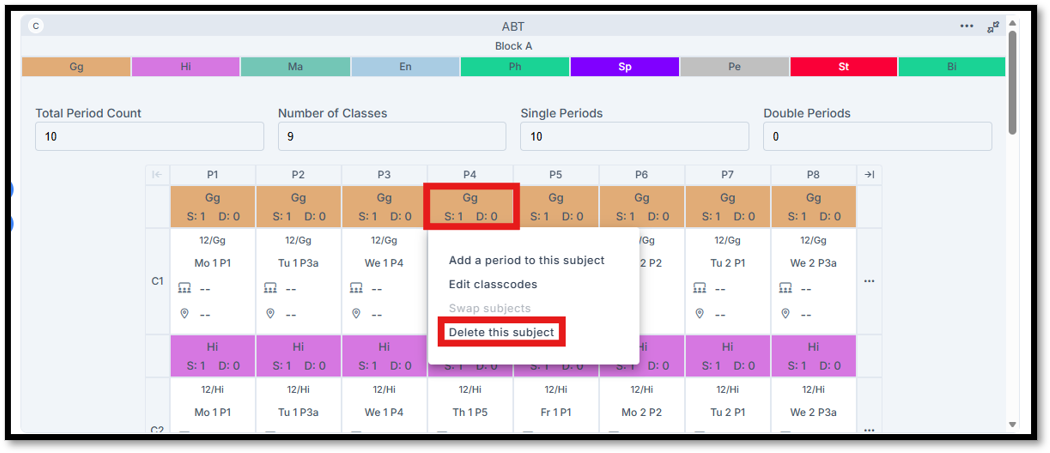
Left-click the period(s) that need to be moved to another block, then select Delete this subject.
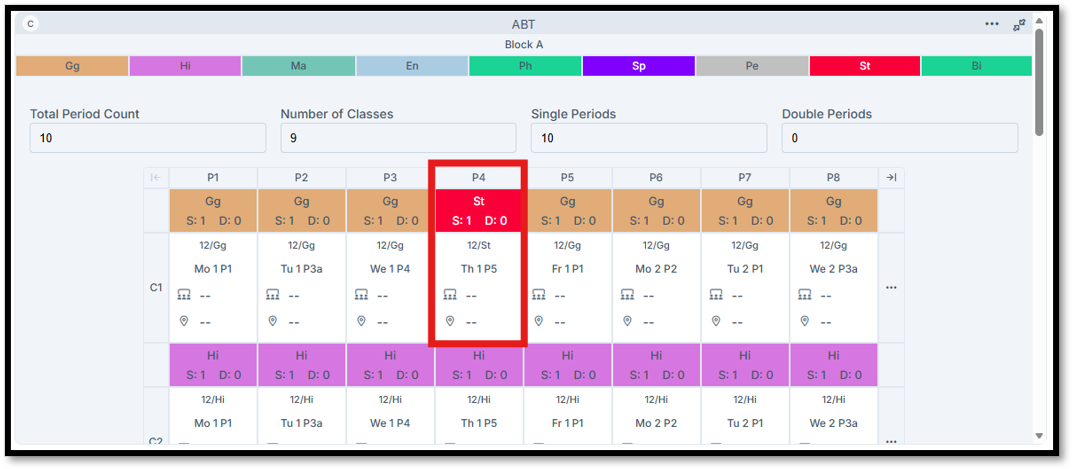
The period(s) can either be left blank or replaced with a subject such as Study, to avoid students having free periods on their timetable.
Locate and expand the block to which the period(s) need to be moved, then add the subject as a new class for the required number of periods. Any remaining periods can either be left blank or replaced with a subject such as Study.
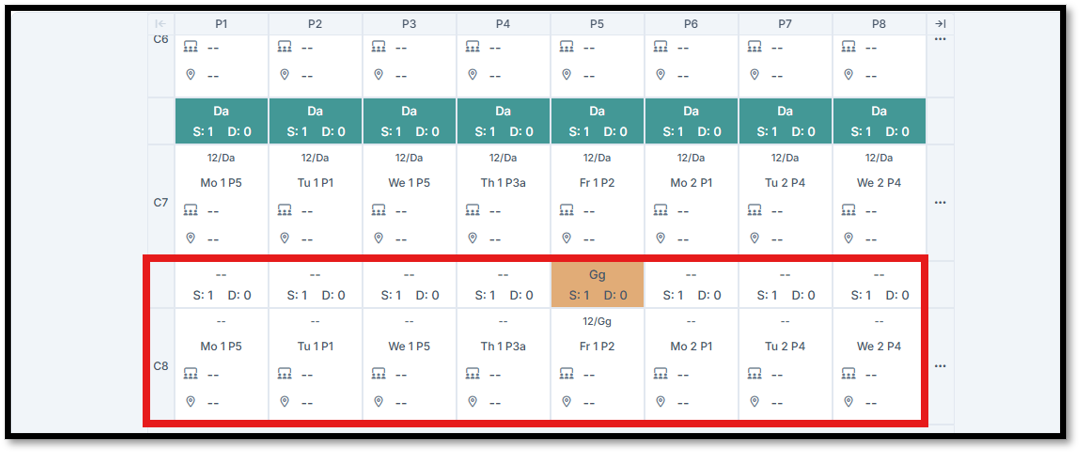
Important: To ensure all periods of the same subject are treated as a single class when imported into the MIS, the class name must be consistent across all blocks.
This section outlines the steps required in wTimetable to support intensive Post-16 curriculum models designed to accelerate student progress through intensive teaching and targeted support. These models are commonly used where students complete an A-Level programme within a single academic year or require additional curriculum time to achieve specific outcomes.
Pre-Requisites:
- The user has a defined model and understands the intended curriculum structure.
- The students participating in the programme have already been identified and the intensive course has been factored into their subject choices.
- Subject requirements and teaching allocations for the programme have been agreed in advance.
Where students require additional teaching time in a particular subject, an additional class can be added within another block. Students can then be assigned to both classes, allowing them to receive increased teaching time for that subject.
To add an additional class to an existing block, navigate to Curriculum Plan, select the required year group, and click the arrow icon to expand the relevant block.
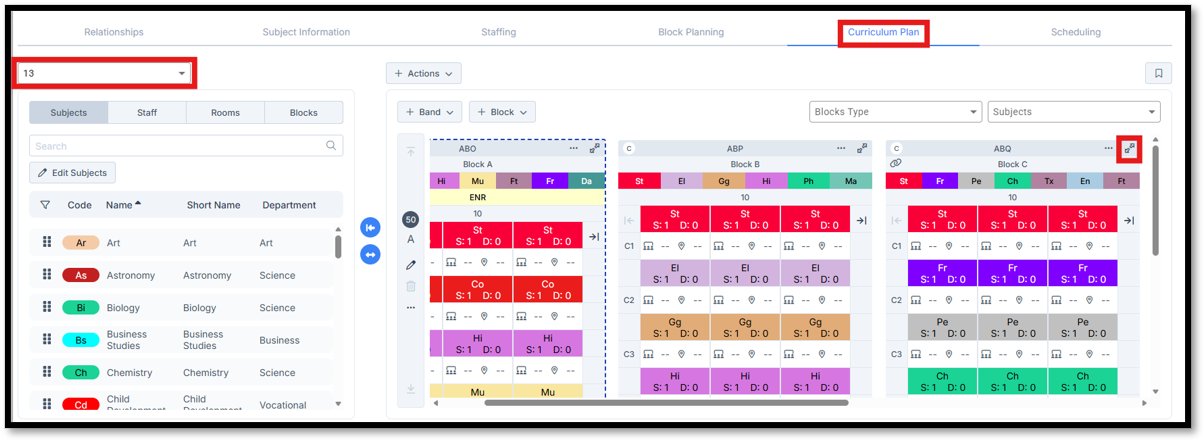
Using the Subjects tab within the left-hand panel, locate the required subject and add the first period of the additional class to the block.
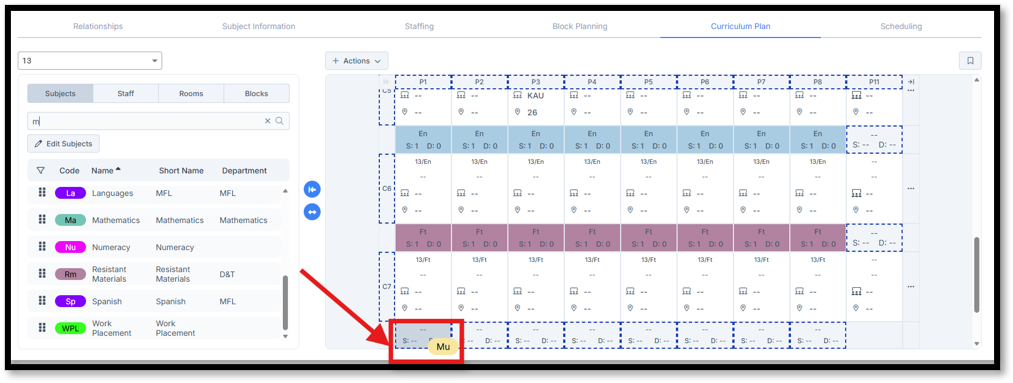
Drag and drop the same subject onto the Class Number cell to populate the remaining periods for that class.
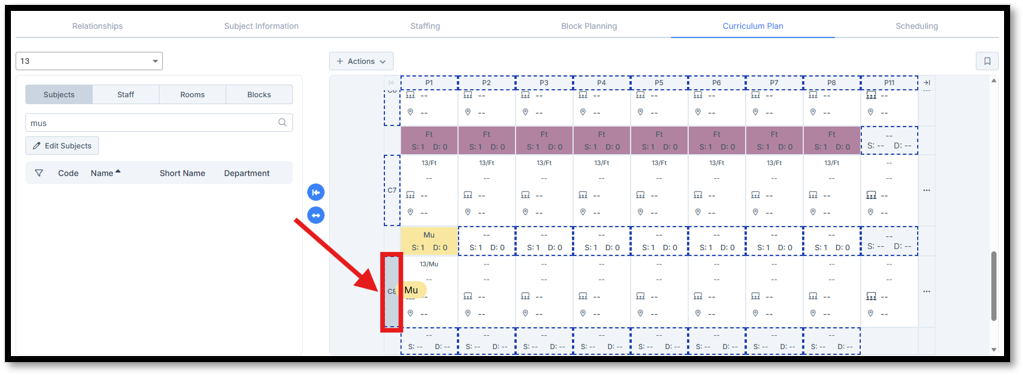
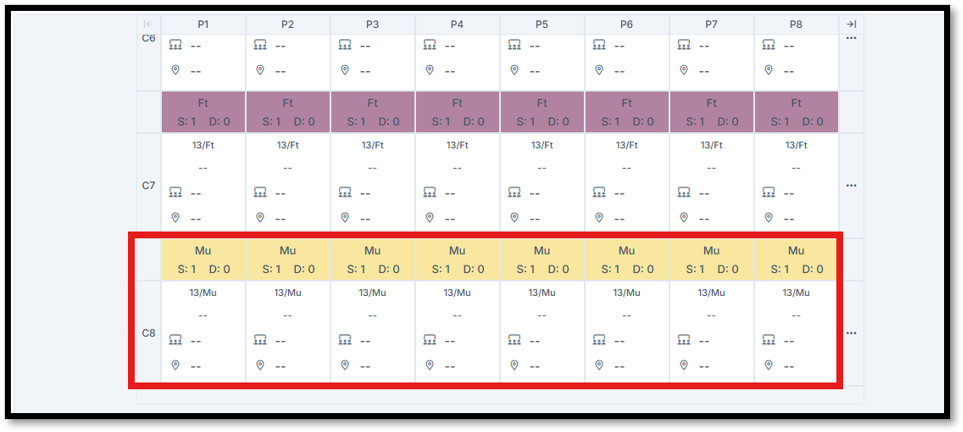
Note: If the full number of periods is not required for the additional class, a Study subject can be used to fill any remaining periods within the block.
In the example shown below, there are now two Music classes, each with ten periods per cycle. The relevant students can be assigned to both classes, giving them a total of twenty Music periods per cycle.
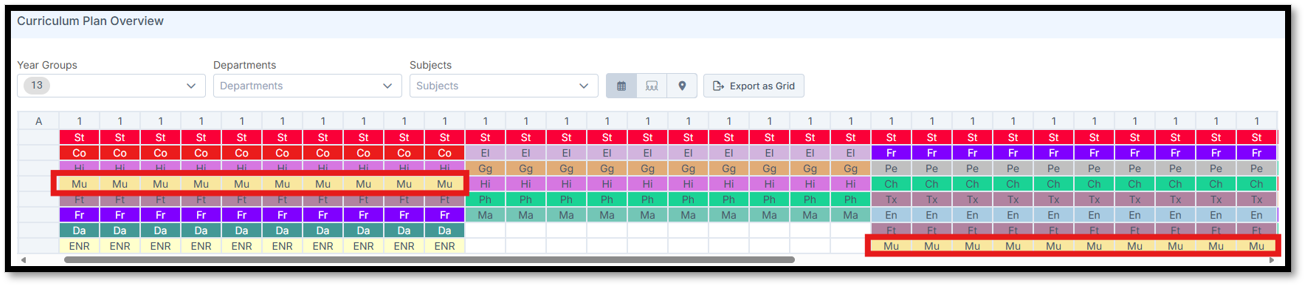
This section outlines the steps required in wTimetable to support Post-16 supervised study periods. These sessions provide structured study time for students when they are not attending timetabled lessons, while also enabling attendance and registration requirements to be managed effectively.
Pre-Requisites:
- The year groups and students requiring supervised study periods have been identified.
- The number of supervised study sessions required within the timetable cycle has been agreed.
- Staffing or supervision arrangements for the study sessions have been agreed in advance.
- A Study subject has been created.
Post-16 supervised study periods can be managed by adding an additional staffed Study class to each timetabled block. Where a student is not studying one of the taught subjects within a block, they can instead be assigned to the Study class, ensuring a timetabled session appears on their timetable rather than a free period.
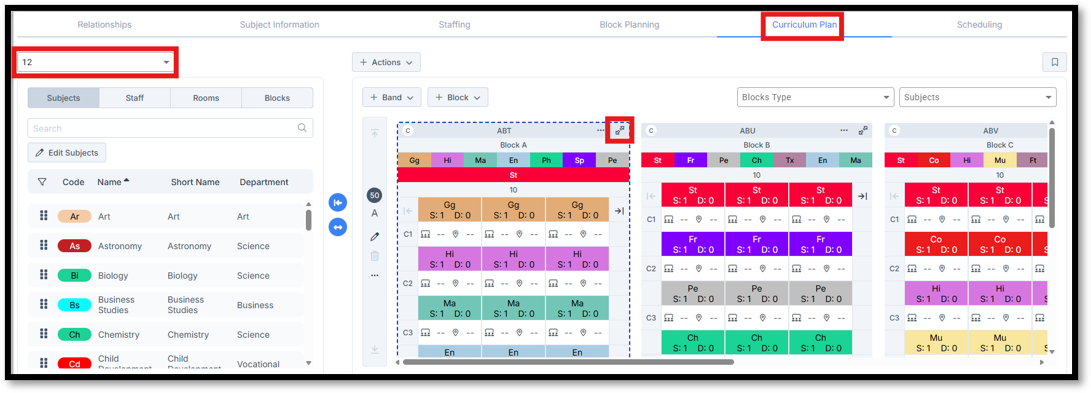
Navigate to Curriculum Plan, select the required year group and, one block at a time, expand each block using the arrow icon in the top-right corner.
Using the Subjects tab within the left-hand panel, locate the Study subject and add it to the block to create an additional class.
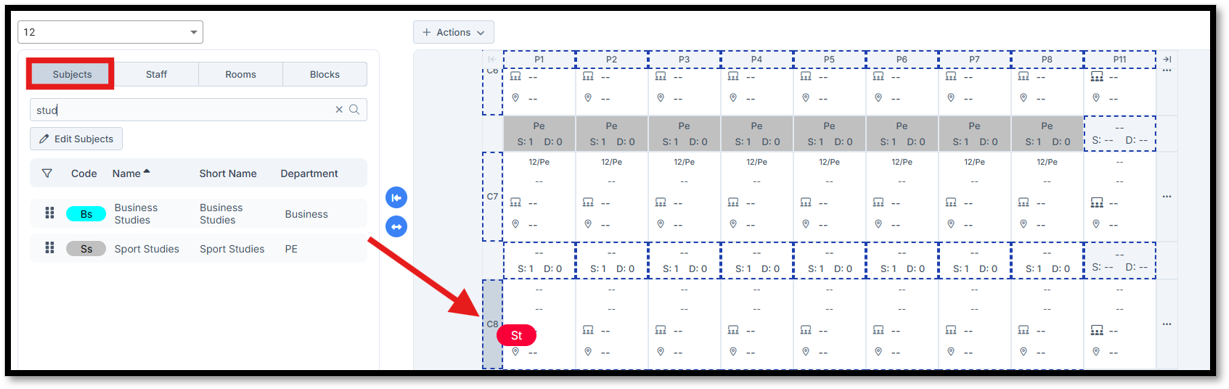
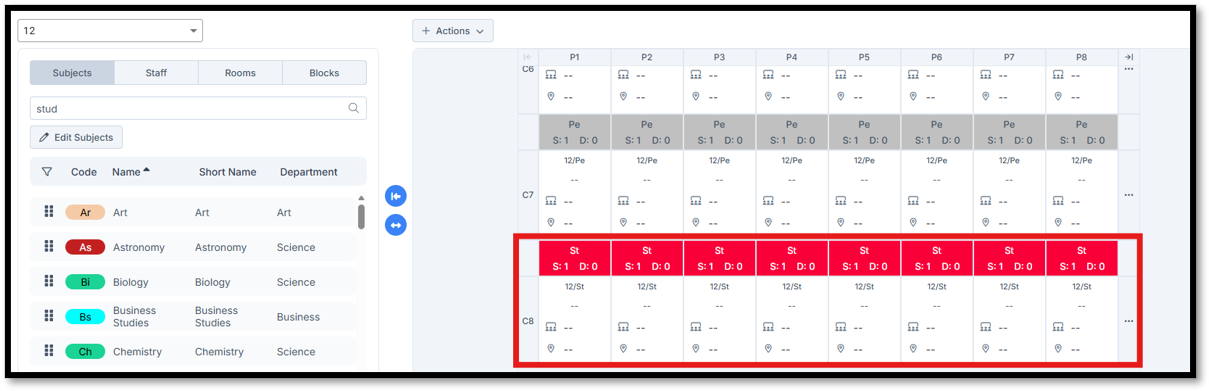
The Study class can then be staffed and roomed as required before being scheduled alongside the rest of the timetable using the standard scheduling process.
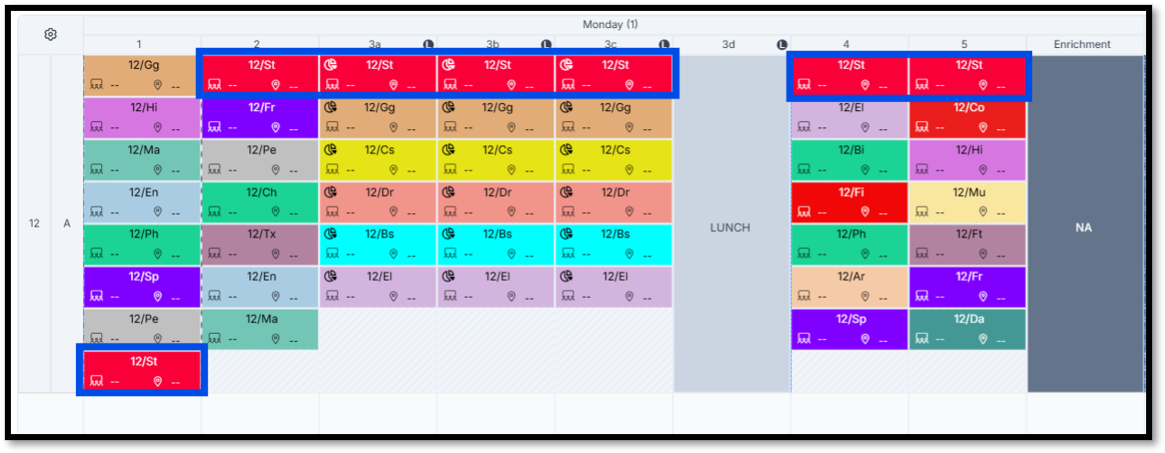
Once the timetable has been imported into the MIS, students can be assigned to the appropriate Study classes. This ensures that students who are not attending a taught lesson during a particular block are allocated to a supervised study session where attendance can be recorded.
Staffing Challenges
This section outlines the steps required in wTimetable to support schools operating across multiple sites. In these environments, staff may be required to teach at different locations throughout the timetable cycle, creating additional scheduling considerations around travel time and site availability.
Pre-Requisites:
- The user has identified all school sites and the staff who are required to work across them.
- One site’s timetable has already been completed (typically the site with the most constraints), allowing travel requirements for staff working across multiple sites to be identified and accommodated within the remaining timetable.
- The travel time required between sites is known.
Once it has been established when staff are required to travel to another site to deliver lessons, the relevant periods within their timetable can be made unavailable using Non-Contact Codes, including any time required for travel.
This ensures that, as the remainder of the timetable is scheduled, those members of staff cannot be assigned to other classes during either the teaching period or the associated travel time.
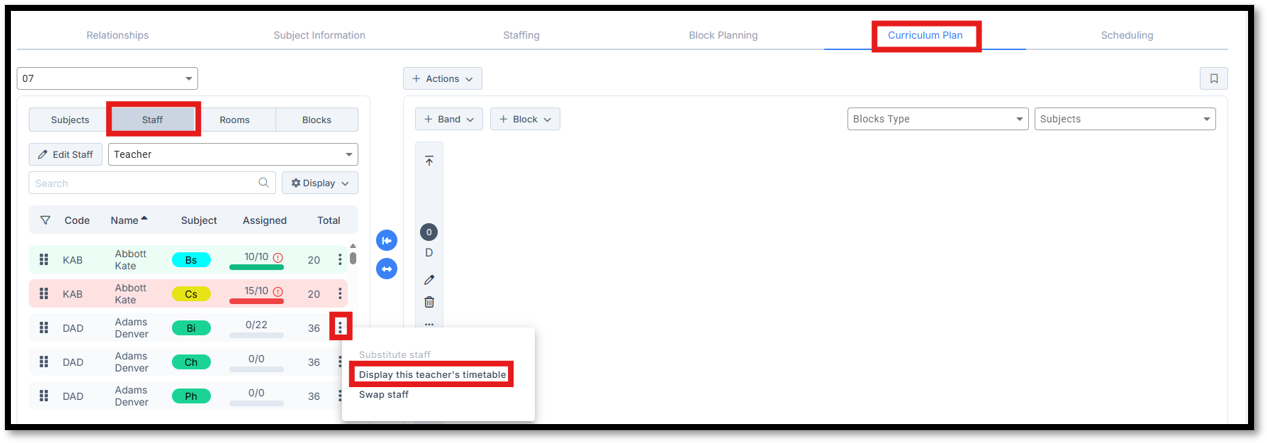
To add Non-Contact Codes to a staff timetable, navigate to Curriculum Plan and, using the Staff tab within the left-hand panel, locate the required member of staff and select Display this teacher’s timetable from the three-dot menu.
To apply a Non-Contact Code to specific periods, including both teaching and travel time, right-click to select the required periods, then left-click and select Non-Contact Codes, choosing the appropriate code from the list.
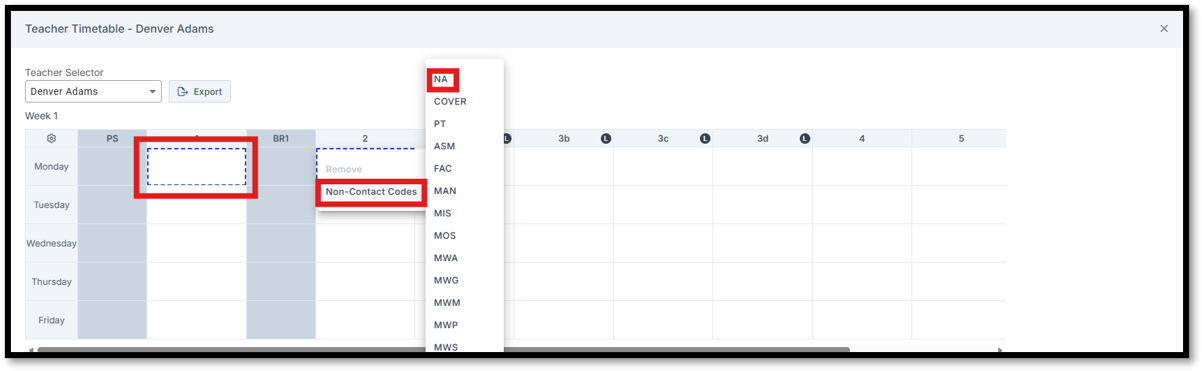
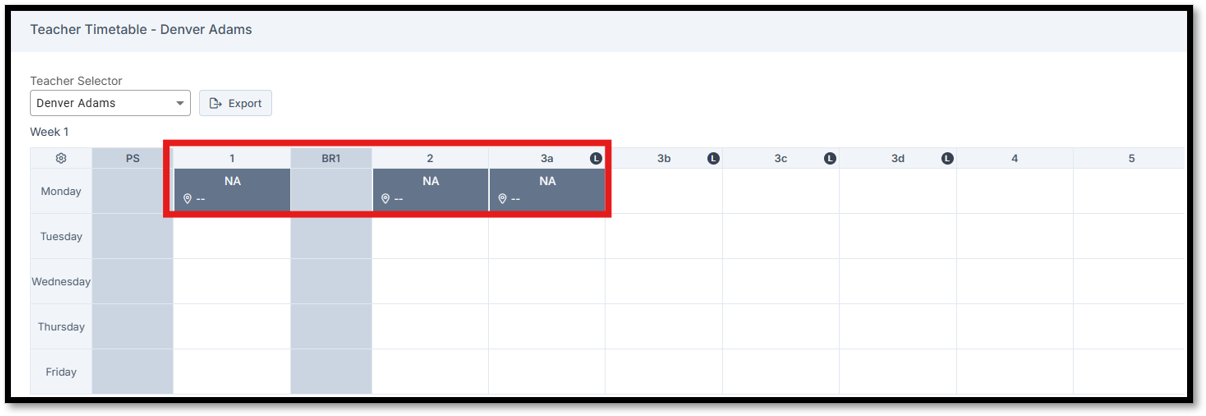
Once applied, these periods will be treated as unavailable during scheduling, preventing the member of staff from being assigned to other classes during those times.
Facility Constraints
This section outlines the steps required in wTimetable to support the scheduling of timetables where specialist rooms (such as labs, workshops, cooking rooms, etc.) are limited, and therefore the number of lessons that can be scheduled at the same time must be restricted.
Pre-Requisites:
- The user has prior knowledge of the specialist rooms available and the subjects that require them.
- The number and capacity of specialist rooms are known before timetable construction begins.
- Any subjects that can only be taught in specialist rooms have been identified in advance.
To ensure limited rooms are not overbooked, rooms first need to be associated with the relevant subject.
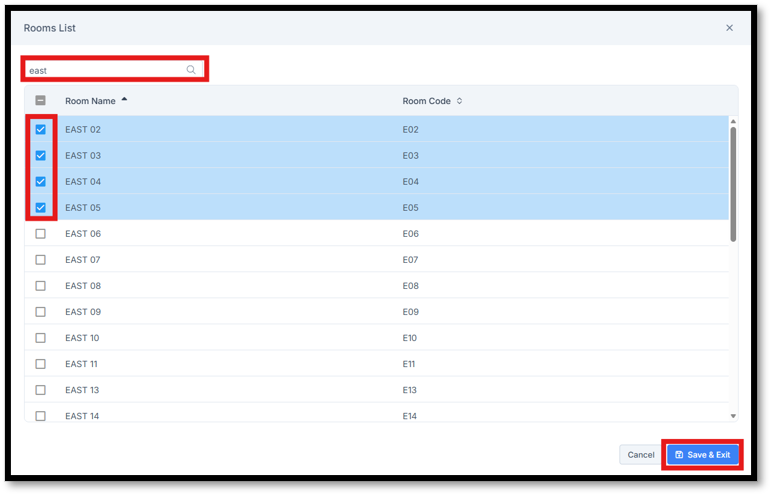
Navigate to Relationships, search and select the required subject, then select the Room tab on the right-hand side and click Add Room.

Select the required room(s) from the list, then click Save & Exit.
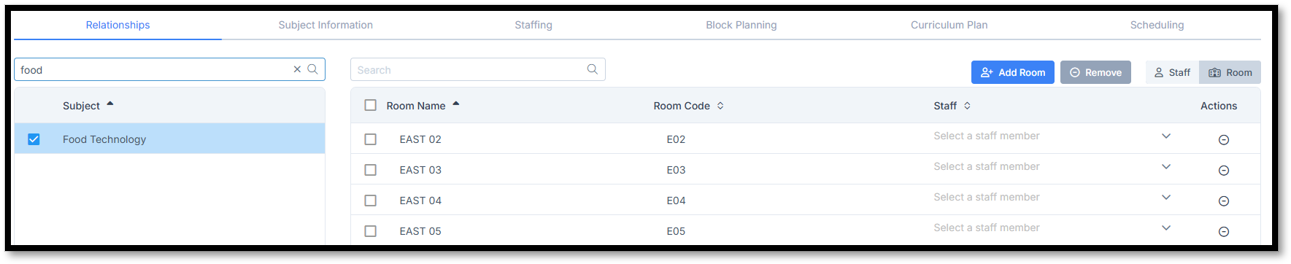
Now that the rooms are associated with the subject, a limitation rule can be added to guide the auto-schedule process and prevent the subject from being scheduled too many times within the same period.
Navigate to Scheduling > Actions > Timetable Specifications.
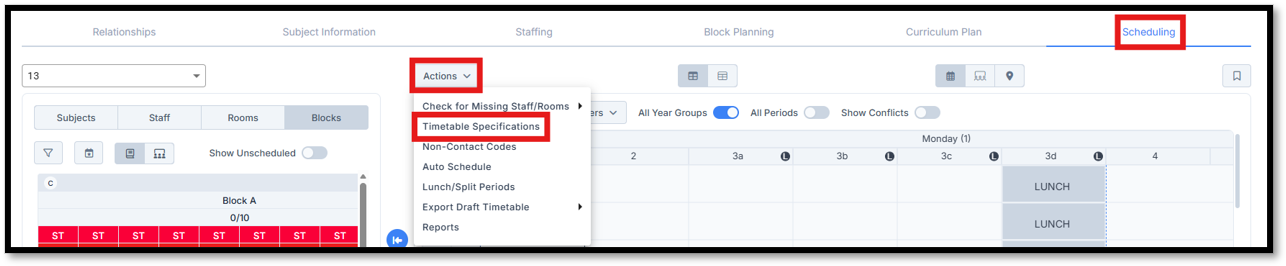
Using the Limitations tab, add a new rule by clicking Add New Row.
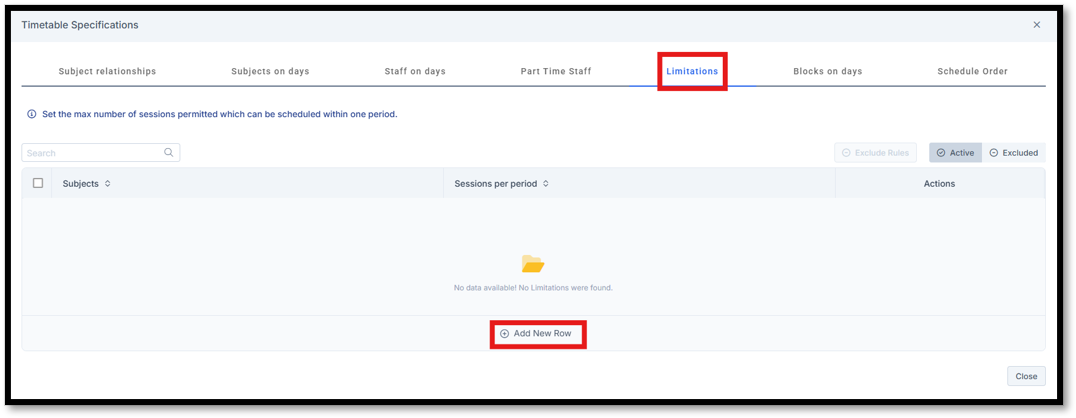
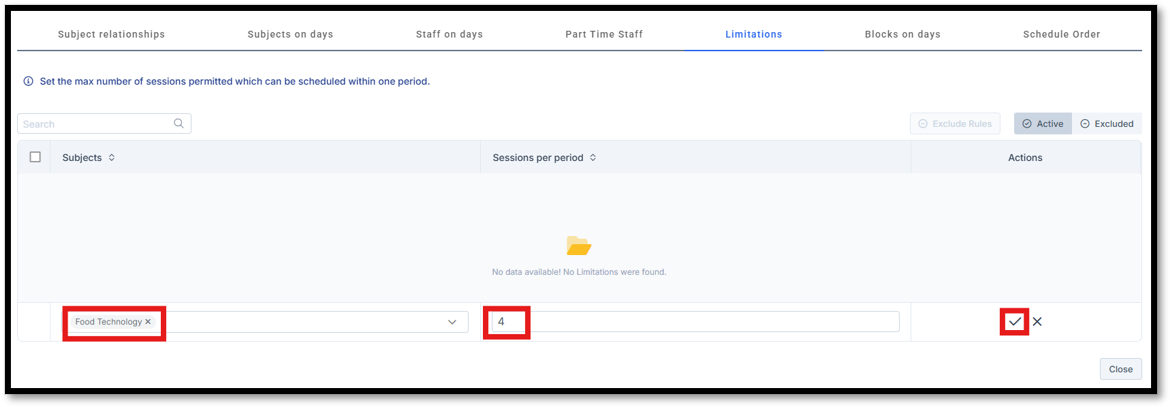
Select the Subject associated with the limited specialist rooms, then enter the maximum number of sessions that can be scheduled within a single period.
Click the Tick icon on the right-hand side to save the rule.
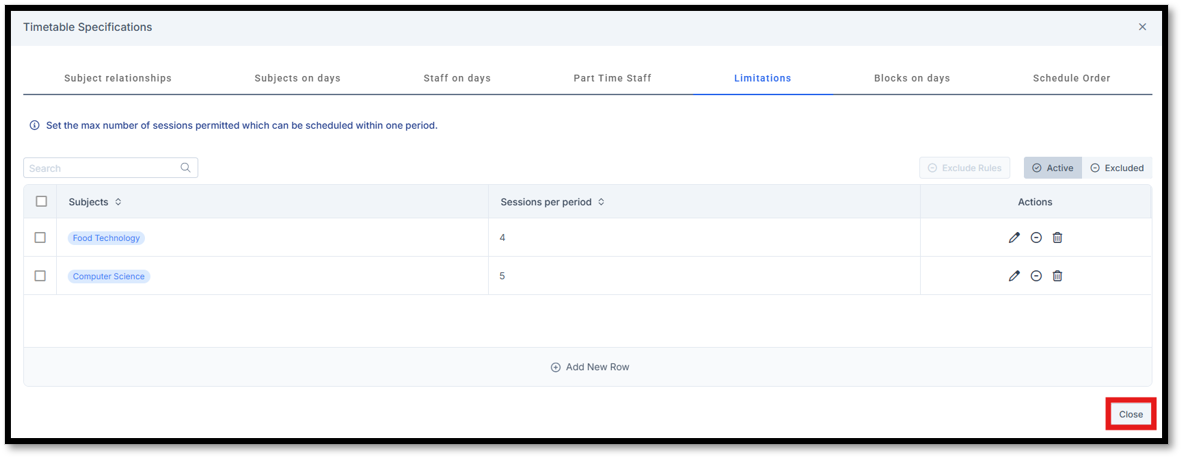
Add further rules if required, then click Close.
The standard Auto-Schedule process can now be used to schedule the timetable, ensuring that no more than the specified number of sessions are allocated within a single period.
This section outlines the steps required in wTimetable to support shared facilities across schools.
Pre-Requisites:
- The schools involved have agreed in advance when facilities will be used at each establishment.
- The user has prior knowledge of how to create Rooms and Non-Contact Codes.
- The facilities have been created as Rooms within each school wTimetable project.
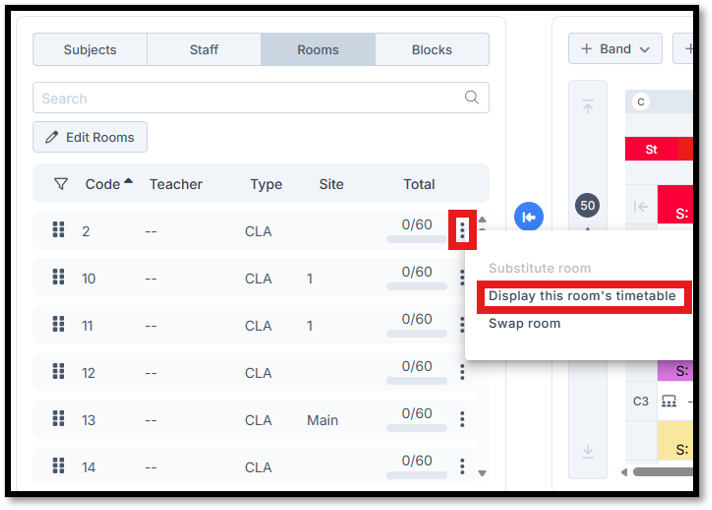
For the school whose facility is being used, navigate to Curriculum Plan and select Rooms from the left-hand panel.
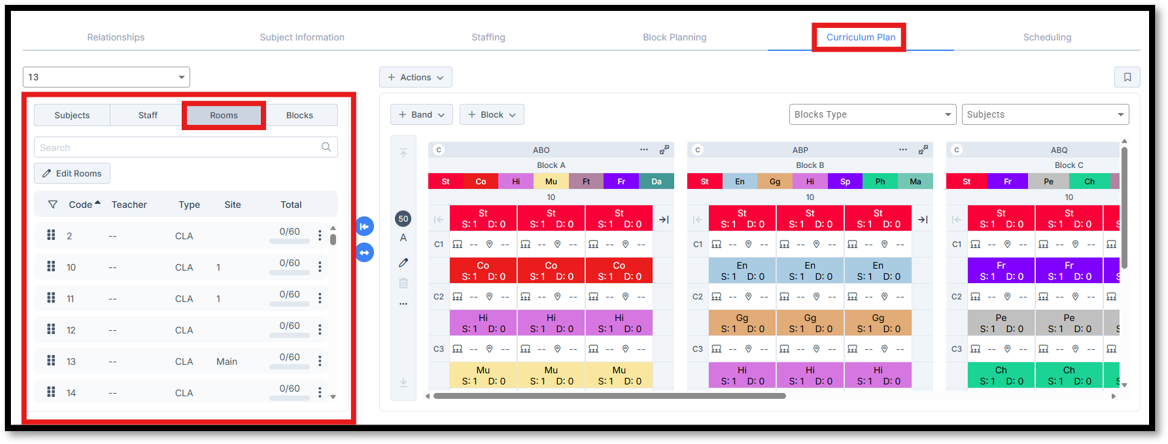
Locate the required room within the list, click the three-dot menu icon on the right-hand side and select Display this room’s timetable.
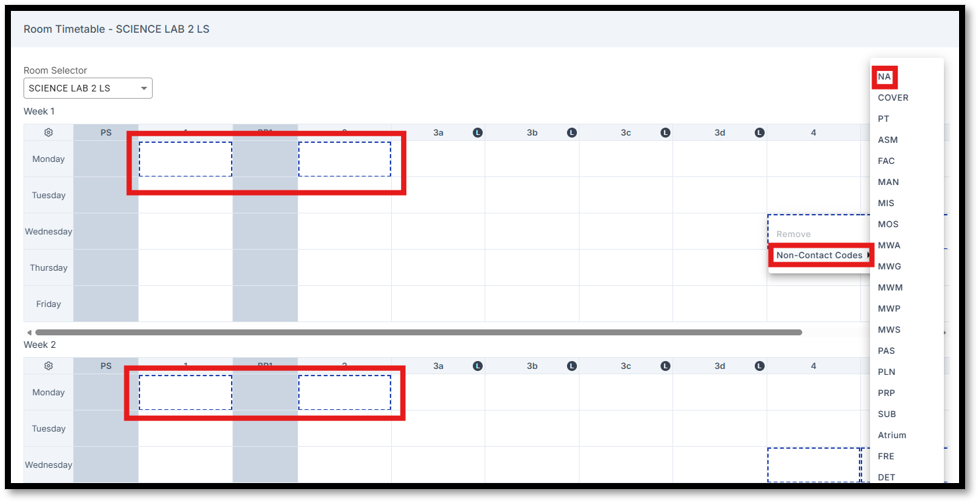
Right-click the relevant periods when the room/facility will be in use by the visiting school, then left-click to assign a Non-Contact Code.
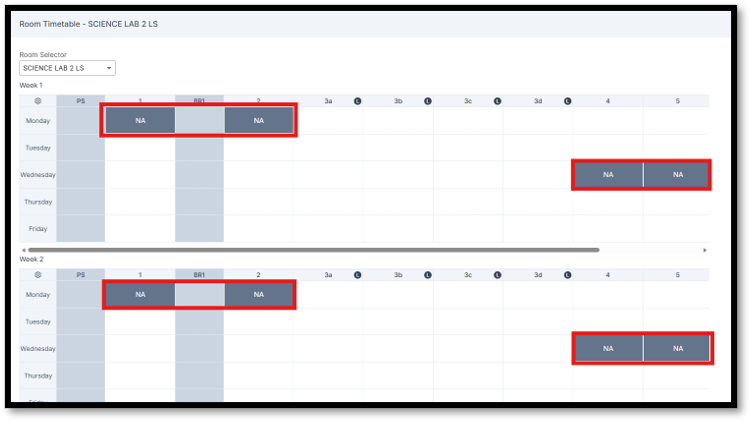
The standard Auto-Schedule process can now be used to schedule the timetable, ensuring rooms/facilities are not allocated during assigned Non-Contact periods.
For the school using the off-site facilities, ensure the required room/facility has been created. Then navigate to Curriculum Plan and assign it to the relevant classes.
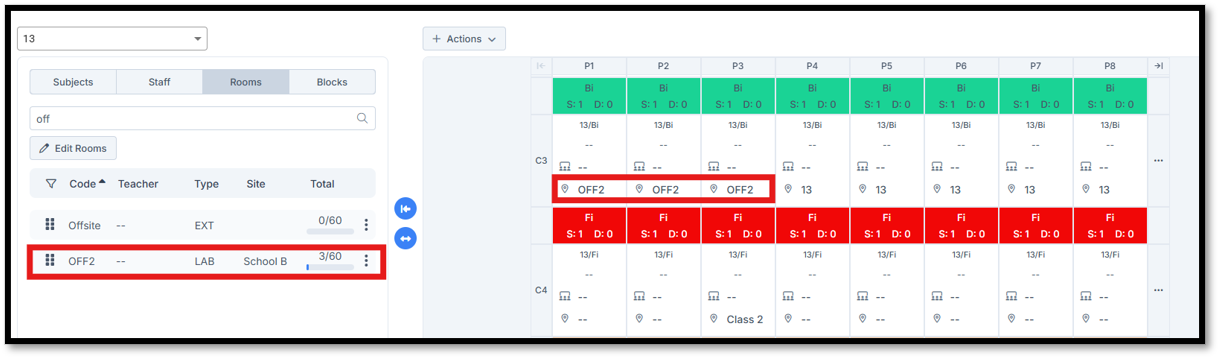
Navigate to Scheduling and manually place the blocks associated with the off-site facility into the required timetable slots.
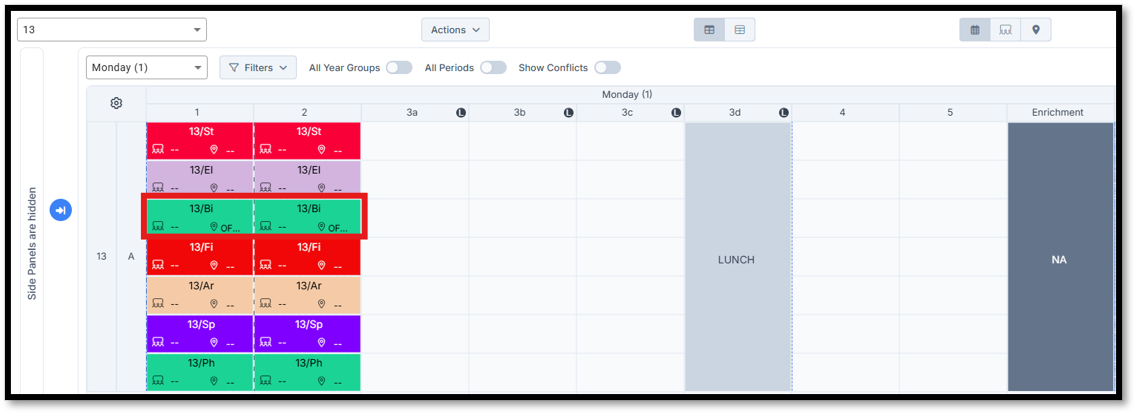
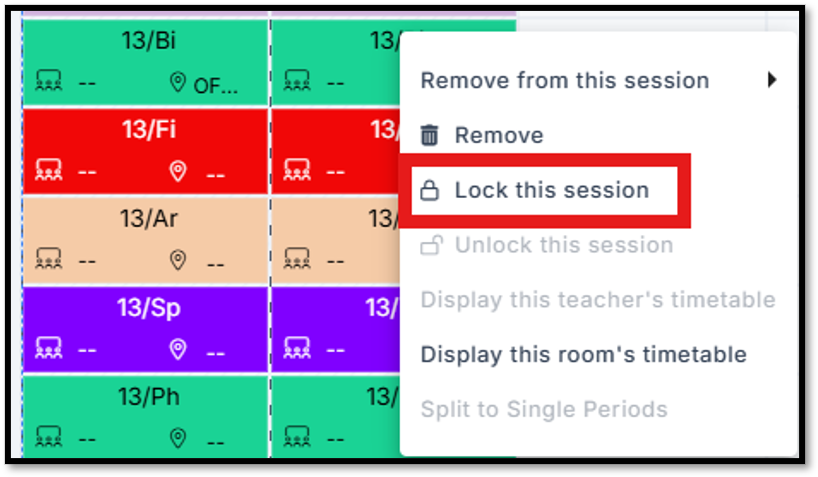
To prevent the period(s) from being moved during Auto-Scheduling, left-click each period and select Lock this Session.
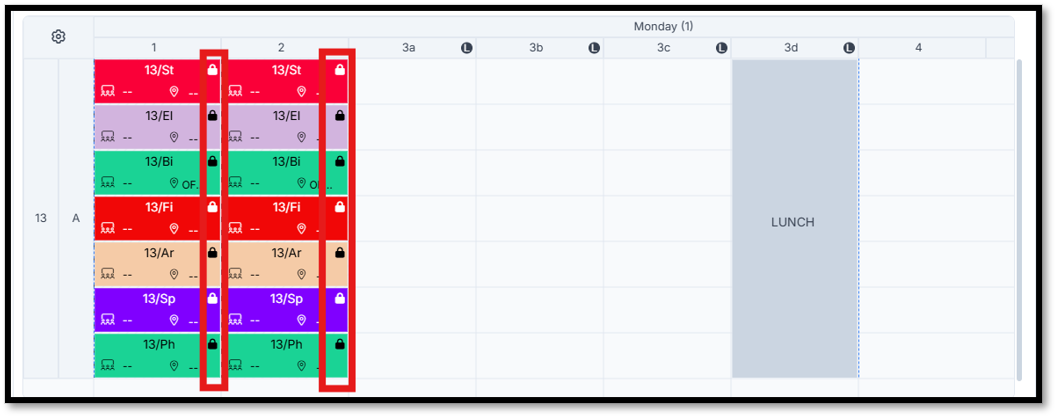
The standard Auto-Schedule process can now be used to schedule the rest of the timetable, while ensuring the periods associated with the off-site facility remain fixed.
Alternative Delivery Models
This section outlines the steps required to create timetable models that support shorter periods for specialist provision, enabling them to be combined into longer, standard class-length sessions and facilitating structured lunch rotations.
Pre-Requisites:
- The user has prior knowledge of how to build a period structure in Bromcom and assign it to the wTimetable Project/Timetable file.
- The user has prior knowledge of the designated lunch slots and required session lengths for each year group.
Period Structure and Split Lunch Arrangements
Navigate to Config > Curriculum > Period Structures, then create a period structure with the required number of teaching periods, setting each period to the desired length.
Ensure additional teaching periods are included to accommodate the split lunch arrangement.
Note: The example below uses 20-minute periods.
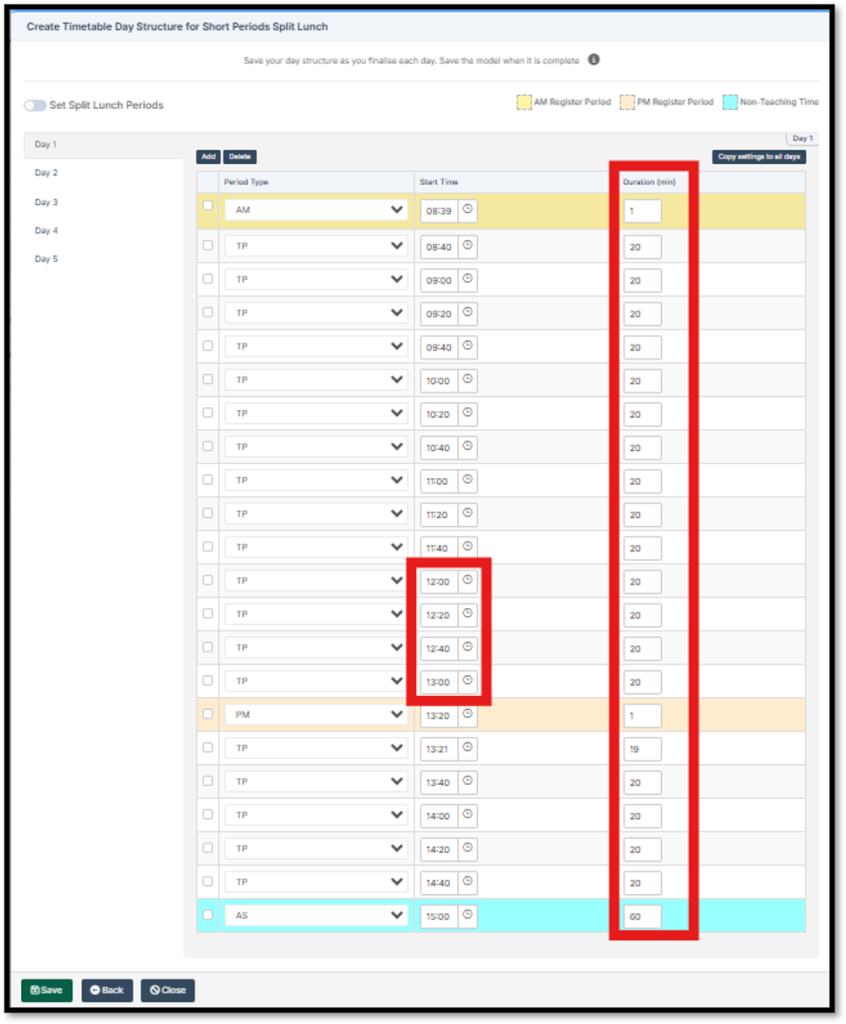
Within wTimetable, create a new project (if required) and timetable file, ensuring the short periods/split lunch period structure is applied.
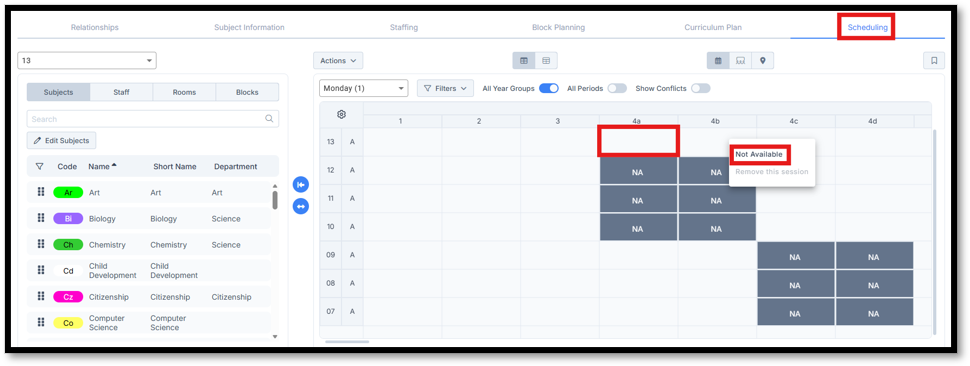
To allocate lunch periods to each year group, navigate to Scheduling and left-click the relevant periods to mark them as Not Available for scheduling.
Linked Periods
To enable different cohorts to have longer teaching sessions within a shorter length period model, the Linked Periods feature in wTimetable can be used with Simple, Linear, and Option blocks.
For example, if Year 11 lessons need to be 60 minutes in length, three 20-minute periods can be linked together. During the auto-scheduling process, wTimetable will schedule these linked periods consecutively.
This feature also allows linked periods to span non-teaching break and lunch periods where required.
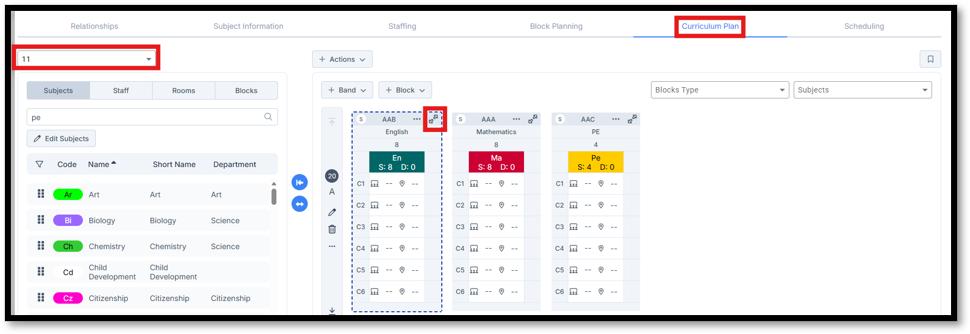
To configure linked periods, navigate to Curriculum Plan, select the required year group, and expand the relevant block(s).
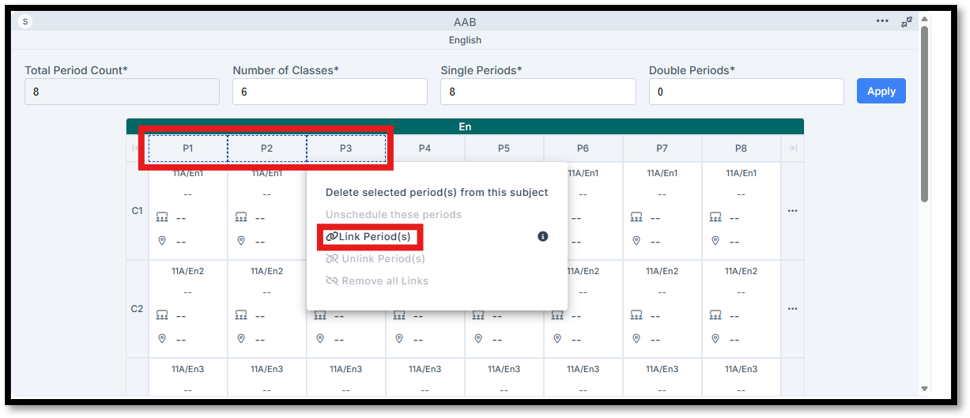
Right-click the required period headers to select the periods that need to be linked, then left-click and select Link Period(s).
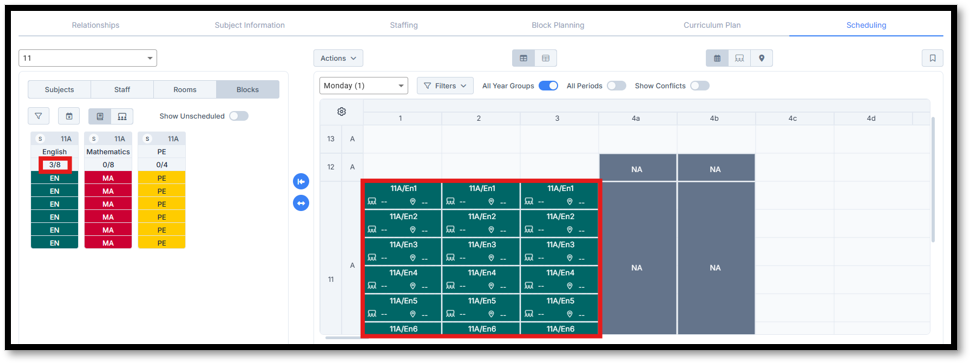
The linked periods will now be displayed as shown in the screenshot below.

The standard Auto-Schedule process can now be used to schedule the timetable. Linked periods will be timetabled consecutively, including across non-teaching break and lunch periods where required.
This section outlines the steps required in wTimetable to support the scheduling of pre-school and after-school sessions. These sessions may be used for intervention programmes, revision classes, enrichment activities, pupil supervision, or other structured support outside of the standard school day.
Pre-Requisites:
- The pre-school and/or after-school sessions to be delivered have been identified.
- Staffing requirements, including supervision responsibilities, have been agreed in advance.
- Additional timetable periods required to accommodate the sessions have been established within the period structure before timetable construction begins.
Pre-school and after-school sessions can be managed by creating an additional band within each year group that will be dedicated to activities taking place outside of the standard school day.
Important: To schedule supervised sessions before and/or after school, ensure that additional teaching periods have been added to the Period Structure in Bromcom at the required times. When creating the timetable file in wTimetable, ensure this period structure is selected.
To create an additional band, navigate to Curriculum Plan, select the required year group and, from the Band drop-down menu, add a new band.
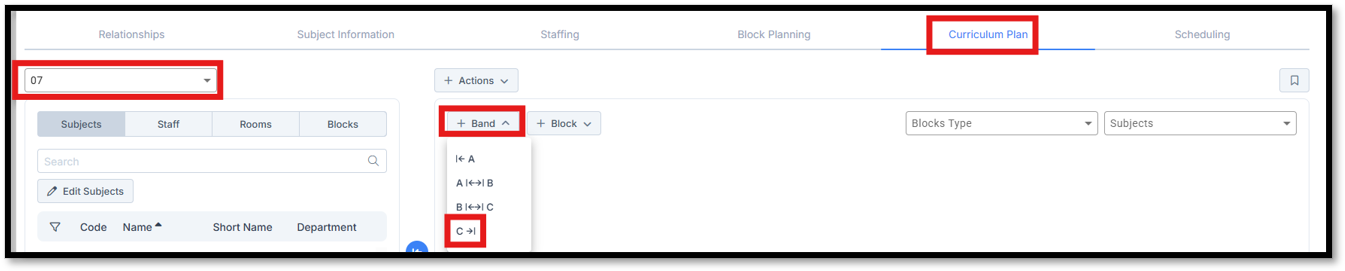
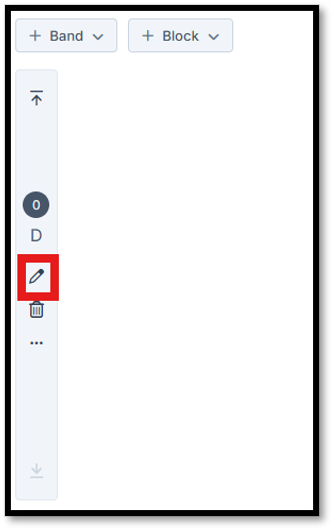
The band can be renamed to distinguish it from standard timetabled bands by clicking the pencil edit icon on the left-hand side, updating the label and clicking the tick icon to save the changes.
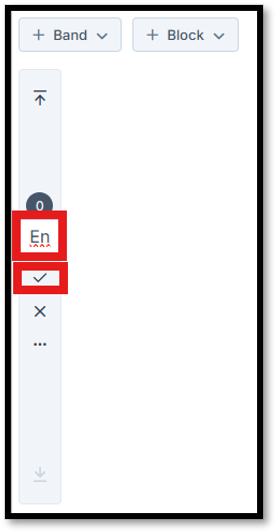
The required classes can then be created and staffed within the band using the standard curriculum planning process.
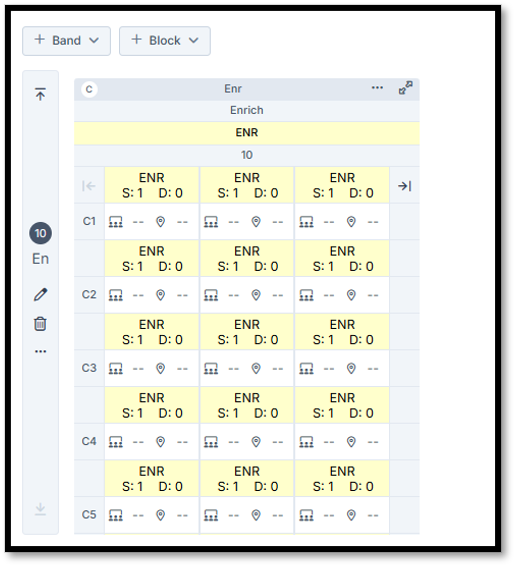
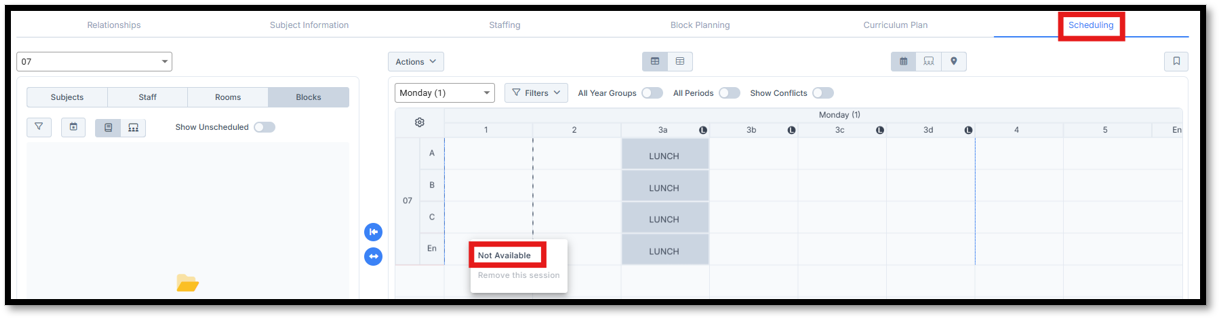
Before scheduling the pre-school or after-school classes, it is recommended that all standard teaching periods within the dedicated band are marked as unavailable. Likewise, the pre-school and/or after-school periods can be marked as unavailable for all standard bands.
Navigate to Scheduling, left-click the required period(s) and select Not Available.
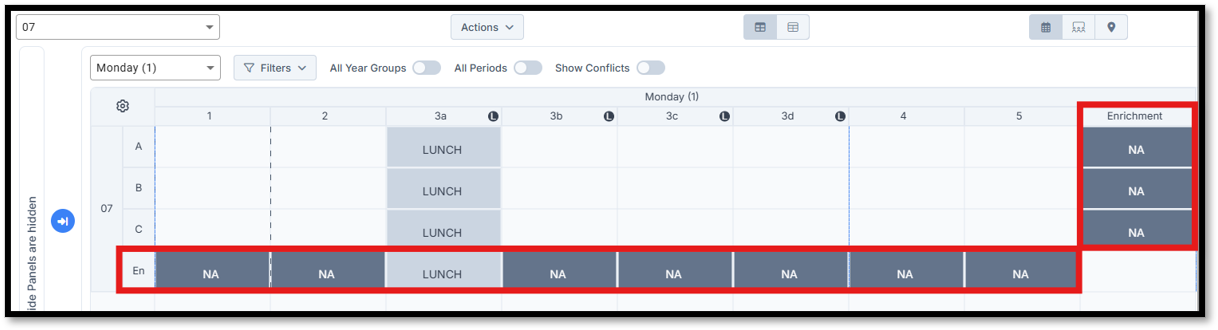
The standard Auto-Schedule process can then be used to schedule the sessions alongside the rest of the timetable, ensuring they are placed within the designated pre-school or after-school periods.