
This guide is the first in the three-part series covering the end-to-end process for Bromcom’s wTimetable software. It focuses on the pre-planning stage, where resource and curriculum information is entered and organised to establish the foundation for timetable creation and ensure sufficient staffing and allocation of subjects and classes.
The Pre-Planning Guide is divided into the following sections:
THE SCREENSHOTS USED IN THE GUIDE ARE FOR ILLUSTRATION PURPOSES ONLY AND MAY DIFFER IN A LIVE SCHOOL’S MIS.
- Expand each item for guidance on the various functions within the wTimetable Module in Bromcom.
- To print this as a checklist, click ‘Collapse All’ (button on the right), then right-click the page and select ‘Print’.
- To print this as a full guide, click ‘Expand All‘, then right-click the page and select ‘Print‘.
Project and Timetable File Creation
The Project Wizard guides users through the six steps required to create a Project. A Project contains the core data used to build a timetable and is created using the following steps:
- Step 1 Project Details
- Step 2 Year Groups
- Step 3 Subjects
- Step 4 Rooms
- Step 5 Staff
- Step 6 Non Contact Codes
Additional tasks:
Navigate to Modules > wTimetable, then select +New in the top-right corner.

Step 1 Project Details
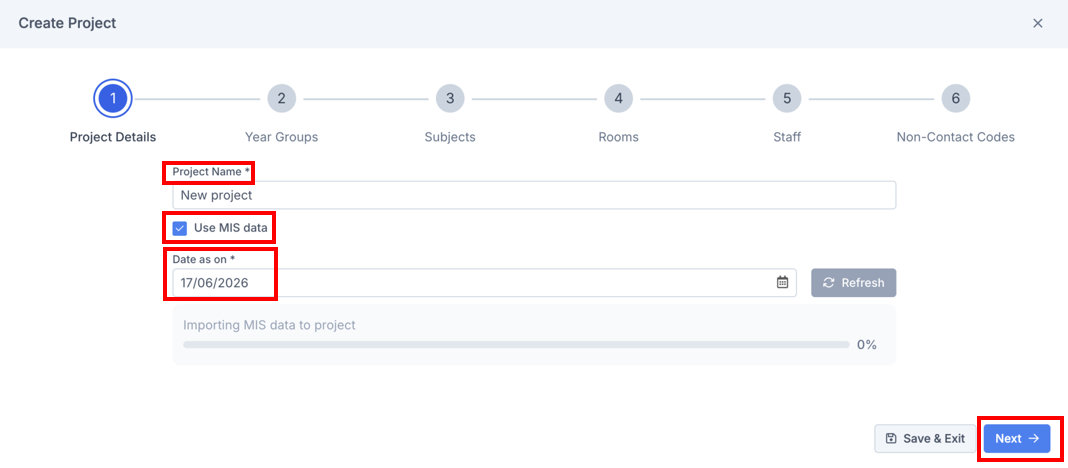
Enter a Project Name and select Use MIS data to import data from the MIS.
Note: When Use MIS data is selected, the Date as on field is enabled and defaults to today’s date. This date can be amended, if required, to include future MIS data, such as a member of staff with a future start date.
Select Next to begin importing MIS data. Once the import reaches 100%, the wizard will automatically progress to Step 2.
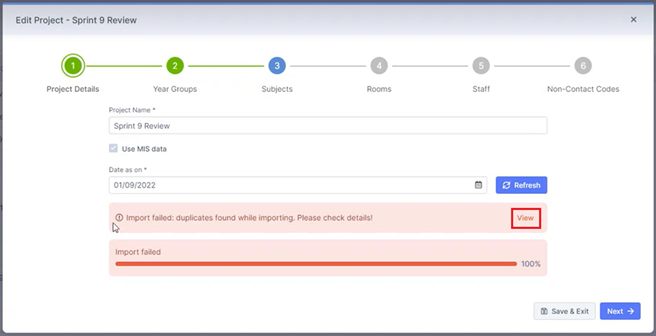
If an Import Failed message is displayed, select View to review the reason for the failure and identify any action required.
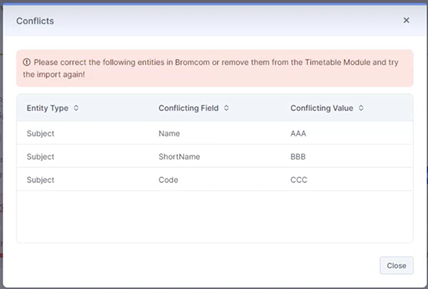
Tips:
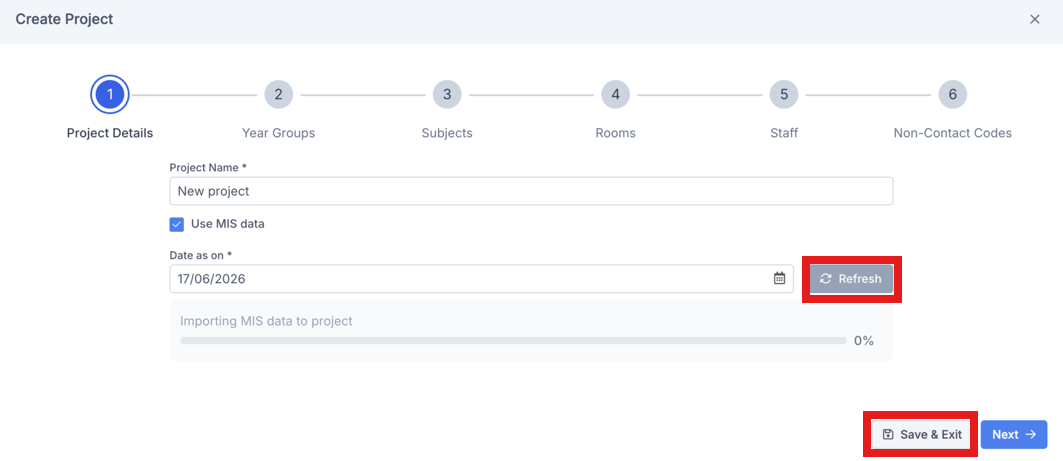
- Select Save & Exit to save progress and return to the Project Wizard at a later time.
- Select Refresh (available after the initial import) to update MIS data if changes have been made, such as adding a new subject within the MIS. Any new entities imported will be available in timetables associated with the project.
Step 2 Year Groups
Review the Year Groups imported into the project and determine whether any should be excluded from the timetable project.
To exclude a year group, select the required checkbox and then select Exclude.
Click Next.
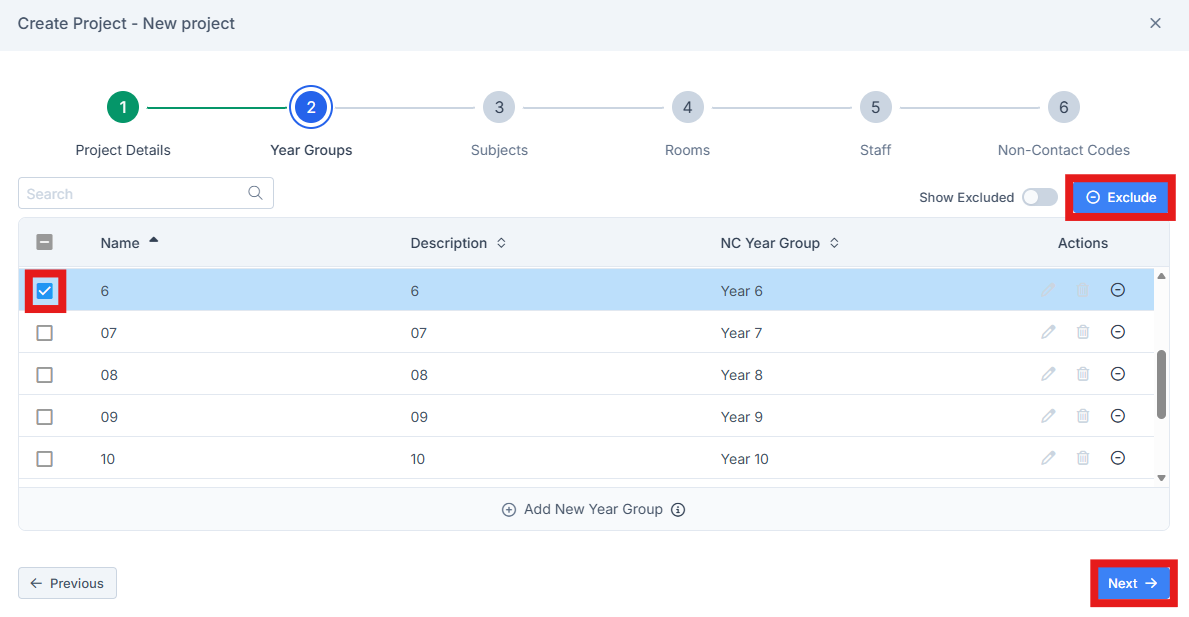
Tip: Use the Show Excluded toggle to display excluded year groups. Excluded year groups will not be included in the timetable.

Additional Options: Records can also be added, edited and deleted from this page. See Additional Wizard Functionality for further information.
Step 3 Subjects
Review the Subjects imported into the project and determine whether any should be excluded from the timetable.
Note: Follow the same process as described in Step 2 – Year Groups to exclude subjects, if required.
Click Next.
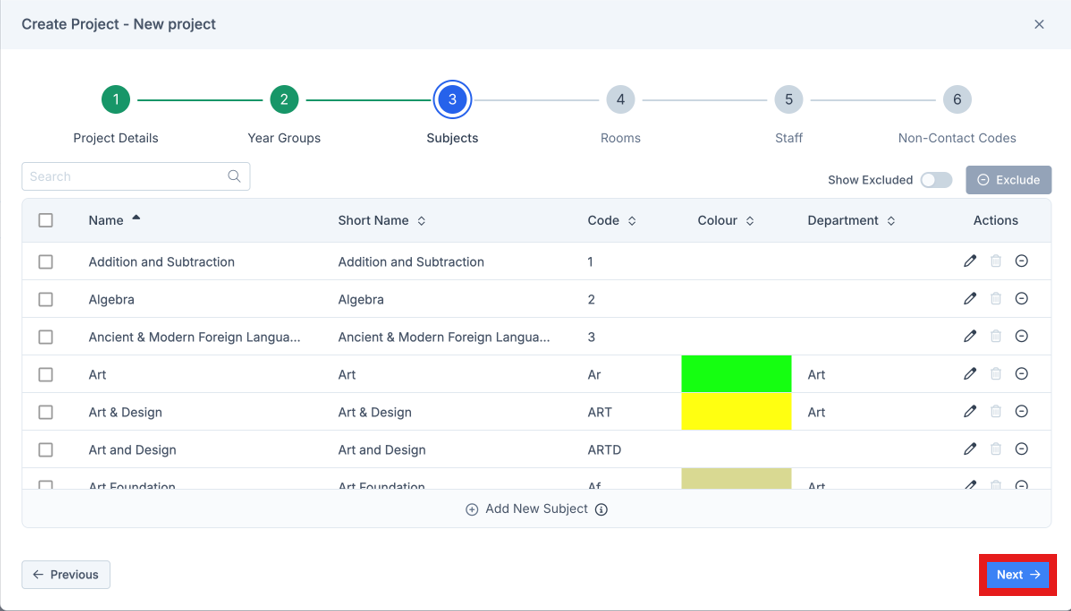
Tips:
- Subject colour codes are imported from the MIS and are used throughout the timetable to help distinguish between subjects. They can be viewed and amended under Groups, where Group Type is set to Subjects.
- The Free Session subject cannot be excluded, as it is automatically used to fill gaps within a block where a subject has fewer periods than others in the same block.

Additional Options: Records can also be added, edited and deleted from this page. See Additional Wizard Functionality for further information.
Step 4 Rooms
Review the Rooms imported into the project and determine whether any should be excluded from the timetable.
Click Next.
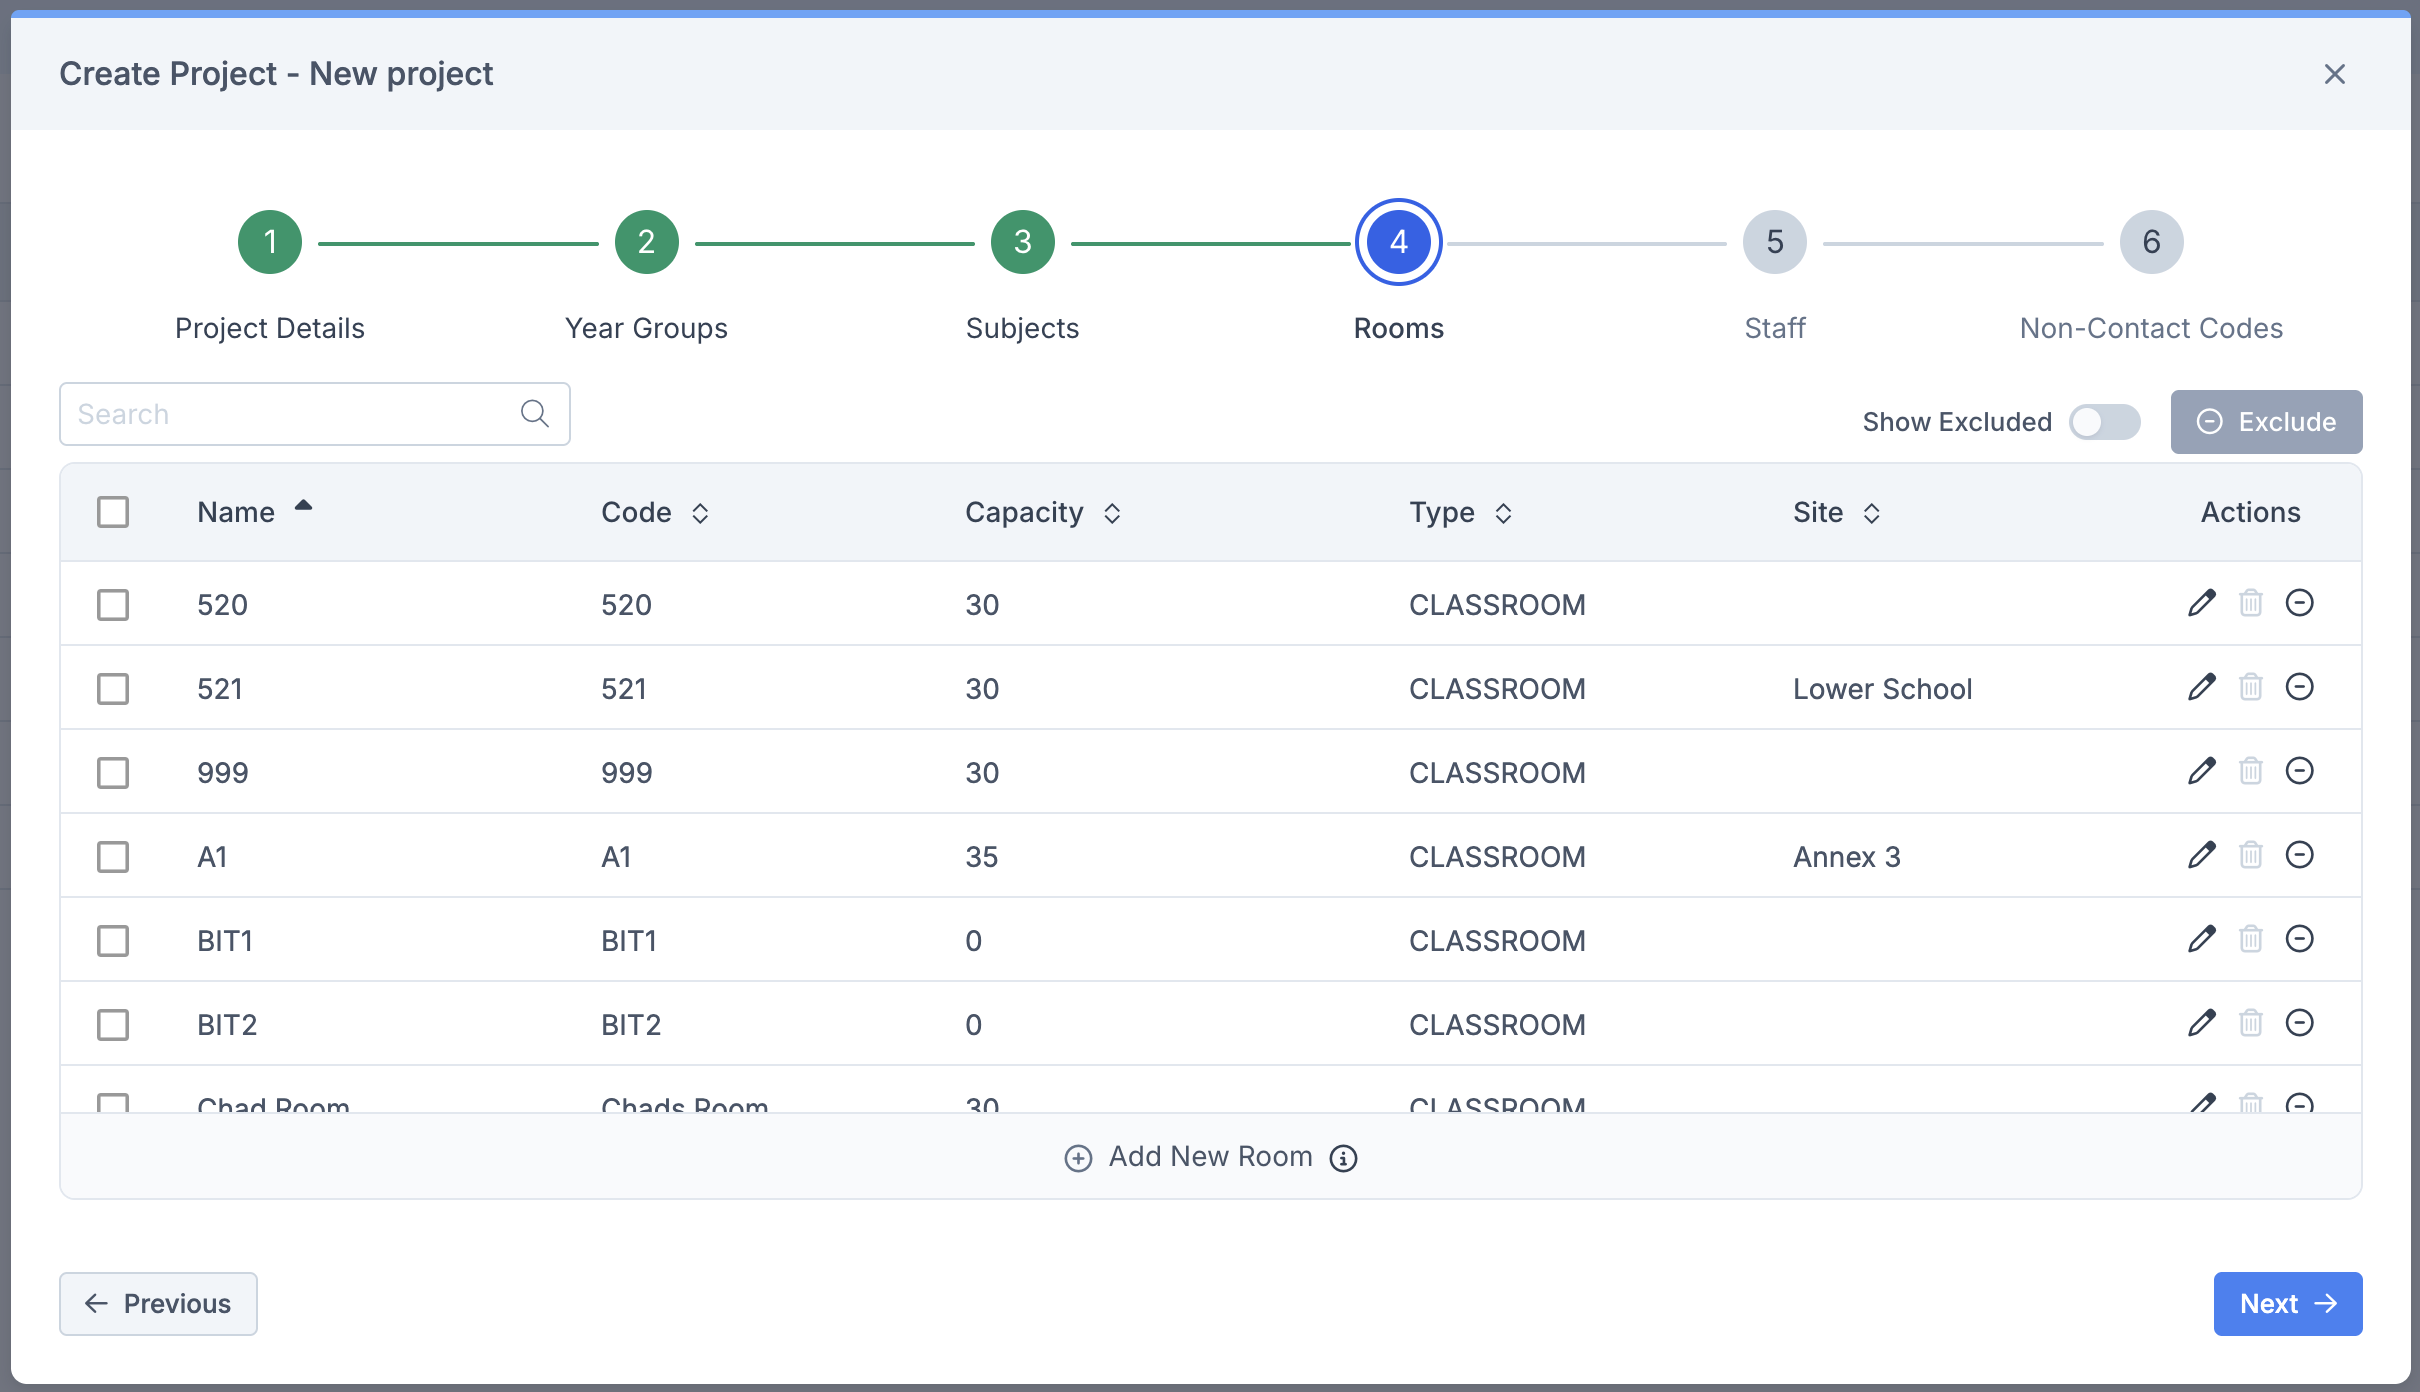
Additional Options: Records can also be added, edited and deleted from this page. See Additional Wizard Functionality for further information.
Step 5 Staff
Review Staff imported into the project and determine whether any should be excluded from the timetable.
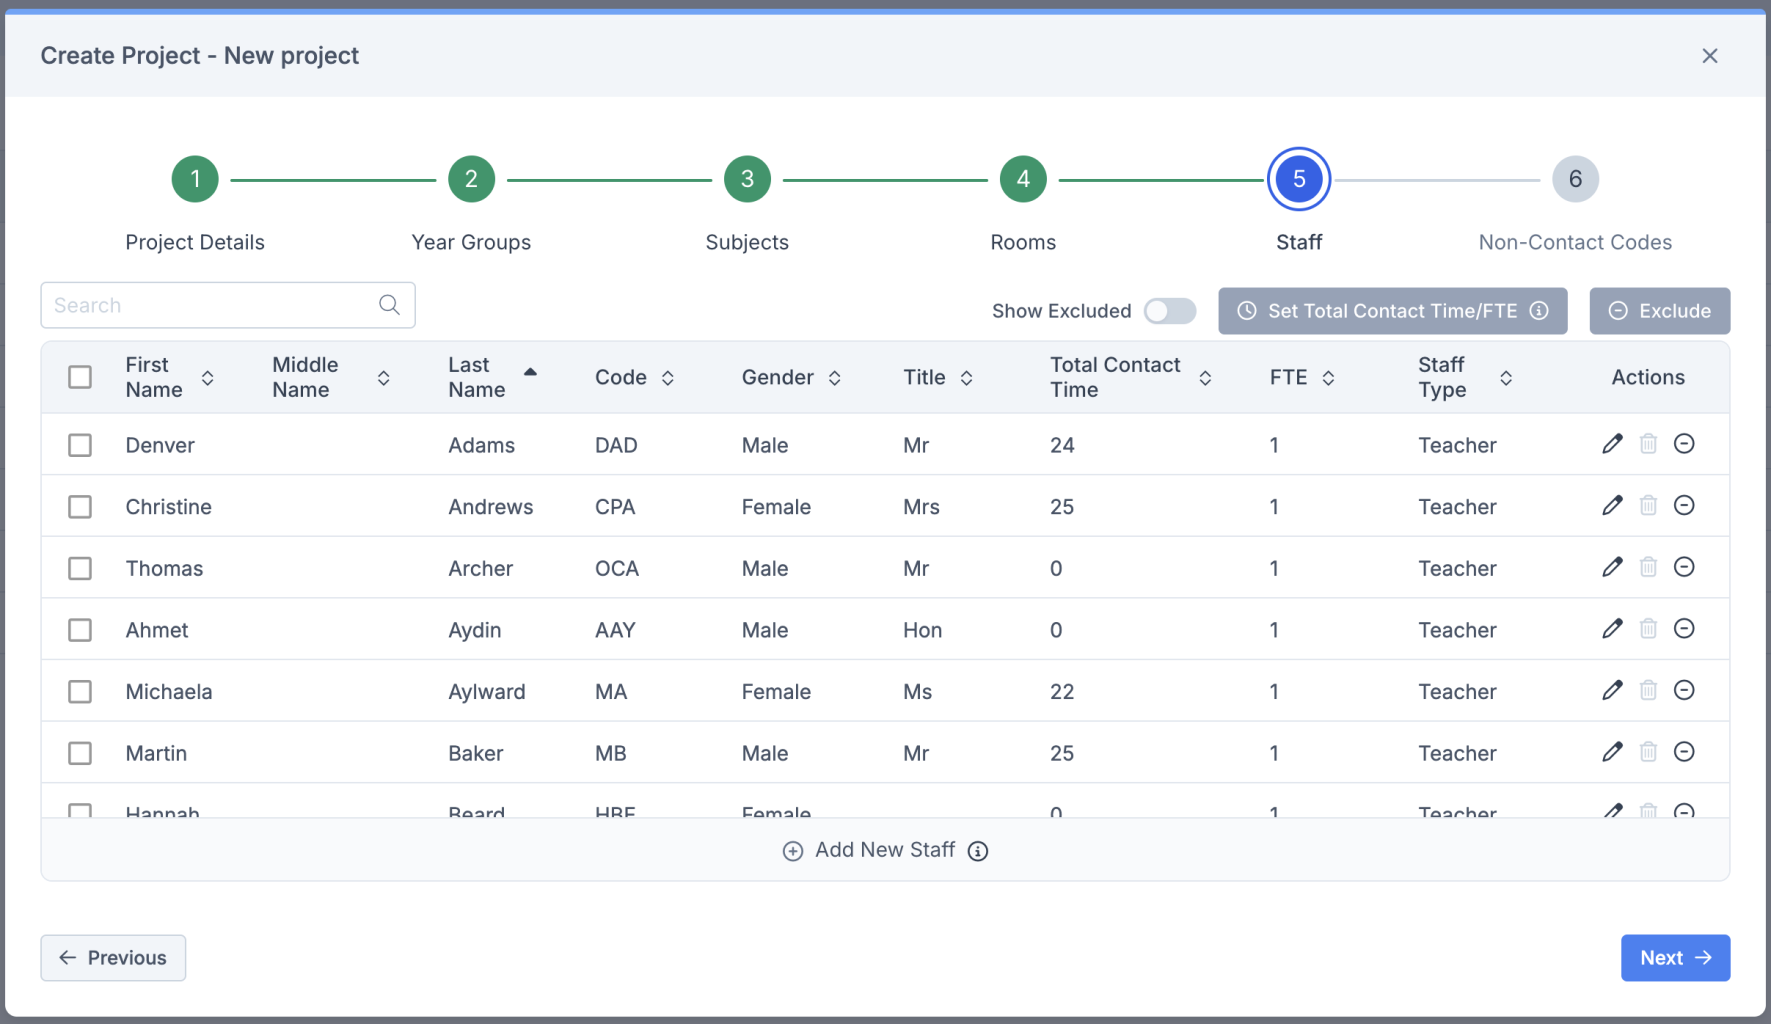
Updating Total Contact Time & FTE
The Total Contact Time and FTE values for staff can be updated at this stage or later from the Staffing page within the timetable.
To edit a staff member, double-click the required record.
- Total Contact Time – Enter the maximum number of teaching periods the member of staff is available to teach. Whole numbers only are accepted.
- FTE (Full-Time Equivalent) – Enter a value between 0.00 and 1.00 (up to two decimal places) to indicate whether the member of staff is full-time or part-time.
Select the ✓ icon to save the changes.

Bulk Edit Total Contact Time and FTE
The Total Contact Time and FTE values can be updated in bulk for multiple members of staff.
Select the required staff records and then select Set Total Contact Time/FTE.
In the pop-up window, choose whether to update Total Contact Time, FTE, or both. Enter the required values and select Save.
A confirmation message will be displayed. Once confirmed, the selected staff records will be updated and a success message will be shown.
Select Next to continue.
Note: When a part time member of staff is amended to a full time member of staff (FTE=1), the user will see the following confirmation:
Additional Options: Records can also be added, edited and deleted from this page. See Additional Wizard Functionality for further information.
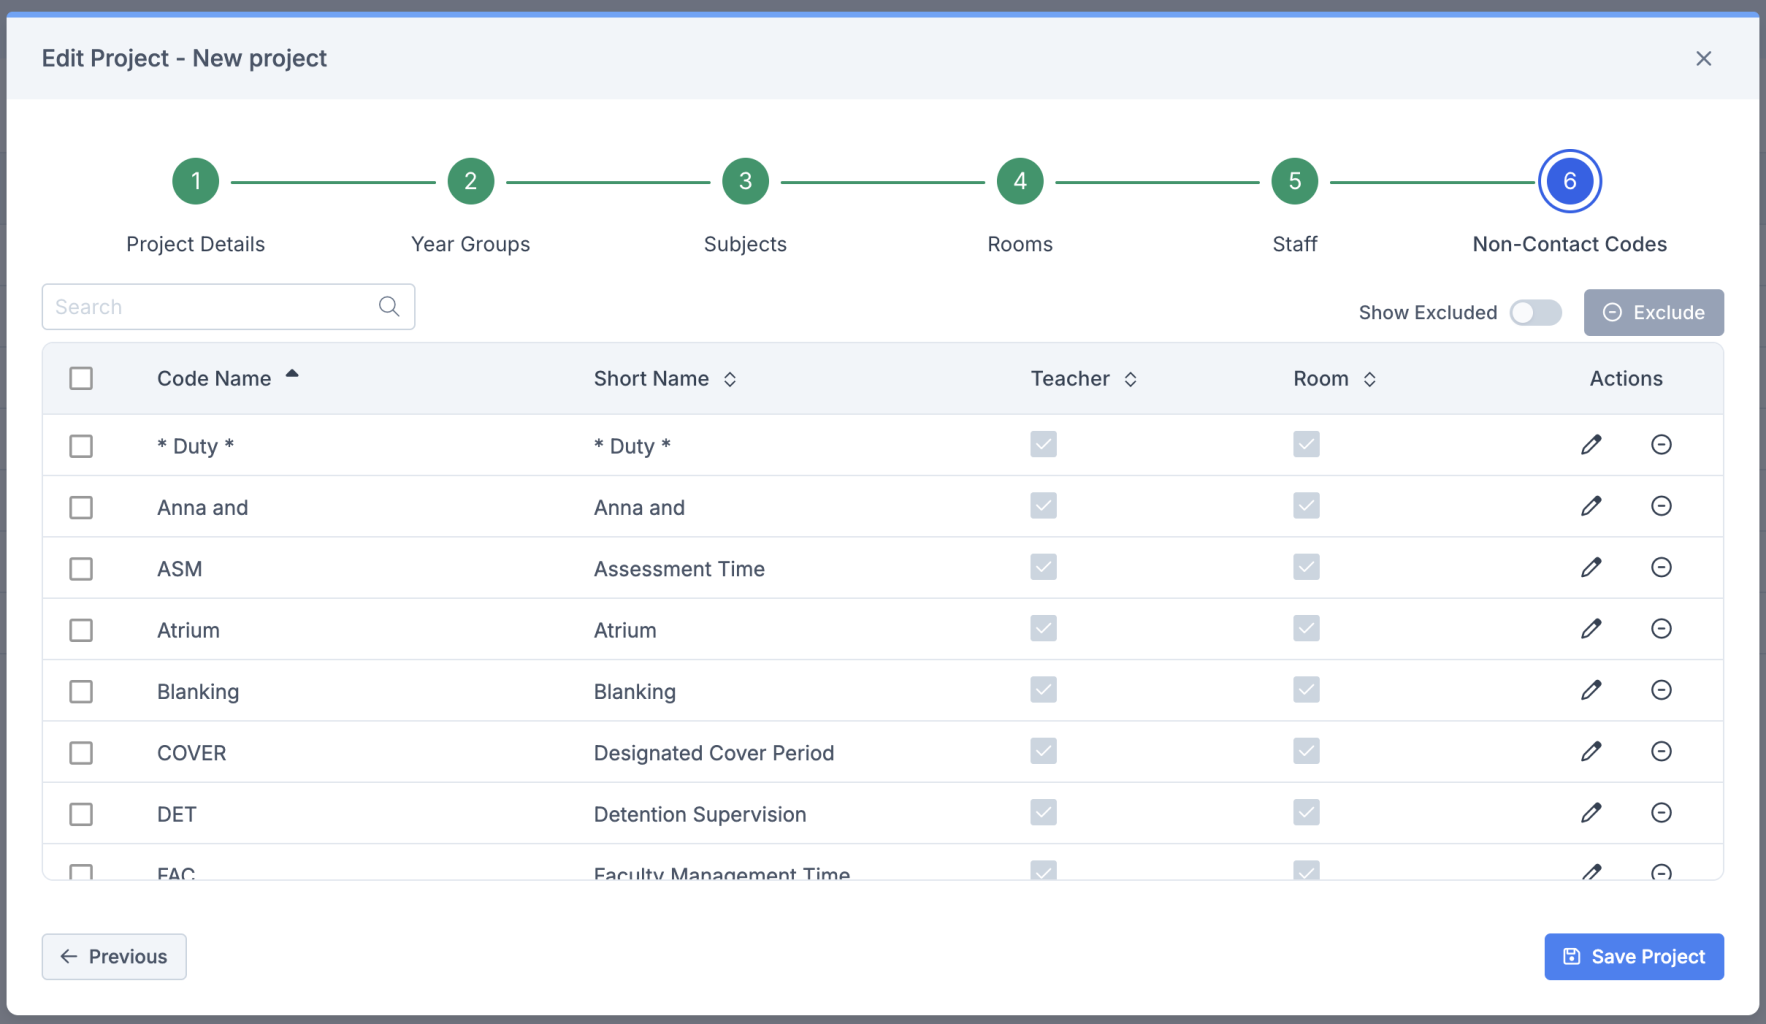
Step 6 Non Contact Codes
Review Non-Contact Codes imported into the project and determine whether any should be excluded from the timetable.
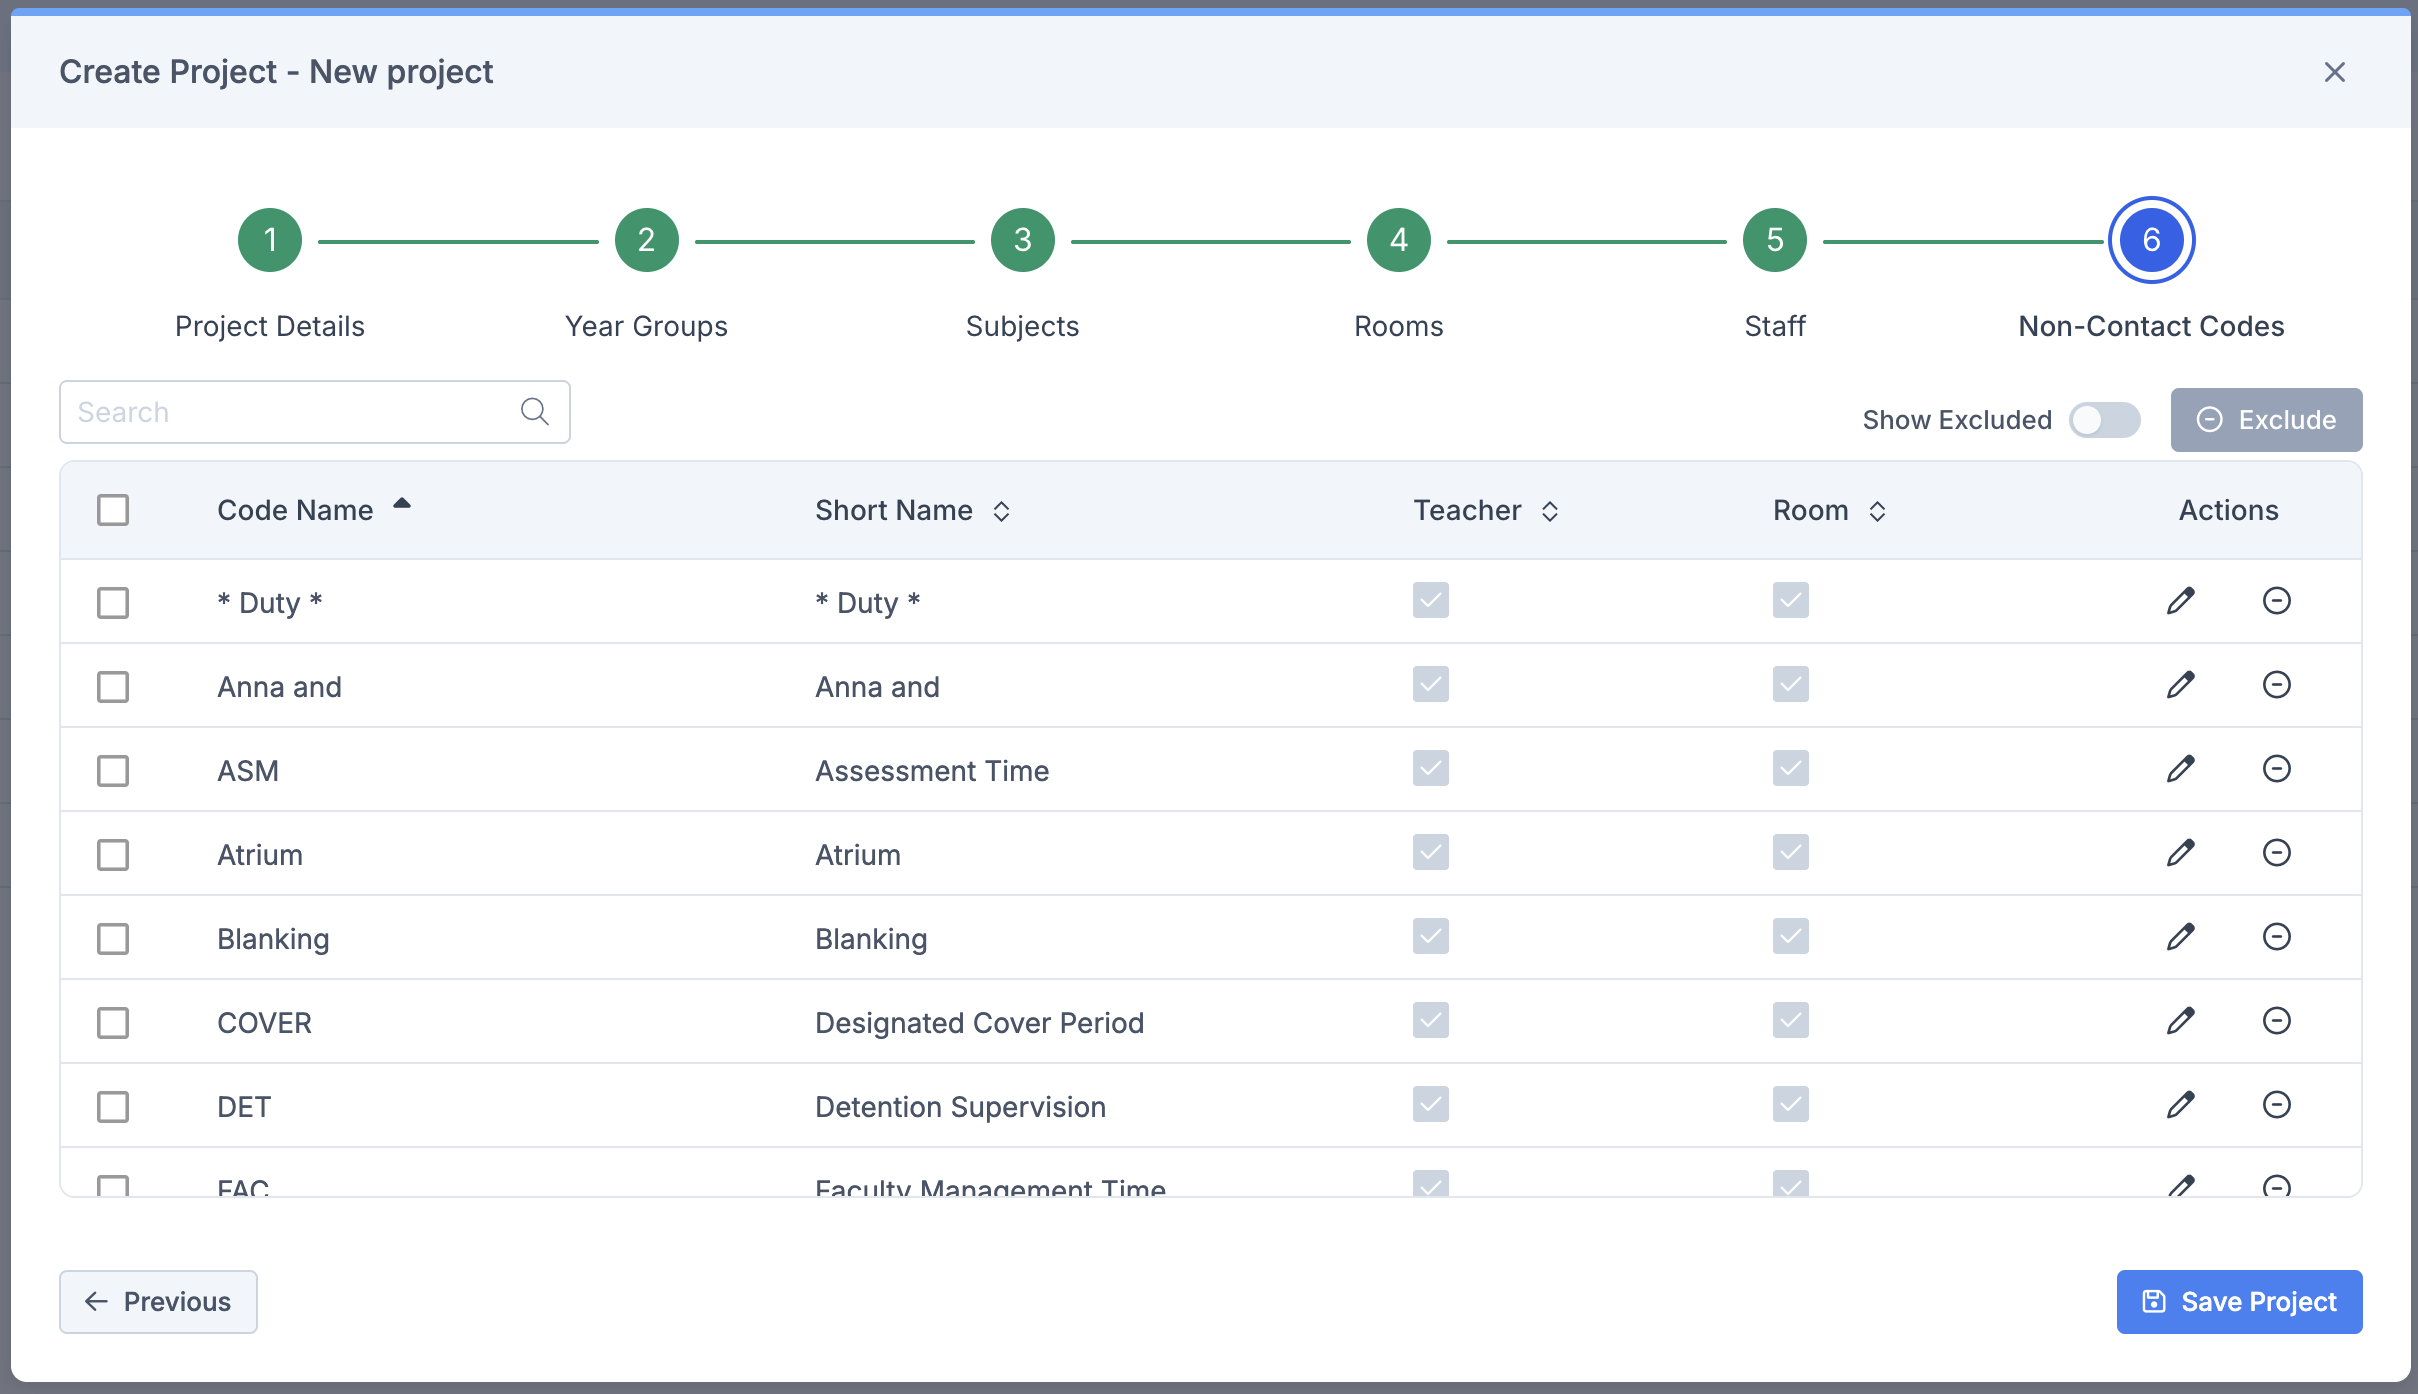
Select the Edit (pencil) icon to configure whether a Non-Contact Code can be assigned to staff, rooms, or both. By default, all Non-Contact Codes are available for both staff and rooms.
Select the ✓ icon to save the changes.

Additional Wizard Functionality
Adding a New Record
Additional Year Groups, Subjects, Rooms and Staff can be added to the project if they are not already available in the MIS.
To add a new record, navigate to the relevant step of the Project Wizard and select Add New at the bottom of the page.
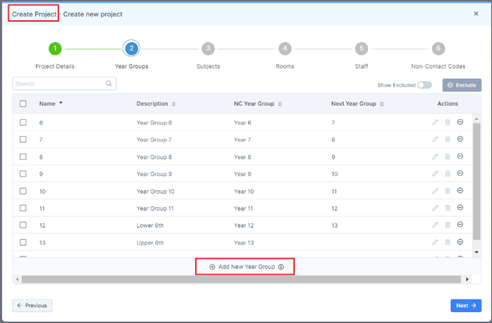
Enter the required details and select the ✓ icon to save, or the ✕ icon to cancel.

Tip: The Add New function can also be accessed after saving the project. Navigate to Modules > wTimetable > Projects > Edit, then select Next to move through the Wizard to the relevant step.

Editing a Record
Most records within the project can be edited. However, Year Groups can only be edited if they were added using the Add New function.
Select the Edit icon to update a record.

Update the required fields, then select the ✓ icon under Actions to save the changes, or the ✕ icon to cancel.

Deleting a Record
Important: Only Year Groups, Subjects, Rooms, Staff and Non-Contact Codes that have been added using the Add New function can be deleted.
Select the Delete icon next to the required record.

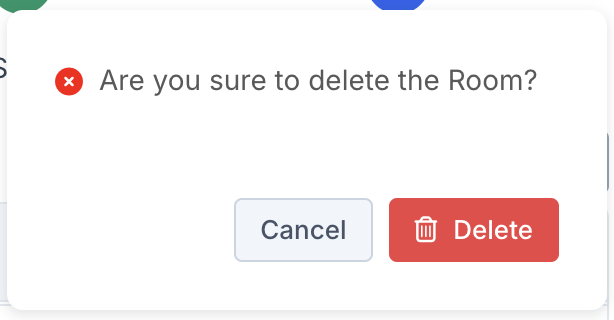
A confirmation message will be displayed: “Are you sure you want to delete the ____?“
Select Delete to confirm.
A success message will be displayed once the record has been deleted.
Saving the Project
Once all selections have been completed in Step 6, select Save Project.
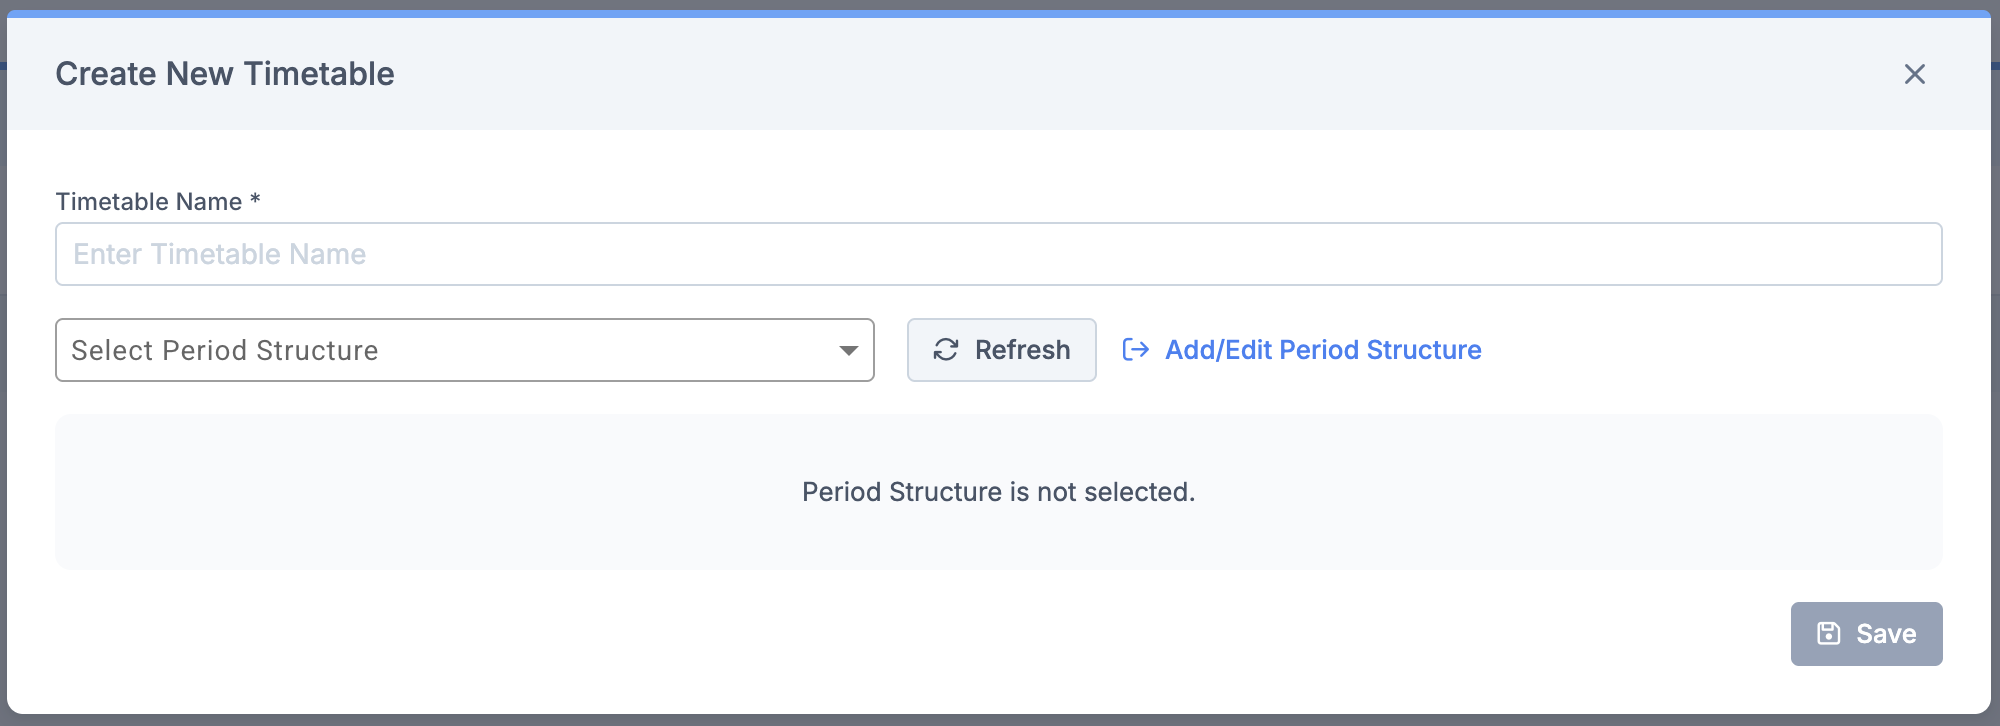
The Create New Timetable pop-up will open automatically.
For further guidance, refer to How to Create a New Timetable File.
This section covers the following functionality within wTimetable Projects:
Editing a Project
To edit a project, navigate to Modules > wTimetable and select the Edit icon under Actions for the required project.

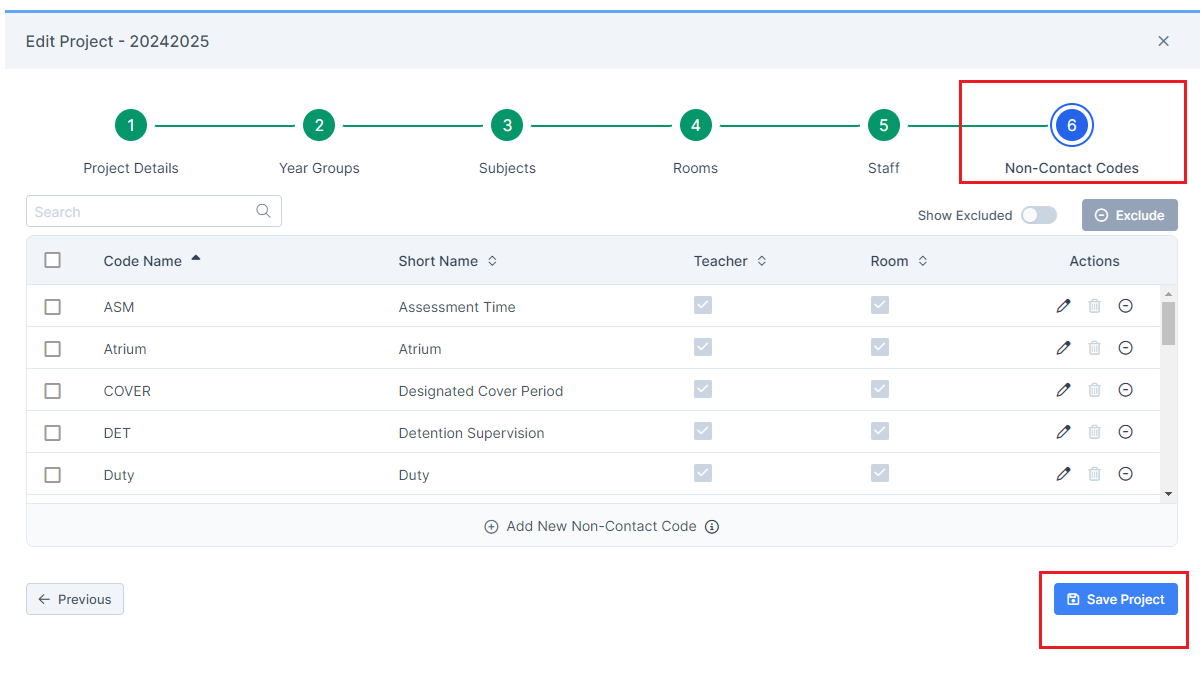
The Edit Project pop-up will open at Step 6 – Non-Contact Codes for completed projects.
For incomplete projects, the Create Project pop-up will open at the last saved step.
Tip: An incomplete project can also be edited by selecting the Project Name.
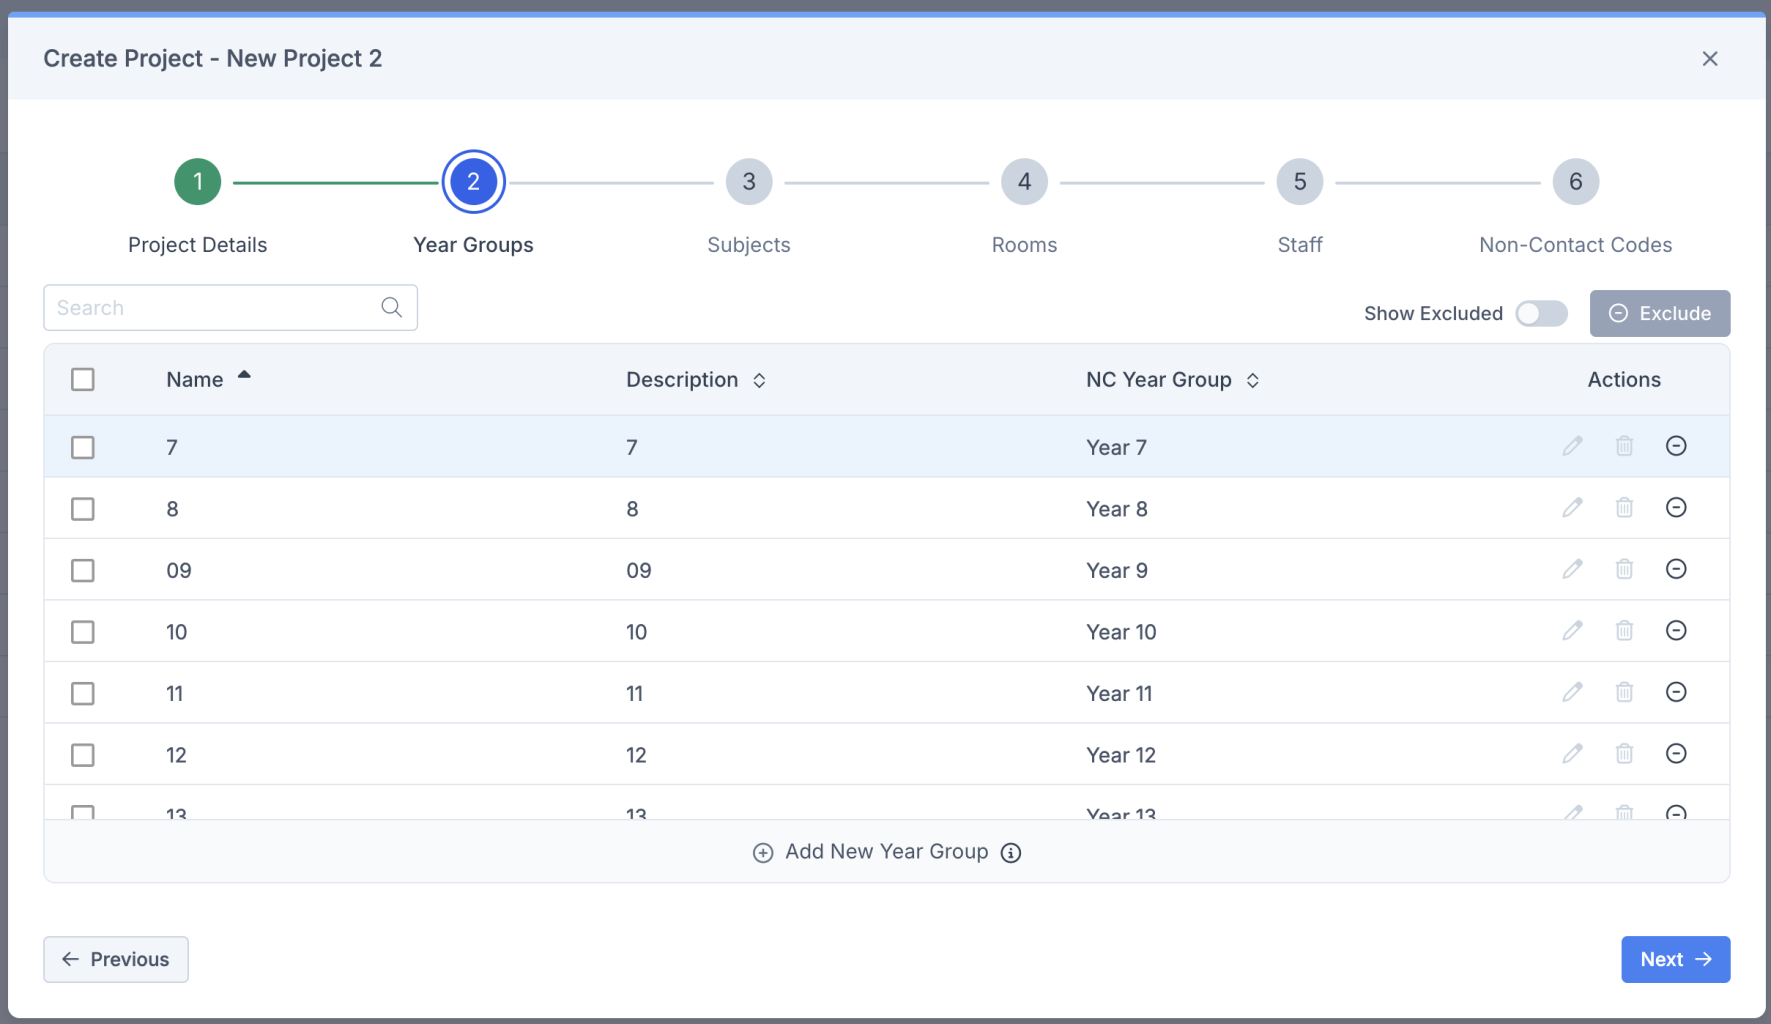
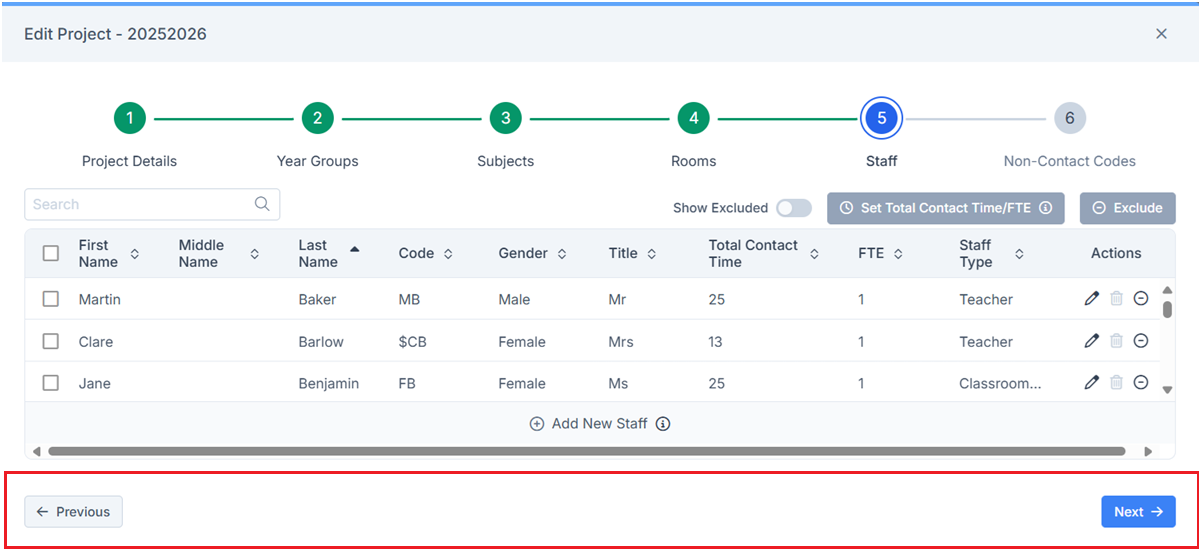
Use the Previous and Next buttons to move between steps, or select a step number to navigate directly to a specific step.
Make the required changes, then navigate to Step 6 and select Save Project to save the updates.
Copying a Project
To copy a project:
To copy a project, select the Copy icon under Actions for the required project.
A confirmation message will be displayed: “Success. Project was successfully copied.”
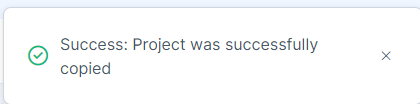
A duplicate project named Copy of [Project Name] will be created and displayed in the Projects table.

Deleting a Project
To delete a project, select the Delete icon under Actions for the required project.

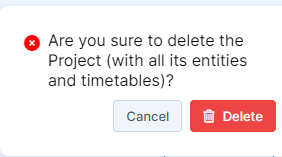
A confirmation message will be displayed: “Are you sure you want to delete the Project (with all its entities and timetables)?”
Select Delete to confirm.
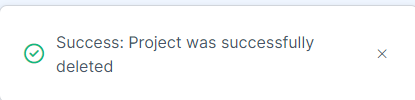
A success message will be displayed once the project has been successfully deleted.
This section covers how to create a new Timetable file using the imported project data, as well as how to manage existing timetable files:
- Creating a New Timetable File
- Editing a Timetable File
- Copying a Timetable File
- Deleting a Timetable File
Note: This section also includes guidance on using period structures. If there is any uncertainty around editing existing period structures, contact support via the usual channels for guidance.
Creating a New Timetable File
Navigate to Modules > wTimetable and select the required Project Name from the Projects page.

On the Timetables page, select New in the top-right corner.
Note: If a timetable file already exists, select the timetable name to open it instead.

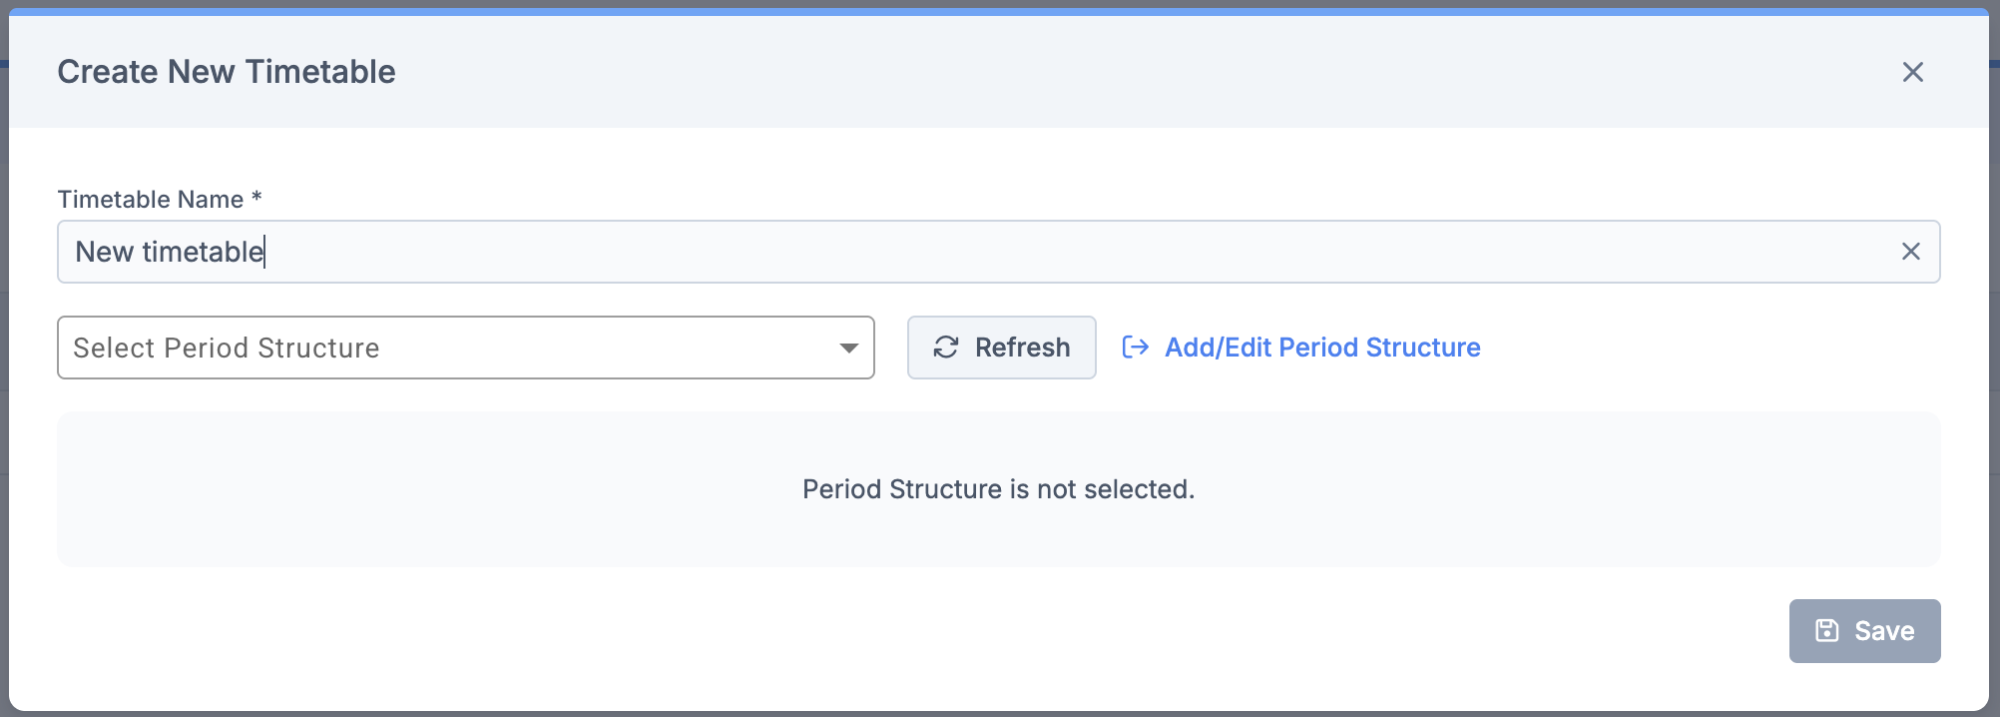
Period Structures
The selected Period Structure cannot be changed once the timetable file has been created. If a different Period Structure is required, a new timetable file must be created.
Before selecting a Period Structure, confirm that the required structure is available in the dropdown.
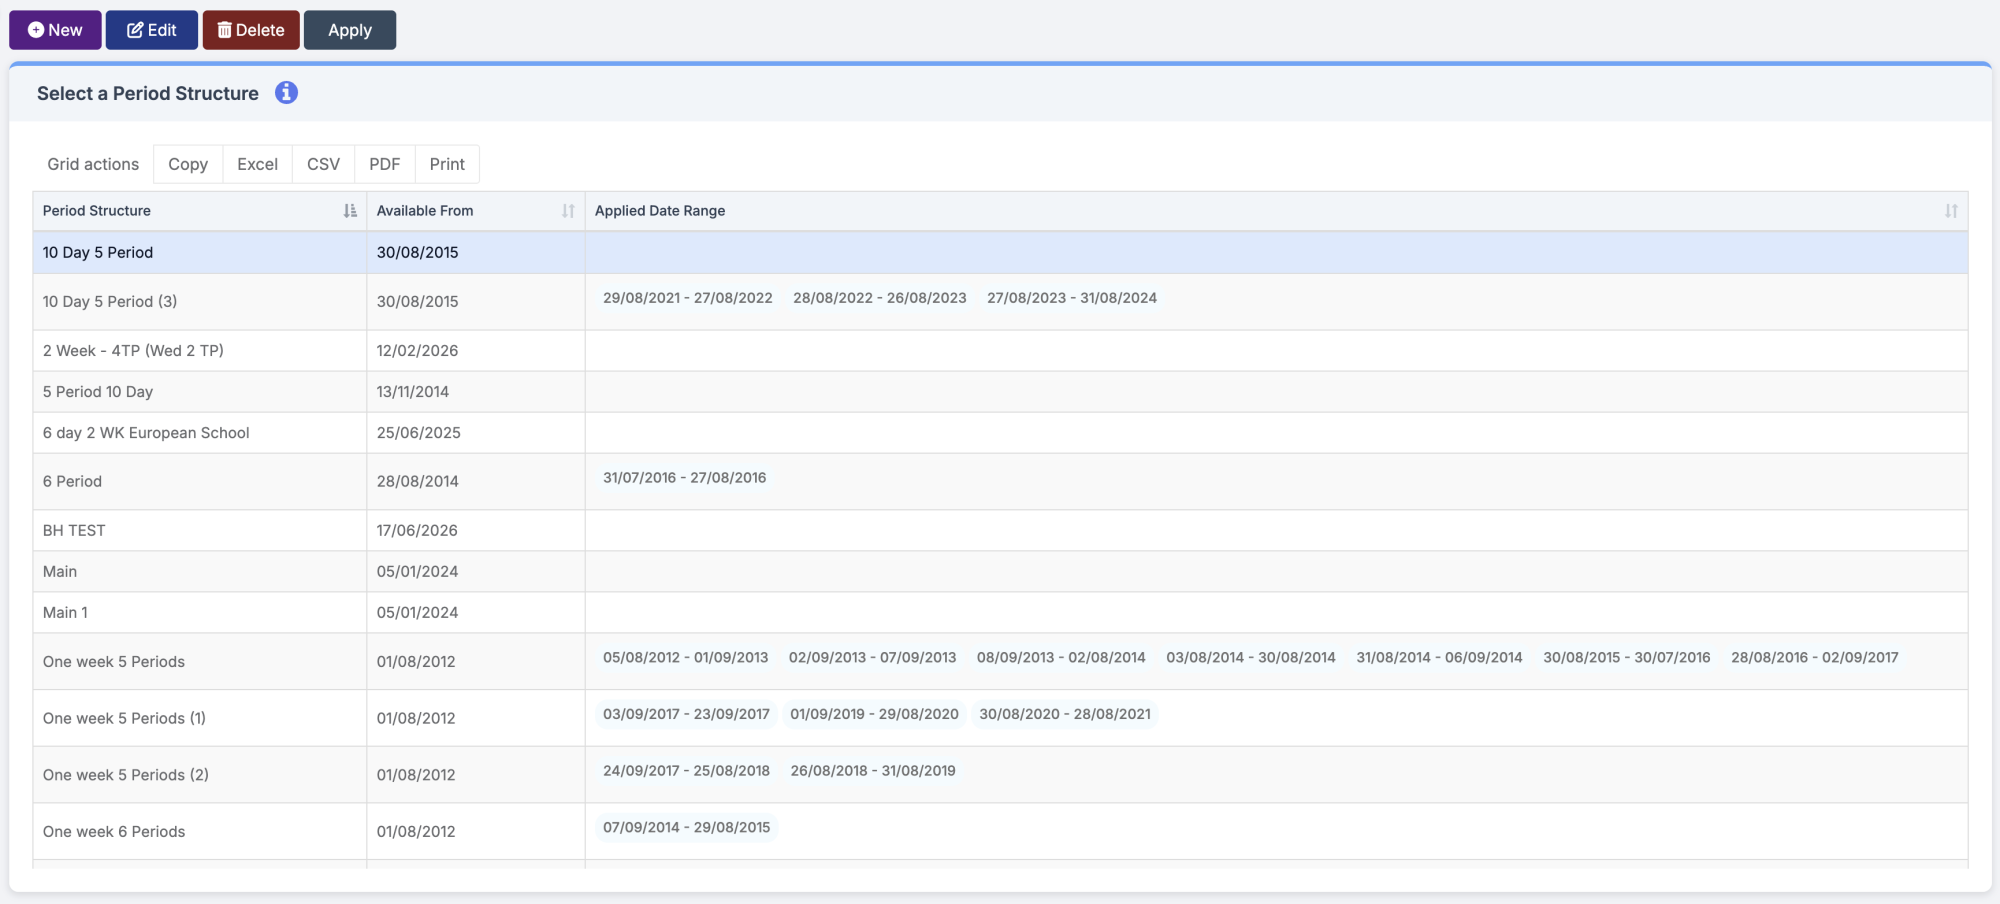
To add or edit Period Structures, select Add/Edit Period Structure. This will open Config > Curriculum > Period Structure in a new tab.
- Select New to create a new Period Structure (see How to Create a New Period Structure).
- Select Edit to amend an existing Period Structure.
Important: Please proceed with caution when editing an existing Period Structure. If there is any uncertainty around making changes, contact support via the usual channels for guidance.
Notes:
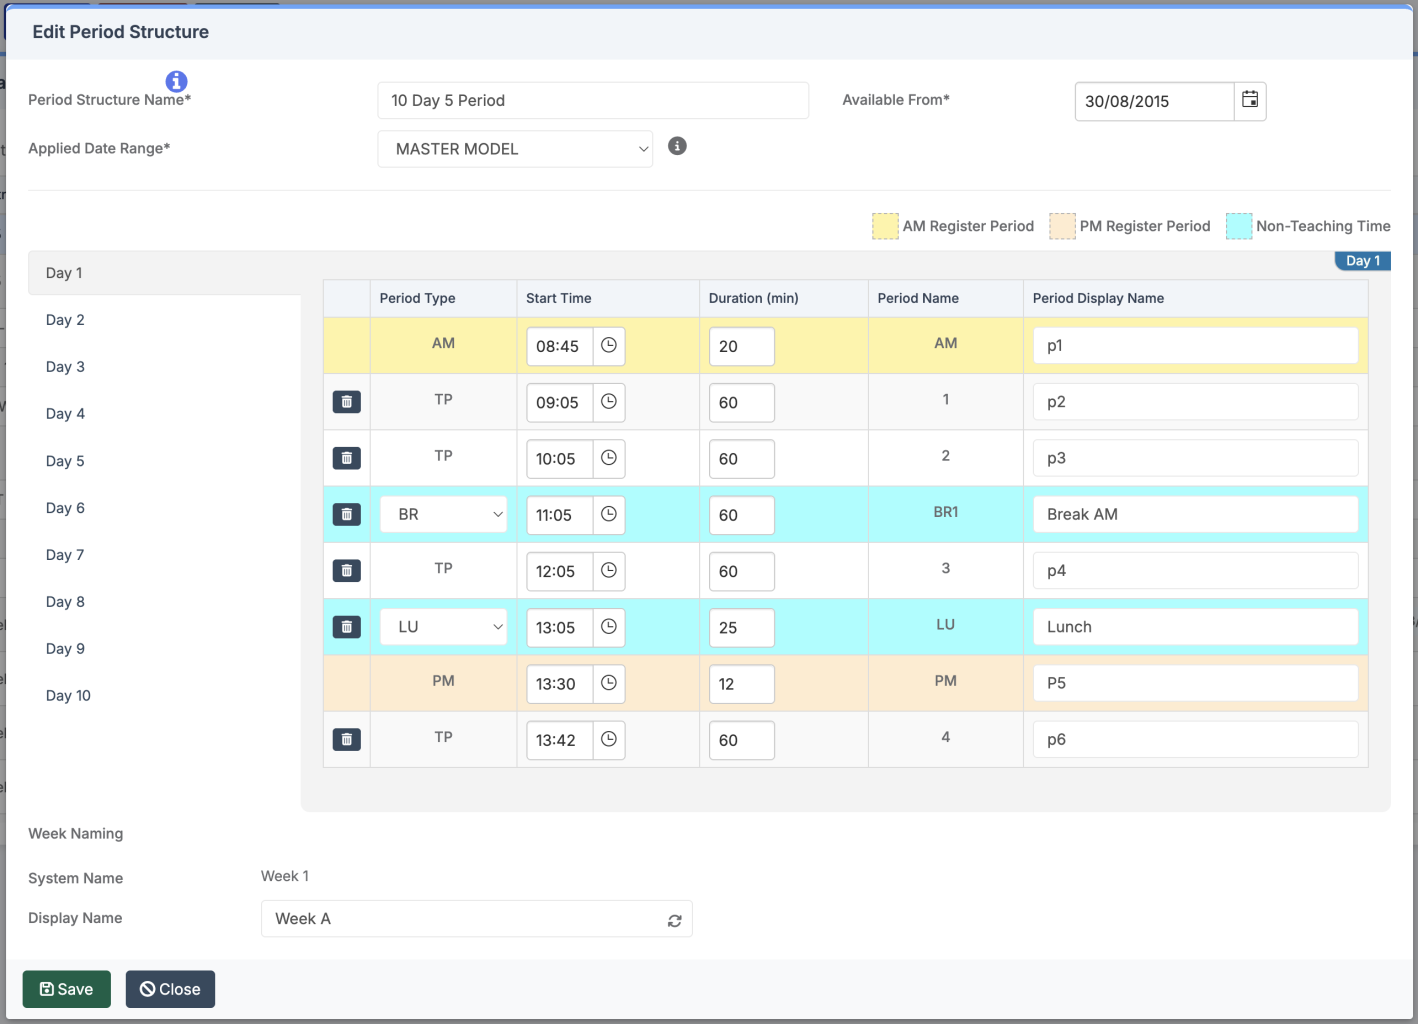
- For split breaks and lunch periods, use Teaching Periods (TP) only.
- Other Period Types (BR, LU, AS, PS) cannot be used for timetabled classes.
After making any required changes, return to the Timetable file page and select Refresh to update the available Period Structures in the dropdown.
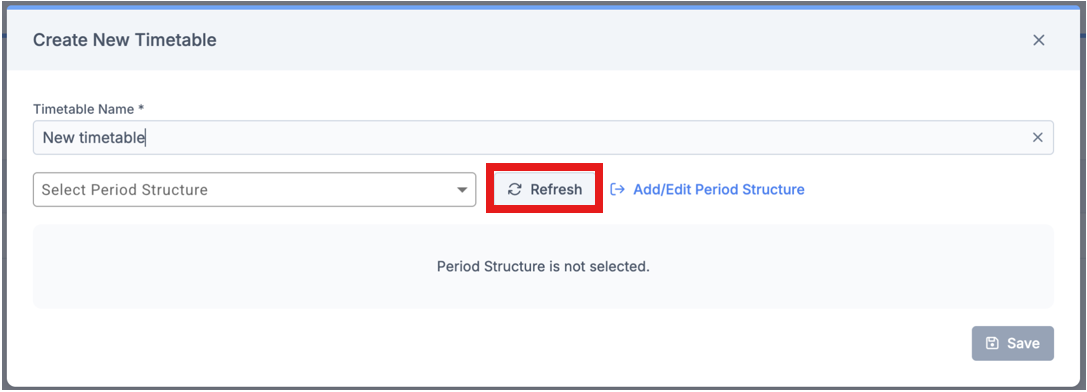
Select the required Period Structure for use, then select Save.
Note: AM and PM are mandatory Period Types used for statutory attendance reporting. They do not form part of timetable modelling and are displayed for information purposes only on this page.
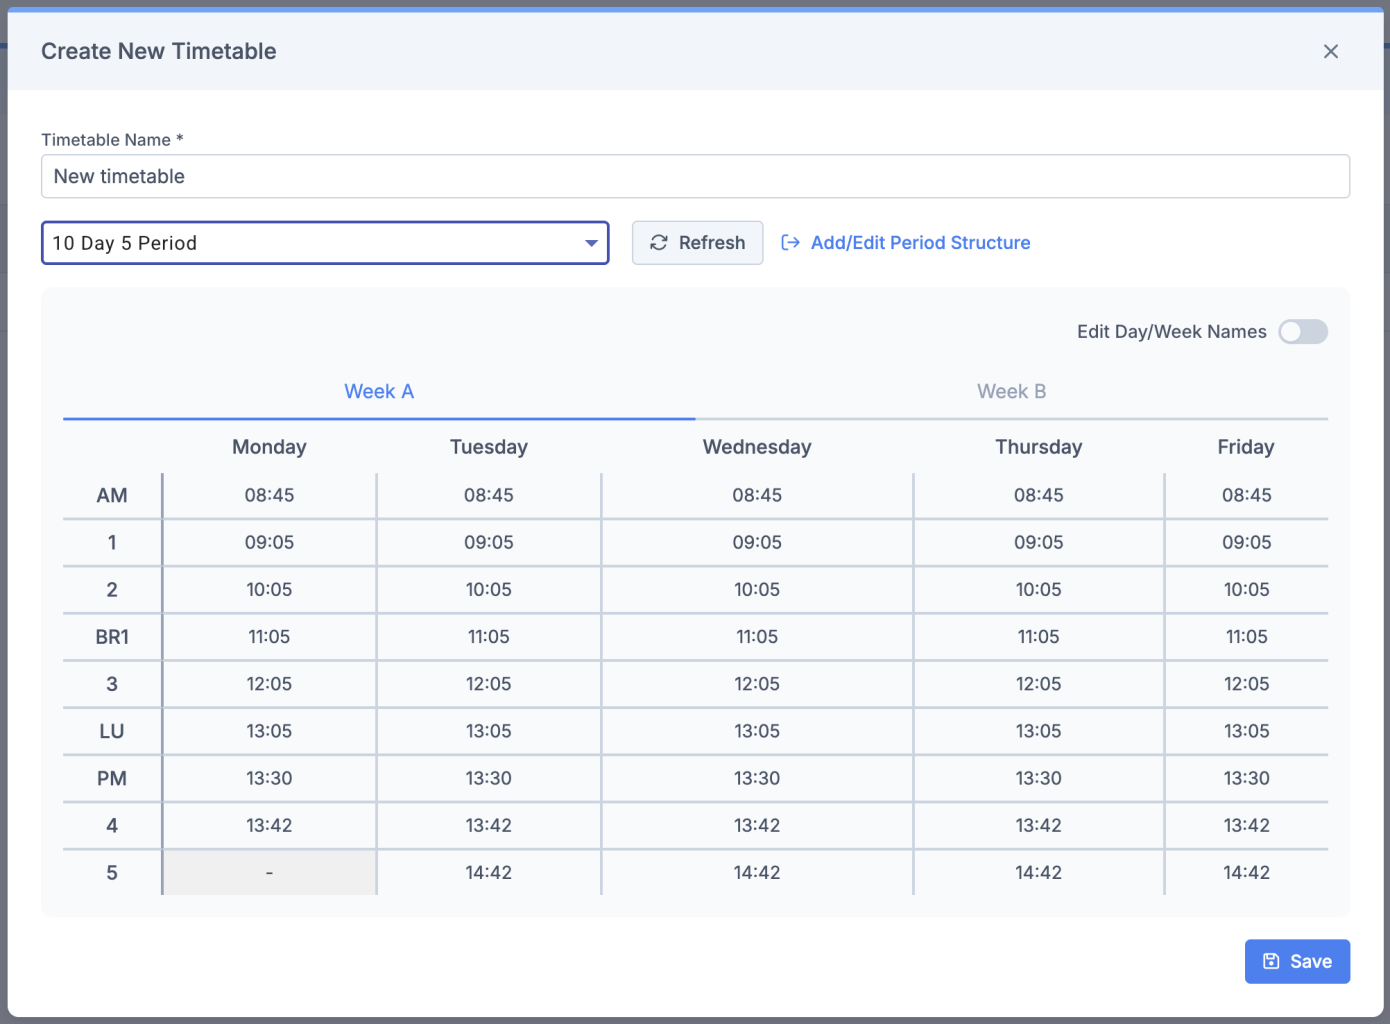
A success message will be displayed: “Success. Timetable was created successfully.”
Next Steps
Once a Project and Timetable file have been created, choose one of the following workflows:
- Plan the timetable in wTimetable – Continue with this guide to configure Relationships, Subject Information, Staffing, and Block Planning in preparation for creating the curriculum model.
- Import a fully scheduled Nova T6 timetable – Refer to the wTimetable: How to Import Nova-T6 guide.
Editing a Timetable File
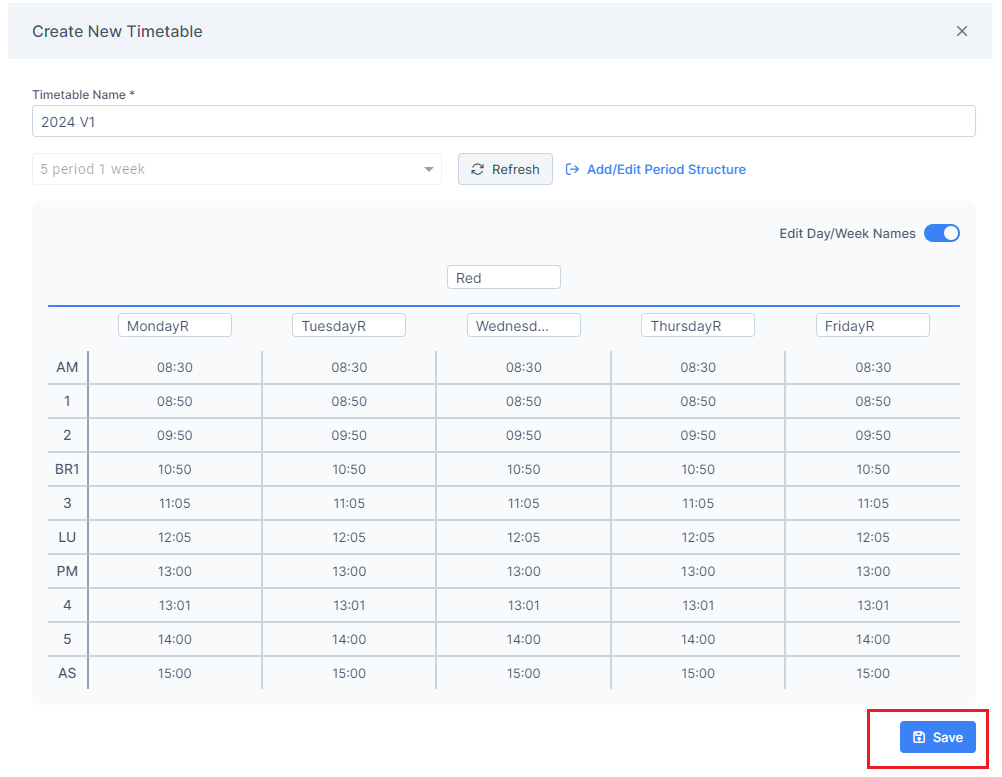
The Timetable Name and Day/Week Names can be edited after a timetable file has been created.
Note: The Period Structure cannot be changed once a timetable file has been created. To use a different Period Structure, a new timetable file must be created.
To edit a timetable file, select the Edit (pencil) icon under Actions for the required timetable.

Update the Timetable Name and/or Day/Week Names as required.
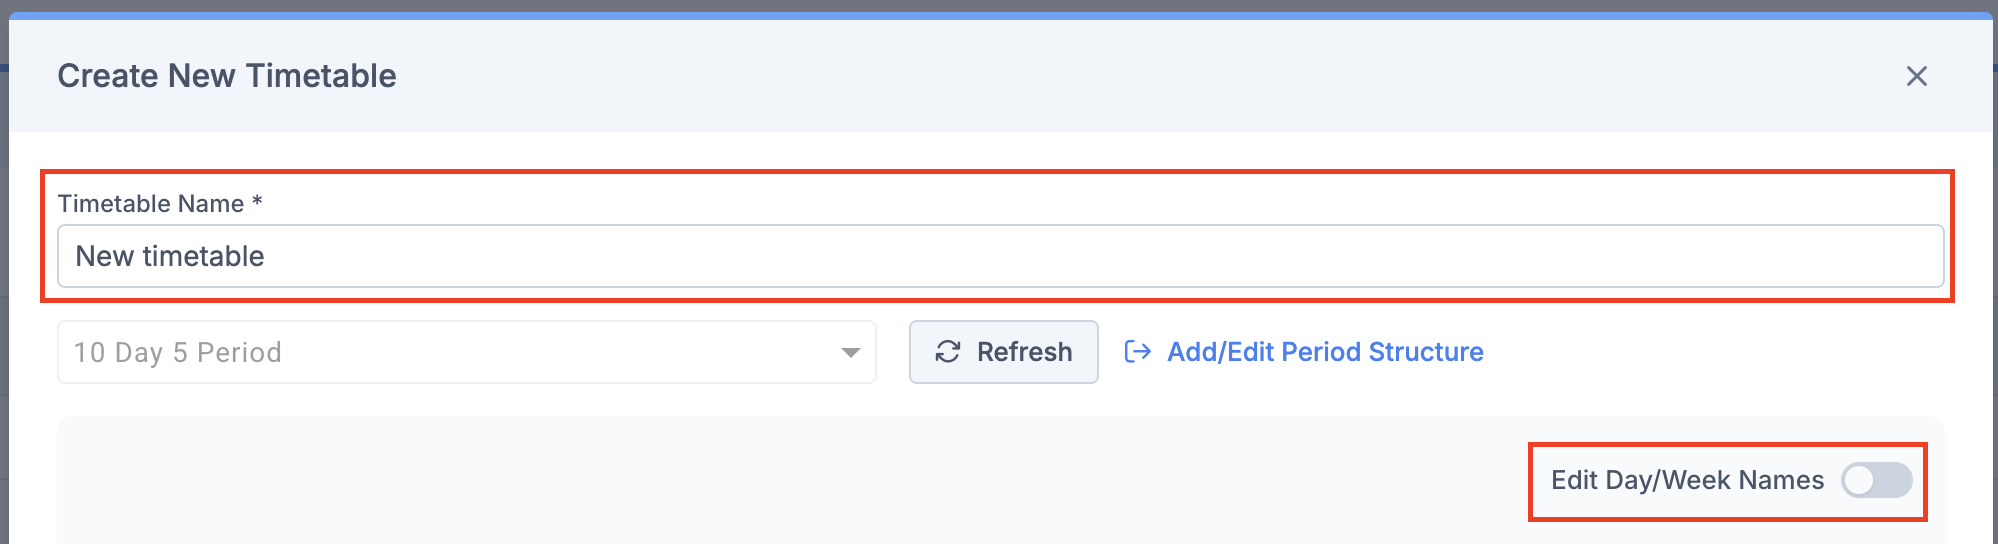
To edit Day/Week Names, enable the Edit Day/Week Names toggle and update each description as required.
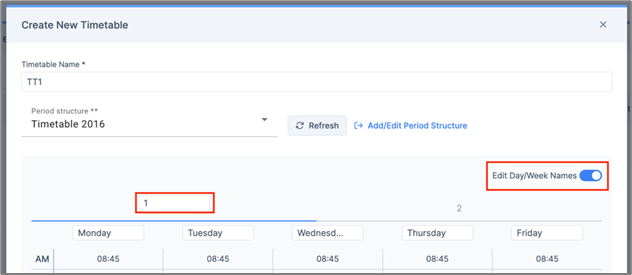
Select Save to apply the changes.
Copying a Timetable File
To create a copy of a timetable file, select the Copy icon under Actions for the required timetable.

A success message will be displayed: “Success. Timetable was successfully copied.”
A duplicate timetable file named Copy of [Original Timetable Name] will be created. Each copied timetable file also includes a date and time stamp to distinguish it from the original.

Deleting a Timetable File
To delete a timetable file, select the Delete icon under Actions for the required timetable.

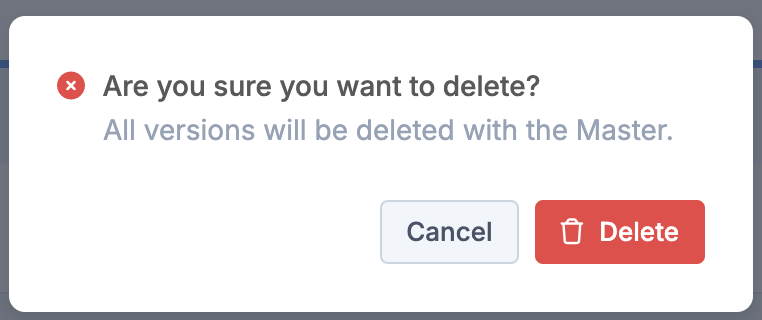
A confirmation message will be displayed: “Are you sure you want to delete? All versions will be deleted with the Master.”
Select Delete to confirm.
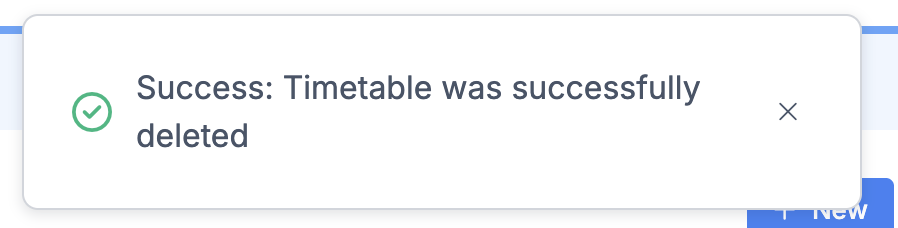
A success message will be displayed once the timetable file has been successfully deleted.
Settings
The Logs page provides a history of actions performed within the Curriculum Plan and Scheduling pages.
Navigate to Modules > wTimetable, open the required Project, then select the required Timetable file.
Select Logs from the top-left corner of the page.

Log entries can be deleted individually by selecting the Delete (bin) icon under Actions, or multiple entries can be deleted by selecting the required checkboxes and then selecting Clear Logs.
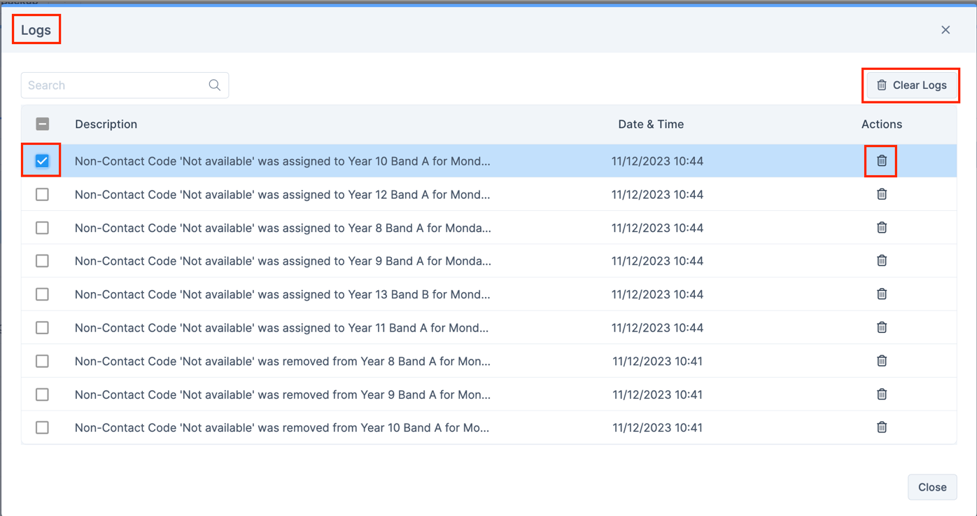
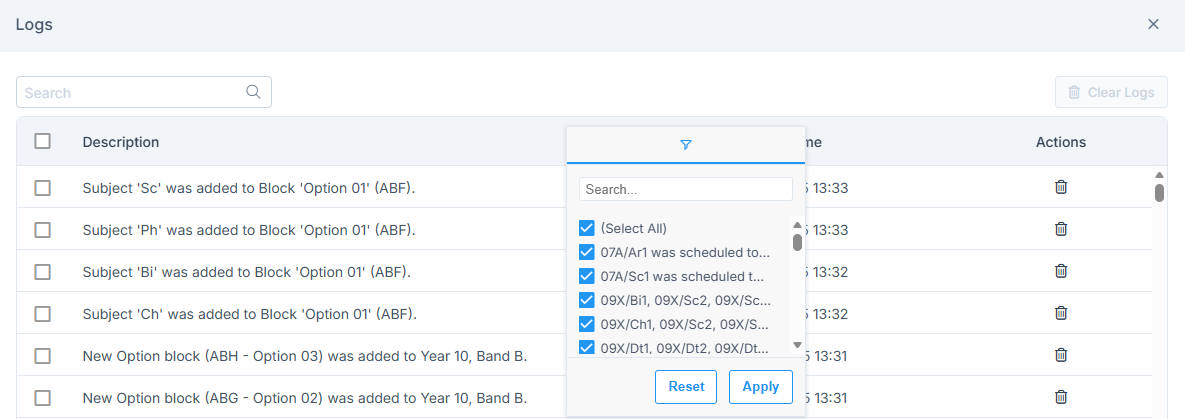
To filter the logs by Description or Date & Time, select the menu icon in the relevant column header.

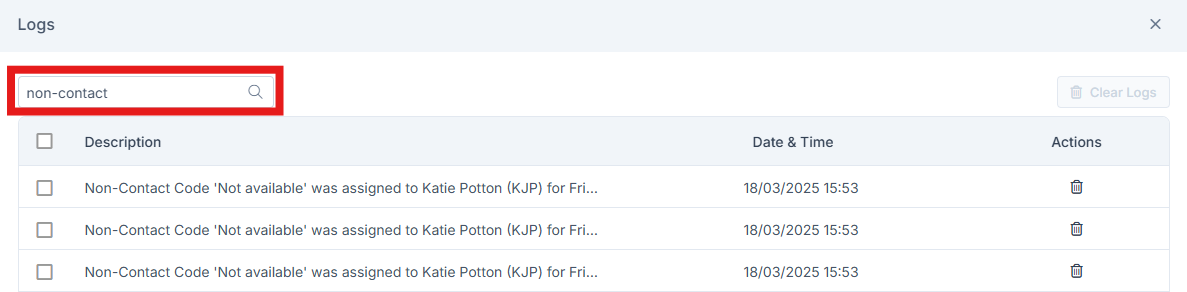
Use the Search field in the top-left corner of the window to search for text or values within the log entries.
This section covers the backup functionality available within wTimetable, including creating manual backups, enabling automatic backups and restoring timetable versions when required.
Creating a Manual Backup
Access the relevant wTimetable Project and Timetable File, then select Create Backup from the top of the page.

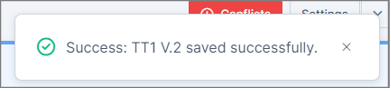
A success message will be displayed to confirm that the backup has been created successfully.
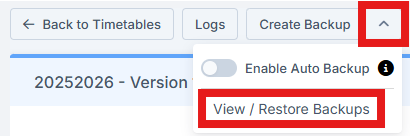
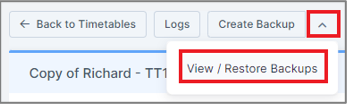
Backup files can be accessed by selecting the dropdown arrow next to the Create Backup button.
Enabling Automatic Backups
Automatic backups can be enabled by switching Enable Auto Backup to On.
Select a Backup Interval of 10, 20 or 30 minutes, then confirm the selection using the blue tick icon.
A confirmation message will be displayed advising that backups will be created automatically at the selected interval. A maximum of 15 backups are retained; once this limit is reached, the oldest backup will be overwritten.
The backup interval begins once changes have been made to the timetable.
Resetting the Backup Interval
The automatic backup interval is reset whenever one of the following actions is performed:
Note: A message will be displayed before either action is completed to advise that the automatic backup timer will be reset.
- Creating a backup manually using Create Backup.
- Selecting + Generate Blocks from the Block Planning page.
Disabling Automatic Backups
To disable automatic backups, switch Enable Auto Backup to Off.
A confirmation message will be displayed before automatic backups are disabled.
Restoring from a Backup
Once a backup has been created, select the Create Backup dropdown and choose View / Restore Backups.
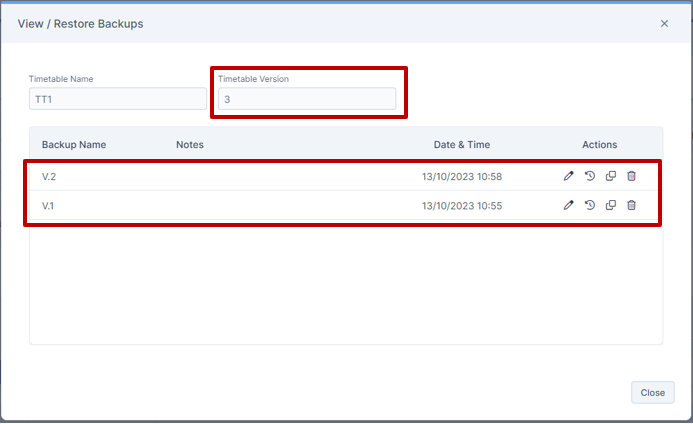
The View / Restore Backups window displays up to 15 saved timetable backups, together with the current timetable version.
From the Actions column, the following options are available:
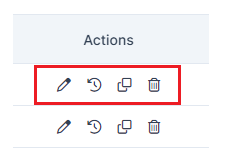
- Edit the backup notes.
- Restore the selected backup, replacing the current timetable version.
- Create a new timetable file from the selected backup. The new timetable file will be named Copy of [Timetable Name]. Backup history is not copied to the new timetable file.
- Delete the selected backup.
Backup versions are displayed on the Timetables page beneath the parent timetable.

Pre-Planning Steps
The Relationships page is used to define the relationships between Subjects, Staff and Rooms. These relationships are used throughout Curriculum Building and support the Auto Schedule process by identifying which staff can teach each subject and which rooms are available for delivery.
This section covers how to:
Navigate to Modules > wTimetable, open the required Project and Timetable file, then select Relationships.

Managing Staff Relationships
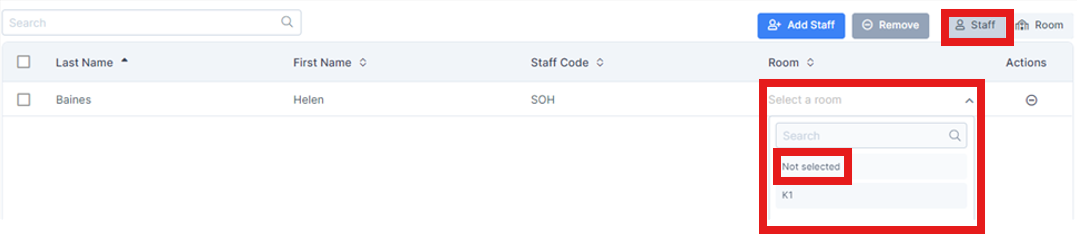
Ensure the Staff view is selected.
To add staff to a subject, select the required Subject from the left-hand panel, then select Add Staff.
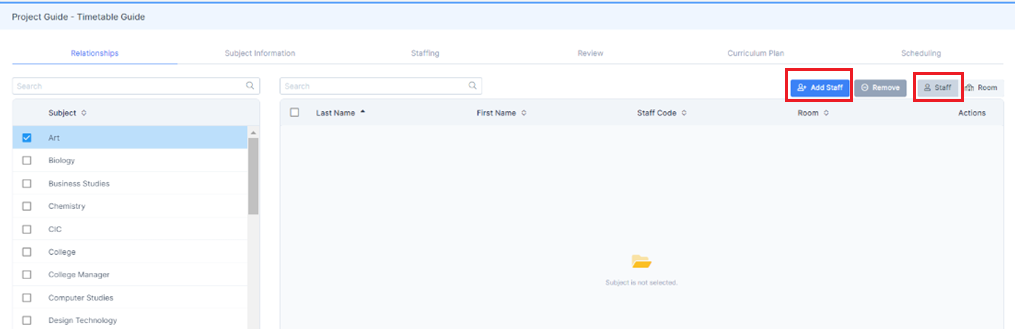
Select one or more staff members and choose Save & Exit.
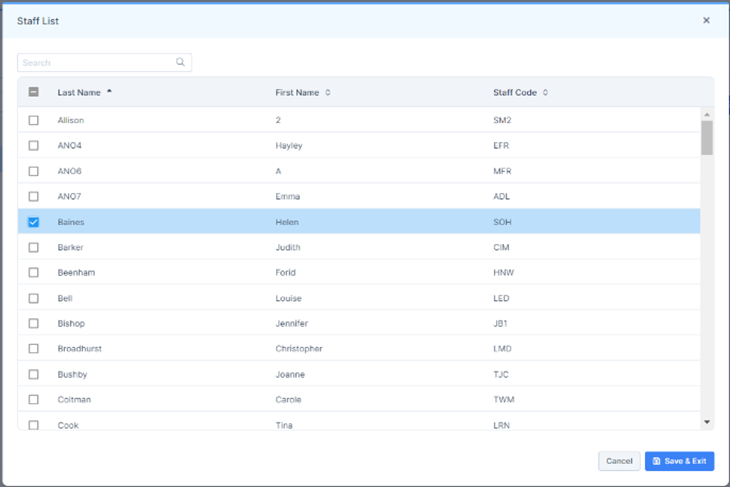
The selected staff members will be added to the subject and displayed in the centre panel.

To remove staff from a subject, select the required staff member(s), then select Remove, or use the Remove icon under Actions.

Managing Room Relationships
Ensure the Room view is selected.
To add rooms to a subject, select the required Subject from the left-hand panel, then select Add Room.
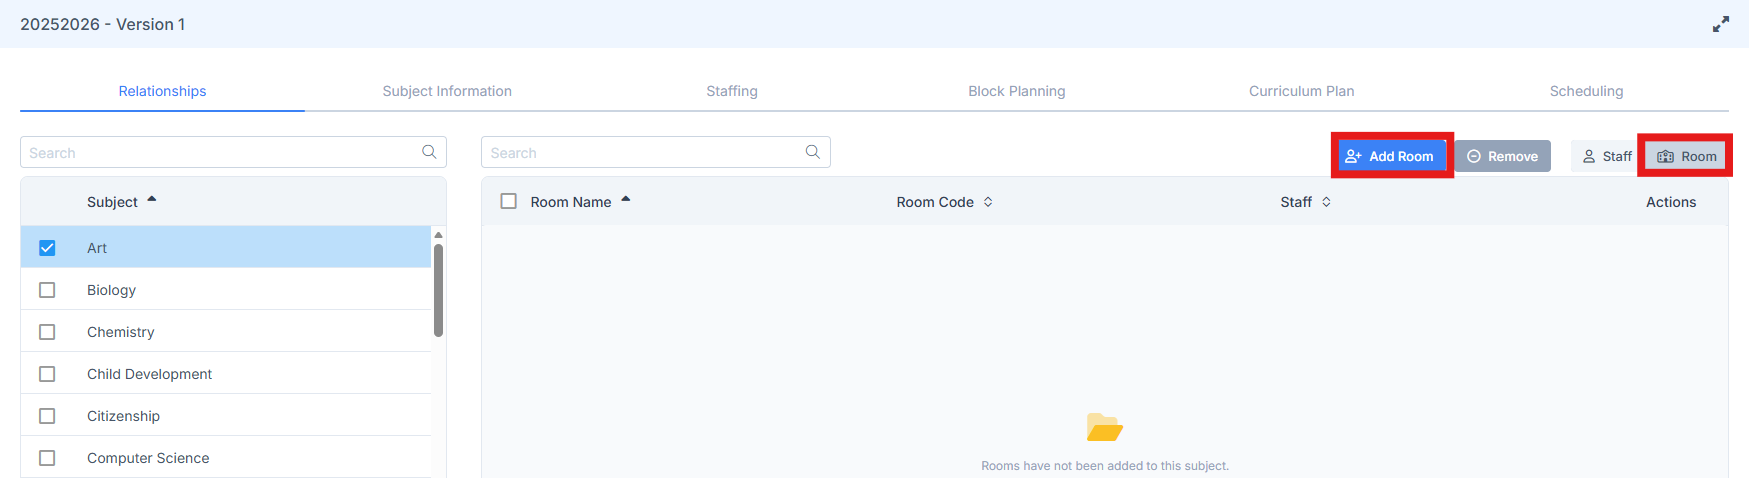
Select one or more rooms and choose Save & Exit.
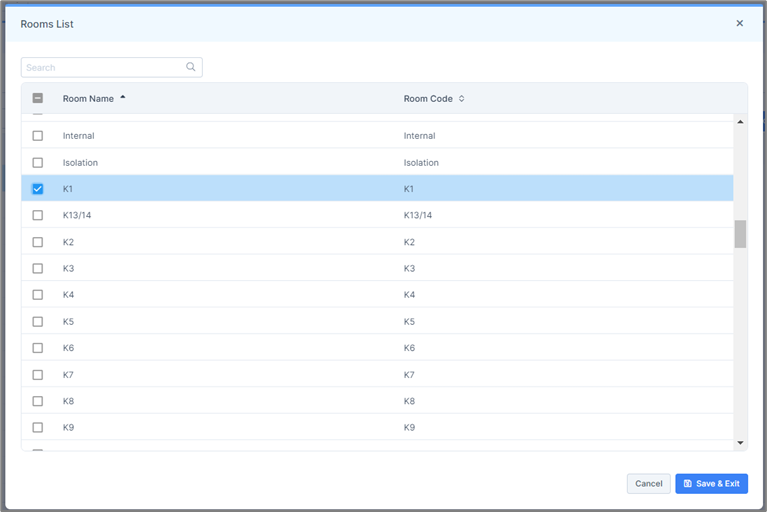
The selected room(s) will be added to the subject and displayed in the centre panel.

To remove rooms from a subject, select the required room(s), then select Remove, or use the Remove icon under Actions.

Managing Preferred Rooms
Preferred rooms can only be assigned to staff members who are linked to the same subject.
Ensure the Staff view is selected.
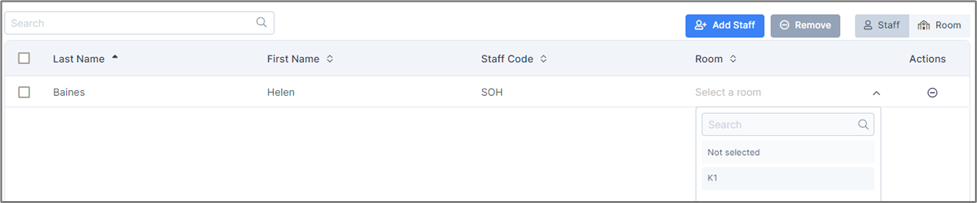
For the required staff member, open the Select a Room dropdown and select the preferred room.
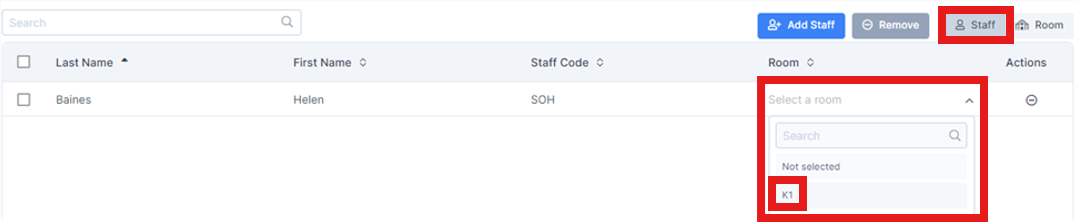
The selected room will be assigned as the staff member’s preferred room.
Note: If the same room is assigned to multiple staff members, a warning message will be displayed. This is for information only and no action is required.
Additional Information
A staff member’s preferred room:
- Is assigned automatically when the staff member is added to a class in Curriculum Plan, unless a room has already been assigned.
- Will still be assigned even if it is already in use during the same period.
- Is not assigned when adding additional staff to an existing class.
Tip: Preferred rooms can also be assigned from the Room view by selecting the required room and assigning one or more staff members.
To remove a preferred room, open the Select a Room dropdown for the required staff member and select Not Selected.
The Subject Information page is used to define the curriculum model for each year group by specifying the subjects to be taught, the number of classes and periods required, and how subjects are organised into groups. This information is used to calculate staffing requirements and forms the basis of the timetable.
This section covers:
- Managing Pupil and Class Information
- Managing Subjects
- Managing Groups
- Managing Linear Groups
- Managing Option Groups
- Managing Complex Groups
- Importing Options
- Subject Information Preview
Navigate to Modules > wTimetable, open the required Project and Timetable file, then select Subject Information.

Managing Pupil and Class Information
The Pupil and Class Information section is used to define the pupil numbers for the selected Year Group and calculate the recommended number of classes required for core subjects. These values are also used to calculate the staffing contact time required to deliver the curriculum.
Select the required Year Group from the Select Year Group dropdown.
The following information is displayed:
- Total Pupils – Displays the total number of pupils in the selected Year Group imported from the MIS. This value can be amended if required.
- Total Pupils – Displays the total number of pupils in the selected Year Group imported from the MIS. This value can be amended if required.
- Classes for Core Subjects – Calculated automatically by dividing the Total Pupils by the Pupils per Class value and rounding up to the nearest whole number. This provides a recommended number of classes for core subjects such as English, Mathematics and Science.

Note: The Classes for Core Subjects value acts as a planning guide and is used to populate the default Number of Classes when subjects are added. This recommendation does not typically apply to Post-16 year groups.
Managing Subjects
The Subjects panel is used to define the subjects required for the selected Year Group, together with the number of classes and teaching periods required for each subject. This information is used to calculate the staffing contact time required to deliver the curriculum.
Adding Subjects
Select Add Subjects.
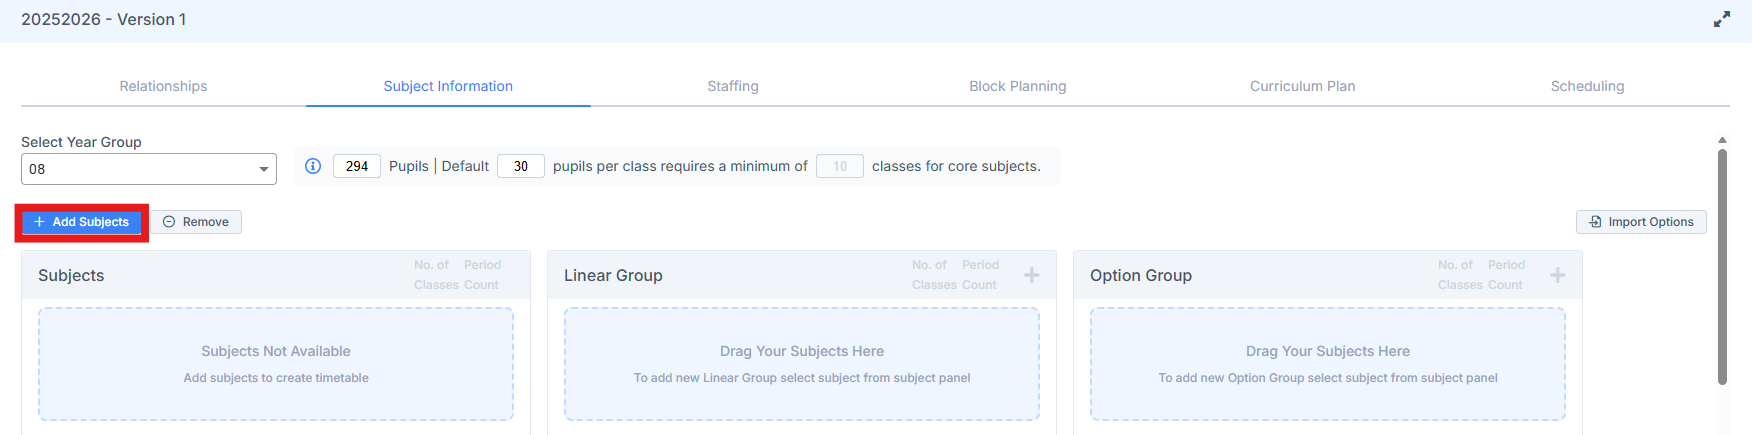
The Add Subjects window displays all active subjects imported into the project during the Project Wizard.
Select the required subject(s), or use the checkbox at the top of the list to select all subjects, then select Add Subjects.
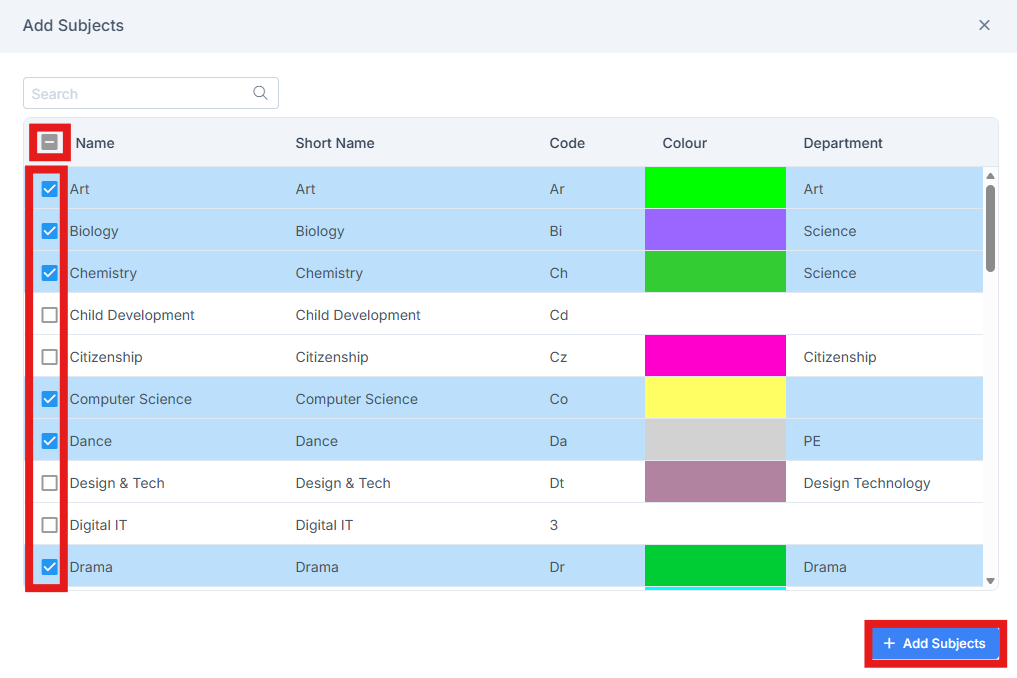
The selected subjects will be added to the Subjects panel.
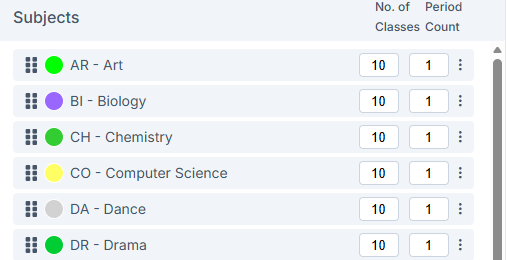
Updating Subject Details
The following values can be amended directly within the Subjects panel:
- Number of Classes – Defaults to the Classes for Core Subjects value calculated in Pupil and Class Information and can be amended as required.
- Period Count – Defaults to 1 and can be amended to reflect the number of teaching periods required.
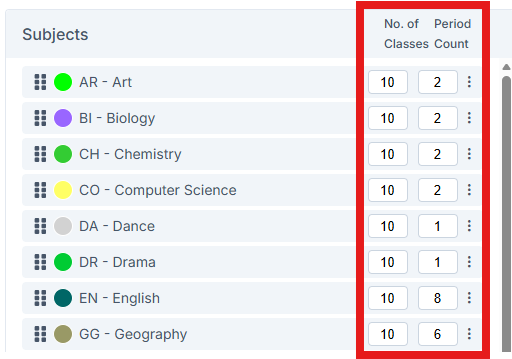
Tip: Use the Tab key to move quickly between fields when updating the Number of Classes or Period Count for multiple subjects.
Copying and Removing Subjects
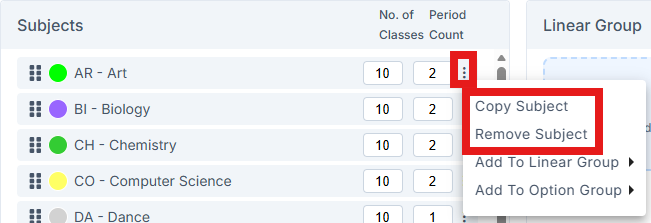
Select the three dots menu icon next to a subject to access the following options:
- Copy Subject – Creates a duplicate of the selected subject, retaining the same Number of Classes and Period Count.
- Remove Subject – Removes the selected subject from the Subjects panel.
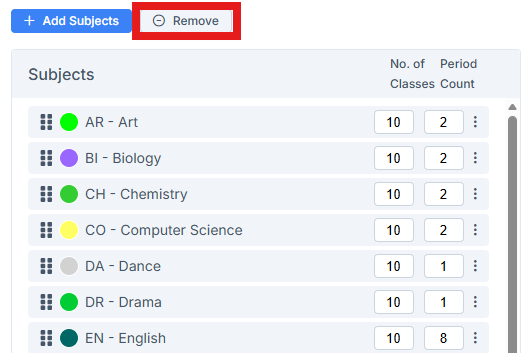
Tip: Select Remove to remove all subjects from the Subjects panel.
Managing Groups
Groups are used where subjects need to be delivered together or scheduled in a specific way. The Groups panels allow subjects to be organised into:
- Linear Groups – Used where all classes within a group study the same combination of subjects.
- Option Groups – Used where subjects are scheduled simultaneously.
When using groups, the required group must be created before subjects can be assigned.
Note: Subjects do not always need to be assigned to a group. Subjects can remain as standalone subjects within the Subjects panel and will be created as simple blocks when the curriculum plan is built through Block Planning.
Creating Groups
Once subjects have been added to the Subjects panel, the Linear Groups and Option Groups panels become available.
Select the + icon in the required panel to create a new group placeholder.

Tip: Multiple empty Linear Groups and Option Groups can be created before assigning subjects.
Adding Subjects to Groups
Once a group has been created, subjects can be assigned using either of the following methods:
- Select the three dots menu icon next to the required subject and choose Add to Linear Group or Add to Option Group.
- Drag and drop the subject into the required group using the drag handle.


Additional Information:
- Subjects can be moved between groups and between group types.
- A subject can belong to multiple groups.
- A subject cannot be added more than once to the same group.
- If a subject is removed from a group, it is returned to the Subjects panel and retains its Number of Classes and Period Count.
Group Actions
Select the three dots menu icon on a group to access the following options:
- Rename – Rename the group. Group names must be unique within the selected Year Group.
- Delete – Delete the group. Any subjects within the group will be returned to the Subjects panel.
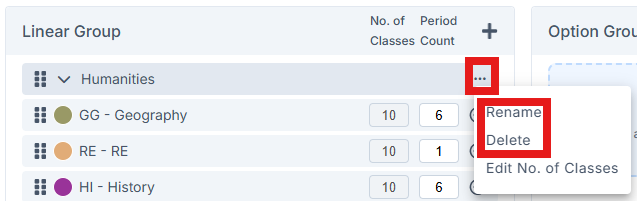
Groups can also be collapsed or expanded by selecting the arrow next to the group name.
- Collapse – Collapse the group to reduce the amount of information displayed.
- Expand – Expand a collapsed group to display all subjects within that group.
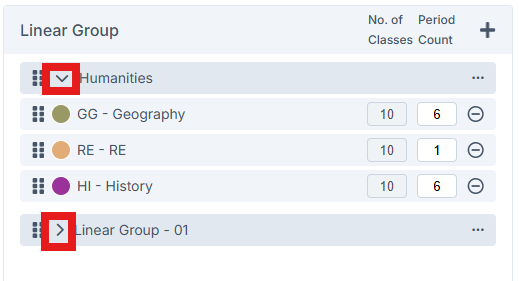
Tip: Subjects can still be added to a group while it is collapsed.
Managing Linear Groups
Linear Groups are used where all classes within a group study the same combination of subjects. Subjects within a Linear Group share the same Number of Classes, however, the Period Count can differ for each subject.
Creating a Linear Group
Create a Linear Group by adding subjects to an empty Linear Group placeholder.
The first subject added to a Linear Group becomes the default subject. Any additional subjects added to the group will automatically inherit the same Number of Classes value as the default subject. The Period Count remains independent and can be adjusted for each subject.
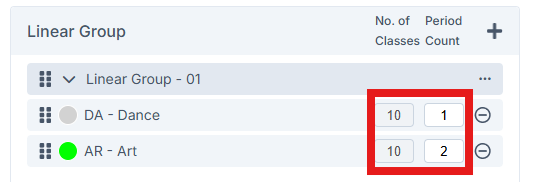
Updating the Number of Classes
To update the Number of Classes for all subjects within a Linear Group, select the three dots menu icon for the Linear Group and choose Edit Number of Classes.
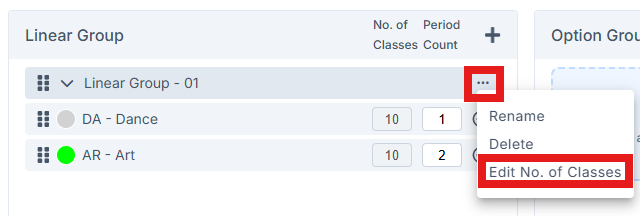
Enter the required value and select Save.
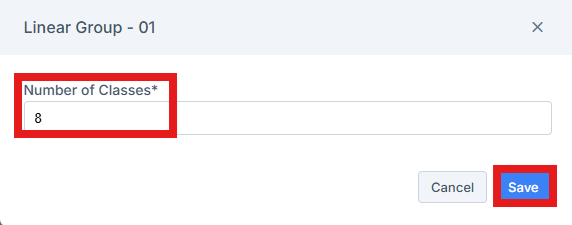
The updated value will apply to all subjects within the Linear Group.
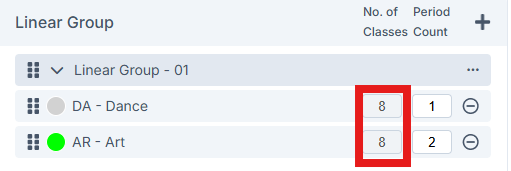
Note: If the Number of Classes is set to 0, the system will automatically change this value to 1.
Updating the Period Count
The Period Count can be updated individually for each subject within a Linear Group.
Select the Period Count value for the required subject and enter the new value.
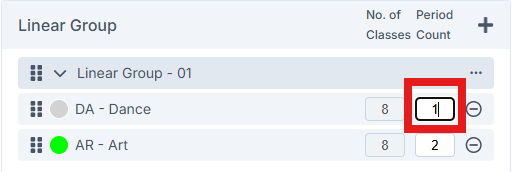
Note: Updating the Period Count for one subject will not affect the other subjects within the Linear Group.
Managing Option Groups
Option Groups are used where subjects are scheduled simultaneously. Subjects within an Option Group will typically have the same Period Count, although the Number of Classes can differ between subjects.
Creating an Option Group follows the same process as creating a Linear Group. For details on creating a group and adding subjects, see Managing Linear Groups.
Tip: For Option Groups, create the required number of groups first, then add subjects to each group. This avoids adding the same subject multiple times to the Subjects panel before assigning them to the appropriate group.
The first subject added to an Option Group becomes the default subject. Any additional subjects added to the group will automatically inherit the same Period Count value as the default subject. The Number of Classes remains independent and can be adjusted for each subject.
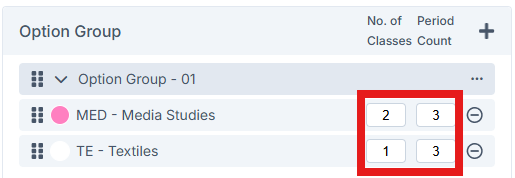
Updating the Period Count for All Subjects
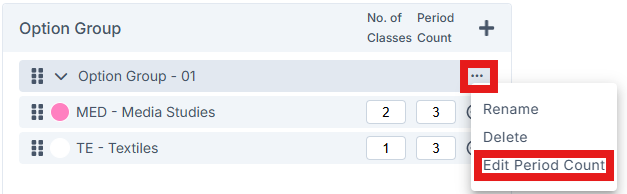
To update the Period Count for all subjects within an Option Group, select the three dots menu icon for the Option Group and choose Edit Period Count.
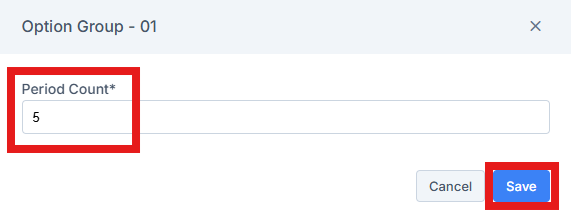
Enter the required Period Count and select Save.
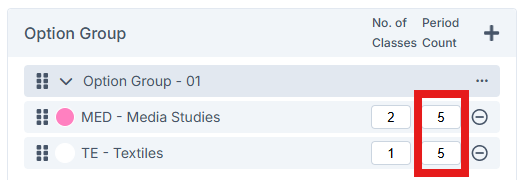
The updated value will apply to all subjects within the Option Group.
Note: If the Number of Classes is set to 0, the system will automatically change this value to 1.
Updating the Number of Classes
The Number of Classes can be updated individually for each subject within an Option Group.
Select the Number of Classes value for the required subject and enter the new value.
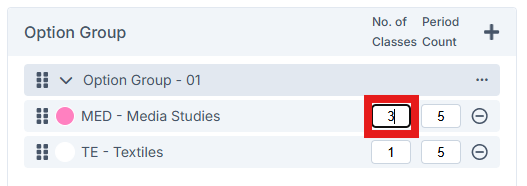
Note: Updating the Number of Classes for one subject will not affect the other subjects within the Option Group.
Managing Complex Groups
Complex Groups are created when an Option Group requires subjects within the same block to have different Period Counts.
Users can edit the Period Count for individual subjects within an Option Group, by selecting the Period Count value for the required subject and entering the new value.
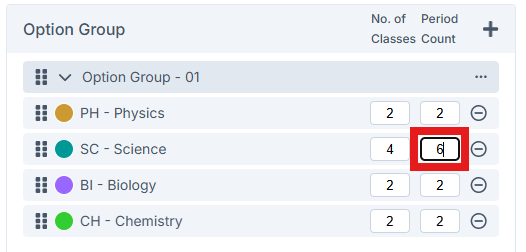
When subjects within the same Option Group have different Period Counts, the Option Group is automatically changed into a Complex Group and identified with a C in the Preview table at the bottom of the Subject Information page.
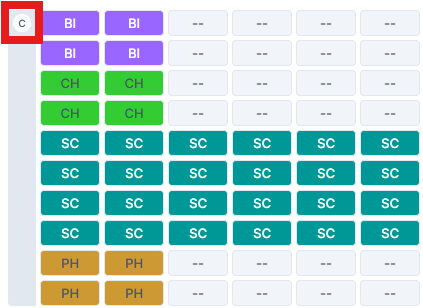
The Subject Information page is simply used to define the required Number of Classes and Period Count values to calculate staffing requirements. Once an Option Group has become a Complex Group, it should be configured further in Curriculum Plan, where the different class structures can be managed.
Importing Options
The Import Options function allows timetable patterns created in the Options module to be imported into Subject Information and used to create Option Groups for Year Groups 9, 10 and 12.
Note: Only timetable patterns marked as Set as Final will be imported. If a finalised option pattern is not available for any of the required year groups, a message will be displayed stating “No Options pattern to import.”
Important: Importing options will replace any previously imported Option Groups. Any manually created groups will remain unchanged.
Select Import Options on the right-hand side of the page.

A confirmation message will be displayed.
Select Continue to proceed with the import.
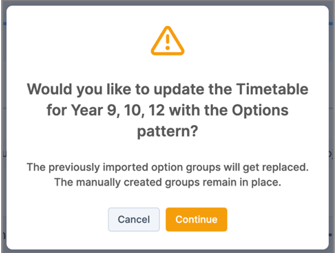
The imported Option Groups will be updated based on the selected timetable patterns.
Import Rules
When importing options:
- Timetable Pattern Year Groups are offset by one year when imported into the wTimetable module. For example, a Year Group 8 timetable pattern will be imported into Year Group 9.
- The Number of Classes for Option Groups are based on the imported timetable pattern.
- If changes have been made on the Block Planning page for a Year Group, that Year Group will be excluded from the import process.
- Class names are imported from the timetable pattern and can be edited through the expanded blocks view in Curriculum Plan.
Subject Information Preview
The Subject Information Preview table, located at the bottom of the page, provides an overview of the subject, class and period requirements for the selected Year Group, based on the information entered in the Subjects, Linear Groups, and Option Groups panels.
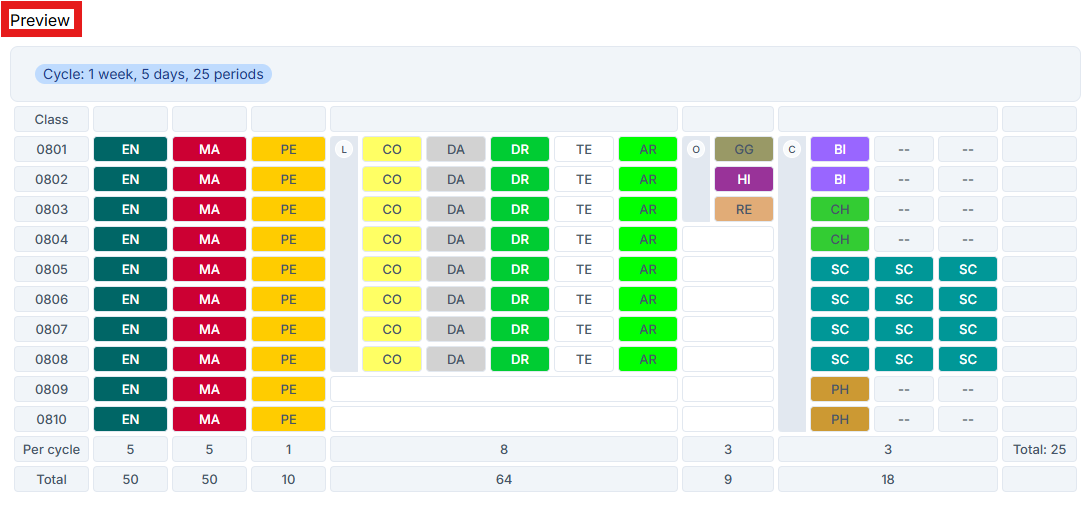
The Preview updates dynamically as changes are made to the curriculum structure.
The Preview displays:
- Subjects by Class and Subject Information Group.
- The type of group each subject belongs to:
- L – Linear
- O – Option
- C – Complex
- The number of rows displayed represents the Number of Classes required for each group.
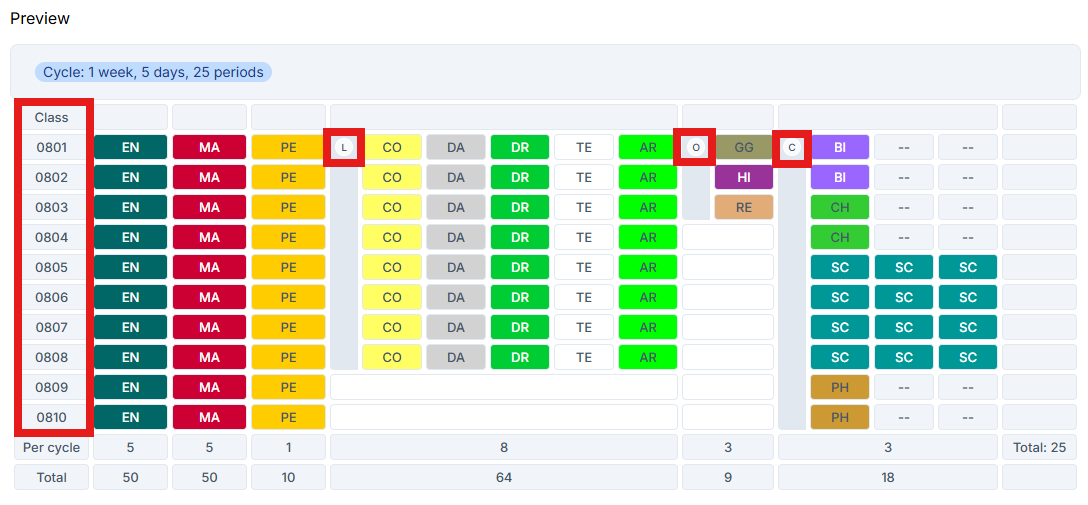
Class Codes
Class codes are created by combining the Year Group with sequential numbering.
For example:
- 0801 = Year Group 08, Class 01
Note: Class codes are used for general planning purposes only. Actual class names are defined using Class Name Definition in Settings.
Summary Information
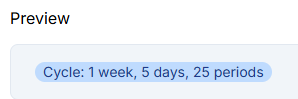
The blue summary at the top of the Preview Table displays the timetable cycle information, including:
- Number of Weeks
- Number of Days
- Number of Periods
For example: 1 weeks, 5 days, 25 periods
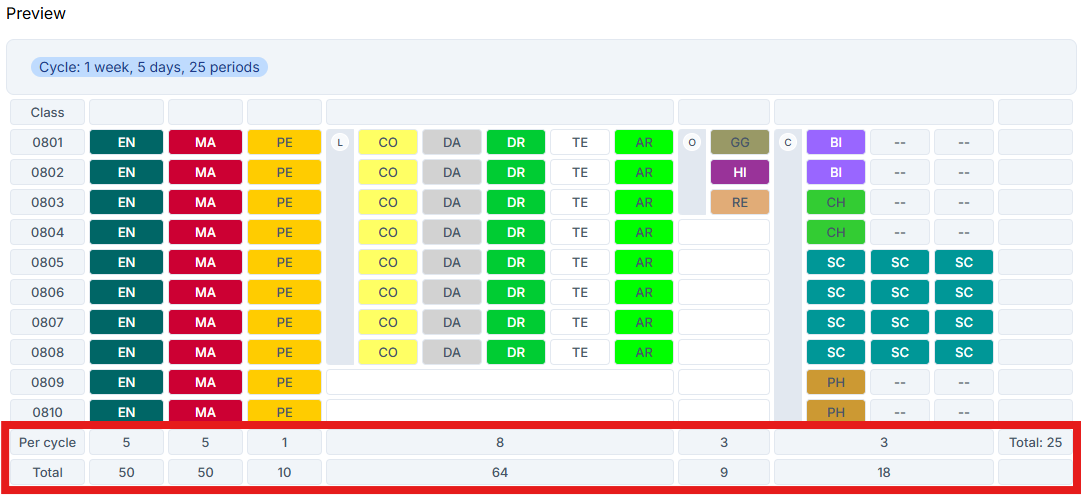
Two summary rows at the bottom of the Subject Information Preview table display:
- Per cycle – The number of periods required per class for the timetable cycle.
- Total – The total number of periods required for the group for the timetable cycle.
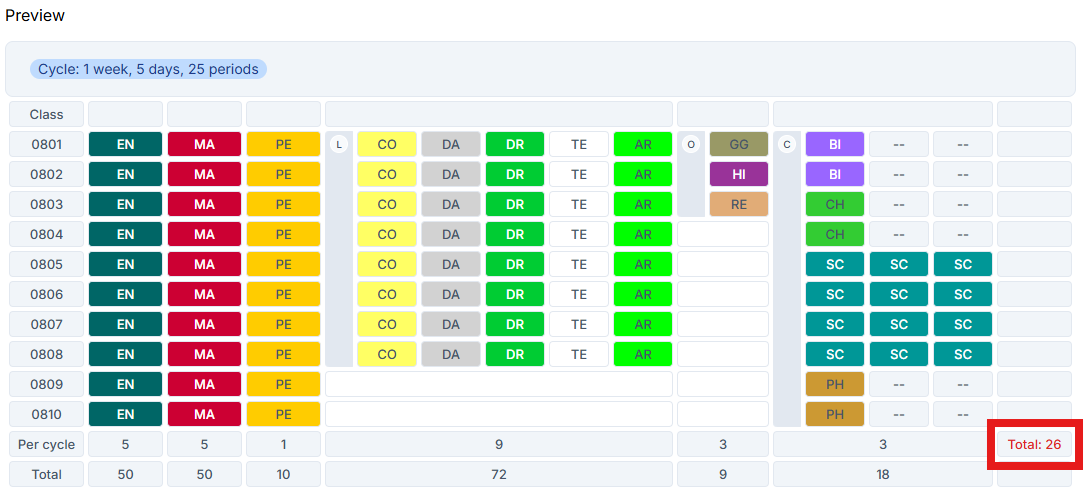
Note: If the total number of periods required exceeds the total number of periods available in the timetable cycle, the overall total displayed in the Subject Information Preview table will be highlighted in red.
The Staffing page is used to assign Contact Time (the number of periods a member of staff is available to teach) to specific Subjects and Year Groups. This information is used during Curriculum Planning and Scheduling to ensure teaching allocations remain within each staff member’s available Contact Time.
Contact Time can only be assigned to staff who have an existing subject relationship configured in the Relationships page.
This section covers:
Navigate to Modules > wTimetable, open the required Project and Timetable file, then select Staffing.

Using the Staffing Page
The Staffing page includes search, filtering and sorting tools to help locate and review data.
Searching
Use the Search field at the top of the page to search the table using any information displayed within it.

This can include information such as Name, Staff Code, Department, Subject, or Contact Time.
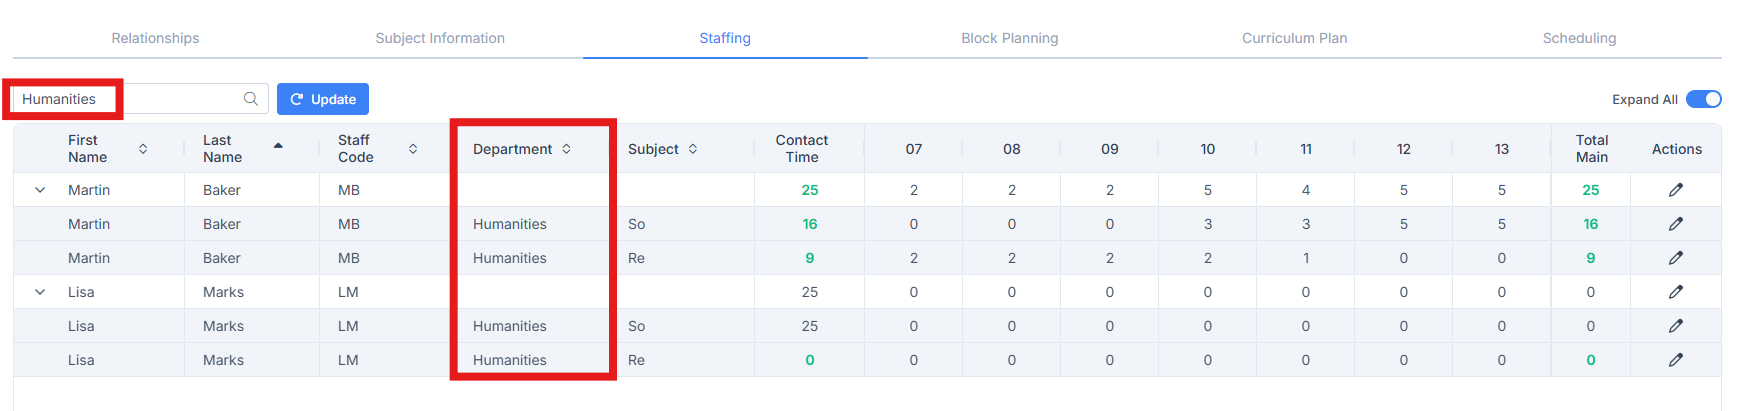
Filtering
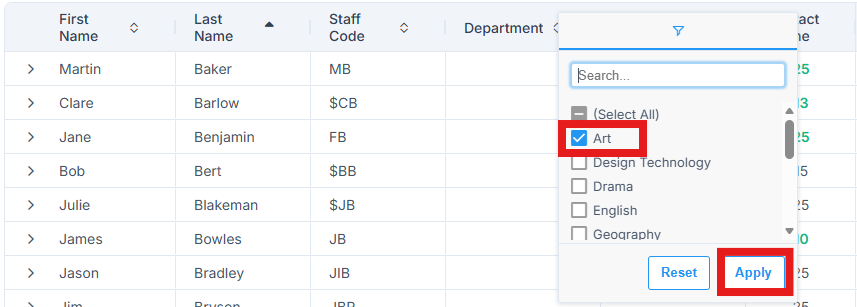
The table can be filtered by:
- Name
- Staff Code
- Department
- Subject
- Contact Time

When filtering by Subject or Department, an additional Subject Total summary row is displayed. This shows the total Contact Time required for the selected Subject or Department, making it easier to compare the teaching requirement against the available Staff Contact Time.
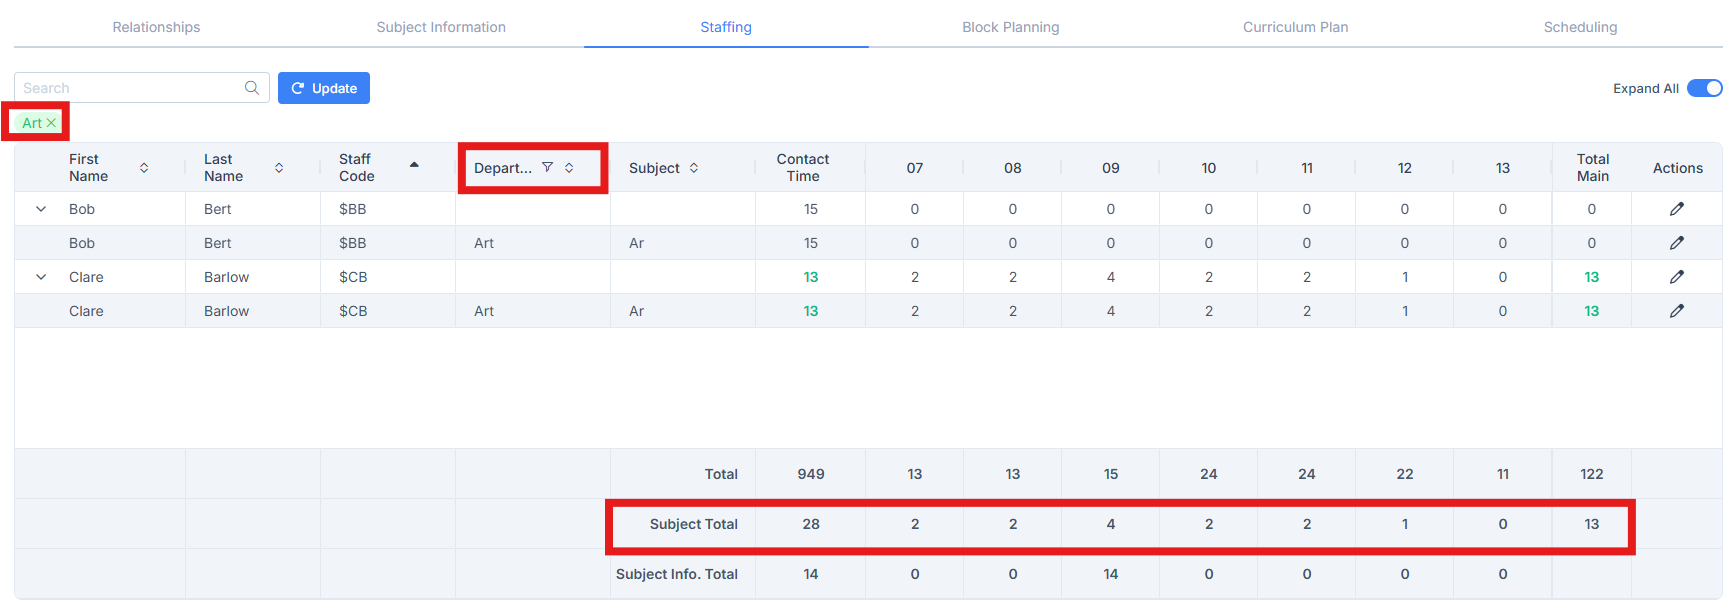
Note: The existing Total row is not affected by filtering.
Sorting
The table can be sorted by:
- Name
- Staff Code
- Department
- Subject

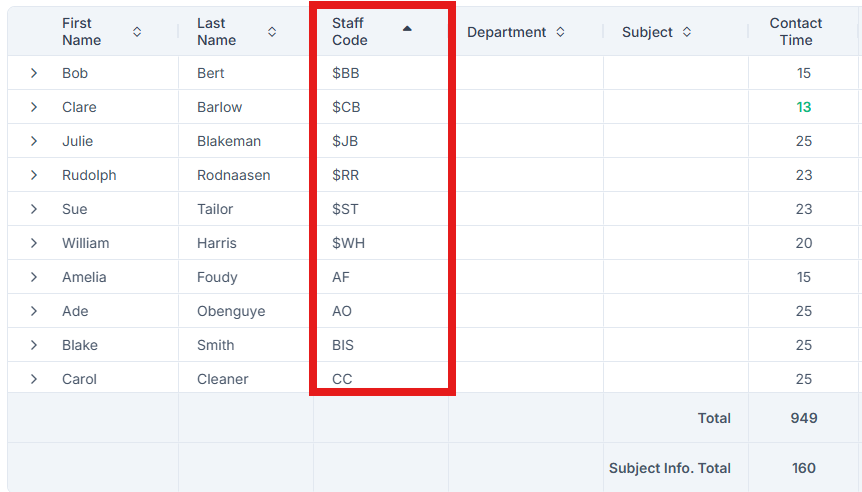
Note: Sorting by Department or Subject applies to the expanded subject rows.
Assigning Contact Time
Updating Total Contact Time
To update a staff member’s Total Contact Time, select the Edit icon, or double-click the required staff record.

Enter the required Total Contact Time and select the ✓ icon to save the changes.

Assigning Contact Time by Subject and Year Group
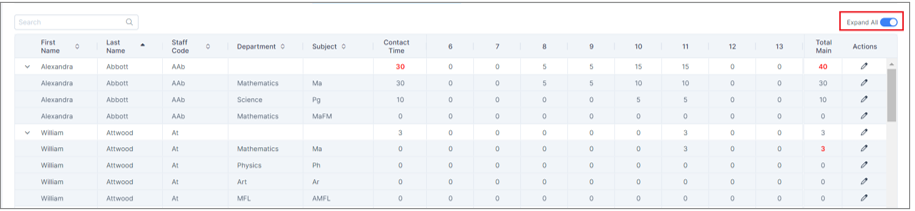
Expand the required staff member using the arrow next to their name to display the subjects previously assigned to them in the Relationships page.

Tip: Use the Expand All toggle to expand or collapse the subjects for all staff members.
To copy a staff member’s Total Contact Time to their first assigned subject, select Update.
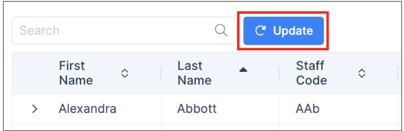
Note: When using Update:
- Only the first assigned subject is updated.
- Additional subjects remained unchanged.
- If the first subject is later removed from the Relationships page, the remaining Contact Time values are not updated automatically.

To update the Contact Time for a subject, select the Edit icon, or double-click the required subject row.

Enter the required Total Contact Time for the selected Subject, then allocate that Contact Time across the applicable Year Groups by entering the number of teaching periods for each.
Once complete, select the ✓ icon to save.

Tip: Assigning Contact Time at both subject and year group level improves the accuracy of curriculum planning.
Check that the Total Main Hours value matches the staff member’s Total Contact Time.

Note: If Total Main Hours is displayed in red, review the Contact Time allocated to each Subject and Year Group to ensure it matches the staff member’s Total Contact Time.

Comparing Staffing Capacity
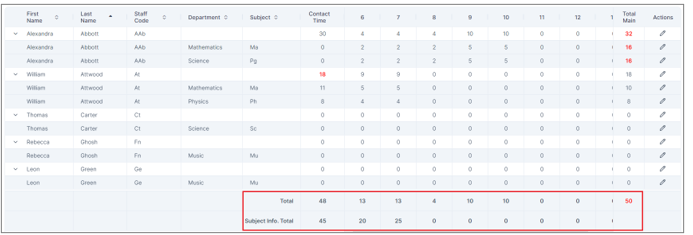
The bottom of the Staffing page provides a comparison between the total Staff Contact Time available and the total number of teaching periods required, based on the configuration in Subject Information. This comparison helps identify whether sufficient staffing capacity is available to deliver the planned curriculum before progressing to Curriculum Planning and Scheduling.
The following summary rows are displayed:
- Total – Displays the total Staff Contact Time available across all staff members.
- Subject Info. Total – Displays the total number of teaching periods required, calculated from the Number of Classes and Period Count configured in Subject Information.
Comparing these totals indicates whether sufficient staff capacity is available to deliver the planned curriculum.
The Block Planning page is used to begin creating the curriculum model for each Year Group using the information configured in Subject Information. It also provides feedback and suggestions on staffing and resourcing based on the minimum requirements configured in the Relationships, Subject Information, and Staffing pages. Once complete, the blocks can be generated for use in Curriculum Plan.
Note: This step is optional. Bands and Blocks can be created directly in the Curriculum Plan page if preferred.
This section covers how to:
- Reviewing Year Group Readiness
- Creating the Band structure
- Assigning Classes to Bands
- Generating Blocks
Navigate to Modules > wTimetable, open the required Project and Timetable file, then select Block Planning.

Reviewing Year Group Readiness
Select the required Year Group to review its readiness.
If a Year Group does not meet the minimum requirements, it will be highlighted in red.
A warning message will identify the subjects that do not have sufficient planned resources.
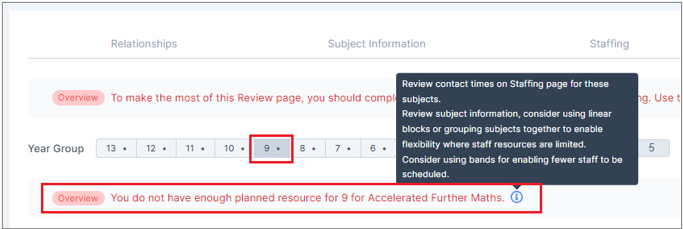
Hover over the Information (i) icon to view recommended actions, which may include:
- Reviewing Contact Time on the Staffing page for the affected subjects.
- Reviewing the Subject Information page and considering the use of Linear Groups or grouping subjects together to provide greater flexibility where staffing resources are limited.
- Considering the use of additional Bands to reduce staffing constraints.
Additional Information
The following information is displayed for each Year Group:
- Staff Number – The number of staff members assigned Contact Time for the selected Year Group on the Staffing page.
- Total Contact Time – The total Contact Time allocated to the selected Year Group on the Staffing page.

Creating the Band Structure
The first step in building the timetable structure is to define the required number of Bands for the selected Year Group. Once created, classes can be distributed across the bands to form the required blocks.
Enter the required number of Bands, then select Apply.
Note: The Pupils figure is populated from the Subject Information page.

The timetable structure is updated to include the additional band(s).
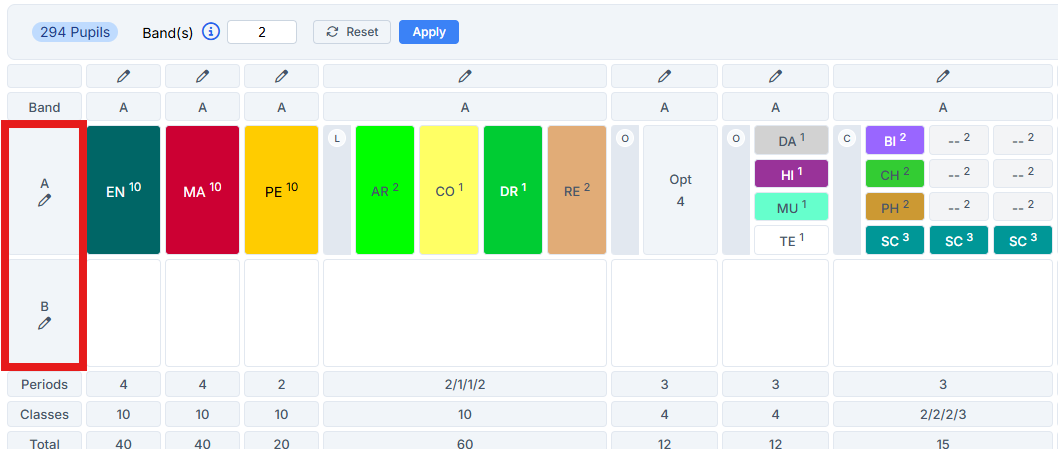
Tip: The summary at the bottom of the page displays the number of Periods, Classes, and Total periods required for the selected block.
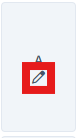
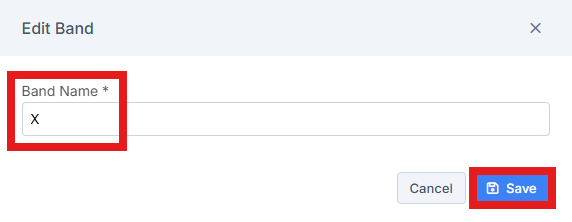
To rename a Band, select the Edit (pencil) icon and update the Band name as required.
Assigning Classes to Bands
Once the required Bands have been created, classes can be assigned to them by selecting the Edit (pencil) icon for the required Block.
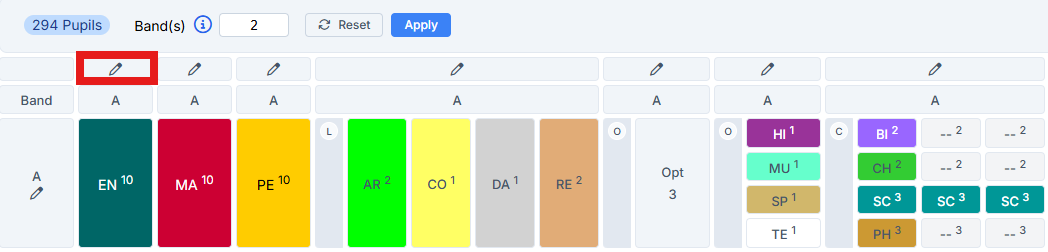
This opens the Class Distribution window, where the distribution method can be selected.
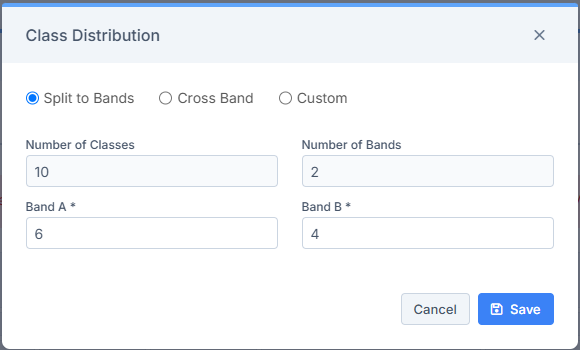
Split Bands
Use Split Bands to share the classes within a block across the selected bands.
Enter the required Number of Classes for each band, ensuring the total matches the overall Number of Classes, then select Save.
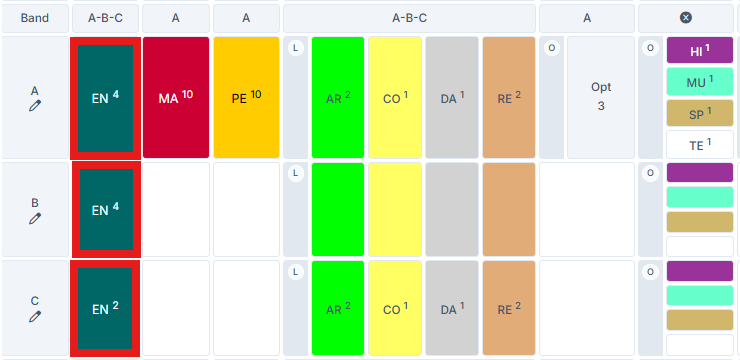
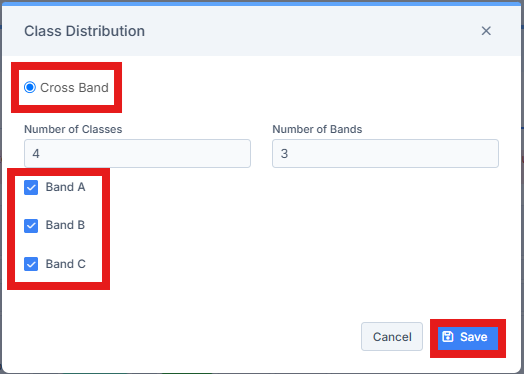
Cross Bands
Use Cross Bands to make a block available across multiple bands.
Select the consecutive bands in which the block should appear, then select Save.
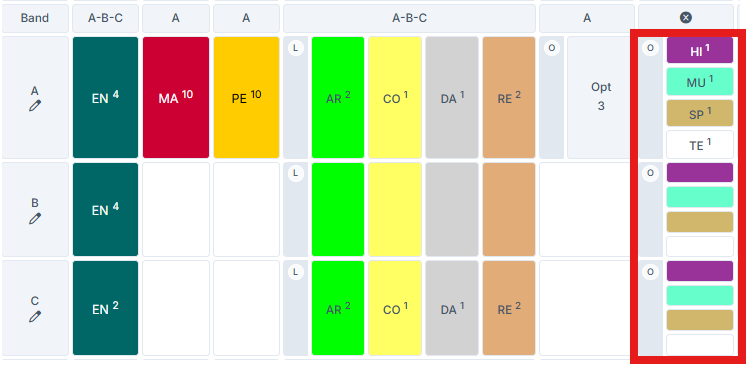
Note:
Custom Distribution
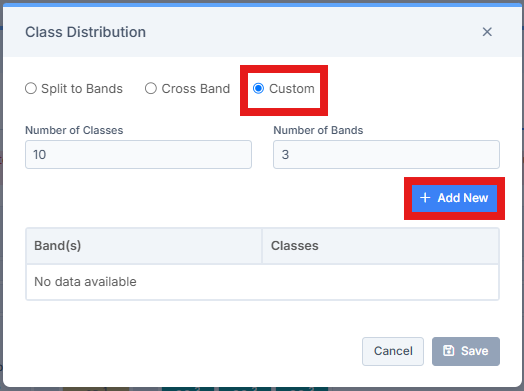
Custom Distribution is available for Simple and Linear Blocks only and allows classes to be grouped across consecutive Bands to create custom Band groupings.
Select Add New.
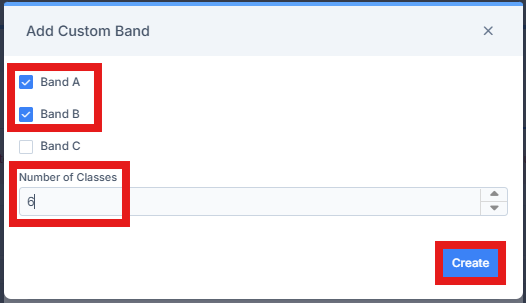
Select the bands to include within the group.
Enter the corresponding Number of Classes.
Select Create.
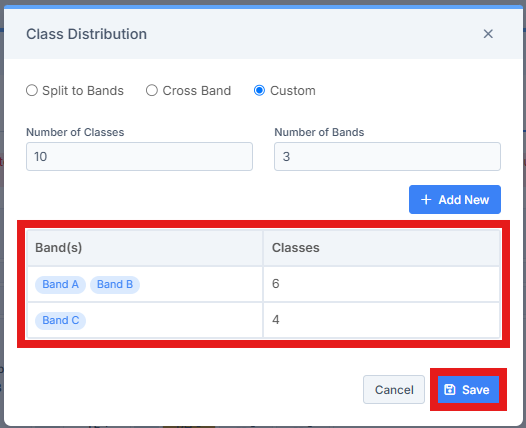
Repeat for any additional band groups, then select Save.
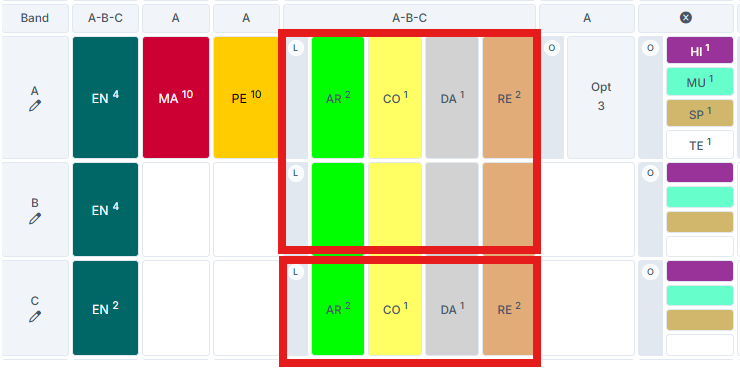
Note: The following rules apply when creating custom band groups:
- A band can either belong to one band group or remain ungrouped.
- A band group must contain consecutive bands.
- The total number of classes across all band groups must equal the overall Number of Classes.
Generating Blocks
Once the timetable structure has been configured, the blocks can be generated for the selected Year Group. This creates the initial block structure in the Curriculum Plan page, where it can be reviewed and further refined as required.
Select Generate Blocks.
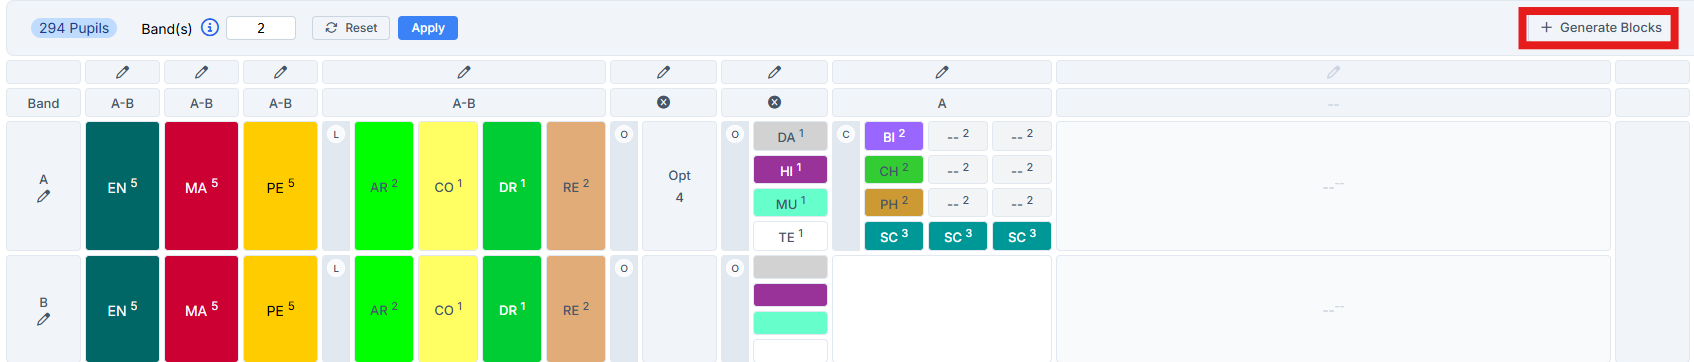
Once the process is complete, a success message is displayed to confirm that the blocks have been successfully generated.
Subsequent Generations
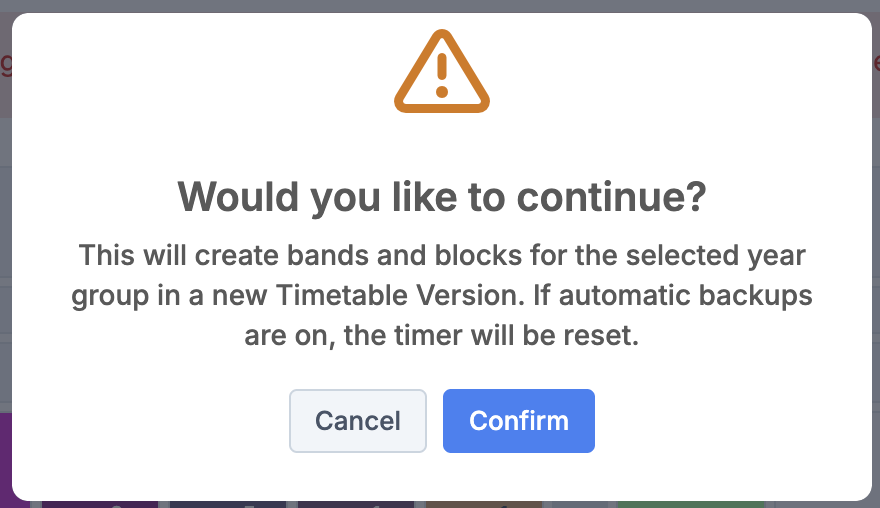
Each time Generate Blocks is selected after the initial generation:
- A new timetable version is created.
- The previous timetable version is saved as a backup.
- A confirmation message is displayed before the new timetable version is created.
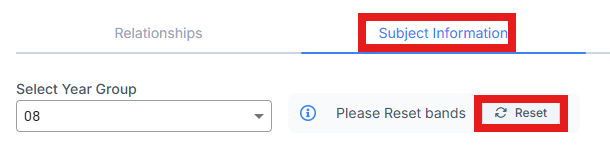
Important: If the number of Bands is increased on the Block Planning page, the corresponding Year Group in Subject Information is disabled to prevent data inconsistencies. To re-enable Subject Information, the Year Group must be Reset. Resetting the Year Group returns the Block Planning page to a single-band structure, and the band structure will need to be recreated before blocks can be generated again.
Next Steps
Continue to Part 2: Curriculum Building for guidance on the next stage of the wTimetable process.