
This guide is the third in the three-part series covering the end-to-end process for Bromcom’s wTimetable software. It focuses on the final stages of timetable creation, including configuring scheduling rules, performing manual and automatic scheduling, resolving timetable conflicts, analysing timetable data using reports, and processing the completed timetable.
The Scheduling & Reporting Guide is divided into the following sections:
For guidance on the wTimetable New UI and the new functionality available on the Scheduling page, please refer to this guide wTimetable New UI.
THE SCREENSHOTS USED IN THE GUIDE ARE FOR ILLUSTRATION PURPOSES ONLY AND MAY DIFFER IN A LIVE SCHOOL’S MIS.
- Expand each item for guidance on the various functions within the wTimetable Module in Bromcom.
- To print this as a checklist, click ‘Collapse All’ (button on the right), then right-click the page and select ‘Print’.
- To print this as a full guide, click ‘Expand All‘, then right-click the page and select ‘Print‘.
Scheduling
The Scheduling page allows users to drag and drop Blocks into available Periods to create a scheduled Timetable. Staff and Rooms can still be assigned to Classes on the Scheduling page.
This guide looks at the following:
- How to manage Toggles within Scheduling
- How to manage Views in Scheduling
- How to manage Filters in Scheduling
Go to Modules > wTimetable to open Projects. Click on your Project Name, then click on your Timetable. Click on Scheduling.

How to manage Toggles within Scheduling
The Scheduling page allows users to drag and drop Blocks into available Periods to create a scheduled Timetable. Staff and Rooms can still be assigned to Classes on the Scheduling page.
This guide covers the following Toggle functions in Scheduling;
Go to Modules>wTimetable>Projects>Click on Project to see the Timetable panel with the tabs below. Click on Scheduling.

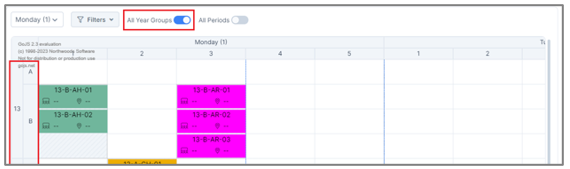
All Year Groups
When the All Year Groups toggle is on – you will see Year Groups in the parent column and Bands in the child column.
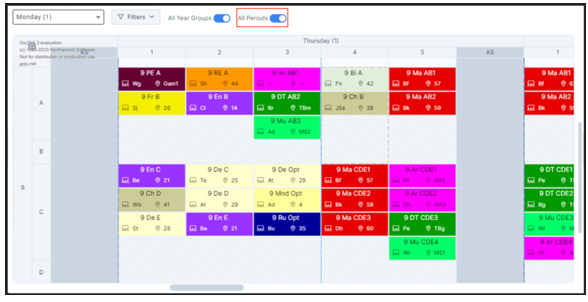
All Periods
When the All Periods toggle is on – you will see all Periods including breaks and lunch in the columns. If it is off you will only see teaching periods.
How to manage Views in Scheduling
The Scheduling page allows users to drag and drop Blocks into available Periods to create a scheduled Timetable. Staff and Rooms can still be assigned to Classes on the Scheduling page.
On the Scheduling page users can choose between Simple and Detailed (default) Views, and Year Group, Staff and Room entities. This guide covers the following Views in Scheduling;
Go to Modules>wTimetable>Projects>Click on Project to see the Timetable panel with the tabs below. Click on Scheduling.

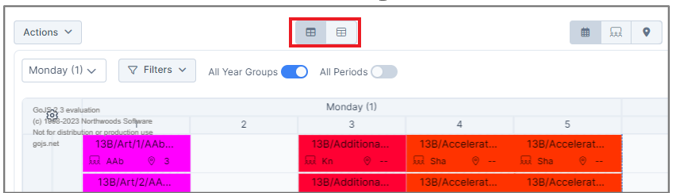
Simple and Detailed
On the Scheduling page users can choose between Detailed (default/bold on the left) and Simple (on the right) views.
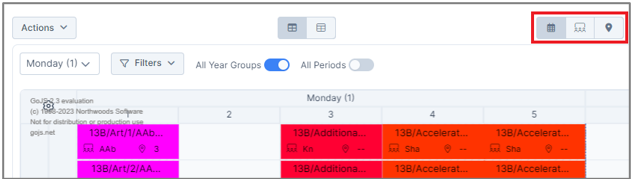
Then in the top right there are options to choose to view either by Year Group, Staff or Room.
Year Group
Year Group view displays scheduled classes by Year Group and Band.
Simple Year Group View
Displays only one cell for the scheduled Classes including the following information:
For simple blocks:
- Subject Code.
- The Subject’s colour matches the cell’s background.
For linear, option, and complex blocks:
- Block Code and Block Name.
- Colour-coded depending on the block type:
- Linear blocks – blue
- Option blocks – yellow
- Complex blocks – green
- Tip: Hover over the Block Code to view the full Block Name.
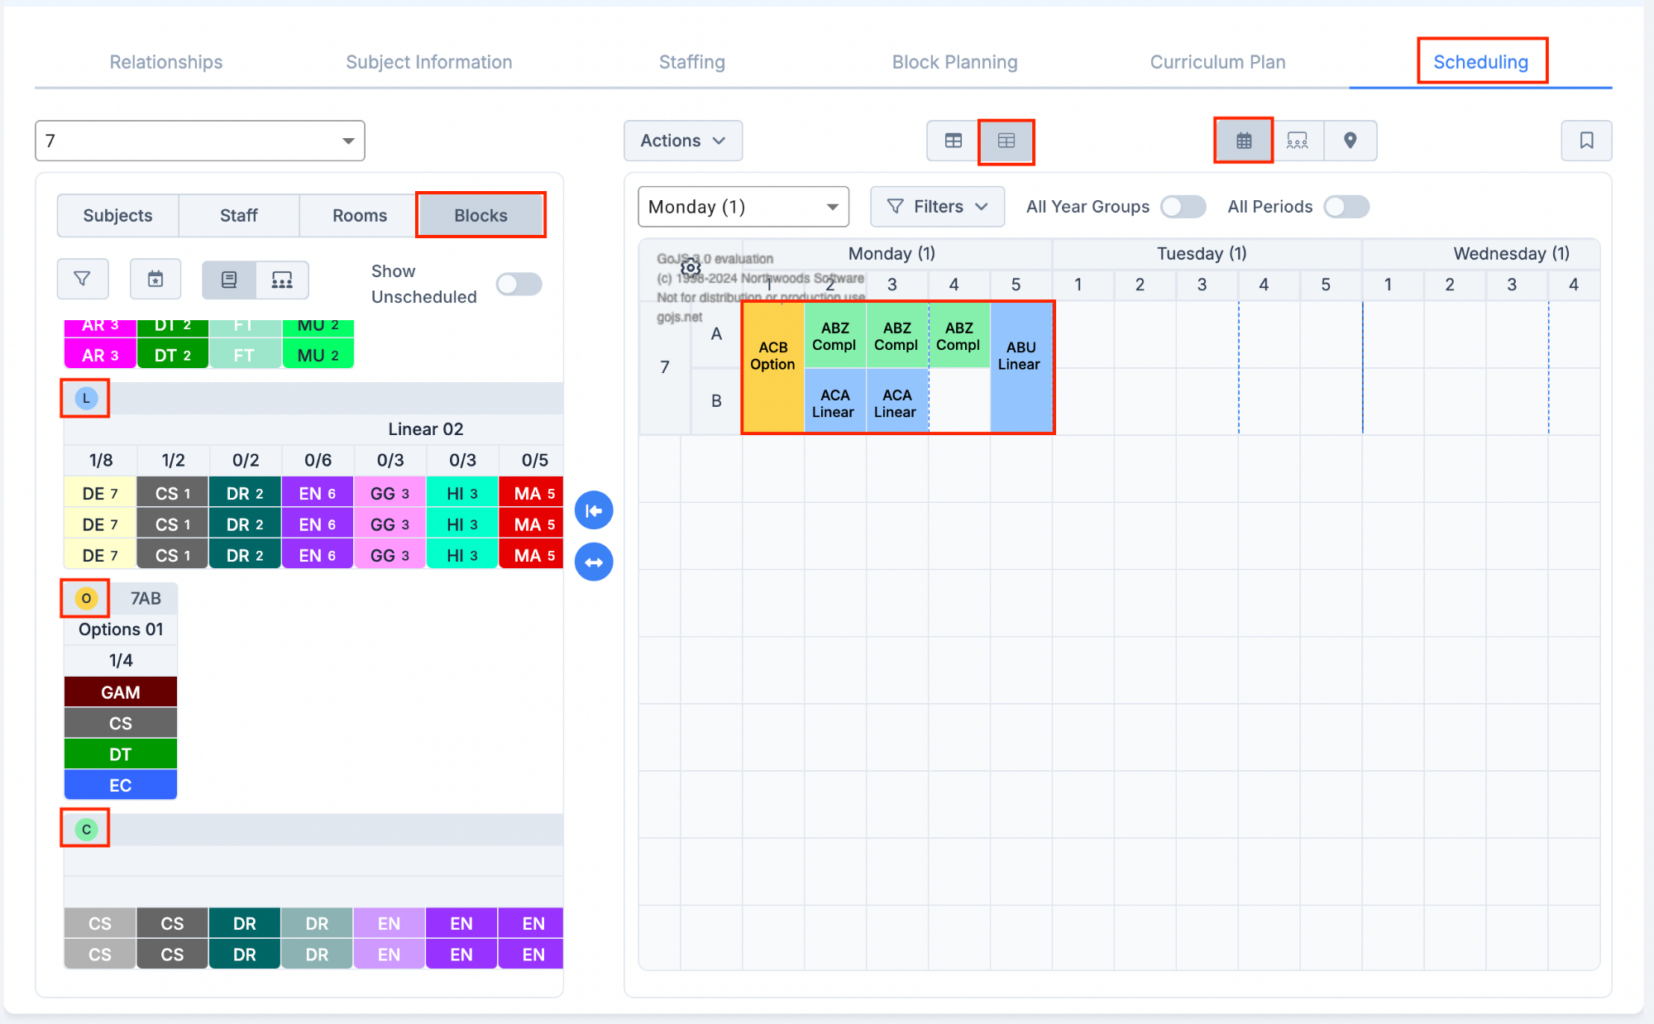
The colour-coding can be personalised by clicking on the Block badge, selecting a colour and clicking Pick. An option to reset block colours to their default values has been included for easier management, with the Set Default feature instantly updating the colour of the blocks in the Simple view back to the default.
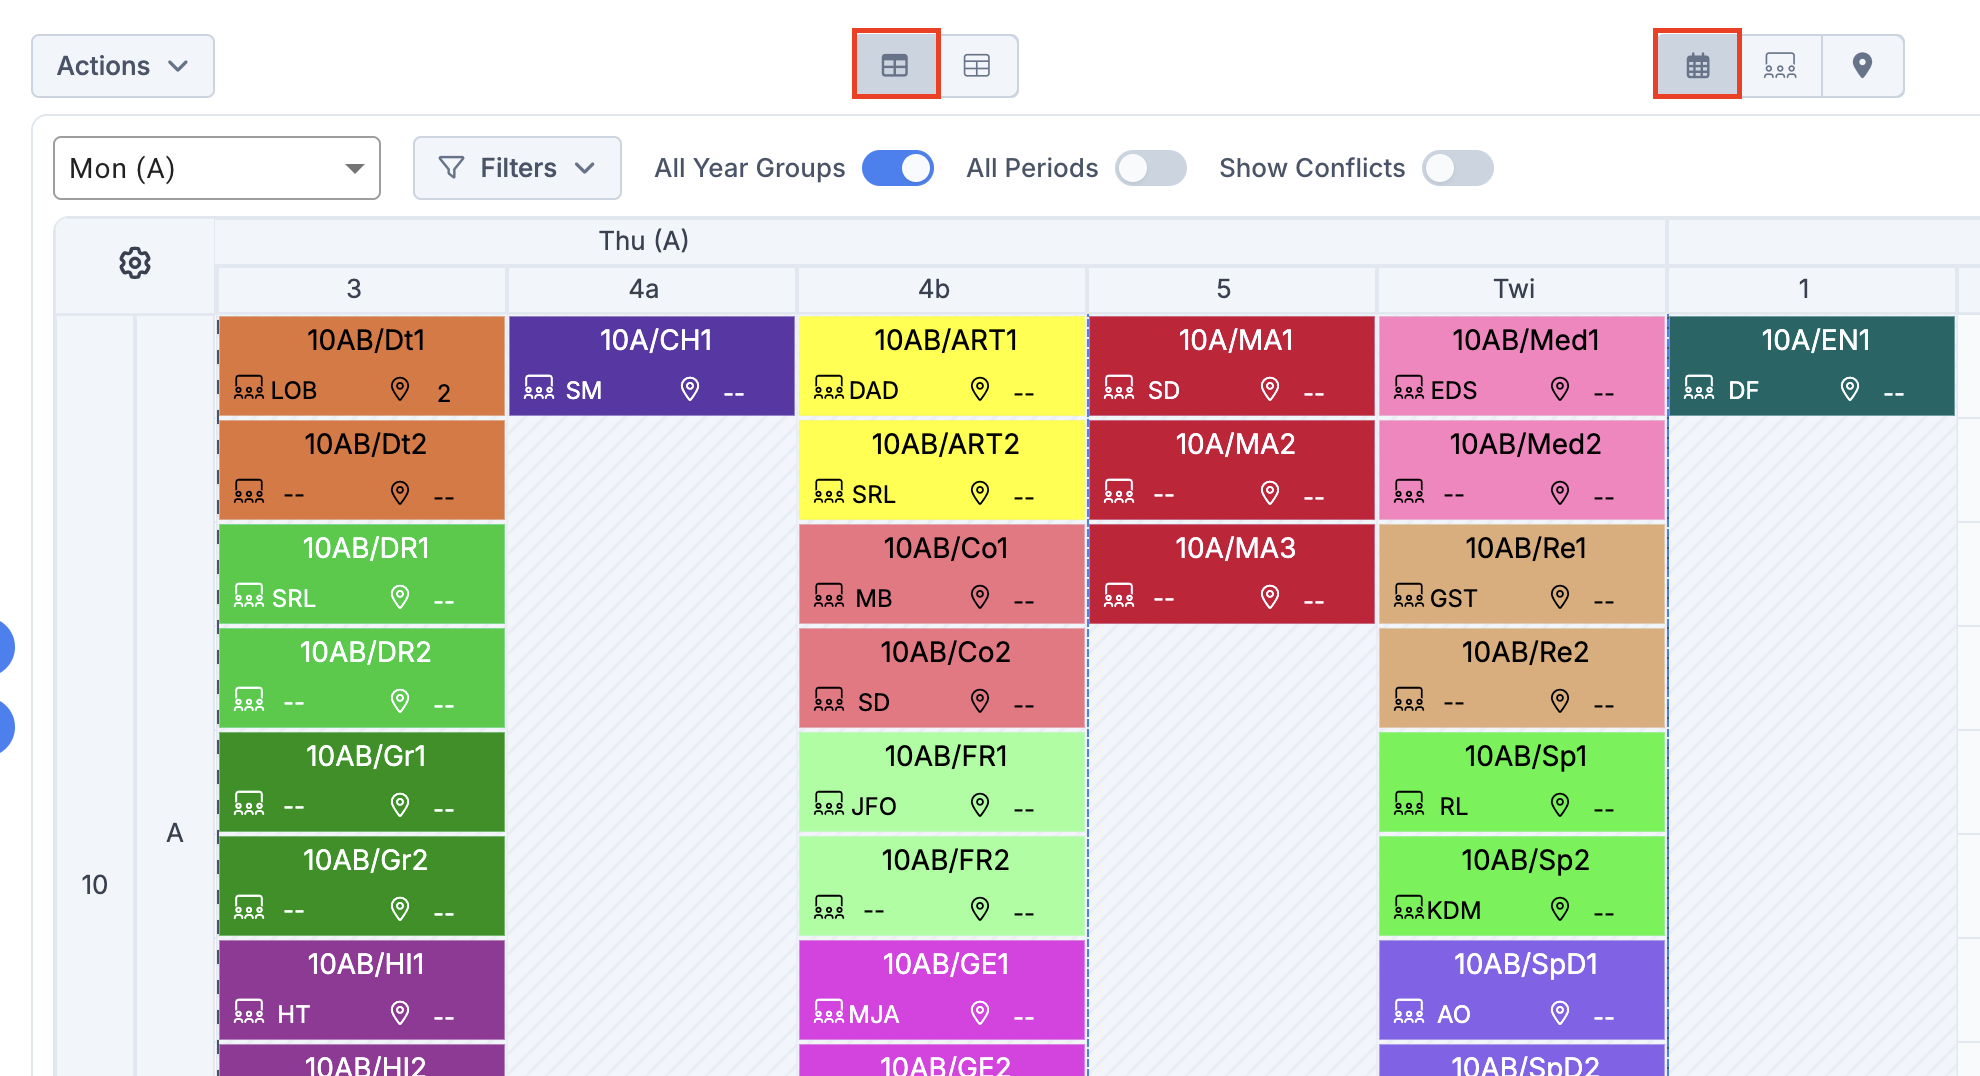
Detailed Year Group View
Displays separate cells for all scheduled Classes in the Period including the following information:
- Class Name
- Assigned Staff member’s Staff Code or a placeholder if not yet assigned.
- Assigned Room’s Room Code or a placeholder if not yet assigned.
Staff
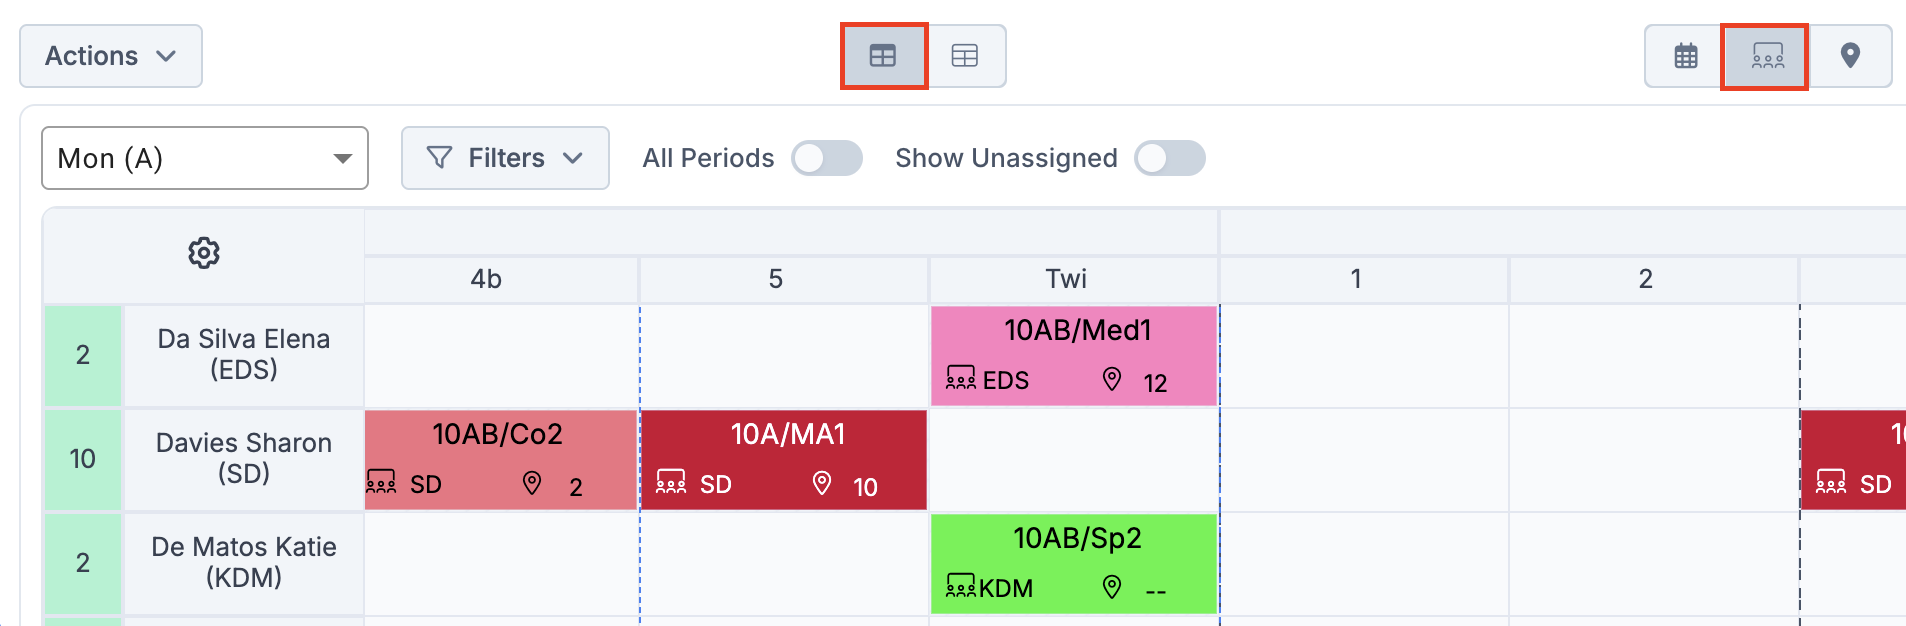
Staff view displays scheduled classes by Staff in alphabetical order.
The scheduled Period count by Staff is shown on the left-hand column in green. A red count indicates the Staff has exceeded the available contact time.
- Tip: Use one of the following filters to focus the spreadsheet: Department, Subject, and Staff Type.
Simple Staff View
Displays the following information for scheduled classes:
- Class Name
- Room Code
Detailed Staff View
Displays the following information for scheduled classes:
- Class Name
- Assigned Staff member’s Staff Code or a placeholder if not yet assigned.
- Assigned Room’s Room Code or a placeholder if not yet assigned.
Room
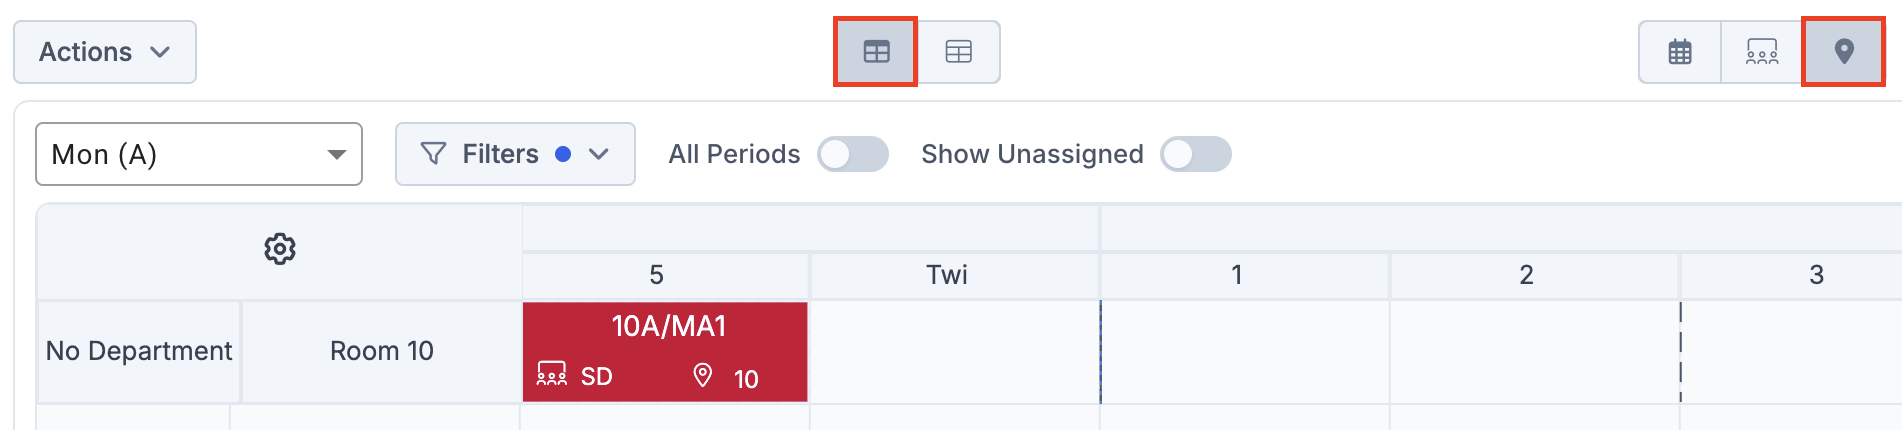
Room view displays scheduled classes by Department by Room in alphabetical order.
- Tip: Use one of the following filters to focus the spreadsheet: Department, Subject, and Staff Type.
Simple Room View
Displays the following information for scheduled classes:
- Class Name
- Staff Code
Detailed Room View
Displays the following information for scheduled classes:
- Class Name
- Assigned Staff member’s Staff Code or a placeholder if not yet assigned.
- Assigned Room’s Room Code or a placeholder if not yet assigned.
How to manage Filters in Scheduling
The Scheduling page allows users to drag and drop Blocks into available Periods to create a Scheduled Timetable.
Filters can be used in the wTimetable to filter by Subject, Department, and Staff Type. Applying the Filter will keep the selected items in the timetable whilst ‘greying out’ the unselected items.
Go to Modules>wTimetable to open Projects, click on your Project to see the Timetable panel with the tabs below.Click on Scheduling.

Filters button
1. Click on the Filters button.
2. Choose from Subjects, Departments, or Staff Type (Staff view only).
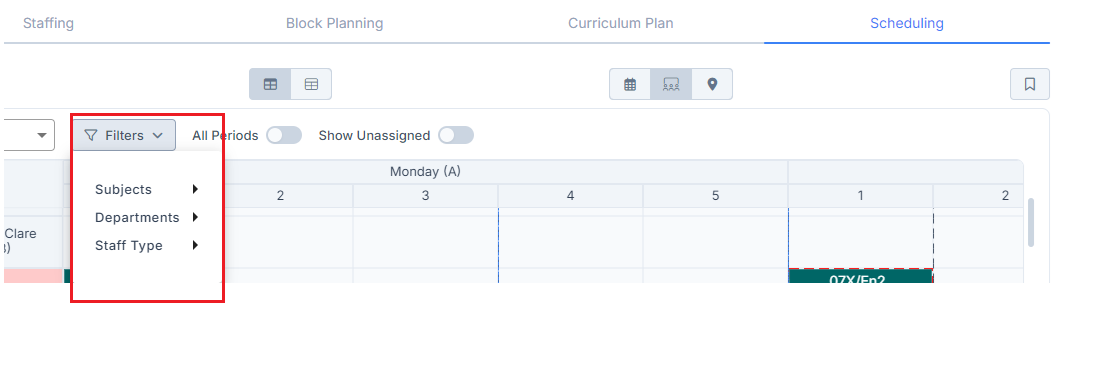
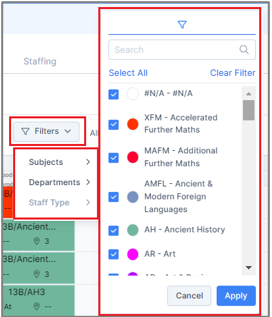
The filter popup will appear.
4. Select the items to be filtered and click Apply.
- Search – for an item in the list.
- Select All – ticks the check box for all items.
- Clear Filter – clears all the check boxes.
- The filter is applied in all views – Year Group, Staff, and Room.
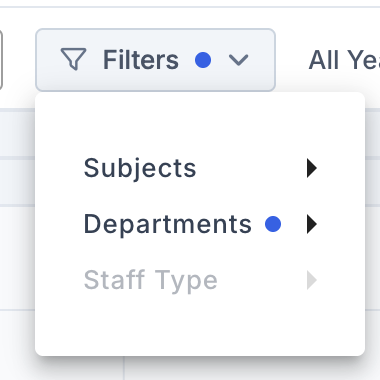
A blue dot on the Filter button indicates a filter is on
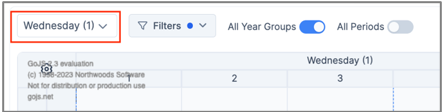
Day Filter
When you select a day from the Day Filter, the timetable automatically scrolls to and focuses on that day.
The Timetable Specifications popup consists of 7 tabs which allow rules to be set up and used in the Auto Schedule functionality.
- Subject relationships
- Subjects on days
- Staff on days
- Part Time Staff
- Limitations
- Blocks on days
- Schedule Order
- Block Priority
- Managing Timetable Specification rules
- Visual Indicators and Conflicts
Go to Modules > wTimetable to open Projects. Click on your Project Name, then click on your Timetable. Click on Scheduling.
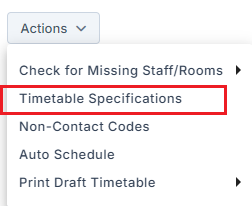
Go to Actions and Timetable Specifications.
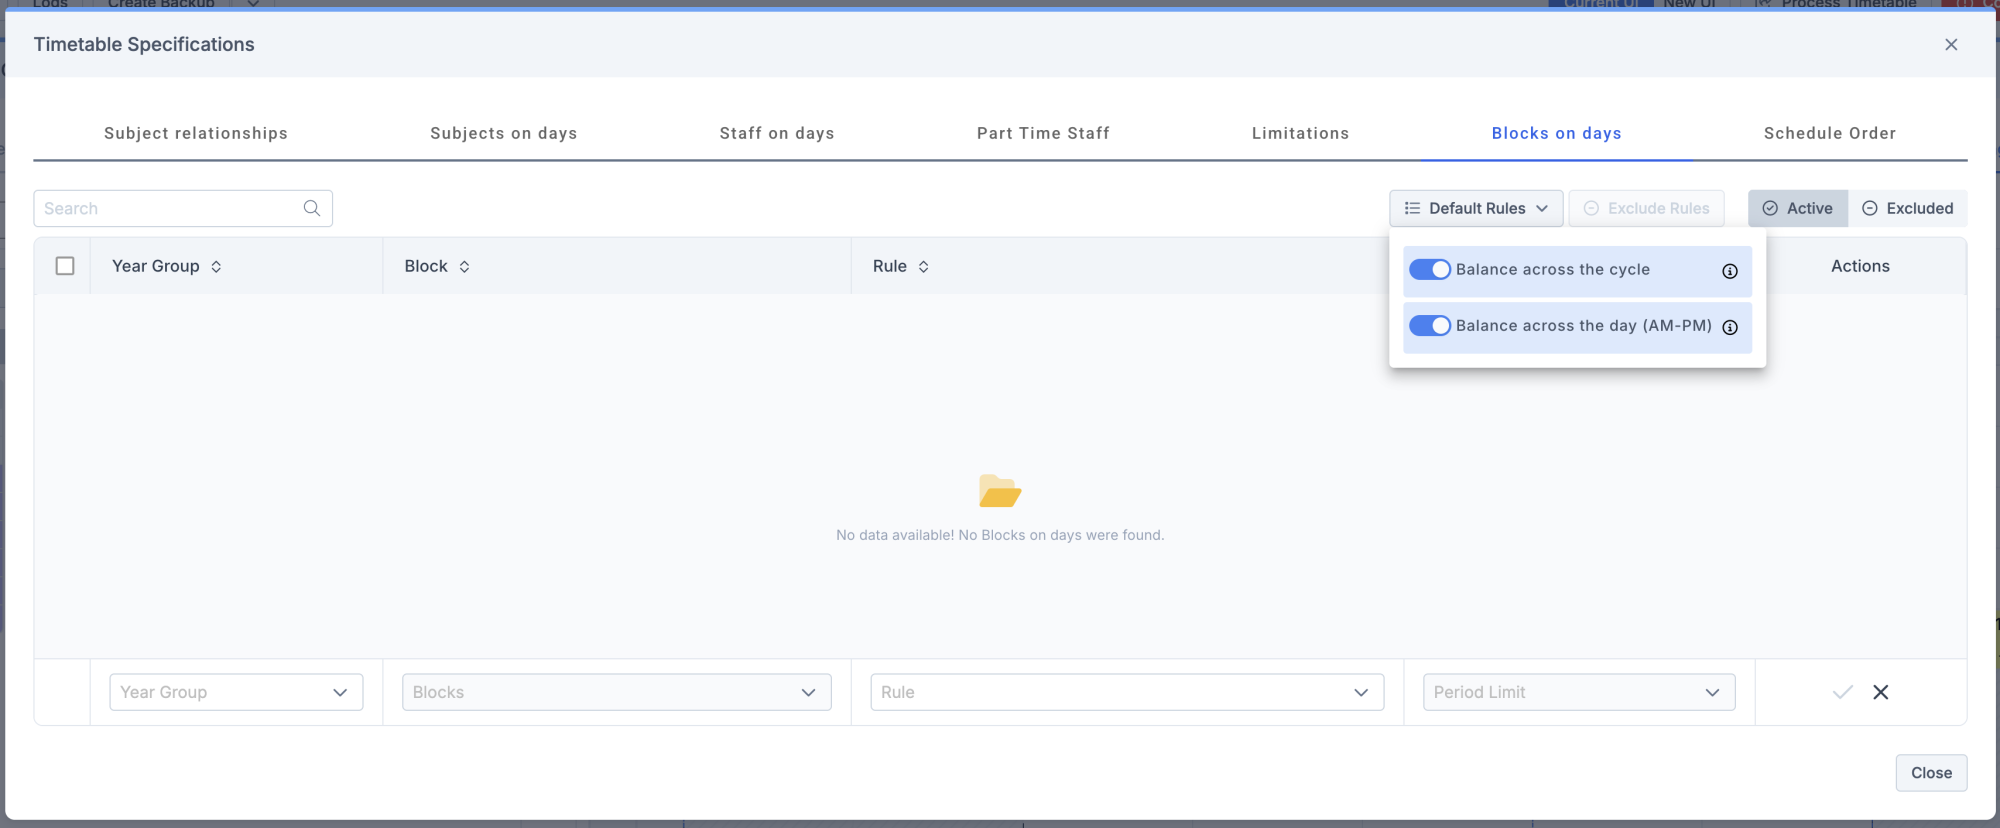
To add a rule to the Auto Schedule process, click on Add New Row within the relevant tab when in Active view.
Default Rules are applied for all Blocks in all Year Groups. These will be switched on by default. Users can switch the default rules off individually, and then set up new rules as shown.
Note: Adding new rules will overwrite the default rules for the selected Blocks.
Subject Relationships
The Subjects Relationships tab allows you to create scheduling rules between Subjects. These rules are used by the auto-scheduling process to ensure sessions are distributed according to the defined requirements.
Add a subject relationship
1. Click Add New Row.
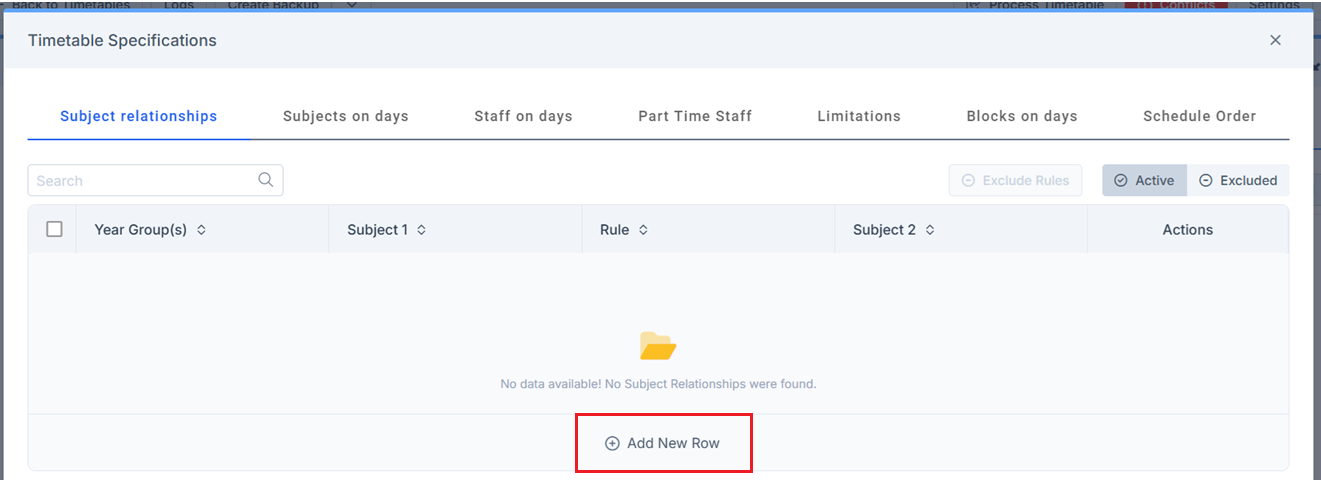
2. Select one or more Year Groups.
3. Select Subject 1.
4. Select the required rule.
- Must follow within a structured week – Subject 1 must be scheduled to the teaching period after Subject 2 within the same structured week.
- Must precede within a structured week – Subject 1 must be scheduled to the teaching period before Subject 2 within the same structured week.
- Not continuous within a day – Subject 1 and Subject 2 cannot be scheduled in consecutive teaching periods on the same day
- Must be on the same day as – Subject 1 and Subject 2 must be scheduled on the same day.
- Must not be on the same day as – Subject 1 and Subject 2 cannot be scheduled on the same day.
- Scheduled together within a day – Subject 1 and Subject 2 must be scheduled in consecutive periods on the same day, regardless of the order in which they occur.
5. Select Subject 2.
6. Click the tick to save the rule.

The new rule is added to the Subject relationships table and will be considered during the auto schedule process.
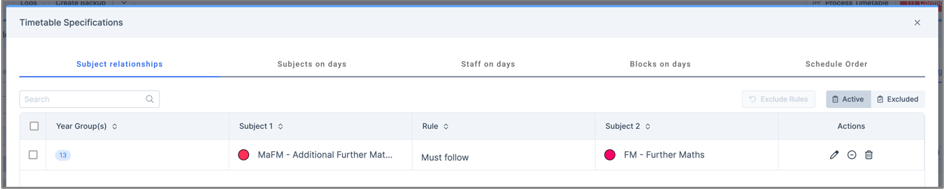
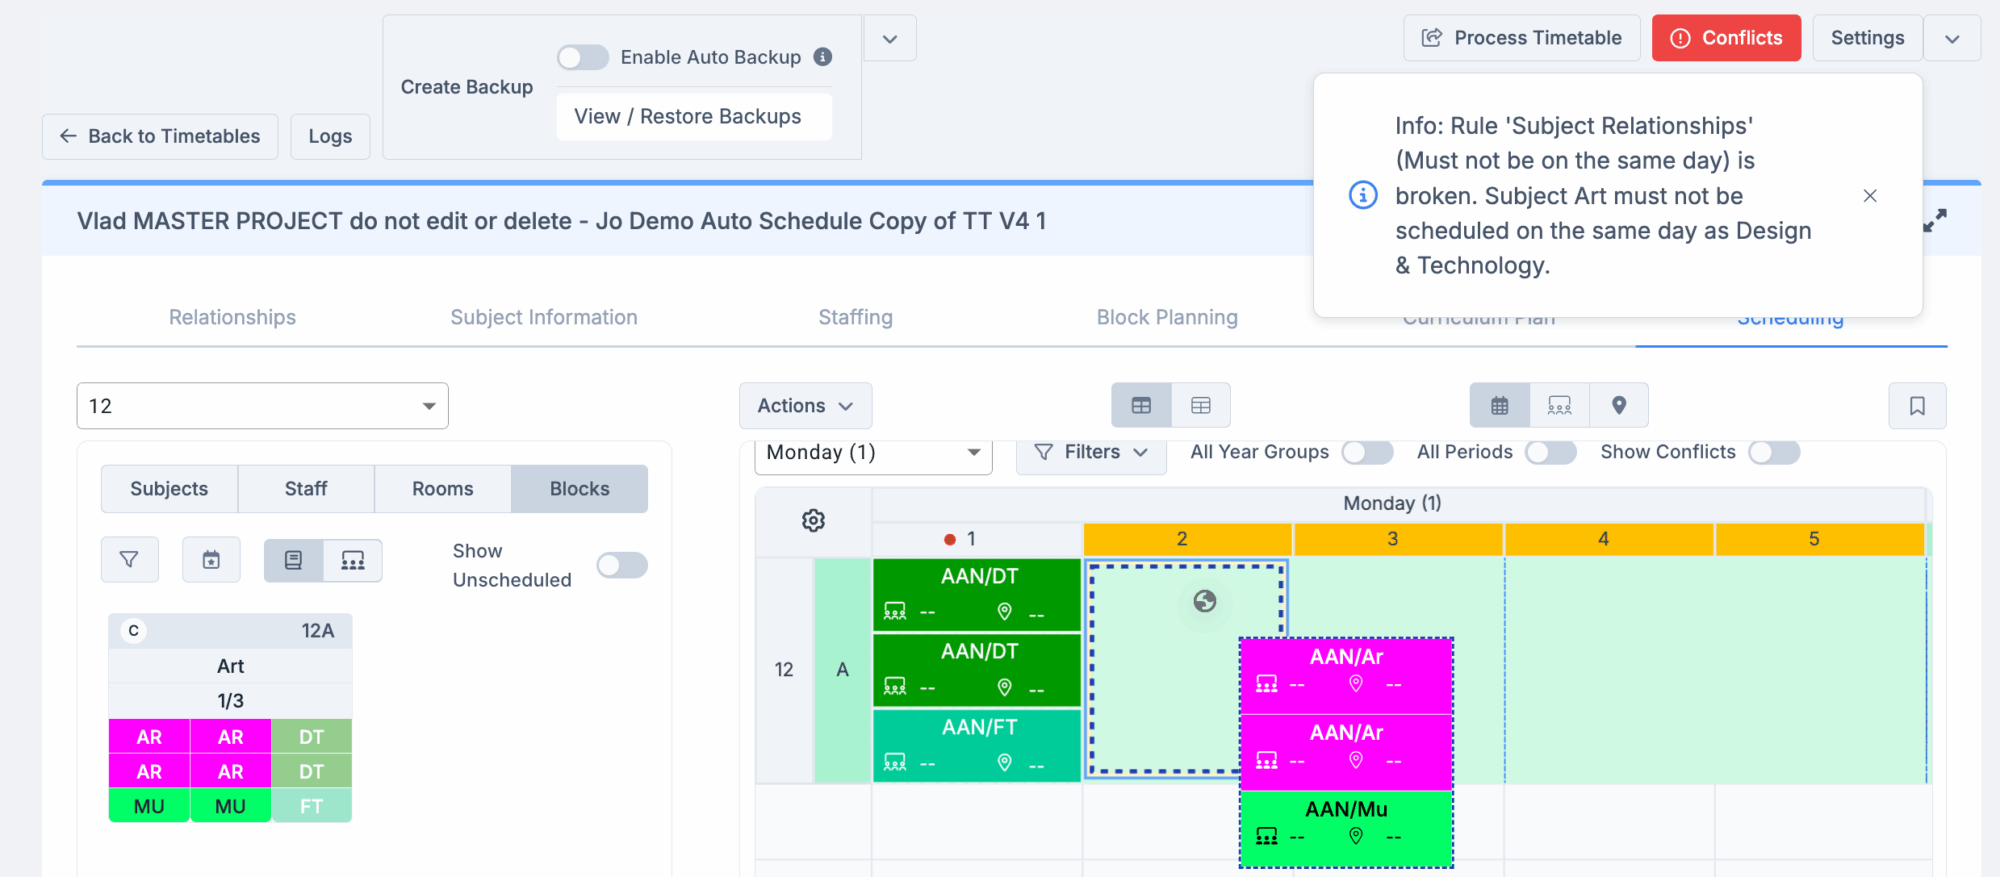
Example: If a Subject Relationship rule states that Art must not be scheduled on the same day as Design & Technology, an amber indicator and pop-up will appear if Design & Technology is scheduled first and Art is then scheduled on the same day.
If Art is scheduled first and Design & Technology is scheduled afterwards, the indicator and pop-up will not appear, although the conflict will still be recorded in the Conflicts area.
To display the indicator and pop-up in both scenarios, create a second rule stating that Design & Technology must not be scheduled on the same day as Art.
Subjects on Days
The Subjects on Days tab allows you to define when subjects can, should, or should not be scheduled. These rules are used by the auto-scheduling process to help distribute sessions appropriately across the timetable.
Add a subjects on days rule
1. Click Add New Row.
2. Select one or more Year Groups.
3. Select a Subject.
4. Select one or more periods for the required rule type:
- Not Available – The selected subject cannot be scheduled during the specified periods for the selected year group.
- Undesirable – The selected subject should avoid being scheduled during the specified periods for the selected year group when alternative periods are available. If no suitable alternatives exist, the subject may be scheduled in these periods.
- Preferred – Where possible, the selected subject should be scheduled during the specified periods for the selected year group.
5. Click the tick to save the rule.
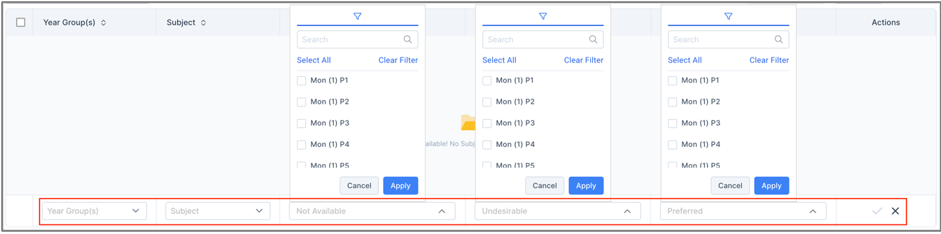
The new rule is added to the Subjects on days table and will be considered during the auto-schedule process.

Staff on days
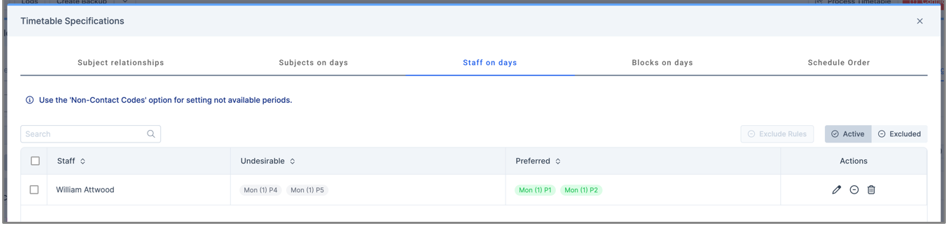
The Staff on Days tab allows you to define preferred and undesirable teaching periods for staff members. These preferences are used by the auto-schedule process when allocating sessions.
- Note: To record staff non-availability, use Non-Contact Codes rather than Staff on Days.
Add a Staff on days rule
1. Click Add New Row.
2. Select a Staff member.
3. Select one or more periods as:
- Undesirable – Sessions assigned to the selected staff member, either as Main Staff or Additional Staff, should avoid being scheduled during the selected periods. If no suitable alternative periods are available, the sessions may still be scheduled during these periods.
- Preferred – Where possible, sessions assigned to the selected staff member, either as Main Staff or Additional Staff, should be scheduled during the selected periods.
3. Click the tick to save the rule.
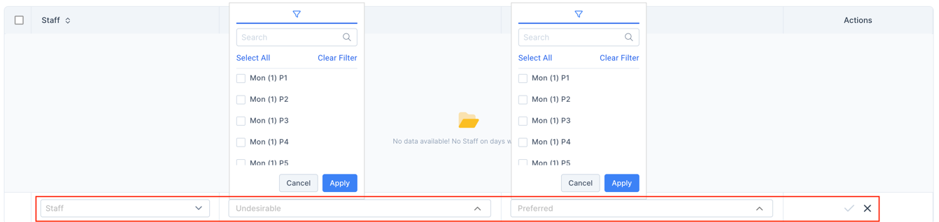
The new rule is added to the Staff on days table and will be considered during the auto-schedule process.
Part Time Staff
The Part Time Staff tab allows the auto-scheduling process to take part-time staff availability into account when creating the timetable.
Note: Staff members will only appear in this tab if they have been assigned an FTE greater than 0 and less than 1 in Step 5 of the Project Wizard.
Add a Part Time Staff rule
You can only add staff members whose FTE is greater than 0 and less than 1.
1. Click Add New Row.
2. Complete the following fields:
- Staff – Select a staff member from the list of staff with an FTE greater than 0 and less than 1.
- Days per Week – Specify the number of days the staff member works each week.
3. Save the rule.
The rule is added to the Part Time Staff table and will be considered during the auto-scheduling process.
Limitations
The Limitations tab allows you to define the maximum number of times a subject, or group of subjects, can be scheduled within the same teaching period. These rules apply across all year groups and are considered during the auto-scheduling process.
Add a Limitation rule
1. Click Add New Row.
2. Complete the following fields:
- Subjects: Select one or more subjects to which the rule will apply.
- Sessions per period: Enter the maximum number of sessions that can be scheduled within the same teaching period.
3. Click the tick to save the rule.
The rule is added to the Limitations table and will be considered during the auto-scheduling process.
Example Rules:
- Example 1:
- Subjects: Art
- Sessions per period: 2
- Result: Art can be scheduled a maximum of two times within the same teaching period.
- Example 2:
- Subjects: Biology and Chemistry
- Sessions per period: 3
- Result: A combined maximum of three Biology and/or Chemistry sessions can be scheduled within the same teaching period. Any combination of the two subjects is allowed, provided the total does not exceed three sessions.
- Example 3:
- Subjects: All
- Sessions per period: 1
- Result: Only one session of any subject can be scheduled within the same teaching period.
Blocks on days
The Blocks on Days tab allows you to control how lessons within a block are distributed across the timetable. These rules help the auto-scheduling process spread sessions over different days where required.
Add a Blocks on days rule
1. Click Add New Row.
2. Select a Year Group.
3. Select one or more blocks.
4. Select the required rule.
5. Select a Period Limit when selecting Allow multiple periods per day.
5. Click the tick to save the rule.

The new rule is added to the Blocks on Days table and will be considered during the auto-scheduling process.

Blocks on days rules
- Allow multiple periods per day
- Allows scheduling multiple sessions of the same subject for a class within a block for the same day.
- Max one session per day
- Enforce a daily scheduling limit for each block. Under this rule, a selected block period may be scheduled only once per calendar day. Period Limit does not apply to this rule. If multiple blocks are included, each block is limited to one session per day and is scheduled independently of the others.
- A double session is treated as a single session. Therefore, scheduling a double session for a block on the same day does not breach the “Max one session per day” rule.
- Similarly, linked periods combined into one group are considered a single session. Scheduling one group of linked block periods on the same day does not breach the “Max one session per day
- Enforce a daily scheduling limit for each block. Under this rule, a selected block period may be scheduled only once per calendar day. Period Limit does not apply to this rule. If multiple blocks are included, each block is limited to one session per day and is scheduled independently of the others.
- Do not balance across the cycle (Week 1-Week 2)
- The sessions of a subject within a class in the block do not have to be distributed evenly between weeks.
- Balance across the cycle (default)The sessions of a subject within a class in the block have to be distributed evenly between weeks. Where we can, we should repeat the scheduled period for Week 2. Auto Scheduling allows alternative periods to be used when exact mirroring is not possible, without creating conflicts. E.g. W1: Mo P1, We P3, W2: Mo P1, We P3
- Staff allocation should be evenly distributed between the weeks – E.g. Staff A is assigned to 4 sessions for a subject, Staff B is assigned to 5 sessions.
- If possible, Staff A should have 2-2 sessions per week, Staff B should get 2-3 or 3-2 session distribution for the two weeks.
- Staff allocation should be evenly distributed between the weeks – E.g. Staff A is assigned to 4 sessions for a subject, Staff B is assigned to 5 sessions.
- Do not balance across the day (AM-PM)
- The sessions of a subject within a class in the block do not have to be distributed evenly between AM/PM.
- Balance across the day (AM-PM) (default)
- The sessions of a subject within a class in the block have to be distributed evenly between AM/PM.
- The two sessions should have as many other periods in between as possible.
- Do not allow consecutive periods
- The sessions of a subject within a class in the block cannot be scheduled to consecutive periods.
- Allow consecutive periods
- The sessions of a subject within a class in the block can be scheduled to consecutive periods.
- If the two sessions have a breaks/non-teaching period in between, they don’t count as consecutive periods.
Schedule Order
The Schedule Order tab allows you to define the priority order used during the Auto Schedule process. Each timetable block is displayed as a separate row, and the order of these rows determines the sequence in which blocks are scheduled.
1. Block Type displays the block type: Simple, Linear, Option or Complex.
2. Cross Band indicates whether a block spans multiple bands. It displays ‘Yes’ for Cross Band blocks and ‘No’ for those that do not.
3. No. of Classes displays the total number of classes in the first period of each block.
- Simple Blocks: E.g. If there are C1, C2, and C3, the value will be 3.
- Linear Blocks: E.g. If there are C1, C2, and C3, the value will be 3.
- Option Blocks: E.g. The value is the sum of the classes (3 + 1 + 5), so the value shown will be 9.
- Complex Blocks: E.g. If there are C1, C2, C3 and C4, the value will be 4.
- Double and Linked Sessions: Do not affect how the number of classes is calculated.
- Cross Band Blocks: Does not affect the class count.
- Link Blocks: Each block will show its own class count. The counts will not be combined across Link Blocks. Curriculum Plan > Blocks Three-Dot Menu > Link Blocks
4. Sessions column displays the count of Single, Double, Linked, and Total periods in a block:
Block Priority
The Priority Order section allows you to control the order in which blocks are processed during the Auto Schedule process. The selected priority order is reflected in the schedule order table .
- The default priority order is Block Type, No. of Classes, Year Group, Cross Band. The columns will appear in the table in this order.
- Change the order by dragging and dropping items within the Priority Order section. The order of the columns in the table will update.
- Click any item to open its dropdown list and, if needed, reorder the values inside that list (Block Type, Year Group and Cross Band only).
- Clicking Reset to Default restores this order, including the default sorting within each dropdown.
- Default sorting rules:
- Block Type: Sorted by Option, Simple, Complex, Linear
- No. of Classes: Sorted in descending order.
- Year Group: Sorted in descending numerical order, then by descending alphabetical order.
- Cross Band: Rows with Yes appear before rows with No.
- When two or more blocks are identical across all the above criteria, they must be sorted by the Block Name in alphabetical order.
- The Order column shows the positioning of the schedule order.
Managing Timetable Specification rules
Rules in the Timetable Specifications table can be managed in several ways:
Use the Actions column to:
- Edit a rule
- Exclude a rule, moving it from Active view to the Excluded view
- Delete a rule

You can also:
- Search – use the search filed to search across all data in the table.
- Exclude or Activate multiple rules – rules can be excluded or reactivated in bulk.
- Select one or more rows, click Exclude or Activate Rules.
- Active / Excluded – use the toggle to switch between Active rules and Excluded rules.

Visual Indicators and Conflicts
Conflicts and visual indicators have been added to the Scheduling page to help users quickly identify and manage sessions that do not follow the Timetable Specification rules.
Visual Indicators
Amber: When scheduling sessions, an amber indicator will appear in the period header to show that one or more sessions have a conflict. All sessions can still be scheduled, but a popup message will display details of the conflict, for example:
- ‘Rule ‘Blocks On Days’ (Balance across the cycle) is broken for block <Block name> session <SessionName>.’
- ‘Rule ‘Blocks On Days’ (Balance across the day (AM-PM)) is broken for block <Block name> session <SessionName>.’
Green: The period header will be shaded green when all sessions can be scheduled without any conflicts.
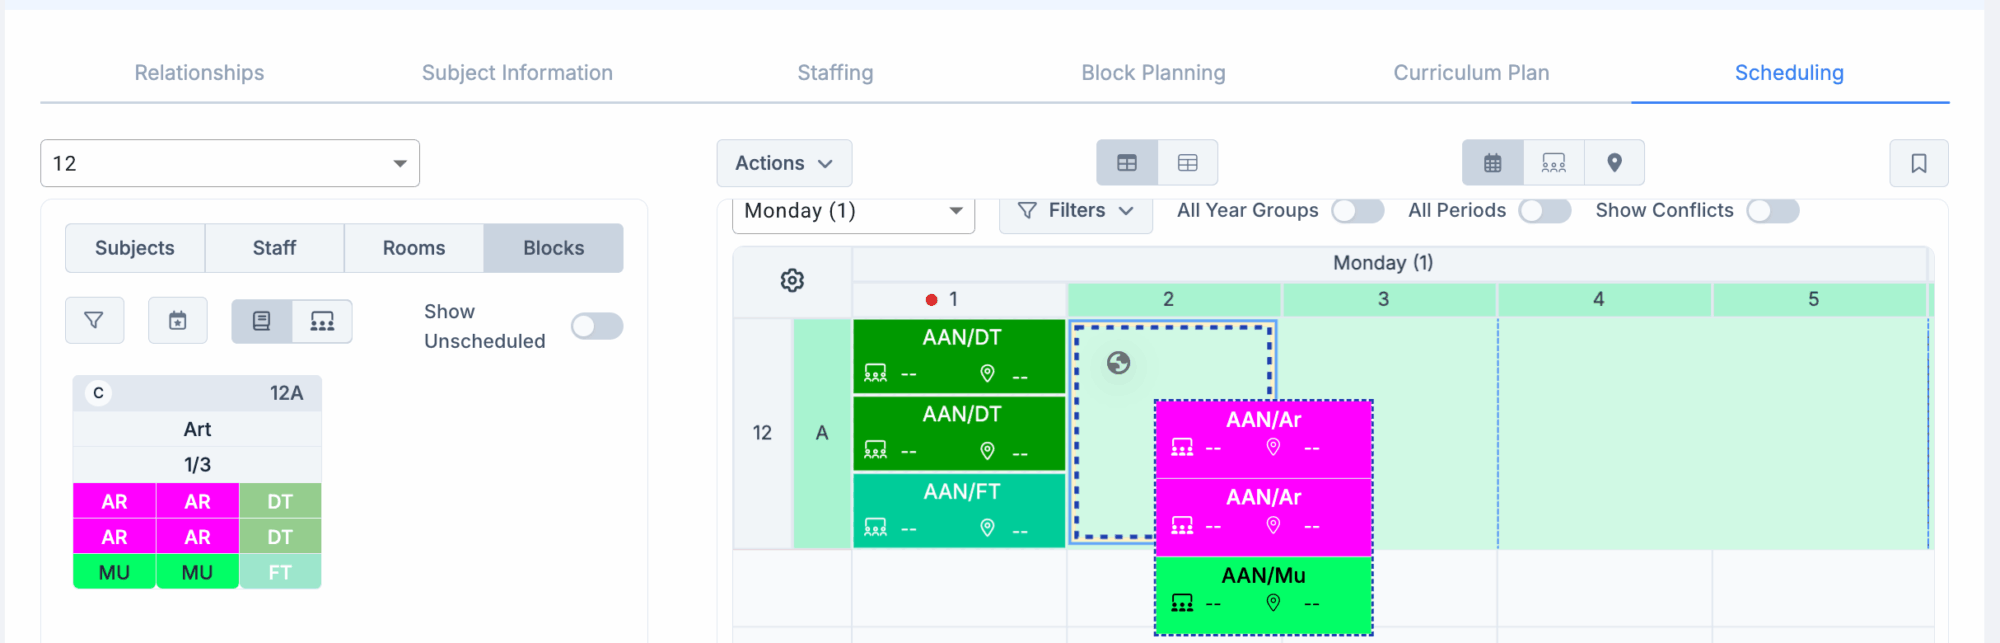
Conflicts
Conflicts generated from the Timetable Specifications rules are included in the Conflicts table. The Auto Schedule process will follow the rules and not create conflicts as a result; however, selected rules will be checked during manual scheduling and conflicts may arise accordingly.
- Conflicts will only display for the Rules that are a ‘must’.
- For Simple, Option and Complex blocks when having multiple classes for the same Subject in the same Block Period, it will only display the conflict for any Timetable Specification once, showing the first Session Name in the conflict.
- For Linear Blocks: For Subject relationships, and Subjects on days we display the conflicts for each session. For Blocks on days, we display the conflicts by Block Period.
If a session is scheduled that breaches a Timetable Specification rule, the conflict appears in the Conflicts popup e.g.
- ‘Rule ‘Blocks On Days’ (Balance across the cycle) is broken for block <Block name> session <SessionName>.’
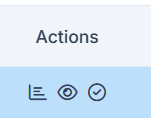
Clicking on the ‘Eye icon’ under the Actions column, will display the Timetable Specifications popup on the relevant tab.
The Scheduling page allows users to drag and drop Blocks into available Periods to create a scheduled Timetable. Staff and Rooms can still be assigned to Classes on the Scheduling page.
This guide looks at the following functions within Scheduling;
- Scheduling rules for Blocks
- Schedule sessions to make a timetable
- Remove scheduled sessions from a timetable
- Add Staff to a scheduled class
- Add Rooms to a scheduled class
- Remove Staff from a scheduled class
- Remove Rooms from a scheduled class
- Reassign a scheduled class to another member of Staff
- Reassign a scheduled class to another Room
- Remove the schedule for a day etc
- Add Non-Contact codes
- Add Not Available codes
- Bulk assign Non-Contact Codes and Not Available
- Lock / Unlock scheduled sessions
- View individual timetables – for Staff
- View individual timetables – for Rooms
- Swap Staff
- Swap Rooms
- Swap Days
- Swap Periods
Go to Modules > wTimetable to open Projects. Click on your Project Name, then click on your Timetable. Click on Scheduling.
Scheduling Rules for Blocks
This section covers the following Scheduling Rules;
General
- Sessions can only be scheduled for the Year Group and Band that they are created for.
- Sessions can be dragged & dropped into the timetable only in the Year Group view.
- Sessions can be dragged & dropped from one Period to another in the timetable.
- Available sessions are highlighted in green.
- Unavailable sessions are marked with a red dot.
- When a session is dropped into the timetable:
- The Band height is expanded based on the class count included in the scheduled periods.
- If a session does not fill up the space in the Band with the included classes, we use a placeholder area for the remaining space.
- Double Periods must be scheduled for consecutive Periods.
- Turn a scheduled double Period into singles by left clicking on the Period and clicking Split to Single Periods.
- Cross-band Blocks:
- When scheduling a cross-band Block all the included Bands have to be available for the selected Period.
- The cross-band can only be dropped in the first band
Simple Blocks
- Drag and drop each period of a Simple Block separately into the timetable.
- If there is more than one class in a Period in a Simple Block, all classes in the same Period will move together and will be scheduled to the same Period of the timetable.
Linear Blocks
- For Linear Groups – drag & drop one session at a time.
- When one class in a Period is scheduled, it creates a “container” for the remaining classes in the same Period not yet scheduled.
- The Timetable will only allow sessions to be scheduled in a way that allows the scheduling of the remaining sessions within the Block.
- Single and Double Periods
- If a double Period is scheduled for class A, two singles of another Subject can be scheduled for class B for the same Period.
- Single sessions can be dropped into double placeholders.
- Doubles can be dropped over single placeholders if:
- another single placeholder is in the consecutive teaching period, OR
- the single placeholder is standing alone, but the remaining classes will fit into the created placeholders after ‘transforming’ it to a double placeholder.
- Doubles cannot be dropped over breaks.
- Layout changes on the side panel: If we schedule a session (class-cell), the counters that displays the remaining periods for that class goes down by one once all classes have been scheduled
Option Blocks
- Drag & drop each Period separately into the timetable.
- When dragging a Period, all classes move together and will be scheduled at the same time.
Complex Blocks Single Periods
- When dragging a Period, all classes move together in a Period and will be scheduled at the same time.
Schedule Sessions to make a Timetable
When scheduling sessions, the following rules apply:
- Classes can only be scheduled within their assigned Bands.
- Linear Blocks – each class is scheduled individually, one class at a time.
- Option Blocks – all classes within the Block are scheduled simultaneously.
- Complex Blocks – all classes assigned to the same Period within the Block are scheduled simultaneously.
- In the Year Group view, schedule sessions by dragging & dropping sessions from the Blocks side panel into any available session within the corresponding Band on the timetable grid. When scheduling a session – visual indicators in both the Band and Period header show whether all, some or none of the sessions can be scheduled.
- Scheduled sessions can be moved by dragging and dropping them to another available session.
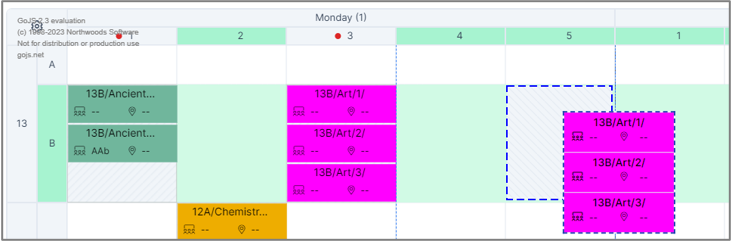
- Tip: Turn off the All Year Groups toggle and filter by Band in the Blocks panel.

Once a class has been scheduled it will appear greyed out in the Blocks side panel.
- Tip: Enable the Show Unscheduled toggle to display unscheduled classes.
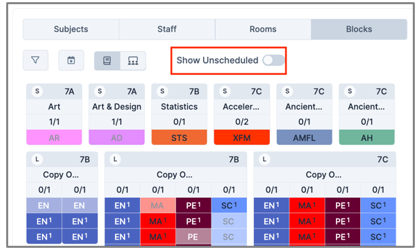
Note: Scheduled classes display their assigned Day, Week, and Period beneath the classcode in the expanded Blocks view on the Curriculum Plan page.
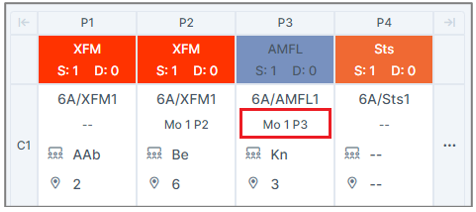
Visual indicators
Green Indicator: The Band and Period header are shaded green when all sessions within a block can be scheduled without any conflicts.
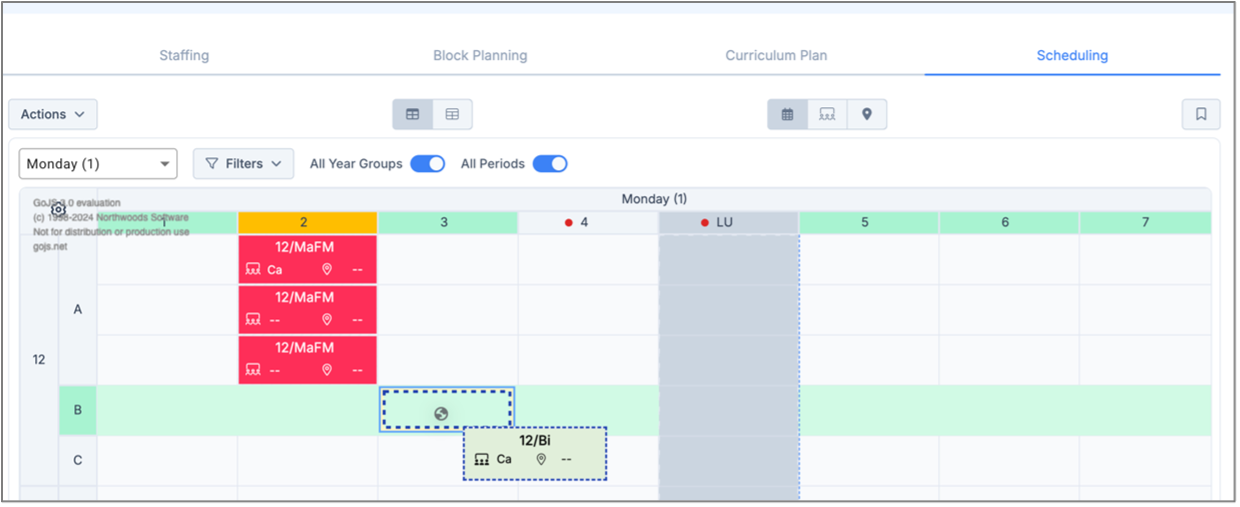
Amber Indicator: The Band is shaded green but the Period header is shaded amber when one or more sessions within the block have conflicts. The block can still be scheduled, and a notification in the top right-corner will provide details of the conflicts.
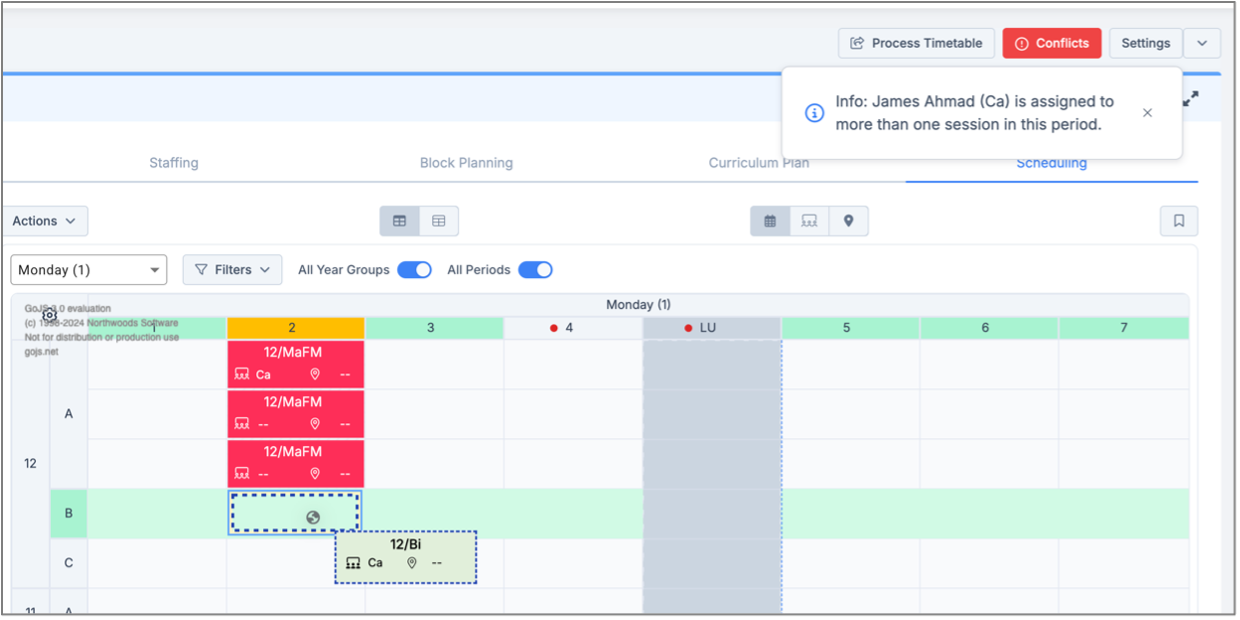
Red Indicator: A red dot appears in the Period header when at one or more sessions within the block cannot be scheduled because of conflicts. No sessions in the block will be scheduled. A notification in the top-right corner will explain why scheduling is not possible.
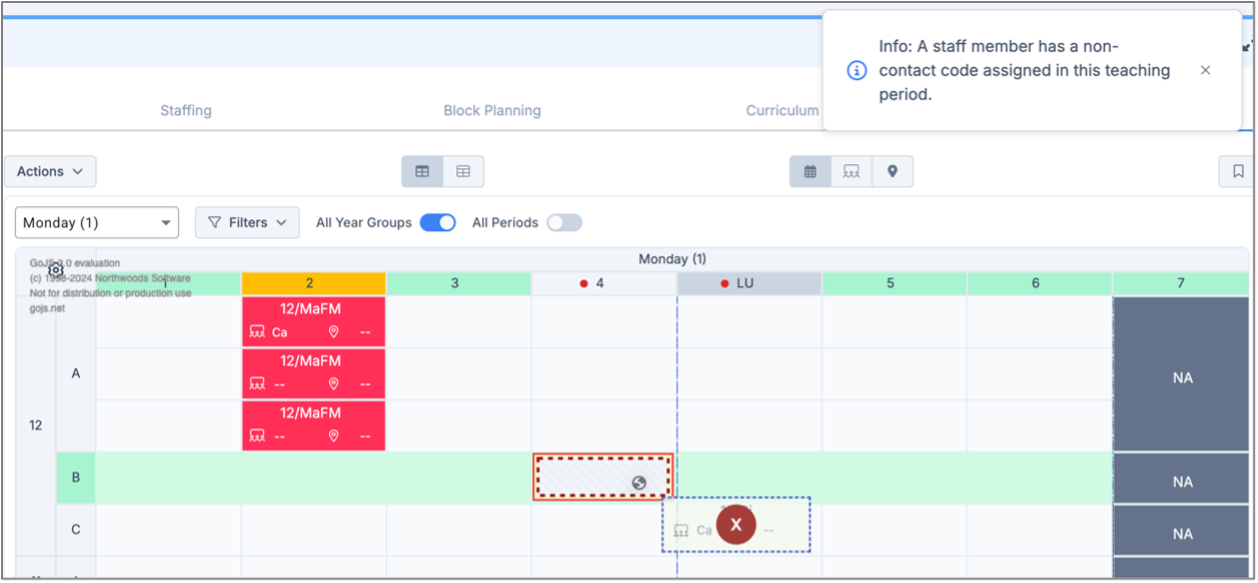
Remove Scheduled Sessions from a Timetable
When removing scheduled sessions from a timetable, the following rules apply:
- Linear Blocks – classes are removed individually, once class at a time.
- Option Blocks – all classes within the Block are removed simultaneously.
- Complex Blocks – all classes assigned to the same period within the block are removed simultaneously.
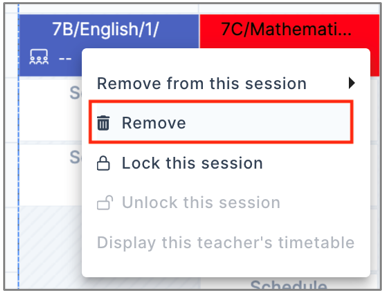
- In the Year Group view, left-click a scheduled session and select Remove.
- Once a session has been removed, the corresponding class is longer greyed out in the Blocks side panel and becomes available for scheduling again.
Add Staff to a Scheduled Class
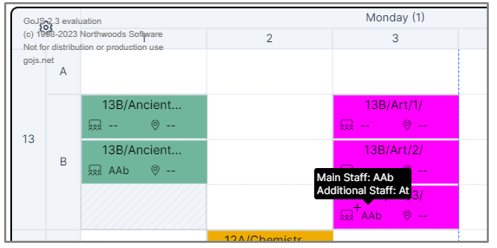
1. In the Year Group view, drag and drop a Staff member from the Staff side panel onto a class in the timetable. The Staff member will be assigned as the Main Staff member for that class.
- Tip: To assign additional staff, hold down the Shift key while dragging and dropping the staff member, and continue holding it until the assignment is complete. Additional Staff members are indicated by a + symbol.
- Note: Staff can also be assigned to classes from the Curriculum Plan page.
Add Rooms to a Scheduled Class
1. In the Year Group view, drag and drop a Room from the Room side panel onto a class in the timetable.
Note: A class can only have one room assigned at a time. Once a Room has been assigned, another Room cannot be assigned to the same class.
If a Staff member has preferred Room for a subject, assigning that staff member to a class will automatically assign their preferred Room to the class as well.
The following rules apply:
- If a Room has already been assigned to the class, the existing Room assignment is retained.
- If the staff member’s preferred Room is already assigned to another class during the selected Period, the Room remains assigned to that class and will not be reassigned.
Note: Rooms can also be assigned to classes from the Curriculum Plan page.
Remove Staff from a Scheduled Class
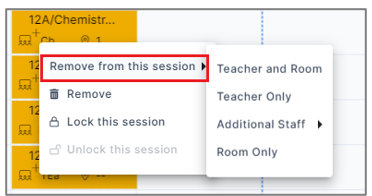
1. In the Year Group view, left-click a scheduled class and select Remove from this session.
2. You can choose from the following:
- Teacher and Room
- Teacher Only
- Additional Staff
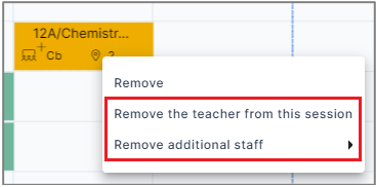
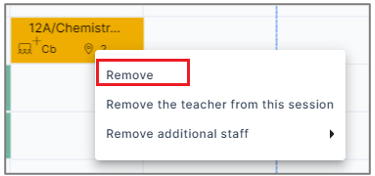
In the Room view, left-click a scheduled class and select Remove the teacher from this session, or Remove additional staff.
Remove Rooms from a Scheduled Class
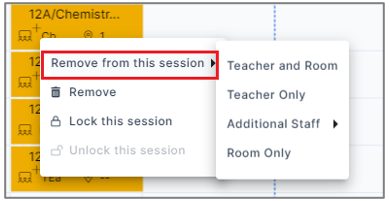
1. In the Year Group view, left-click a scheduled class and select Remove from this session.
2. Choose from either Teacher and Room, or Room Only.
In the Staff view, left-click a scheduled session and select Remove the room from this session.
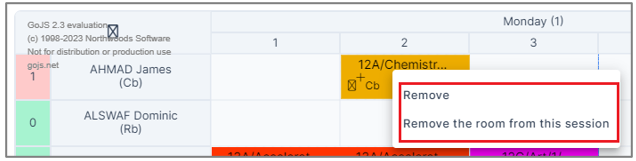
In the Room view, left-click a scheduled session and select Remove.
Reassign a scheduled class to another member of Staff
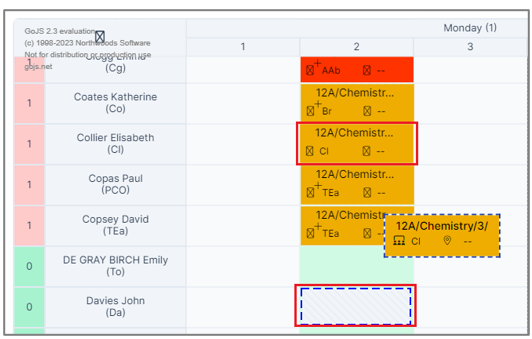
Scheduled classes can be reassigned to different staff member, provided the class remains scheduled in the same Period. When a class is reassigned, the Staff Code is updated to reflect the newly assigned Staff member.
1. In the Staff view, drag and drop the class from one Staff member to another.
E.g., If a class is assigned to staff member E Collier and reassigned to J Davies, the staff code will update from Cl to Da.
Reassign a scheduled class to another Room
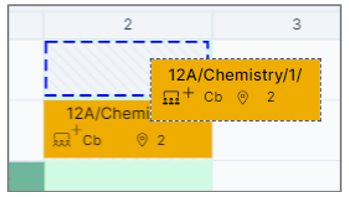
Scheduled classes can be reassigned to different Room, provided the class remains scheduled in the same Period. When a class is reassigned, the Room Code is updated to reflect the newly assigned Room.
1. In the Room view, drag and drop the class from its current room to another available Room.
2. The room assignment will be updated automatically.
Remove the schedule for a day etc
Remove the schedule for a Day
1. In the Year Group view, left click on the day header.
2. Choose Remove the schedule for ___day (week).
- Note: If the All Year Groups toggle is enabled, these actions are applied across the entire timetable for all Year Groups. If a specific Year Group is selected, the actions apply only to that Year Group.
- Tip: You can also choose to Lock the schedule, or Unlock the schedule (See Lock/Unlock scheduled sessions).

Remove the schedule for a Period
1. In the Year Group view, left click on the period header.
2. Choose Remove the schedule for ___day (week) PX.
- Note: If the All Year Groups toggle is enabled, these actions are applied across the entire timetable for all Year Groups. If a specific Year Group is selected, the actions apply only to that Year Group.
- Tip: You can also choose to Lock the schedule, or Unlock the schedule (See Lock/Unlock scheduled sessions).

Remove the schedule for a Year Group Band
1. In the Year Group view, left click on the year group band header.
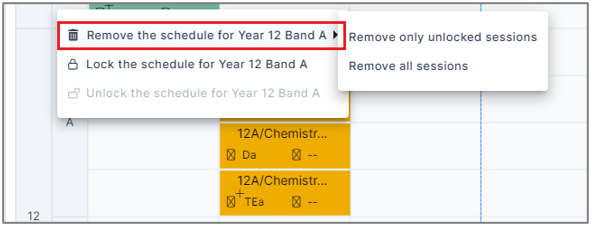
2. Choose Remove the schedule for YearX Band X, and either Remove only unlocked sessions or Remove all sessions.
- Tip: You can also choose to Lock the schedule, or Unlock the schedule (See Lock/Unlock scheduled sessions).
Remove the schedule for a Year Group
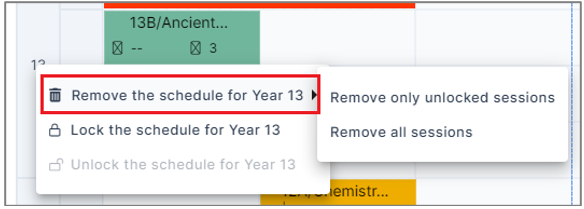
1. In the Year Group view, left click on the year group header.
2. Choose Remove the schedule for YearX, and either Remove only unlocked sessions or Remove all sessions.
- Tip: You can also choose to Lock the schedule, or Unlock the schedule (See Lock/Unlock scheduled sessions).
Remove the whole schedule
1. In the Year Group view, left click on the cog.
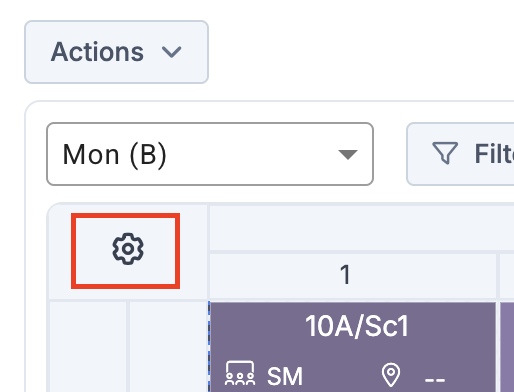
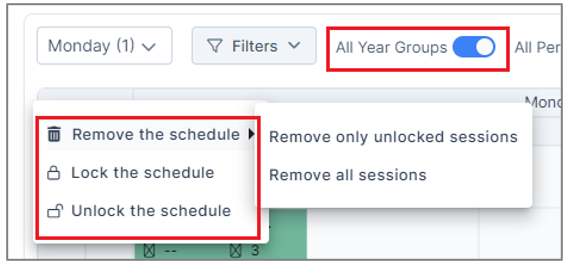
2. Choose Remove the schedule, and either Remove only unlocked sessions or Remove all sessions.
- Note: If the All Year Groups toggle is enabled, these actions are applied across the entire timetable for all Year Groups. If a specific Year Group is selected, the actions apply only to that Year Group.
- Tip: You can also choose to Lock the schedule, or Unlock the schedule (See Lock/Unlock scheduled sessions).
Add Non Contact Codes
Non-Contact Codes can be assigned to empty sessions to prevent classes from being scheduled during those times. Non-Contact Codes can only be scheduled from the Staff and Room views in the following ways:
- Staff view – individual sessions, Periods, days, and empty sessions for a Staff member.
- Room view – individual sessions, Periods, days, Department Name, and Room Code.
- In Staff or Room view, left-click an eligible empty session type (as mentioned above).
- Select Non-contact Codes to display the list of active codes.
- Choose the required code.
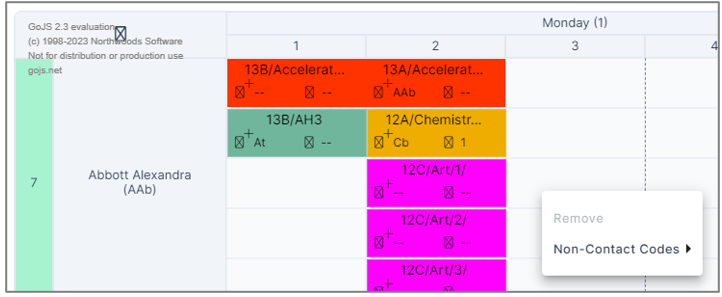
- Tip: To apply a Non-Contact Code to multiple sessions at once, first right-click to select the required sessions, then left-click and choose the Non-Contact Codes option.
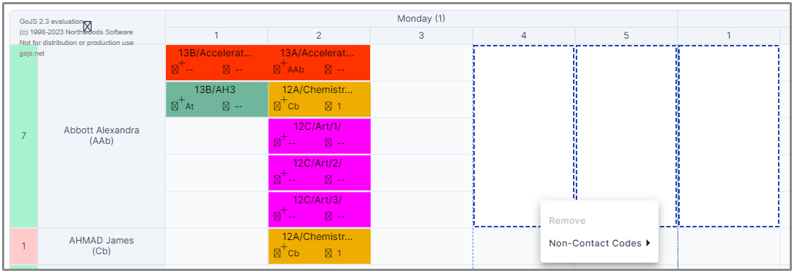
To remove a Non-Contact Code
1. Left-click the session containing the Non-Contact Code.
2. Select Remove.
To change a Non-Contact Code
1. Left-click the session containing the existing Non-Contact Code.
2. Select Non-Contact Codes.
3. Choose a different code from the list. The new code will replace the existing one.
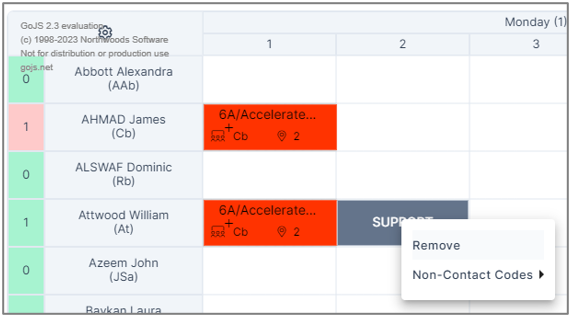
Add Not Available Codes
Not Available codes can be assigned to empty sessions to prevent class from being scheduled during those times. Not Available codes can be scheduled from the Year Group view, in the following ways:
- Individual sessions, Periods, and days.
1. In Year Group view, left-click an eligible empty session (as mentioned above).
2. Select the following option to assign the Not Available code:
- Individual session = Not Available
- Period = Set Day (Week) PX to Not Available
- Day = Set Day (Week) to Not Available
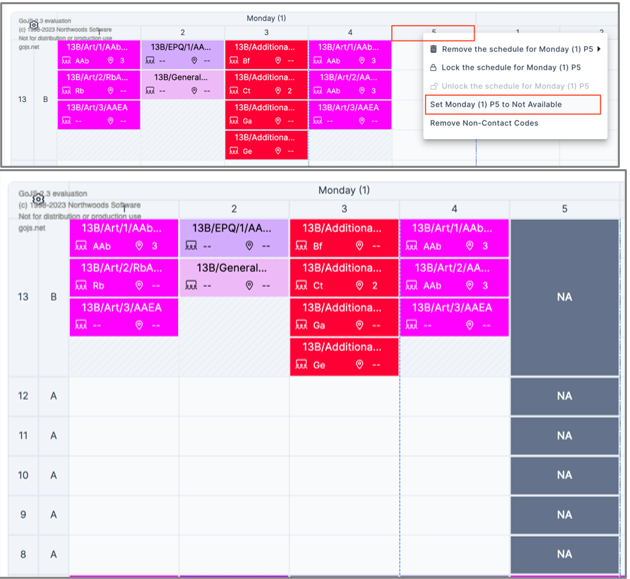
To remove Not Available codes:
1. Left-click the session containing the Not Available code.
2. Select the following option to remove the Not Available code:
- Individual session = Remove this session
- Period = Remove Non-Contact Codes
- Day = Remove Non-Contact Codes
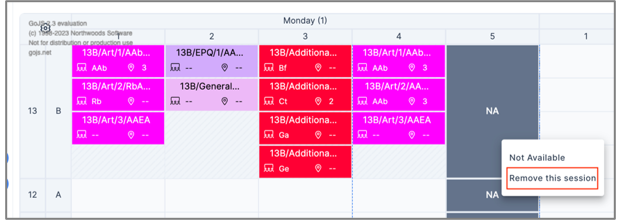
Bulk Assign Non Contact Codes and Not Available
You can bulk assign Non-Contact Codes, including Not Available, to one or more staff members.
1. Go to Actions and select Non-Contact Codes.
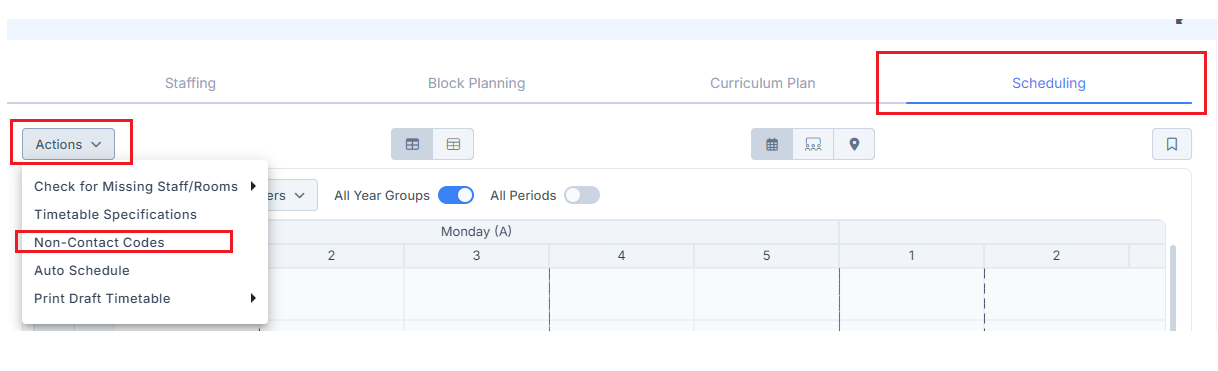
2. Click Add New.

3. Complete the following fields:
- Select a Non-Contact Code from the dropdown (including Not Available).
- Select the Period during which the NCC will apply.
- Select a Room from the available rooms for the chosen period (optional).
- Select one or more Staff members.
- Enter a custom name in the Group Alias field to identify the NCC Group (optional).
- Click Check Availability to view the selected staff members’ timetable, including scheduled sessions and existing Non-Contact Codes.
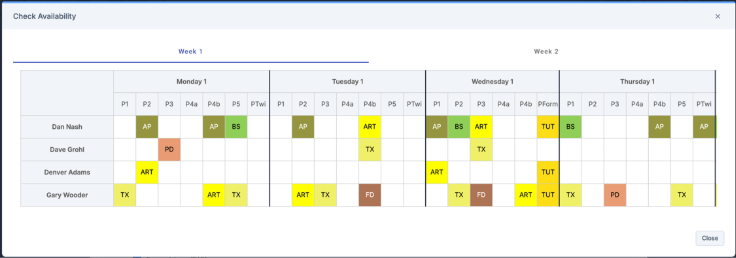
- Click Save.
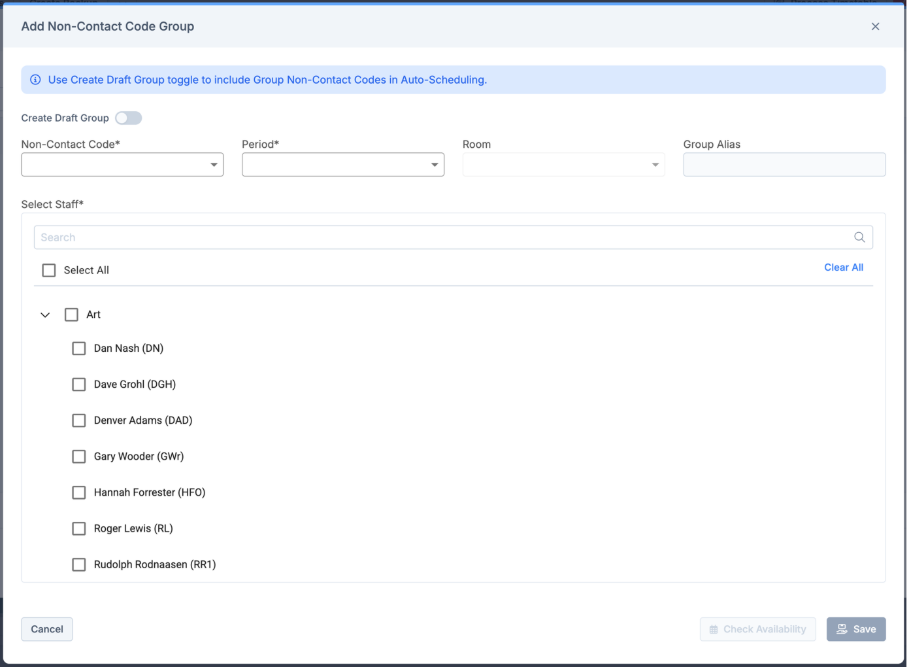
- Note: If a period is selected for an NCC Group and not all assigned staff are available, a notification will appear when the user attempts to save.
4. The Non-Contact Code entry is added to the table.

Viewing assigned Bulk Non-Contact Codes
The assigned Non-Contact Code appears in both the Staff view and Room view.
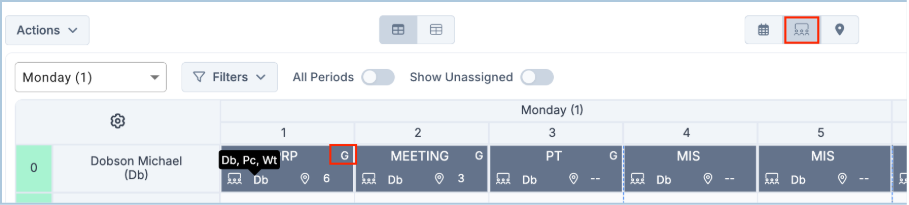
In Staff view, NCC group sessions (assigned to multiple staff members) are identified by a G in the top-right corner of the session. Hover over the Staff code to view all staff members assigned to the Non-Contact Code. If a room has been assigned, the Room Code is displayed directly within the session.
Create a Draft NCC Group
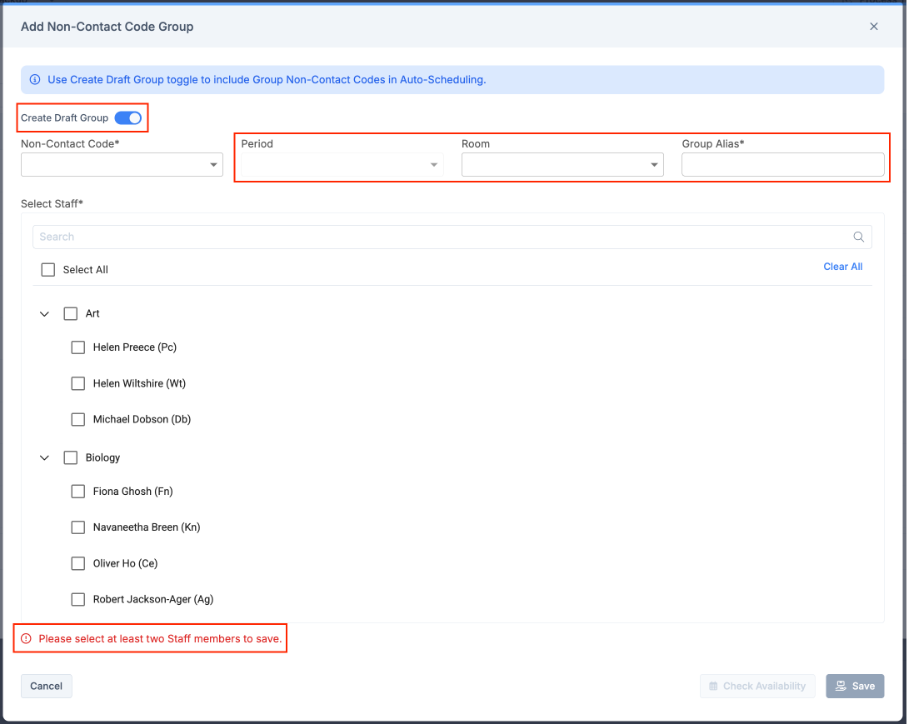
You can create draft Non-Contact Code groups in advance and scheduled them later using the Auto Schedule feature. This allows NCC groups to be prepared ahead of time without manually assigning them to a timetable period.
1. When adding a draft Non-Contact Code group, enable the Create Draft Group in the Add Non-Contact Code Group popup.
2. With Create Draft Group enabled, the following field behaviour changes apply:
- Period: Disabled.
- Room: All available rooms are shown.
- Group Alias: Becomes a mandatory field.
- Select Staff: Must select at least 2 staff members.
3. After a draft NCC group is created, it is displayed in the NCC popup table with Draft shown in the Period column.Once the group has been scheduled, the Period column is updated to display the assigned timetable period.

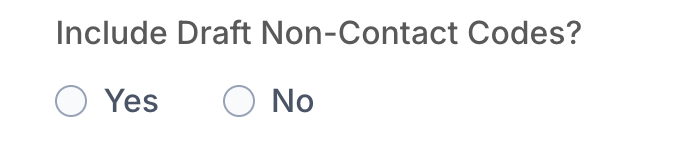
- Note: You can choose to include Draft NCC Groups in the Auto Schedule process by selecting “Yes” for the “Include Draft Non-Contact Codes?” option in the first step.
Lock Unlock Scheduled Sessions
You can lock scheduled sessions to prevent them from being moved to other available timetable slots. Locked sessions remain fixed until they are unlocked.
Sessions can be locked or unlocked at the following levels:
- Individual session
- Period
- Day
- Band
- The entire timetable
- In the Year Group view, select a specific Year Group from the dropdown, or enable the All Year Groups toggle.
- Left-click one of the following timetable elements and select Lock or Unlock:
a. Individual session
b. Day header
c. Period header
d. Band header
e. Timetable cog – top left-hand corner of the timetable
- Tip: When a specific Year Group is selected, the lock option references that Year Group. When All Year Groups is enabled, the lock option applies across all year groups and does not reference a specific Year Group.
E.g., Selecting the cog icon allows you to lock/unlock the entire timetable.
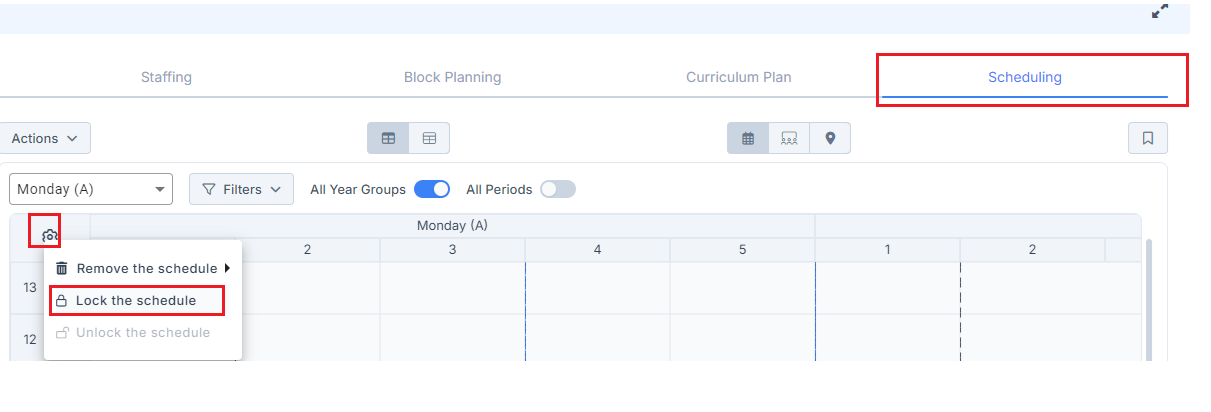
A lock icon is displayed on all locked sessions.
The same lock icon is also displayed against locked sessions in the Curriculum Plan page.
- Note: Cross-band blocks are also locked if they extend into a band that is being locked.
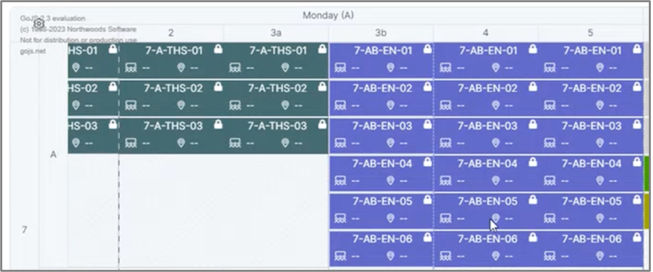
In the Curriculum Plan page, locked sessions have the following impact:
- When adding classes to a block – in Simple, Option and Complex Blocks – newly added classes inherit the lock status of the existing classes in the same period and are automatically locked.
- Clear these sessions – option is disabled when all sessions in a block are locked.
- Unschedule these sessions – option is disabled when all sessions in a block are locked.
View individual timetables for Staff
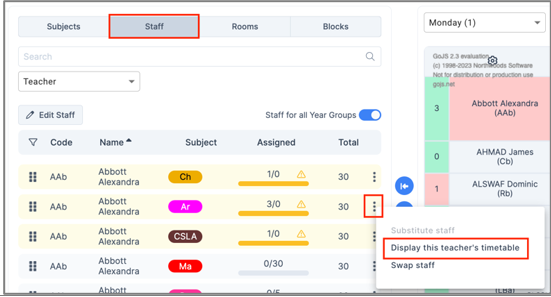
You can view individual Staff timetables across all Year Groups in any of the following ways:
From the Curriculum Plan or Scheduling Page
- In the Staff side panel, click the three dots next to the staff member.
- Select Display this teacher’s timetable
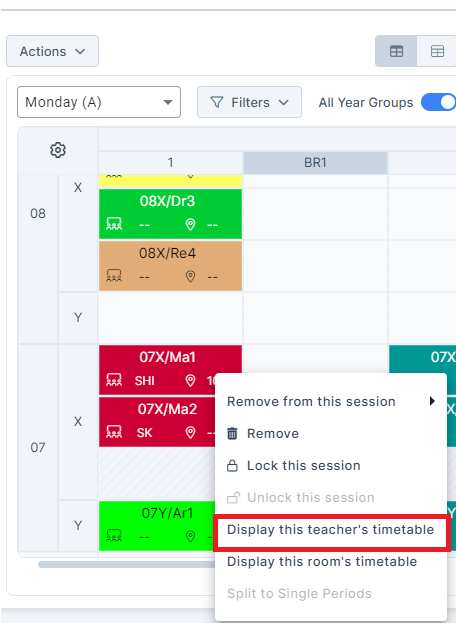
From the Scheduling page (Year Group view)
- Left-click a scheduled session that has a staff member assigned.
- Select Display this teacher’s timetable.
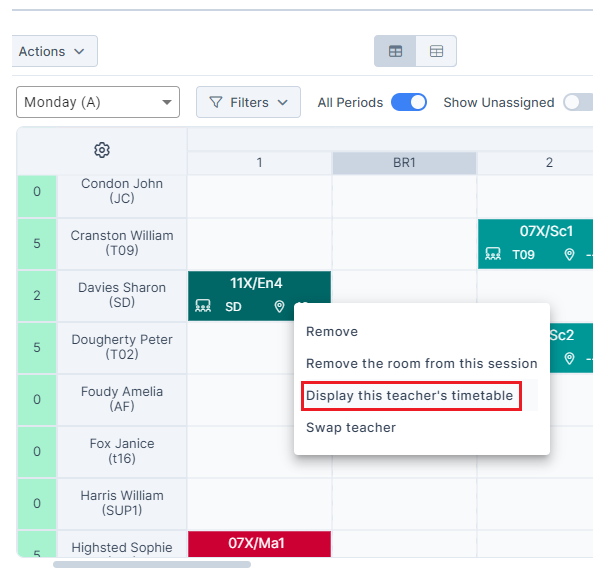
From the Scheduling Page (Staff view)
- Left-click either a scheduled session with an assigned staff member, or the header row for a staff member.
- Select Display this teacher’s timetable.
Teacher Timetable popup
Selecting Display this teacher’s timetable opens the Teacher Timetable popup, which displays all scheduled sessions for the selected teacher.
- Each session displays the classcode, room code and subject code.
- Conflicts are outlined with a dashed red border.
- Only teaching periods are displayed in the columns.
- Ability to export to pdf.
Use the Teacher Selector dropdown to switch between teachers. It defaults to the teacher from whom you originally opened the timetable.
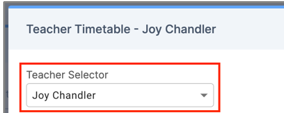
Managing Sessions
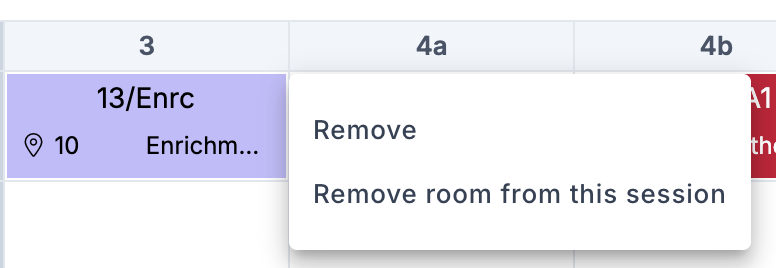
You can left-click on a scheduled session in the teacher timetable to Remove (removes scheduled session) and Remove room from this session.
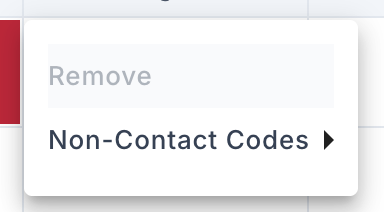
You can left-click on any blank session to Add Non-Contact Codes.
- Tip: Perform bulk-actions for the teacher timetable by left-clicking on Day headers, Period headers and cog in the top left-hand corner to remove scheduled sessions and add/remove Non-Contact Codes.
View individual timetables for Rooms
You can view individual Room timetables across all Year Groups in any of the following ways:
From the Curriculum Plan or Scheduling Page
- In the Room side panel, click the three dots next to the Room.
- Select Display this rooms’s timetable
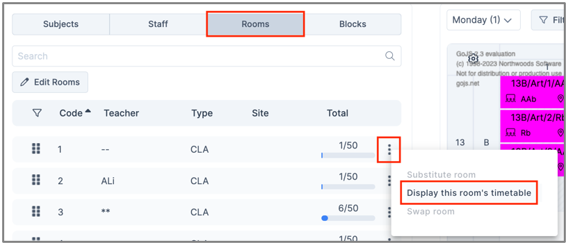
From the Scheduling page (Year Group view)
- Left-click a scheduled session that has a room assigned.
- Select Display this room’s timetable.
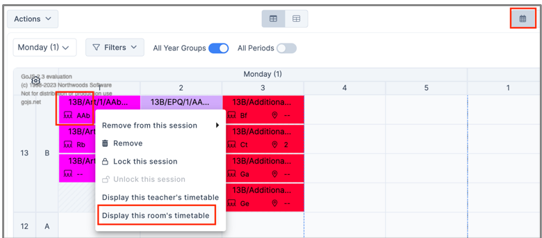
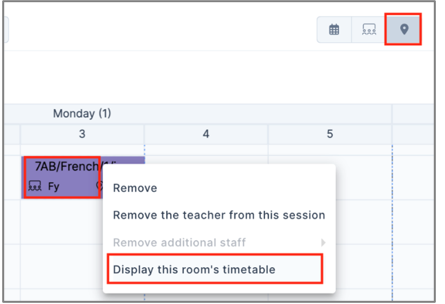
From the Scheduling Page (Room view)
- Left-click either a scheduled session with an assigned room, or the header row for a room.
- Select Display this room’s timetable.
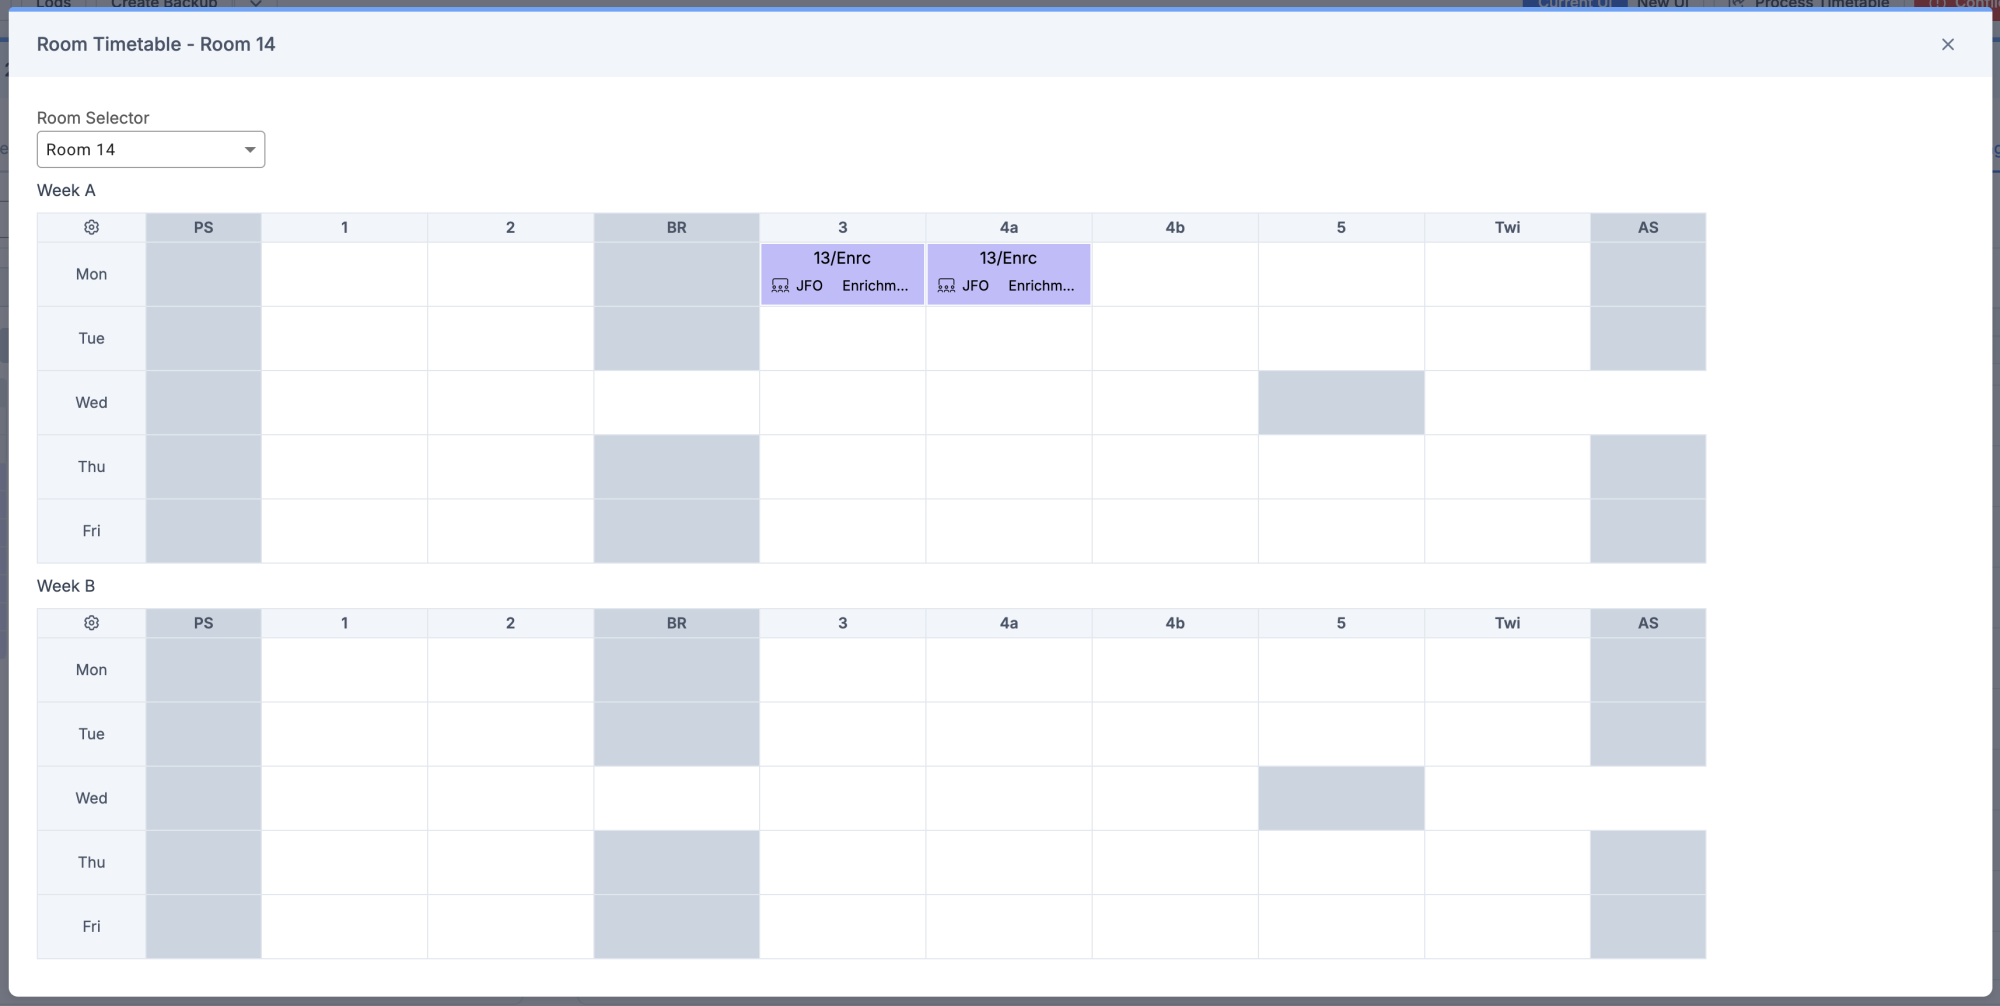
Room Timetable popup
Selecting Display this room’s timetable opens the Room Timetable popup, which displays all scheduled sessions for the selected room.
- Note: If the room has timetable clash in a Period, all sessions scheduled in that Period are displayed side by side and highlighted with a red border.
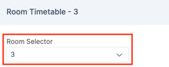
Use the Room Selector dropdown to switch between rooms. It defaults to the room from whom you originally opened the timetable.
Managing Sessions
You can left-click on a scheduled session in the room timetable to Remove (removes scheduled session) and Remove teacher from this session.
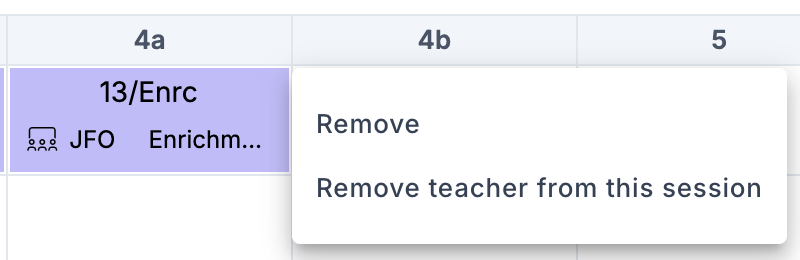
You can left-click on any blank session to Add Non-Contact Codes.
- Tip: Perform bulk-actions for the teacher timetable by left-clicking on Day headers, Period headers and cog in the top left-hand corner to remove scheduled sessions and add/remove Non-Contact Codes.
Swap staff
You can swap the main staff member assigned to two scheduled classes in the same period from the Staff view.
You can also swap staff and choose whether to include Non-Contact Codes in wTimetable – Part 2: Curriculum Building > Curriculum Plan > Left Hand Panel Functionality > Staff side panel three dot menu.LINK TO FOLLOW JD
1. Left-click the name of a scheduled session that has a main staff member assigned.

2. Select Swap teacher.
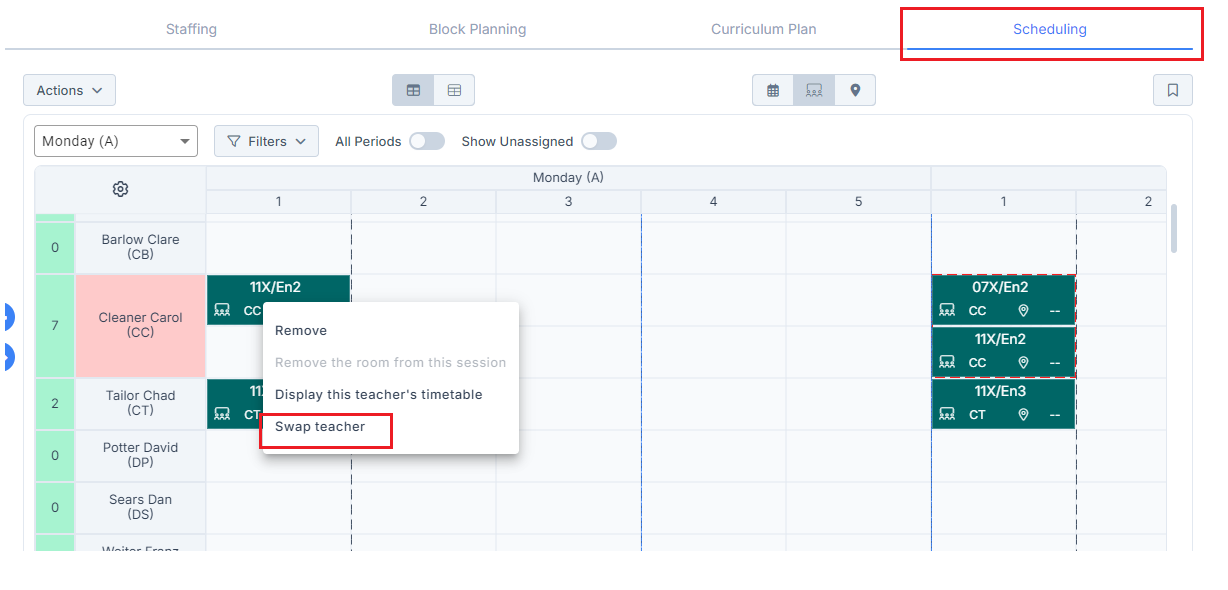
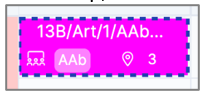
The scheduled session is saved for swapping, and the Staff Code is highlighted.
3. Left-click a second scheduled session. If the second session is scheduled in the same period as the first session, the Swap with _ option becomes available.
4. Select Swap with _ to exchange the main staff members between the two sessions.
- Note: If a room has not been assigned to a session and swapped teacher’s preferred room is available during that period, the preferred room is automatically assigned to the session.
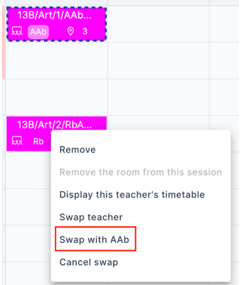
Additional options
- If Swap Teacher is chosen for the second session, the second session becomes the ‘saved’ session.
- If Cancel Swap is chosen, the ‘saved’ session is cleared from selection.
- If Swap Teacher is chosen for a Complex scheduled session – the Subject will also be swapped as well as the member of Staff.
Swap Rooms
You can swap rooms assigned to two scheduled sessions in the same period from the Room view.
You can also swap rooms and choose whether to include Non-Contact Codes in wTimetable – Part 2: Curriculum Building > Curriculum Plan > Left Hand Panel Functionality > Room side panel three dot menu. LINK TO FOLLOW JD
1. Left-click the name of a scheduled session that has a room assigned.
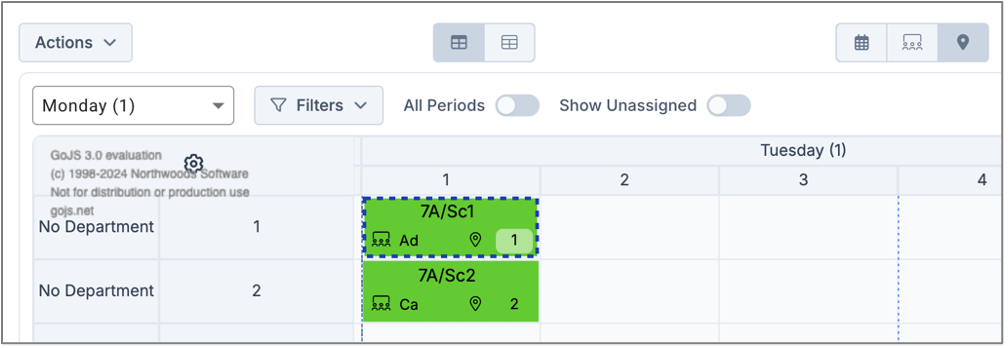
2. Select Swap Room.
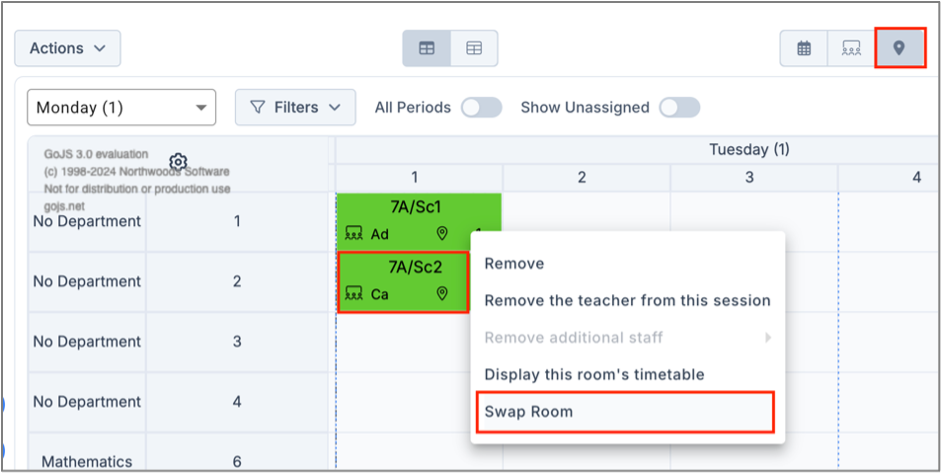
The scheduled session is saved for swapping, and the Room Code is highlighted.
3. Left-click a second scheduled session. If the second session is scheduled in the same period as the first session, the Swap with _ option becomes available.
4. Select Swap with _ to exchange the rooms between the two sessions.
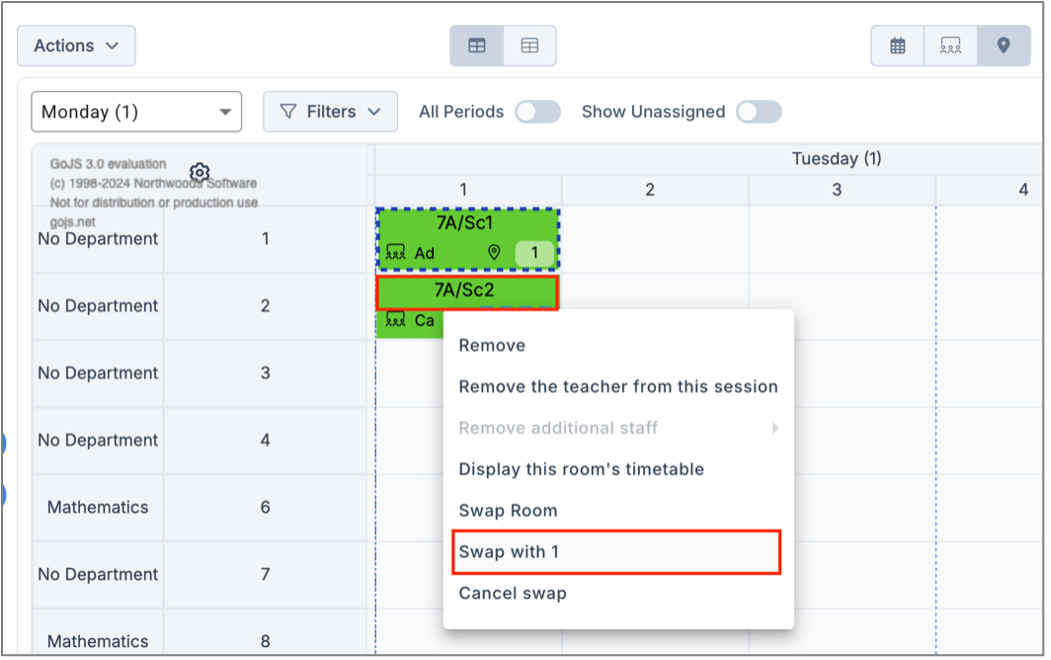
Additional options
- If Swap Room is chosen for the second session, the second session becomes the ‘saved’ session.
- If Cancel Swap is chosen, the ‘saved’ session is cleared from selection.
Swap Days
You can swap timetable days across all Year Groups simultaneously.
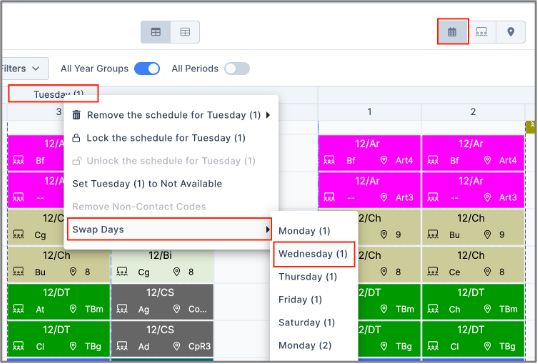
1. In the Year Group view, left-click the day you want to swap.
2. Select Swap Days.
3. Select the day you want to swap it with from the list.
All scheduled sessions assigned to the two selected days are swapped immediately.
- Note: Day swaps are not permitted if either of the selected days contains: locked sessions, NA sessions, Staff non-contact codes, and different period structures between the selected days. If any of these conditions exist, the swap cannot proceed. Users will be prompted to unlock affected sessions and remove any NA or non-contact code entries before attempting the swap again.
Swap Periods
You can swap periods across all Year Groups simultaneously.
1. In the Year Group view, left-click the period you want to swap.
2. Select Swap Periods.
3. Select the periods you want to swap it with from the list.
All scheduled sessions assigned to the two selected periods are swapped immediately.
- Note: Period swaps are not permitted if either of the selected periods contains: locked sessions, NA sessions, Staff non-contact codes, and double sessions. If any of these conditions exist, the swap cannot proceed. Users will be prompted to unlock affected sessions and remove any NA or non-contact code entries before attempting the swap again.
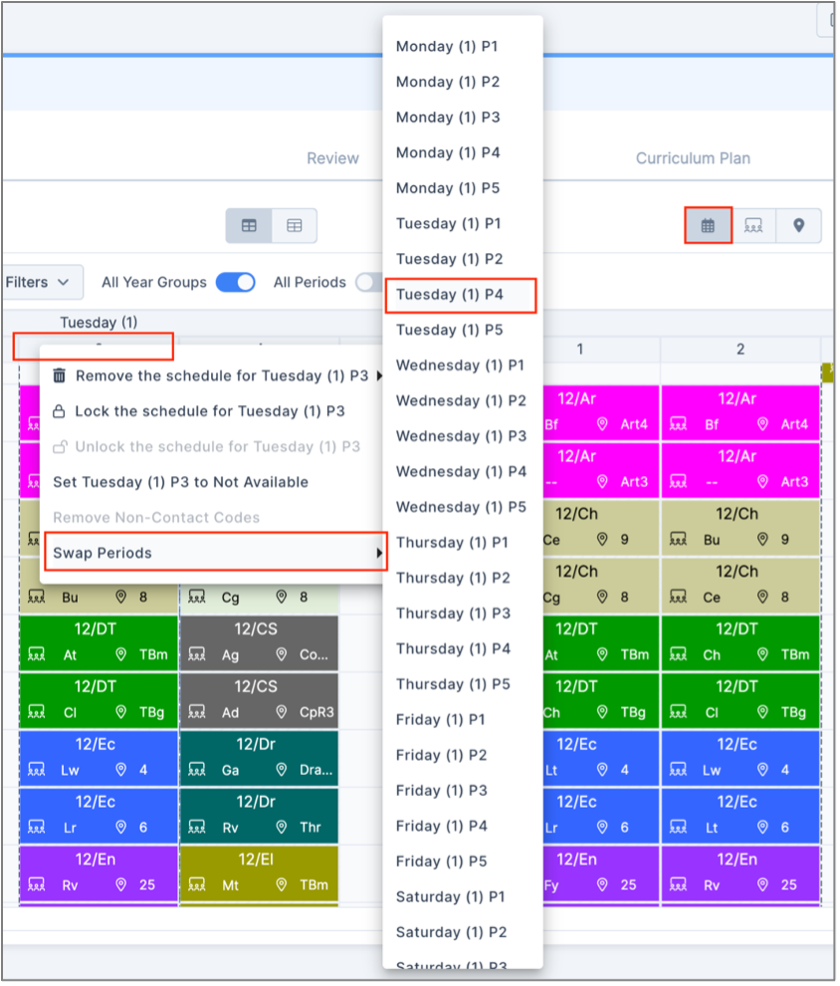
This section covers the following:
- Conflict Detection during Scheduling
- How to accept Conflicts
- Show Conflicts toggle
- Analyse and Resolve Staff Conflicts
The Conflicts table displays scheduling conflicts for Staff and Rooms that have been created through manual scheduling.
The following conflict types are detected:
- Allocated staff sessions exceed available staff sessions.
- Allocated room sessions exceed available room sessions.
- A staff member is assigned to more than one session during the same period.
- A room is assigned to more than one session during the same period.
Go to Modules > wTimetable to open Projects. Click on your Project Name, then click on your Timetable. The Conflicts button is visible in the top right on any of the tabs in the Timetable.

Conflict Detection during Scheduling
When scheduling staff or rooms, users receive immediate warnings if the selected resource is already assigned to another session during the same period.
Note: The conflict message is informational only. Users can still proceed with scheduling the staff member or room.
Staff Conflict Detection
- Single Staff Conflict: When a staff member (Main or Additional) is already scheduled in the same period, the following message is displayed: “Info: <Teacher> is assigned to more than one session in this period.”
- Multiple Staff Conflict: When multiple staff members are involved in conflicts, the following message is displayed: “Info: Multiple staff members are assigned to more than one session in this period.”
Room Conflict Detection
- Single Room Conflict: When a room is already booked during the same period, the following message is displayed:: “Info: <Room> is assigned to more than one session in this period.”
- Multiple Room Conflict: When multiple rooms are involved in conflicts, the following message is displayed: “Info: Multiple rooms are assigned to more than one session in this period.”
How to accept Conflicts
1. Click the red Conflicts button.
The popup contains two tabs:
- Active – Displays conflicts that require attention.
- Accepted – Displays conflicts that have been reviewed and accepted.
2. Select the Active tab.
- Tip: Use the search, sort, and filter options available on each column in the table to quickly identify and review conflicts.
3. Click View in the Actions column.
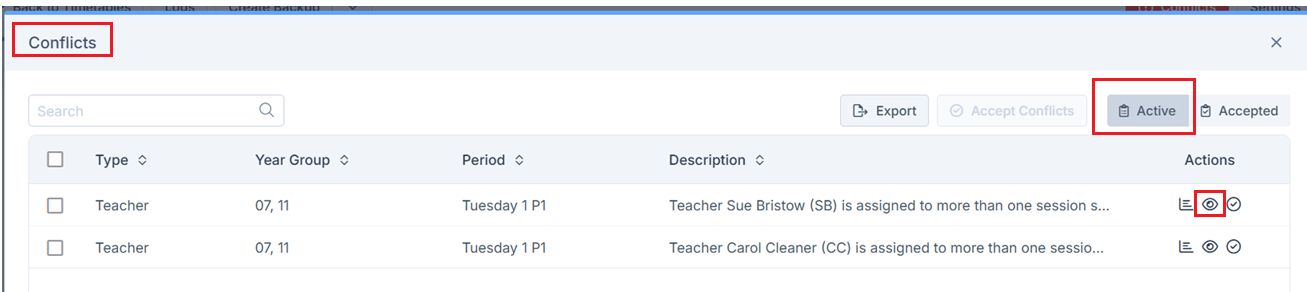
Depending on the conflict type, you will be taken to one of the following locations:
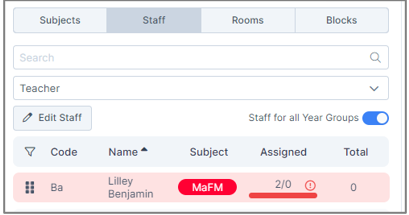
Allocated Sessions Exceed Available Sessions
If allocated sessions exceed available sessions for a staff member or room, you will be redirected to the Curriculum Plan page. The relevant Staff or Room side panel will highlight the conflicting row in red.
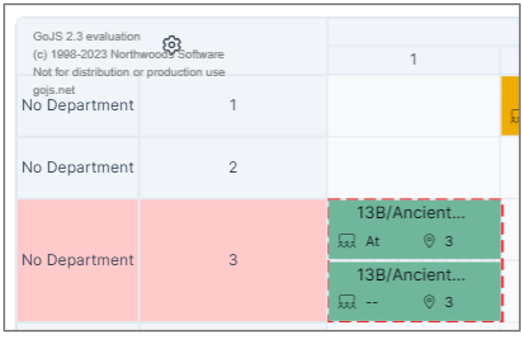
Multiple Assignments in the Same Period
If a staff member or room has been assigned to more than one session in the same period, you will be redirected to the Scheduling page. The relevant Staff or Room view will highlight the conflicting session in red.
Accept a Conflict
To move a conflict from Active to Accepted:
- Select one or more rows and click Accept Conflicts, or
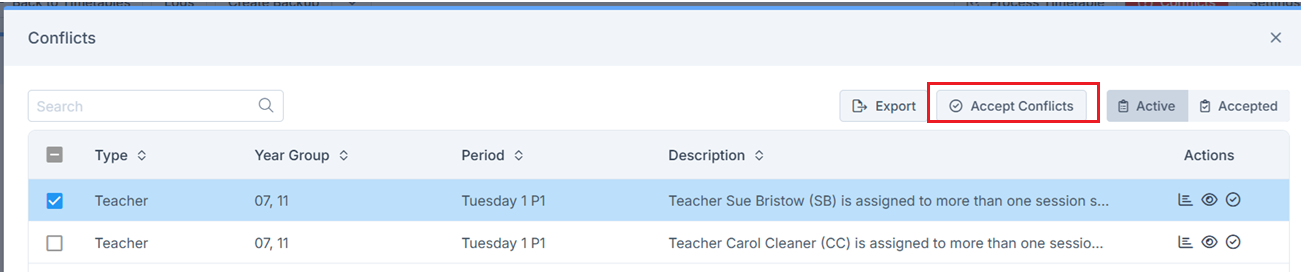
- Click the Accept (tick) icon in the Actions column.
Restore a Conflict
To move a conflict from Accepted back to Active:
- Select one or more rows and click Restore Conflicts, or
- Click the Restore icon in the Actions column.

Session Locking and Unlocking
To provide control and visibility over scheduling decisions, sessions are automatically locked or unlocked when conflicts are managed.
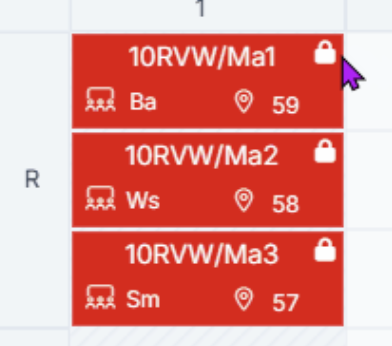
- Accepting Conflicts: When an Active conflict is accepted, the related session is automatically locked to prevent accidental changes. A lock icon is displayed on the Scheduling page.
- Restoring Conflicts: When an Accepted conflict is restored, the related session is automatically unlocked and becomes available for reallocation.
- Auto-Scheduling: Locked sessions are preserved during the Auto Schedule process. Accepted conflict decisions are therefore not overwritten by automated scheduling.
Show Conflicts toggle
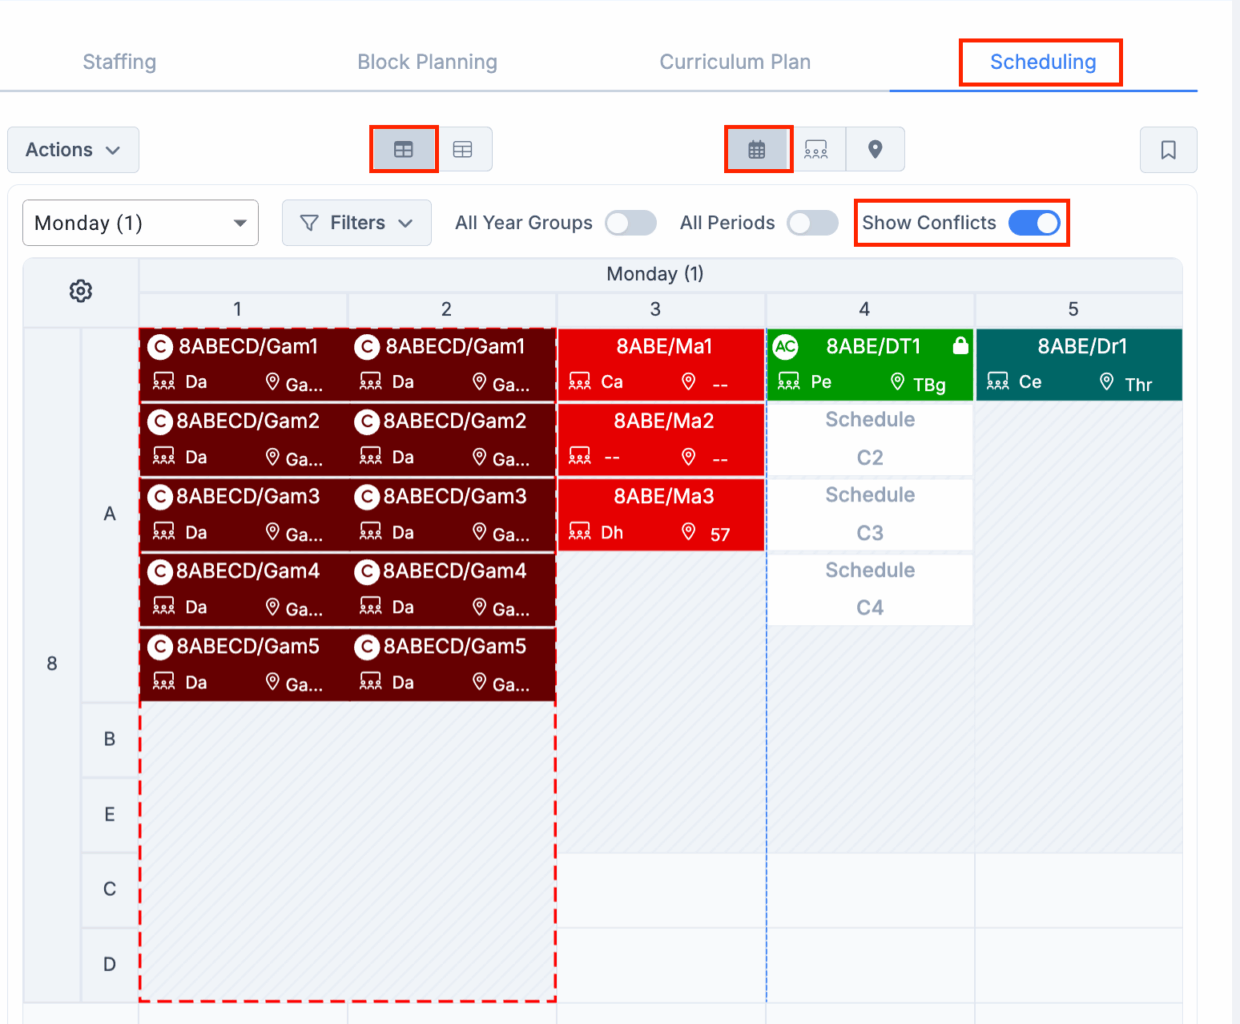
In Detailed and Year Group views, a Show Conflicts toggle is available in the top-right corner.
When enabled, conflict indicators are displayed on sessions and blocks.
- Sessions
- C – Active conflict (from the Active tab in the Conflicts popup).
- AC – Accepted conflict (from the Accepted tab in the Conflicts popup).
- Blocks
- Any block containing at least one Active conflict is outlined with a red border across the entire block period.
Labels Conditions:
- If a session has multiple Active conflicts, only one C label is displayed.
- If a session has multiple Accepted conflicts, only one AC label is displayed.
- If a session has both Active and Accepted conflicts, only a single C label is displayed.
- If a session occurs during a Split Lunch period and Count Lunch Periods as One is enabled, the conflict label replaces the Split Lunch icon.
Analyse and Resolve Staff Conflicts
The Analyse & Resolve Conflict page helps you review and resolve teacher scheduling conflicts.
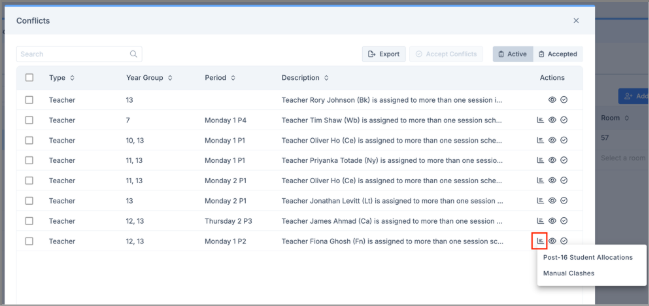
From the Conflicts popup, select the Analyse & Resolve Conflict icon and choose one of the following analysis modes:
- Manual Clashes – Available for conflicts across all year groups.
- Post 16 Student Allocations – Available for Post-16 conflicts only
Manual Clashes
Selecting Manual Clashes opens the Analyse & Resolve Conflict popup in the Analyse tab.
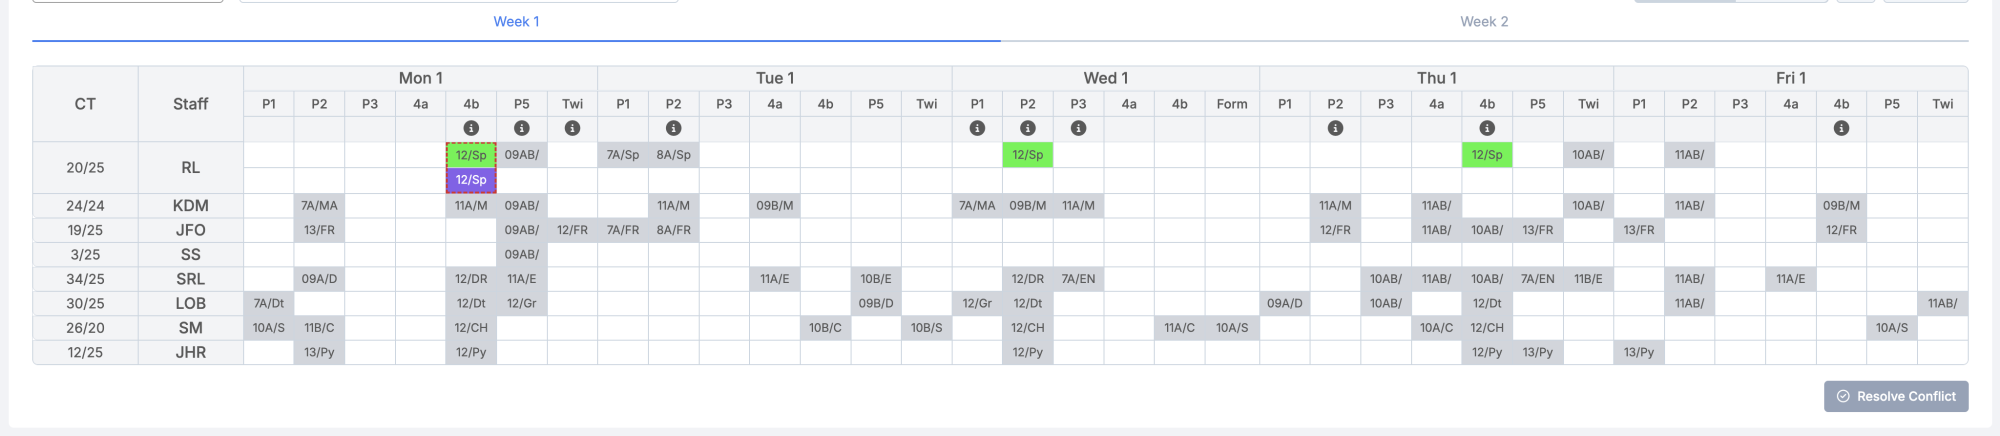
The conflict is clearly highlighted in red at the top of the grid.
Example: Teacher Roger Lewis (RL) is assigned to more than one session scheduled to the same period: Monday 1 P4b. Sessions: as Main Teacher for 12/Sp, as Main Teacher for 12/SpD.
Page controls
- Use the Select Class dropdown to view all classes involved in the conflict.
- Use the Add/Remove Staff dropdown to manage which staff members appear in grid. By default, only relevant staff are displayed. You can:
- Removed staff from the list
- Add additional staff members for any subject
- Select Export to download the conflict analysis as an Excel (.xlsx) file.
- Use the tabs to switch between:
- Analyse – Review conflict details
- Resolve – Identify and apply possible resolutions

Grid
- The grid is divided into timetable weeks (e.g. Week 1, Week 2).
- The grid displays:
- Each staff member’s Contact Time (CT) and total scheduled hours.
- Staff Codes, with full staff names available on hover.
- The selected teacher at the top of the grid, showing all scheduled classes.
- Classes involved in the conflict, highlighted with a red dashed border.
- Other scheduled sessions for the same subject, shown in their assigned colour.
- All other scheduled sessions, shown in grey.
- The grid may also includes timetables for:
- Staff in the same department as the conflict class.
- Staff who teach the conflicting class or related subject.
- Staff whose classes belong to the same block as the conflicting class (Complex and Option blocks only).
- Each timetable cell displays the Class Code and Subject Code (e.g. 12/SP). Hover over the cell to view additional details.
Class Colour Coding
You can apply colours to grey classes to make them easier to identify.
- Left-click a grey class.
- Select the pen icon.
- Choose a colour.
- Select Pick.
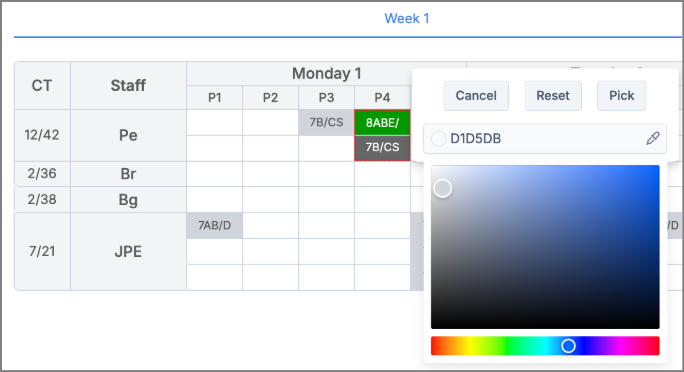
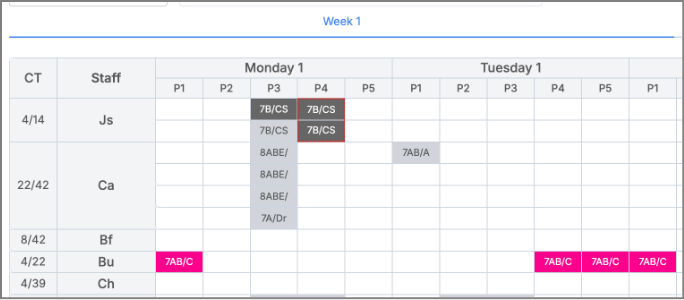
Updating the colour of a single class will apply the change to all instances of that class in the grid.
Add/Remove Staff
Use the Add/Remove Staff dropdown to control which staff members are displayed.
The dropdown includes:
- Search
- Select All
- Clear All
Available actions:
- Apply – Applies the selected changes.
- Cancel – Closes the dropdown without saving changes.
Tooltips and Indicators
- Period Indicators: Indicators appear when a Block, NA, or Lunch period exists within the same year group and band as the conflict.
- For example, if a conflict occurs in Year 13 Band A, indicators are displayed for all blocks scheduled within Year 13 Band A across all periods.
- Cross-Band Blocks tooltips display: <Block Full Name> spread to band: <Band Name(s)>”.
- Linked Blocks tooltips displays: <Block Full Name> linked to <Block Full Name>”.
- Split Lunch Periods: Split Lunch periods display an L indicator.
- Session tooltips: includes a Staff Type label showing whether the teacher is assigned as Main Staff or Additional Staff.
- Staff Information Tooltip: The information tooltip displays: Split teacher with the conflict cl§ass
Analyse and Resolve Conflicts
The Manual Clashes page opens in the Analyse view by default. You can switch to Resolve when you are ready to address the conflict.
Analyse View
Use the Analyse view to:
- Review conflict details.
- Highlight related classes using colour coding.
Resolve View
Use the Resolve view to:
- Identify sessions that can be moved or swapped.
- Review available swap suggestions.
- Resolve scheduling conflicts.
Conflict Resolving – Suggestions
In Resolve view:
- Conflicting sessions are highlighted with a red border.
- Sessions that cannot be used to resolve a conflict are greyed out.
- Eligible sessions are colour-coded according to their suitability.
Colour Indicators
- Green – Ideal swap. Staff teach the same subject and belong to the same department.
- Yellow – Staff belong to the same department but teach different subjects.
- Red – Staff have no direct relationship to the subject or department. These staff only appear if they have been manually added to the page.
Suggestion Limitations
Suggestions do not take the following into account:
- Timetable Specification rules.
- Staff Total Contact Time limits.
- Unscheduled sessions.
- Scheduled sessions without an assigned staff member.
- Note: For double sessions, periods separated by a break, AM boundary, or PM boundary are greyed out because double sessions cannot be scheduled across these boundaries.
Resolving a Conflict
To resolve a conflict:
- Left-click an eligible session.
- Select Resolve Conflict.
- Review any remaining conflicts.
If additional conflicts remain, the page will stay open for further resolution.
If the resolved conflict is the final one, the page will close and return you to the Scheduling page.
Any swaps made will be reflected in both the Scheduling and Curriculum Plan pages.
Note: When moving double sessions:
- Moving vertically treats each period is treated as an individual session
- Moving horizontally moves both periods together.
Post 16 Student Allocations
Important: Post-16 Student Allocations will be available for timetables where Import Options has been completed – for Year 12 in England and Year 13 in Northern Ireland in the Curriculum Plan > Actions. After this, you must schedule the blocks. Conflicts will then be visible only for scheduled blocks.
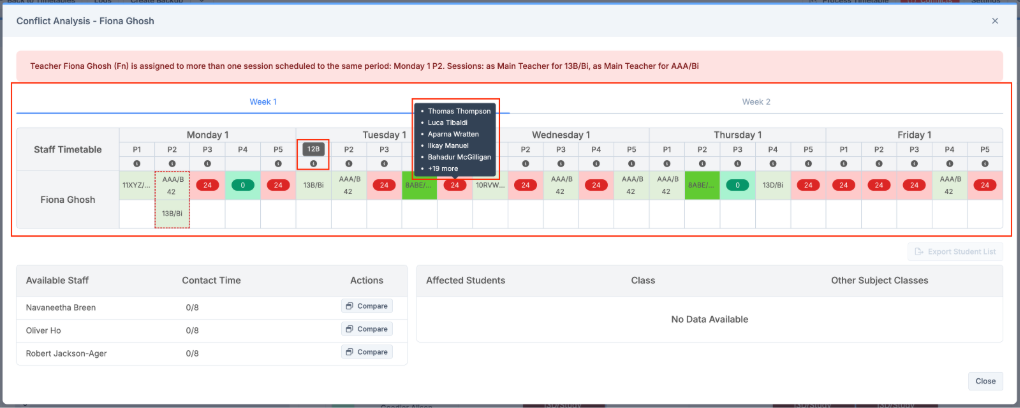
Clicking Post-16 Student Allocations opens the popup. The conflict is clearly highlighted in red at the top of the grid.
Example: Teacher Fiona Ghosh (Fn) is assigned to more than one session scheduled to the same period: Monday 1 P2. Sessions: as Main Teacher for 13B/Bi, as Main Teacher for AAA/Bi.
Grid
The grid is organised by weeks in the timetable cycle (e.g., Week 1, Week 2) and displays the timetable for the staff member with the conflict.
- Conflicting classes are marked with a red dashed border.
- Each cell shows the Class Code and Room Code (e.g., AAA/Bi 42), with full details available via tooltip.
Free periods for the selected staff member are highlighted and show the number of student conflicts with other scheduled classes, using the following colour-coded system:
- Green: 0–2 student conflicts
- Yellow: 3–5 student conflicts
- Red: More than 5 student conflicts
Hovering over a class displays the first five affected students. To see the full list, click the cell to open the Affected Students panel. Hovering over the i icon beneath a period reveals the Block Name.
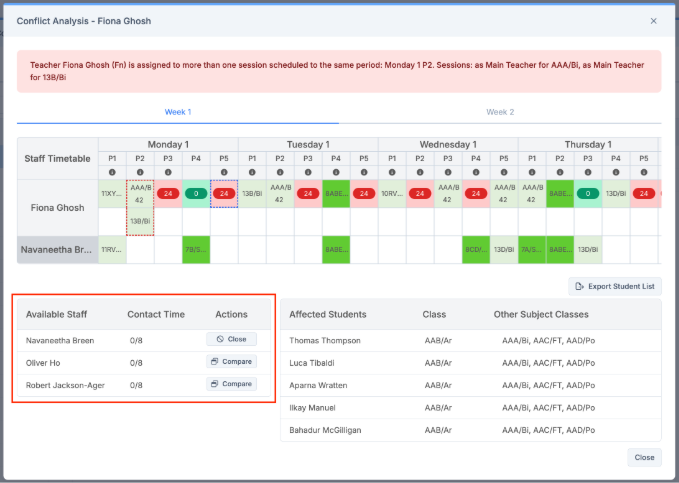
Available Staff
The Available Staff panel is static and shows staff members linked to the subject and class. It displays each person’s Contact Time and total scheduled hours. Clicking Compare adds the selected staff member to the grid, allowing timetable comparison with the existing staff member. Clicking Close will remove them from the grid.
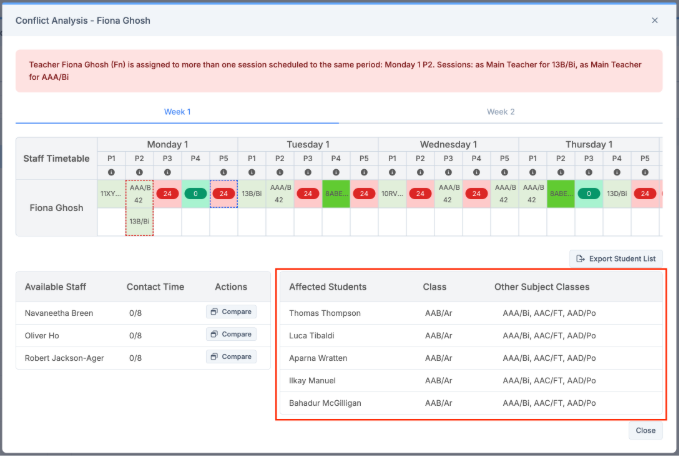
Affected Students
The Affected Students panel updates when you click on a free period in the grid, which is then highlighted with a blue dashed border. It displays the affected students for the selected class, along with their other subject choices.
Note: If no affected students exist for the selected period, or if no period has been selected, the panel will display: “No Data Available.”
Click Export to download the data as an Excel (.xlsx) file.
This feature allows users to automatically schedule the Timetable using parameters set in Timetable Specifications.
- Note: If required, users should complete Timetable Specifications, and also ensure that where there are Conflicts that these are not already scheduled and locked on the timetable.
This guide looks at the following:
Go to Modules > wTimetable to open Projects. Click on your Project Name, then click on your Timetable. Click on Scheduling.
Click on Auto Schedule from the Actions button.
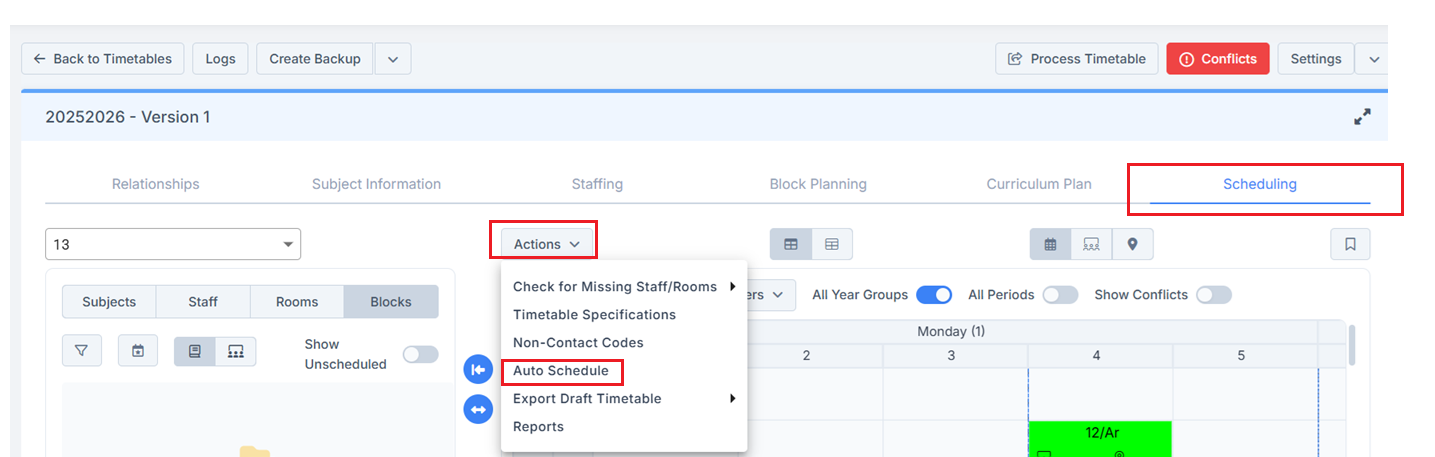
Select Entities
This 1st step in the Auto Schedule allows users to select which entities are included in the automation.
- Select which Year Groups and Subjects and Blocks to include in the auto scheduling or Select All.
- Select Year Group or select all
- Select Subjects or select all
Select Blocks
- Visible only when at least one Year Group and one Subject are selected.
- Displays only blocks relevant to the selected Year Groups and Subjects.
- Each block includes a type icon: S (Simple), L (Linear), O (Option), C (Complex).
- Features include:
- Select All / Clear All
- Block search by name
- Ability to manually select/unselect individual blocks
- Important For Option blocks: If at least one subject within the block is selected, the entire block is eligible for scheduling.
Note: The Search bar, Select All check box, and Clear All can be utilised here.
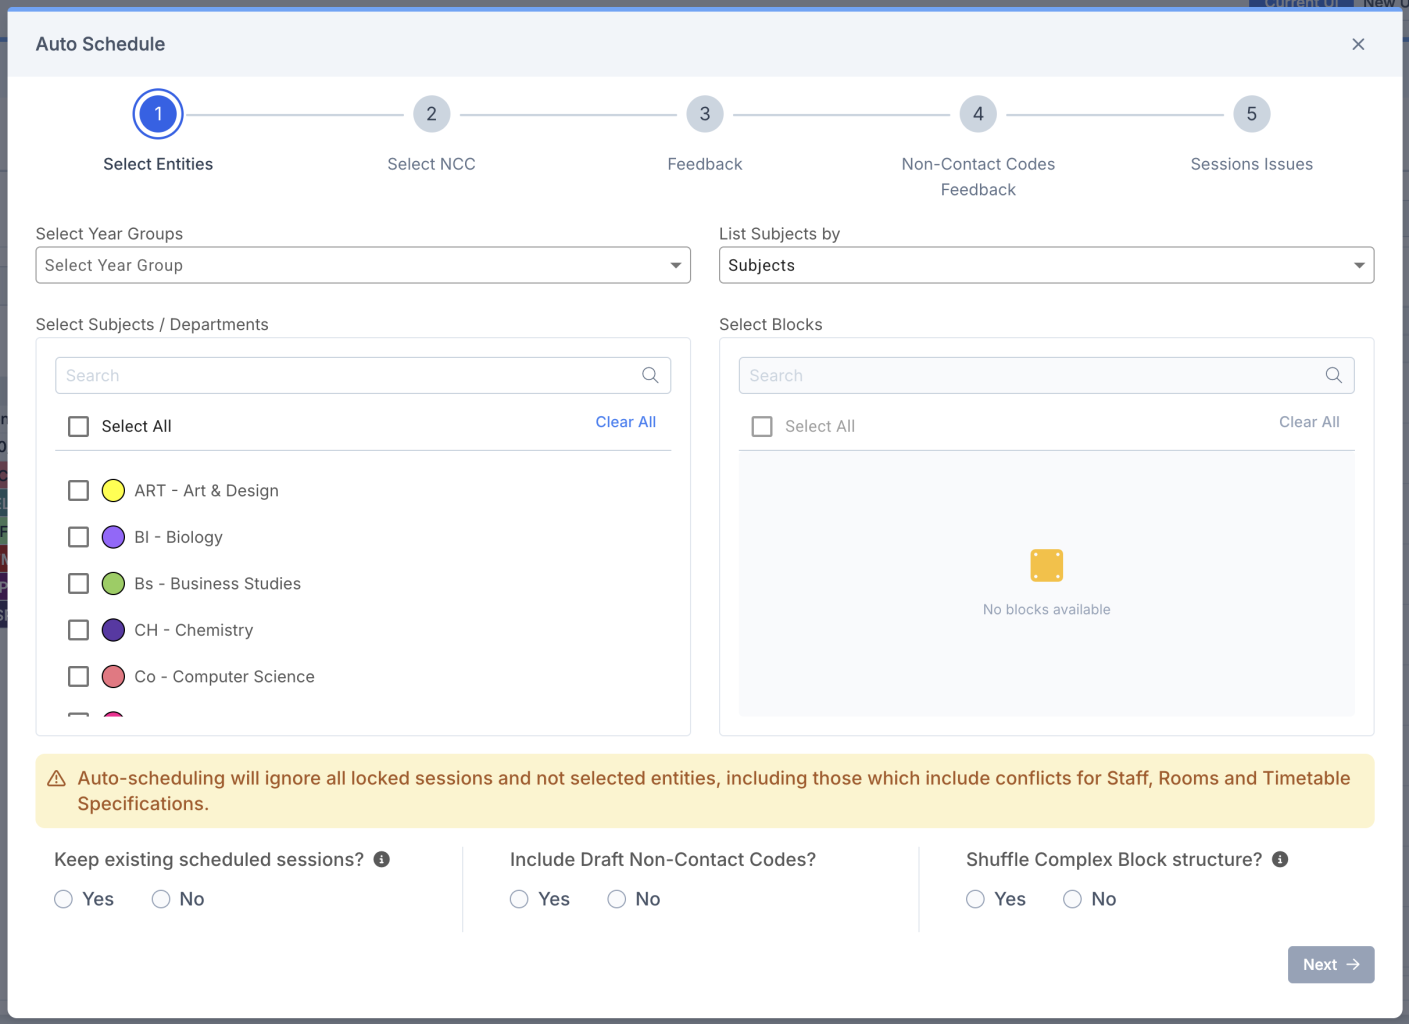
Before you can move on to the next step, you must answer the following:
Keep existing scheduled sessions?
This tick is designed to give you more control and ensure existing scheduled sessions are protected.
- When Yes is selected, Auto Schedule will only fill empty slots without modifying your current timetable.
- When No is selected, Auto Schedule will run and may discard previously scheduled sessions
Include Draft Non-Contact Codes?
You can choose to Include Draft Non Contact Codes by selecting “Yes”
Shuffle Complex Block Structure?
- Yes = Auto Schedule may swap sessions in a Complex Block within a class across different periods, where necessary, to ensure all sessions can be scheduled without conflicts.
- No = Sessions in a complex block will be fixed, and Auto Schedule will reserve the positions of the sessions in the complex block.
In this example, the same staff member is assigned to Ar and ArF in two different classes during Period 1. When the Auto Schedule process is run, the outcomes are shown in the Step 3 Feedback screen, depending on whether Shuffle Complex Block Structure is set to Yes or No.
- Selecting No, the position of the sessions in P1 in the complex block become fixed. This has resulted in sessions from P1 not being scheduled because of a staff conflict between C1 and C2.
- Selecting Yes, sessions have been swapped across the different periods to ensure all sessions can be scheduled without conflicts.
Click Next to start the Pre-Schedule process.
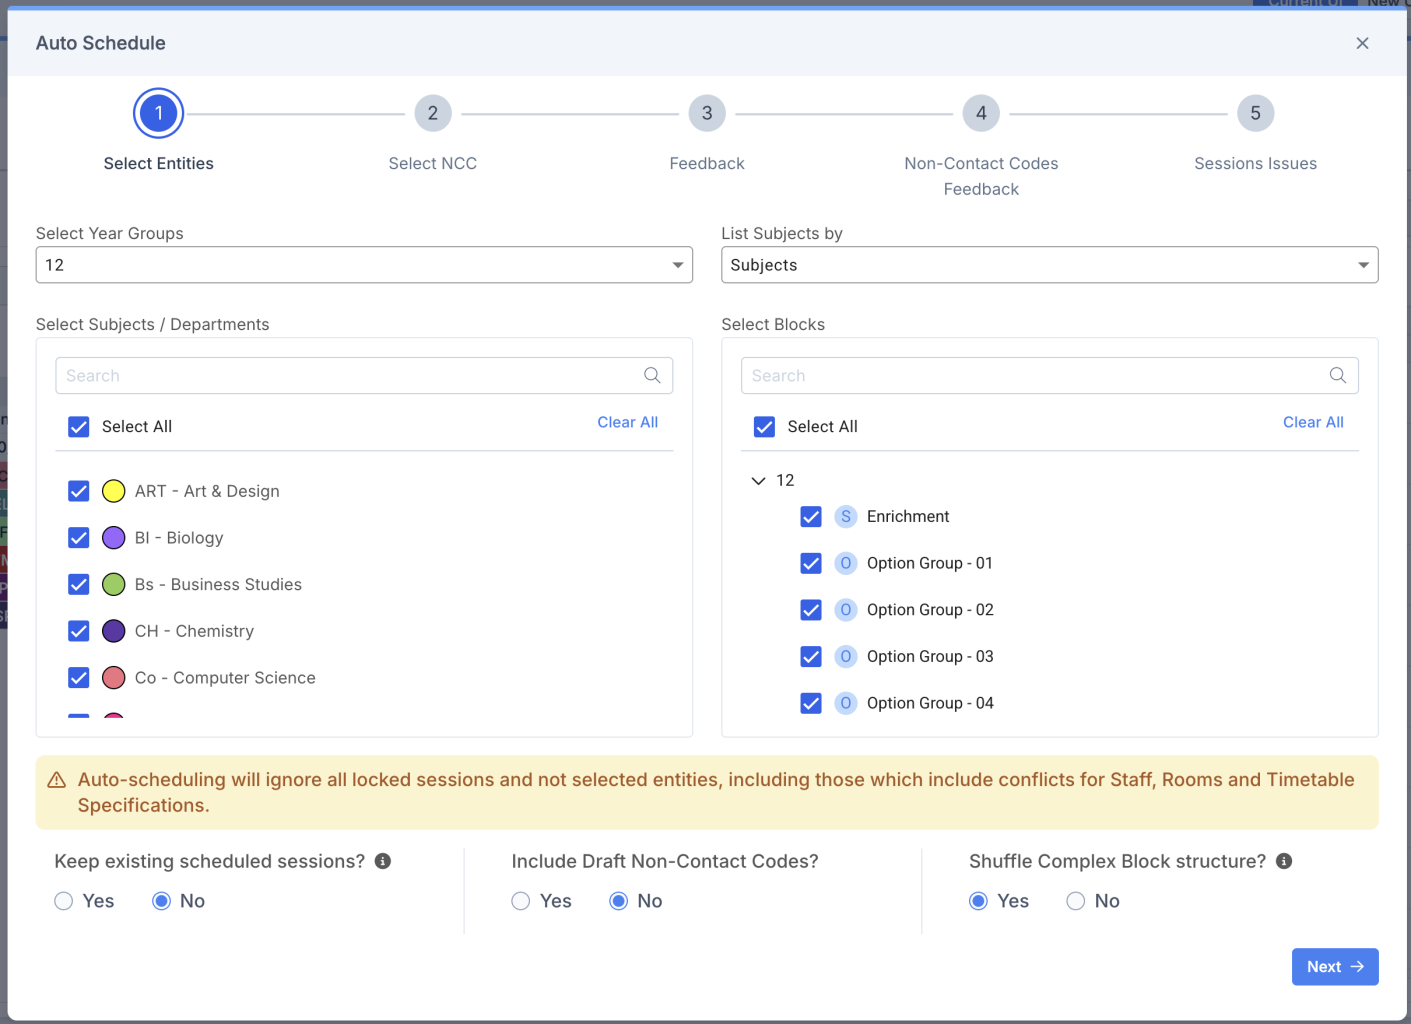
Once the process is complete, users will be moved to Step 2. If the process fails, see Note.
Note: When clicking on the Next button, if the sum of the Block periods on the Curriculum Plan do not fit within the teaching periods of the Timetable cycle, users will see this message: “Are you sure you want to continue?” “<YearGroup> Band <BandName>, has more block periods on the Curriculum Plan than can fit into the Timetable Cycle. Some periods will not be scheduled.”
Clicking Cancel returns the user to step 1 without any changes. Clicking Continue will take users to step 2.
Select NCC
If you chose “Yes” to include Draft NCCs, you can select one or more from the list or continue without selecting.
Auto-scheduling will attempt to find a suitable period for each selected Draft NCC Group, ensuring no staff or room conflicts.
Click Next.
Feedback
Step 3 provides Feedback on the pre-scheduled blocks. This table lets the user know in the Scheduled Sessions column which blocks were successfully scheduled (100%), and which ones were only partly scheduled.
Note: The Search bar, Filters, and Sort can be utilised here.
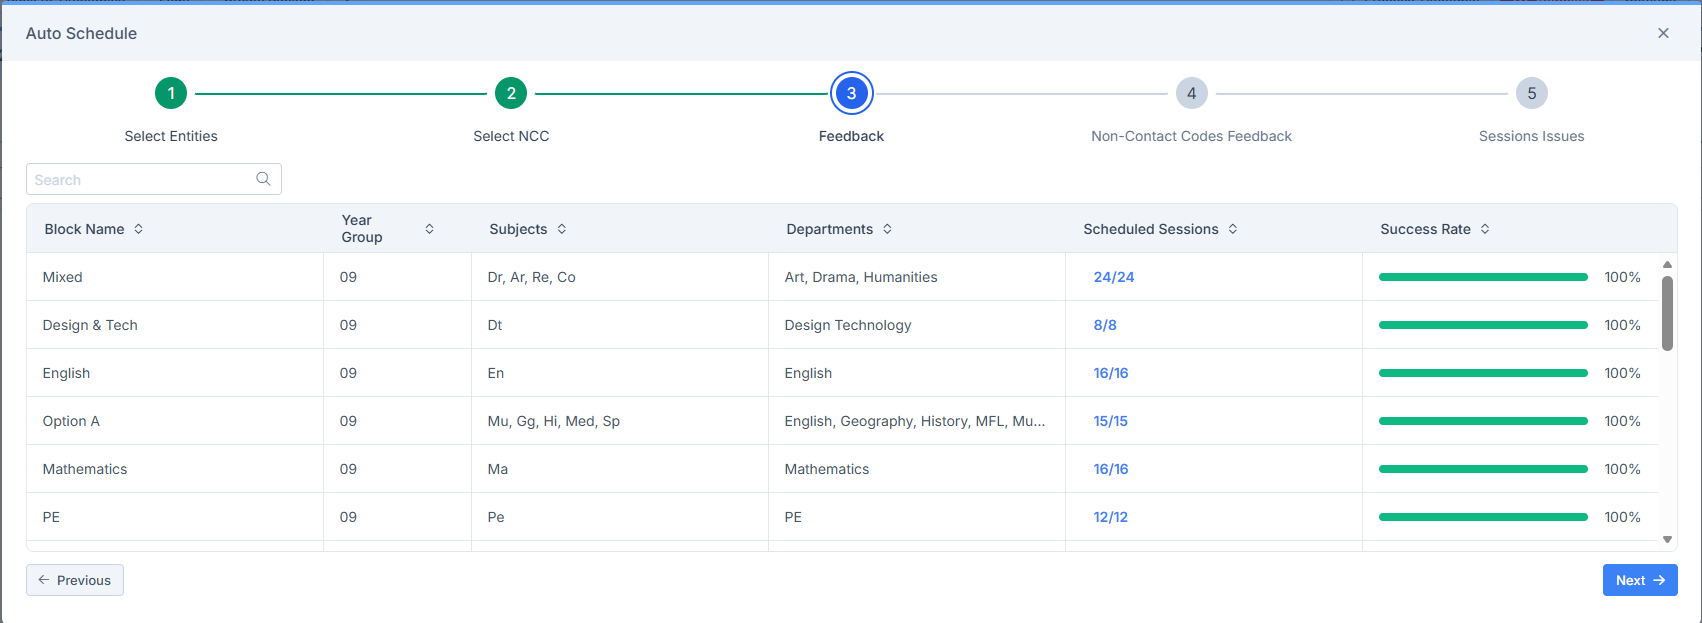
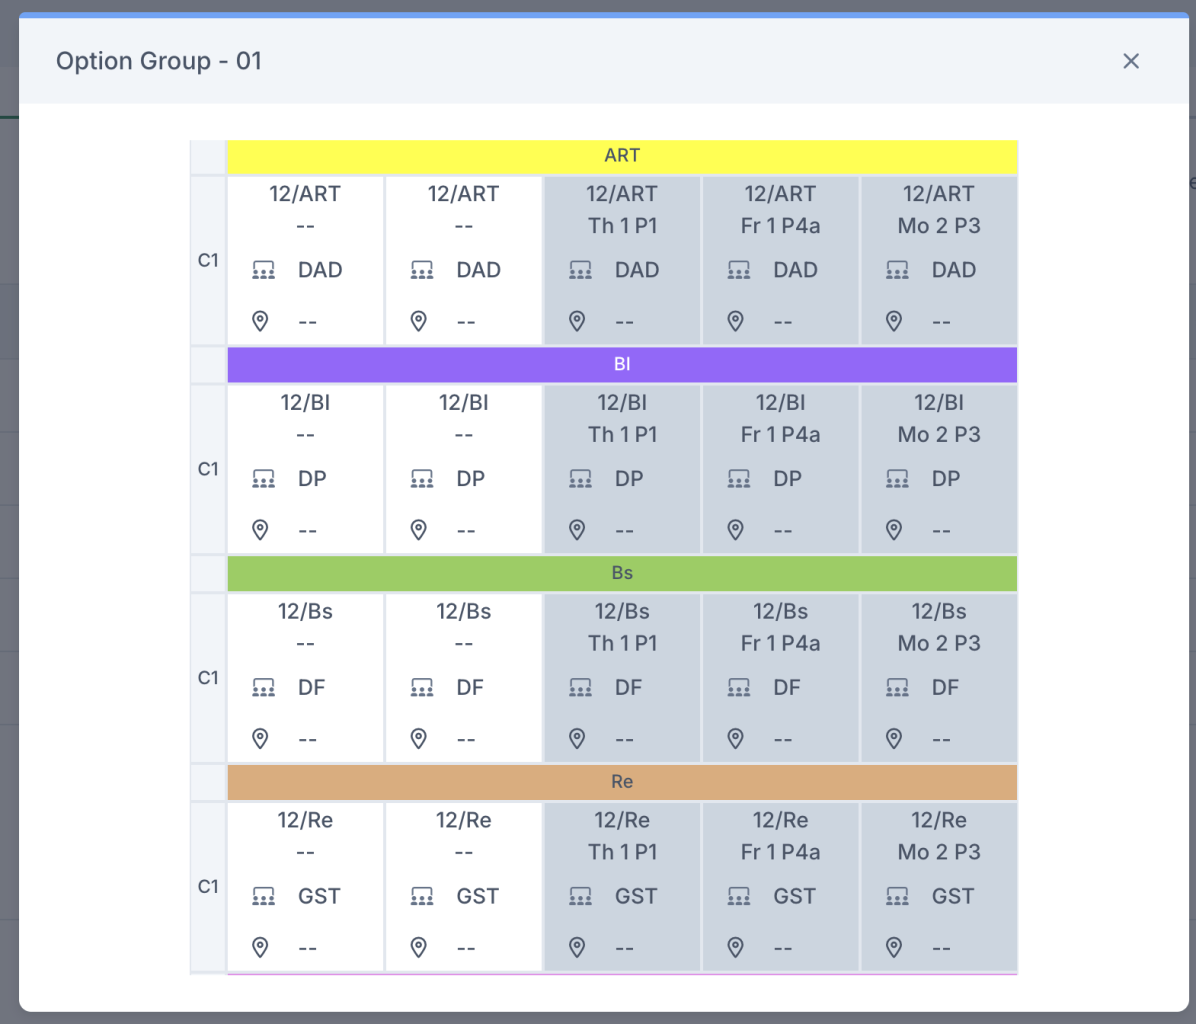
- Click on the Scheduled Sessions to view the sessions for a Block. This opens a read only, expanded Blocks view. The scheduled sessions in the Block have a grey background. The sessions that cannot be scheduled have a white background.
- Click the X to close the view and return to the Feedback page.
3. Click Next to move to step 4.
Non Contact Codes Feedback
Auto-scheduling will attempt to find a suitable period for each selected Draft NCC Group, ensuring no staff or room conflicts. Non-Contact Codes Feedback provides detailed feedback on the outcome of Draft NCC Group scheduling.
- Room: Displays the Room Code (if assigned)
- Period: If scheduled: “Day [Week] Period”. If not scheduled: Field remains blank.
- Reason: Displays one of the following reasons when scheduling is not possible for all group members:
- “Staff <Staff code> has been assigned Non-contact code – <Name>.”
- “Staff conflict for <Staff code> in teaching periods.”
- “Room <Room code> has been assigned Non-contact code – <Name>.”
- “Room conflict for <Room code> in teaching periods.”
- “No Periods are found” when the session cannot be scheduled for any member of staff.
When a Draft NCC is successfully scheduled, the Reason displayed will be: “Period scheduled.”
Note: If you chose “No” for the “Include Draft Non-Contact Codes?” option in the first step, the Select NCC and NCC Feedback steps will be skipped.
Sessions Issues
Step 5 of the Auto-Schedule process displays any sessions that could not be scheduled within the current timetable setup.
Columns
- Block Period: Displays the block period affected by the scheduling issue.
- Reason: Displays the active rule, staff restriction or room restriction that is preventing the session from being scheduled.
- Suggested Action: Provides a recommendation that, if applied, may allow the session to be scheduled. Depending on the cause of the issue, one of the following suggestions may be displayed:
- Delete the rule ‘rule name‘ from ‘Timetable Specifications tab name‘ for ‘Year Group‘, ‘Subject/Block name‘ ‘Block Period‘
- Create a rule ‘rule name‘ for ‘Year Group‘ ‘Block Period‘
- For Balance across the cycle and Balance across the day (AM -PM) rules in the Blocks on days tab
- Remove the non-contact code for ‘staff/room‘ in ‘Session/Block Period‘
- Note: The system will not suggest to remove a non-contact code when it is NA (Not Applicable).
- Remove ‘staff/room‘ from ‘Session/Block Period‘
- Delete the Limitation rule from ’Limitations‘ for subject ‘subject‘.
- Status: Blank by default. Displays ‘Accepted‘ when a Suggested Action has been accepted.
- Action:
- Click the tick to accept a Suggested Action.
- Click the cross icon to remove the acceptance.
- Alternatively, click Accept All to accept every suggestion in the table. Clicking Accept All again will deselect all suggestions. Individual selections can also be accepted or removed as required.
Accept a Suggested Action
1. Click the tick icon in the Action column for the suggestions you want to accept, or click Accept All. To undo an acceptance, click the cross icon.
2. The Status column updates to Accepted for the selected rows.
3. Click Update to apply the accepted suggestions and rerun the Auto Schedule process.
4. When the rerun is complete, you are automatically returned to Step 3: Feedback (or Step 2 if draft NCCs have been scheduled), where you can review the updated Success Rate.
- Note: If you accept Suggested Actions but do not click Update, an alert appears when you click Apply Schedule.
5. Review the updated Success Rate and click Next to return to Step 5: Session Issues.
6. If you are satisfied with the results, click Apply Schedule to apply the timetable. Any accepted suggested actions are included in the final schedule.
7. Alternatively, click the X to close the Auto Schedule window if you do not want to proceed with the current timetable setup.
- Note: For Simple, Option, and Complex Blocks, any block period containing at least one conflicting session will not be scheduled when Apply Schedule is selected.
- Note: You can manually adjust the timetable setup, resolve the issues, and run Auto Schedule again if required.
- Note: When deleting a rule that applies to multiple Year Groups, the system removes only the Year Group causing the issue and retains the rule for all other Year Groups.
- Tip: If Auto Schedule is applied with partially scheduled sessions, you can view unscheduled sessions in:
- Curriculum Plan > Blocks > View Details
- Scheduling > Blocks > Show Unscheduled
Export Issues
Click Export to download the Session Issues list as an Excel file.
Double and Linked Periods
Double and linked periods are clearly identified in the Block Period column and displayed within a single row.
- All related periods are grouped together.
- The description Double or Linked appears in the Block Period column to identify these period types.
- Double/Linked Periods with one issue
- If a double or linked period has only one issue, the Suggested Action is displayed in full. You can accept the suggestion by clicking the tick icon in the Action column.
- Double/Linked Periods with multiple issues
- If a double or linked period has one issue for each block period, click the button in the Suggested Action column to open the See Suggested Actions pop-up.
- From the pop-up you can:
- Review all suggested actions.
- Click Accept All to accept every suggestion.
- When Accept All is selected, the Status column updates to Accepted. Click the cross icon in the Action column to reverse the decision.
- From the pop-up you can:
- After accepting suggestions, remember to click Update to rerun Auto Schedule and review the Feedback and Session Issues steps again before clicking Apply Schedule.
- Note: If a double or linked period has two or more issues per block period, the Suggested Action column remains blank. In these cases, the issues must be investigated and resolved manually using the information provided in the Reason column.
- If a double or linked period has one issue for each block period, click the button in the Suggested Action column to open the See Suggested Actions pop-up.
Auto Schedule rules for Complex Blocks
For Complex Blocks, Auto Schedule uses a dynamic scheduling process before the timetable is applied. During scheduling, sessions within a class may be reordered to achieve the best possible result and provide feedback on potential issues.
If the block distribution changes during Auto Schedule:
- The updated distribution is reflected in the Curriculum Plan.
- Subjects can still be manually swapped after scheduling.
If you want to preserve part of the original distribution:
- Schedule the block using the original distribution.
- Lock the required sessions on the timetable.
- Run Auto Schedule again.
Auto Schedule – Locked Sessions and Non Selected Entities
Auto Schedule automatically schedules all locked sessions and excludes any non-selected entities from the scheduling process, even if doing so creates conflicts.
- Locked Sessions
- Ignore rules defined in Timetable Specifications.
- Ignore staff and room restrictions.
- Remain in their existing scheduled positions.
- As a result:
- The Feedback step will show locked sessions as scheduled.
- The Issues step will not display information about locked sessions because they are scheduled automatically.
- Non-Selected Entities
- Auto Schedule finds the best available position for selected entities (Year Groups and/or Subjects) while working around the existing timetable positions of any non-selected entities.
Use the Check Missing Staff/Room option to quickly identify sessions that do not have a main staff member or room assigned.
Go to Modules > wTimetable to open Projects. Click on your Project Name, then click on your Timetable. Click on Scheduling.
Highlight sessions with missing staff or rooms
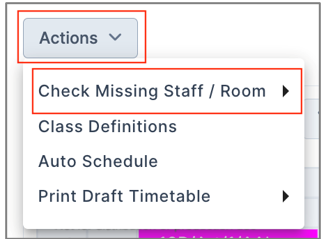
1. Click Actions and select Check Missing Staff / Room.
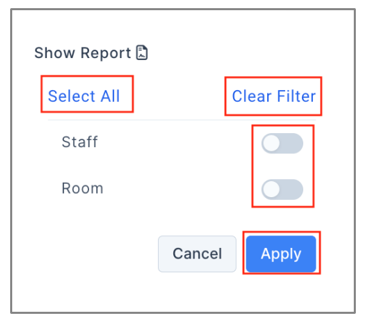
2. Choose the required filter option:
- Staff: highlights sessions without an assigned main Staff member.
- Room: highlights sessions without an assigned Room.
- Select All: highlights sessions missing either a main staff member, a room or both.
- Clear Filter: removes all selected filters.
- Tip: Use Clear Filter and Apply, between each new filter selection.
3. Click Apply.
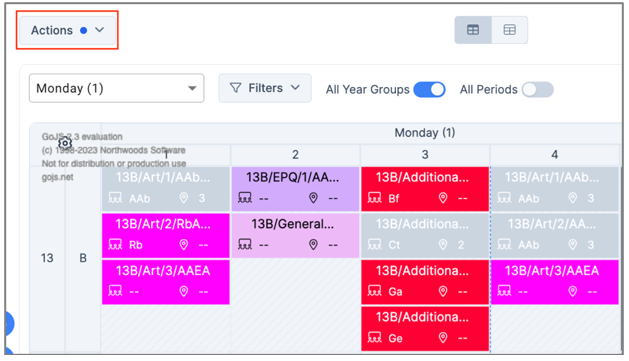
A blue dot on the Actions button indicates that a filter is active. The Scheduling page updates to display sessions that match the selected criteria, while sessions with assigned staff members or rooms are greyed out.
- Note: When both Staff and Room filters are selected, sessions missing either a main staff member or a room remain visible. Only sessions with both a main Staff member and a Room assigned are greyed out.
View the Missing Staff/Room Report
The Show Report option opens a report listing sessions with missing staff members and/or rooms.
1. Click Actions and Select Check Missing Staff / Room.
2. Click Show Report.
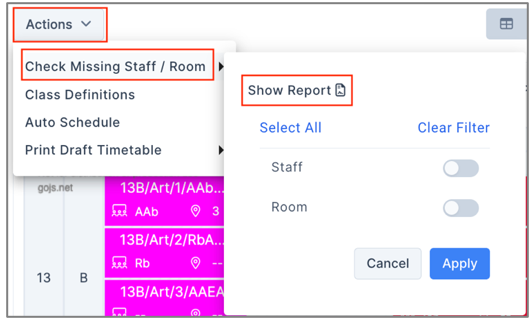
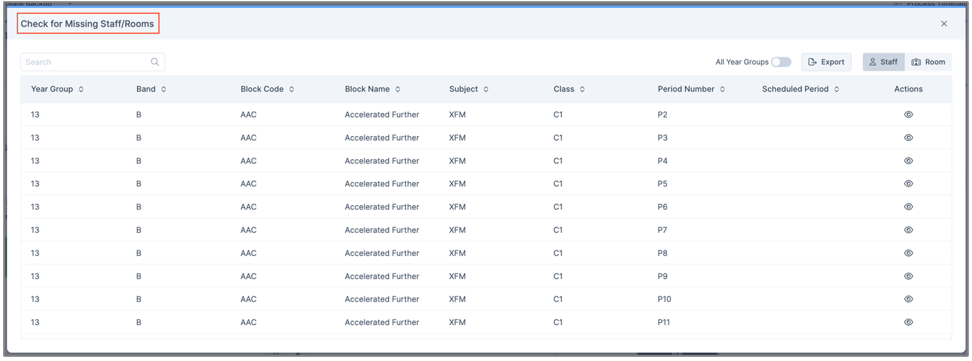
3. Switch between the Staff and Room tabs to view sessions with missing assignments.
The Check for Missing Staff/Rooms report displays all sessions with missing assignments.
4. Click the eye icon in the Actions column to open a session.
- Unscheduled session – the report closes and opens the Curriculum Plan page. The relevant block is expanded and the session is highlighted with a blue dotted outline.
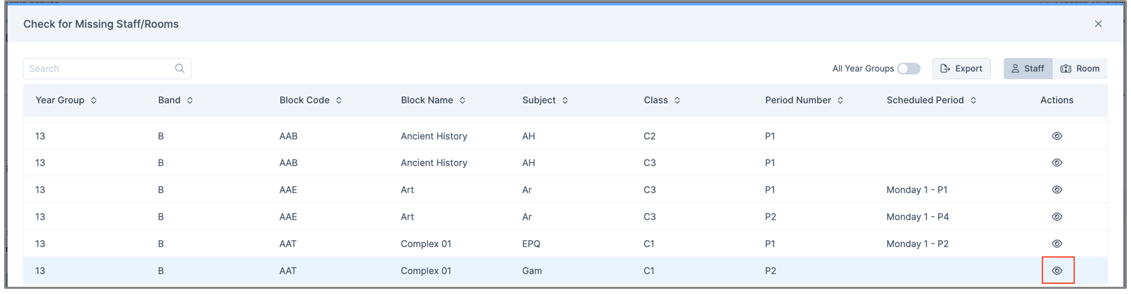
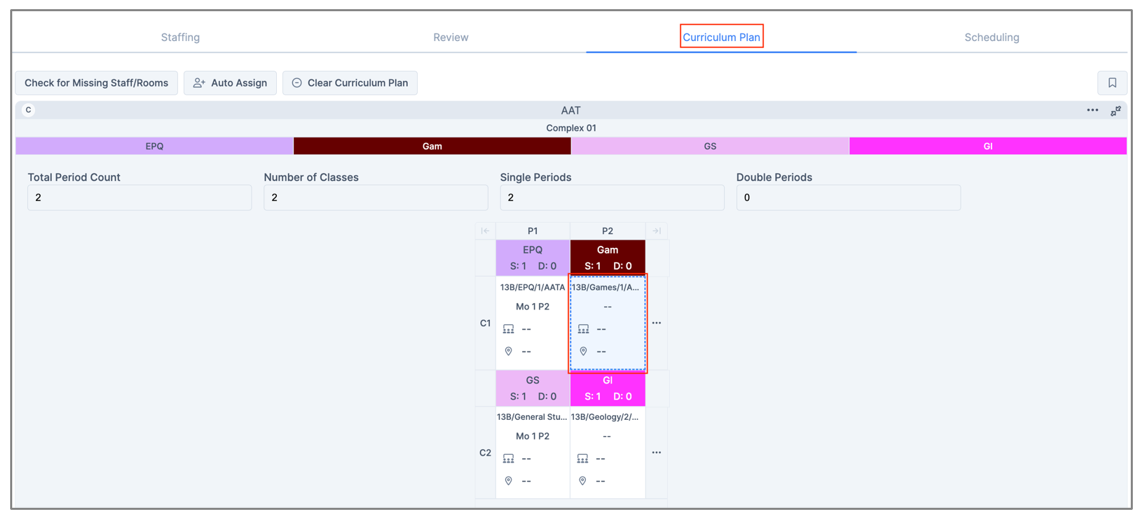
- Scheduled session – the report closes and returns you to the Scheduling page in Year Group view, with the session highlighted by a blue dotted outlineline.
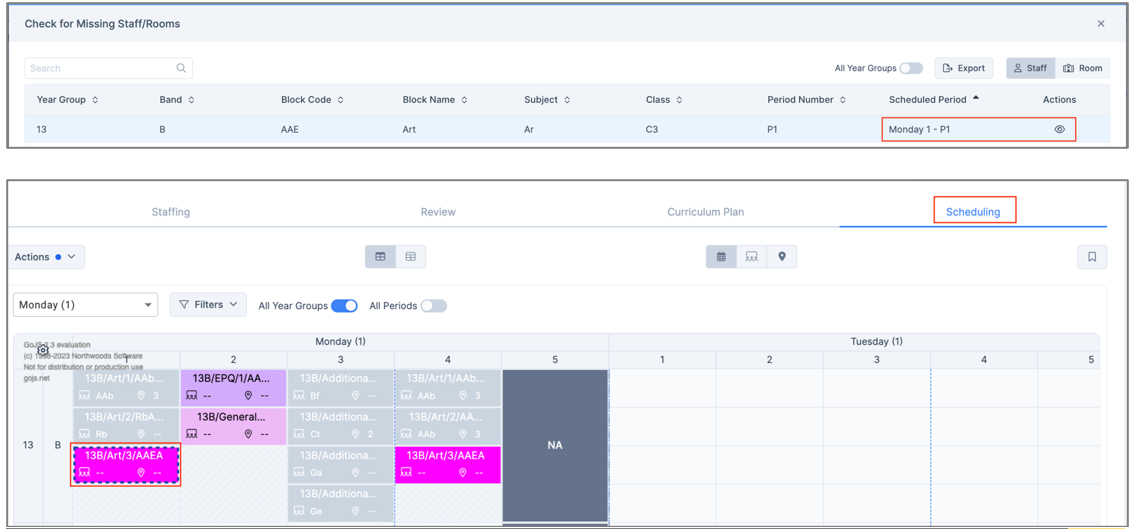
Filters, Search and Export Results
- Filter the report by Year Group, Band, Subject, Class, and Period Number.
- Use the Search field to search across all displayed data.
- Click Export to download the report as a CSV file.
- Enable All Year Groups to view missing staff and room assignments across all year groups. If the toggle is Off, only sessions for the Year Group currently selected on the Scheduling page are displayed

Reporting
Timetables can be printed from any Scheduling view. Any filters applied on the Scheduling page are reflected in the exported timetable.
Go to Modules > wTimetable to open Projects. Click on your Project Name, then click on your Timetable. Click on Scheduling.
To export a timetable:
- Click Actions.
- Select Export Draft Timetable.
- Choose one of the following export options:
- Export Excel – Download a spreadsheet version of the full timetable. Once downloaded, you can filter by year group within the Excel file.
- Export PDF – Retains the original ‘Print Draft Timetable’ PDF options: Compact, Large, and Canvas.
Note: The Export Excel option is only available in the Year Group / Detailed view.
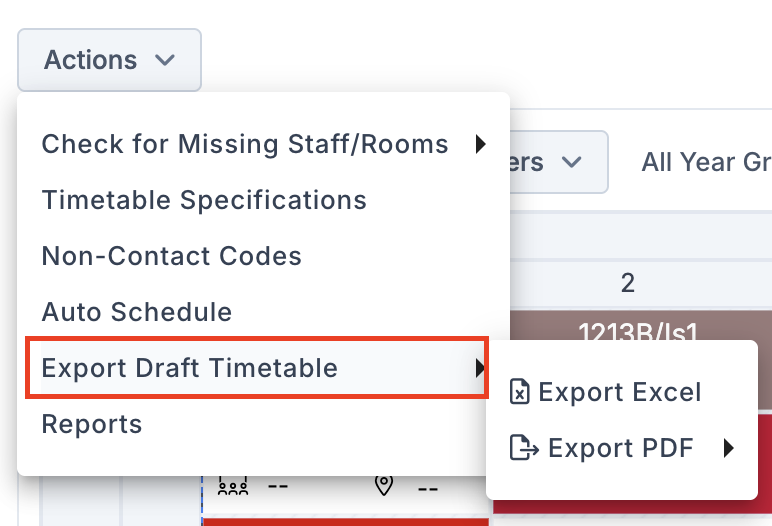
Export Excel
The Export Excel option downloads a spreadsheet version of the timetable.
The spreadsheet includes all timetable weeks for every year group and provides filtering options within the file.
The export contains the following information:
- Year Group
- Band
- Class Name
- Staff Code
- Additional Staff
- Room
- Subject
Once downloaded, you can use the spreadsheet filters to view specific year groups and timetable data.
- Note: The filters for Year Group, Band, and Detail are located in the first row of the spreadsheet. When filters are applied, the period headers may be hidden. To keep the period headers visible, you can manually move the filters to the second row within the spreadsheet.
Export PDF
The Export PDF option provides three layout formats:
- Compact
- Large
- Canvas
Compact
- The timetable is divided into A6 sections, with four sections printed on each A4 page. This layout removes gaps between timetable sections.
- Page orientation is automatically determined based on the number of rows:
- More than 21 rows – Portrait
- 21 rows or fewer – Landscape
- 15 rows or fewer – Portrait
- 10 rows or fewer – Landscape
Large
- The entire timetable canvas is printed across multiple A4 pages.
- Where the timetable exceeds the size of a single page, the content continues onto additional pages.
- Page orientation is based on the overall dimensions of the timetable:
- If the canvas height is greater than its width, pages are printed in Portrait orientation.
- If the canvas width is greater than or equal to its height, pages are printed in Landscape orientation.
Canvas
- The entire timetable canvas is printed on a single page.
- The page is automatically sized to fit the full timetable without splitting the content across multiple pages.
Go to Modules > wTimetable to open Projects. Click on your Project Name, then click on your Timetable. Click on Scheduling.
Go to Actions > Reports.
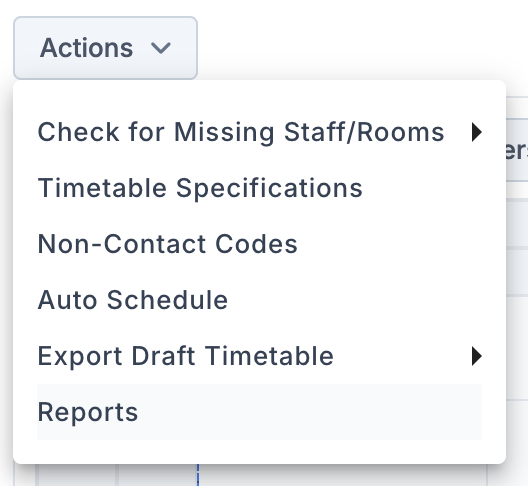
Subject Timetables
The Subject Timetables report allows users to analyse subject timetables by staff and room.
Select Entities:
- Generate timetable reports by Staff or Room.
- Select Subjects and/or Departments:
- Select individual Subjects, an entire Department, or all Departments at once.
- Search for a Department/Subject.
- Clear All to clear selection.
Export Options:
- Show Unassigned Classes – switch this toggle on to also show classes where staff members are unassigned (when generating a staff timetable) or where rooms are unassigned (when generating a room timetable).
- Click Preview to preview the export before downloading.
- Click Export to download an Excel version for further analysis and sharing.
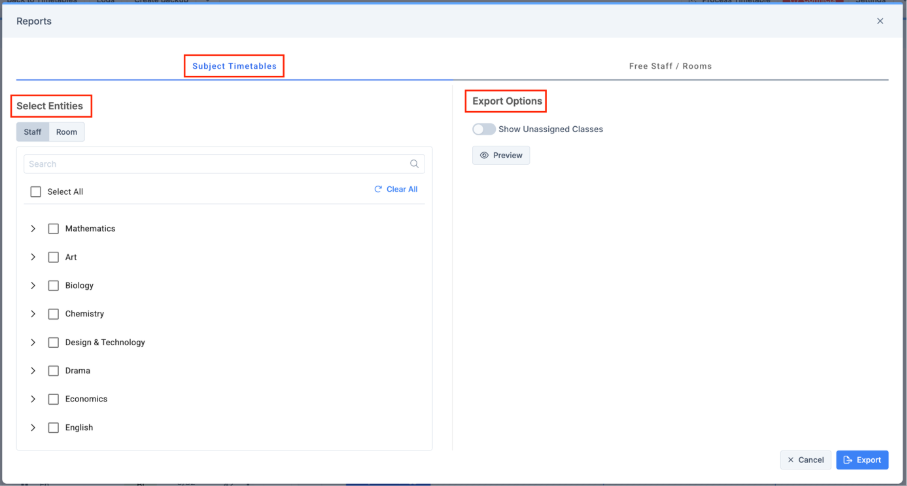
Report:
- Unassigned Staff or Rooms appear at the beginning of the report.
- Staff/Rooms will appear on multiple rows if there are timetable clashes.
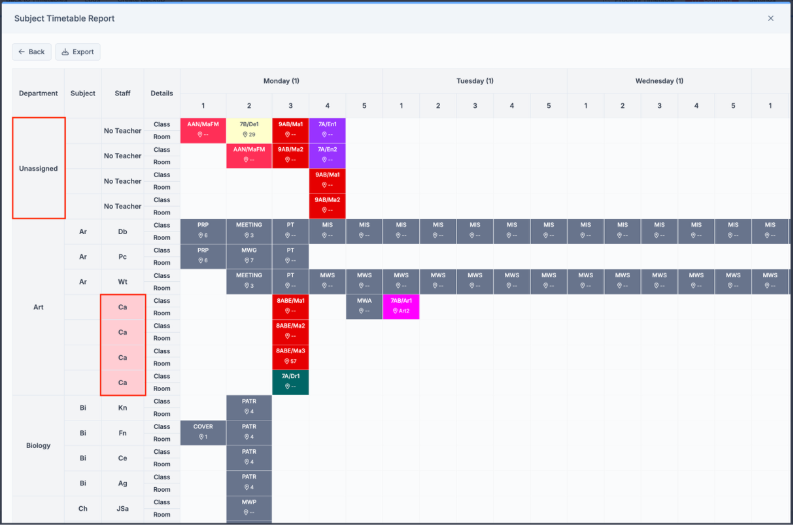
- The Subject column displays the subject linked to Staff/Rooms, as defined in the Relationships page. If a staff member/room is associated with subjects across multiple departments, their timetable will appear under each relevant Subject/Department.
- If a staff member has a scheduled session for a subject but no subject relationship set, the Subject column will display as blank.
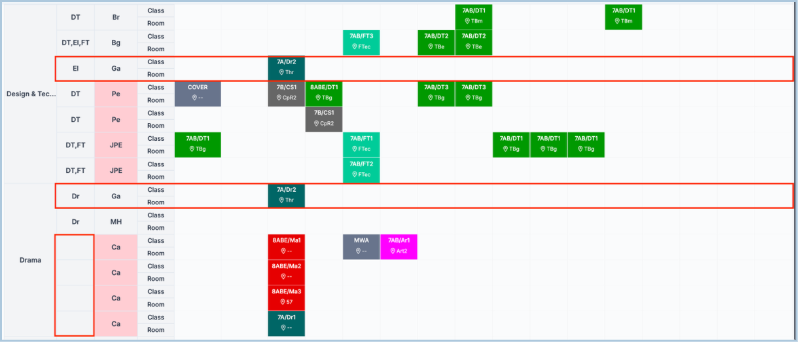
- For subjects classified as No Department in Select Entities, the Subject name will appear in both the Subject and Department columns.
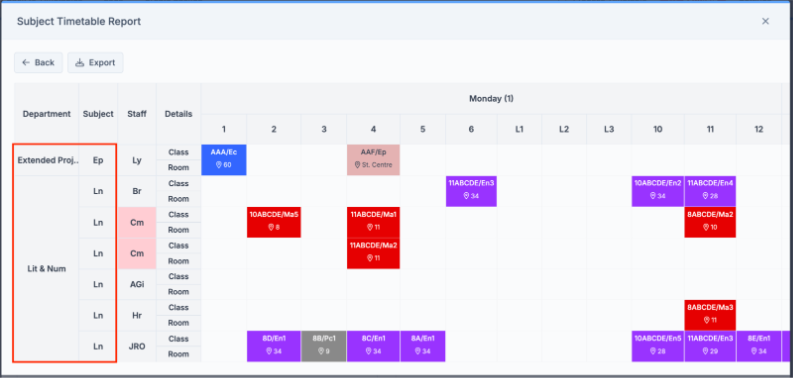
Go to Modules > wTimetable to open Projects. Click on your Project Name, then click on your Timetable. Click on Scheduling.
Go to Actions > Reports.
The Individual Timetable report allows users to analyse Staff and Room timetables by department, subject and teacher.
Select Entities
- Generate timetable reports by Staff or Room.
- Staff – List Teachers by: Department, Subject, or Teacher
- Room – List Rooms by: Department, Subject, or Room
- Use the Search field to narrow down the selection.
- Use Clear All to clear selection.
Export Options
- Display Periods across top or Days across top to determine the layout of the report.
- Click Preview to preview the export before downloading.
- Click Export to download a pdf version for sharing.
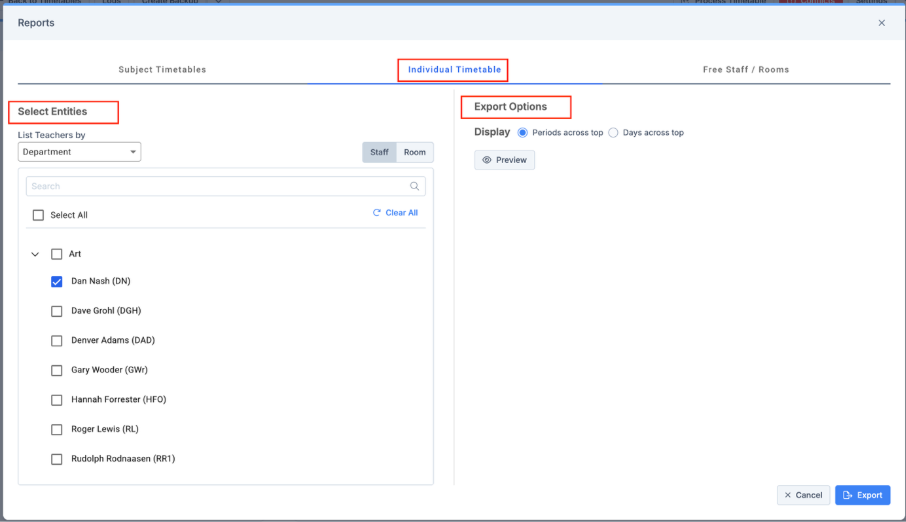
Report
- One timetable is shown per staff member or room per page.
- The Staff Timetable or Room Timetable report header appears on the right-hand side of the report.
- Use the dropdown menu or the navigation arrows to switch between timetables.
- In the Staff timetable, each session displays the classcode, room code and subject code.
- Conflicts are outlined with a dashed red border.
- Only teaching periods are displayed in the columns.
- Display Periods across top or Days across top to determine the layout of the report.
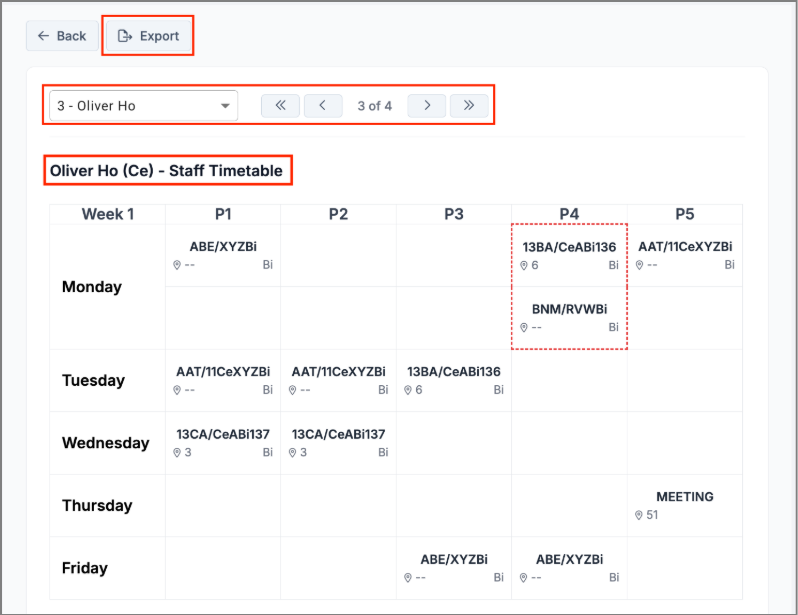
- In the Room timetable, each session displays the class, staff code and subject code.
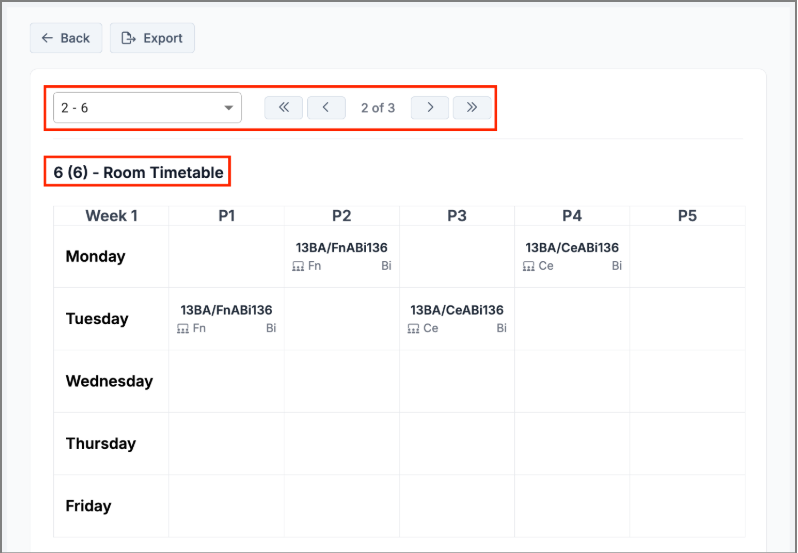
- Click Export to export to pdf. All exported PDF files include a footer displaying the date, time, and page number. A success message is now shown each time a report is successfully exported.
- Split Lunch is indicated with the ‘L’ icon in the period headers, and a session this duplicated over a split lunch is indicated with the ‘duplicate’ icon.

Go to Modules > wTimetable to open Projects. Click on your Project Name, then click on your Timetable. Click on Scheduling.
Go to Actions > Reports.
The Free Staff/Rooms report enables users to view available periods for staff (by subject) and for rooms.
- Filters (subjects):
- All subjects are displayed by default.
- Select individual Subjects, or all Subjects at once.
- Clear All to clear selection.
- Search for a Subject.
- Show Available Staff – toggle is switched on by default to show only free Staff with available Contact Time. Switch off to see all free staff.
- Report – Select either Staff or Room.
- Weeks -If there is more than one week in the timetable, you can switch between the individual weeks.
- Columns (periods):
- All Periods are displayed by default.
- Select individual Periods, all Day, or all Periods at once.
- Search for a column.
- Clear All to clear selection.
- Export – Click to download an Excel version for further analysis and sharing.
- Hovering over a staff member displays:
- Assigned Contact/Total Contact Time in the header
- Assigned Subject Contact Time/Total Subject Contact Time for each subject
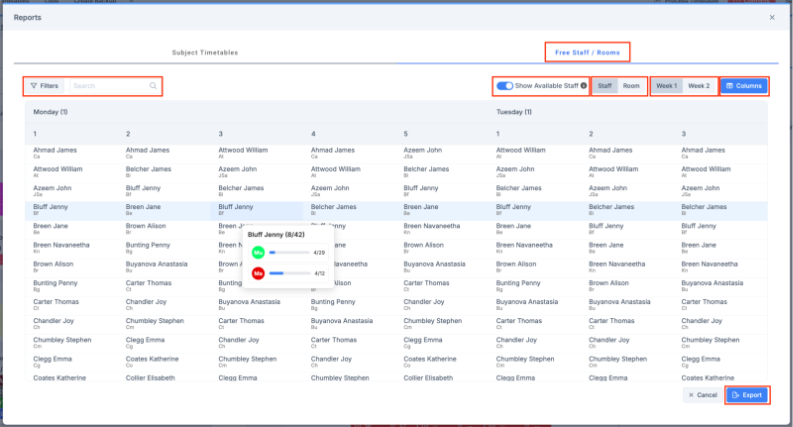
Processing the Timetable
The Process Timetable button publishes the Timetable data back to the MIS. All Conflicts must be resolved before this process can be carried out. The following Project entities are exported and saved in the corresponding MIS tables:
- Year Groups
- Subjects
- Departments
- Staff members
- Rooms
- Non-Contact Codes
Go to Modules > wTimetable to open Projects. Click on your Project Name, then click on your Timetable.
The red Process Timetable button is visible on top right of the Scheduling tab.

Click on the Process Timetable button.
If there are any unresolved Conflicts, the user will see the following popup:
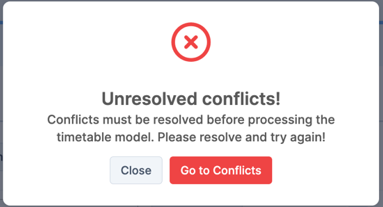
Click Go to Conflicts which will open the Conflicts popup and the user will need to resolve the outstanding Conflicts.
Click on the Process Timetable button again.
If there are any unscheduled sessions, the user will see the following popup:
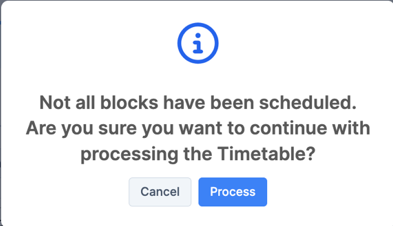
Click Process to start the publish flow.
Observe the Process Timetable progress bar reach 100%, the user will see the following popup:
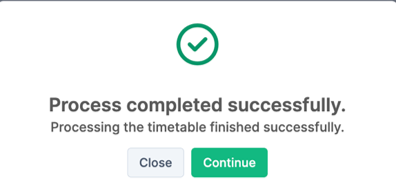
Clicking Close will return the user to the Timetables page. Processed Timetables receive a Processed flag in the Status column and Edit action is disabled.

Clicking Continue will open, in a new tab, Modules > Curriculum > Routines > Apply Timetable Model page. Select the Timetable Model from the dropdown list.
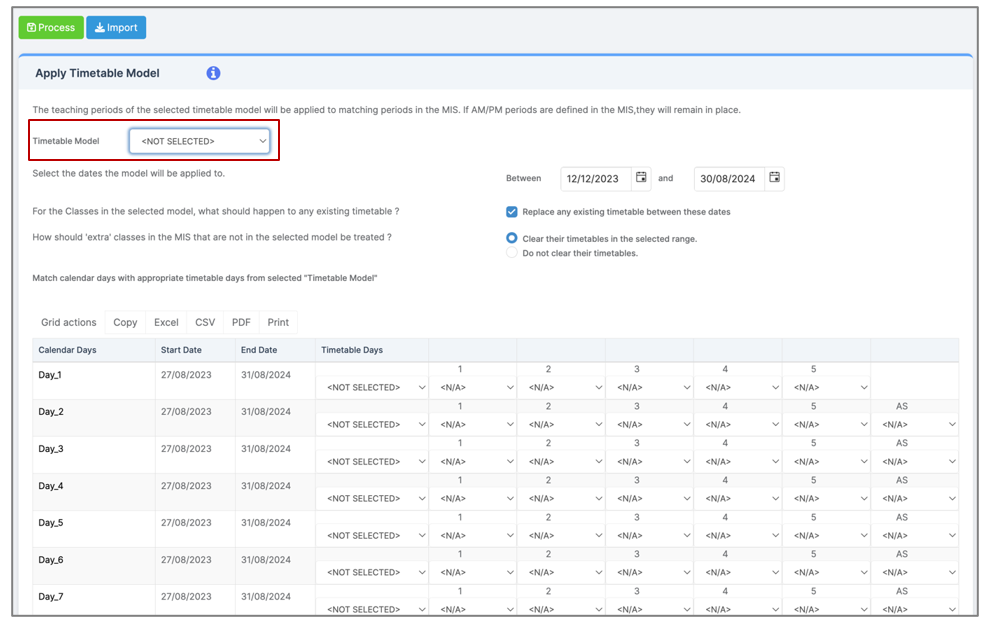
- Tip: If the user receives a Processing Failed! message after step 8, click View Details in the message to open the Process Failed popup to see the conflicting values. Correct the conflicting entities or remove them from the Timetable and go back to step 5.
Note: Published timetables have to be copied if we would like to view or edit them. If we copy a published timetable, we won’t include the “Processed” flag for the copy.
For more information on how to import the processed timetable, refer to How to Apply a Timetable Model using Bromcom Timetable Software.
Next Steps
Continue to Advanced Model Scenarios for guidance on approaching a range of scenarios that may be encountered during the timetable build process.