Note: All pages below are subject to having relevant Roles and Permissions.
Exams Officers can use this article to Import Candidate UCIs (unique candidate identifier) from a downloadable template.
Every Candidate has one 13-character code that’s unique to them. It’s used to collect results for each Candidate across time and different exam boards, schools or colleges.
All students need a UCI. You need to make sure that you add a UCI to every Exam Entry you make.
Note: The Candidates must first be assigned to the required Exam Season before you can Import the Candidate UCIs. See How to Add Internal Candidates.
See: Examinations for other guidance.
Go to Modules>Examinations>Manage Candidates.

Note the Active Season on the top right, this can be changed from the Season drop down if required.

First select the Candidates you wish to Import UCIs for. You can use the filter cups in the column heading to filter the Candidates without an Exam Number or type the Candidate Name into the top right Search Names box.
Or as in this example Select All has been selected from the Selections drop down.

Then from the Actions drop down select Assign UCI & Candidate Numbers.

Then tick Assign by File and then click Download Template.

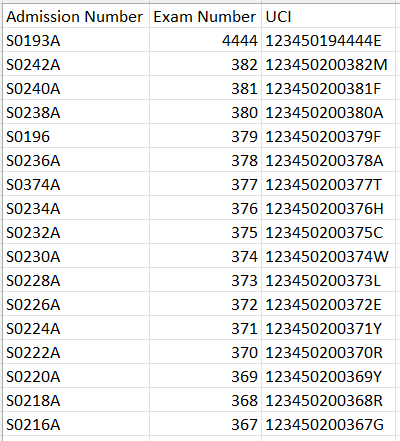
The downloaded template contains 3 columns; Admission Number, Exam Number and UCI.
Note is this example all Candidates have already got an Exam Number and UCI, for Candidates without either or both of these fields populated in the template simply type in the Exam Number and/or UCI and save the downloaded template.

Once you have populated the template with the Exam Numbers/UCIs click Upload in the Assign UCI & Candidate Numbers panel, locate the file.

Click on the csv File in the Files box.
Choose to Assign Candidate Numbers and/or Assign UCIs
Click Save.
Then a pop up will appear to confirm the Candidate Details, assigned Exam Number and assigned UCI , in this example only the Candidate Number has been assigned.

Click Close to complete the process.
