
In this guide, we will show you how to get started with the Options module, by creating an Options Setup.
Prerequisites: You must have the Options Module licenced on your MIS. The Options Module is available for all G Cloud 13 One Stop Shop customers and you can get this licenced by raising a helpdesk case or emailing onboarding@bromcom.com.
Examples: the screenshots in this guide are for illustration purposes only.
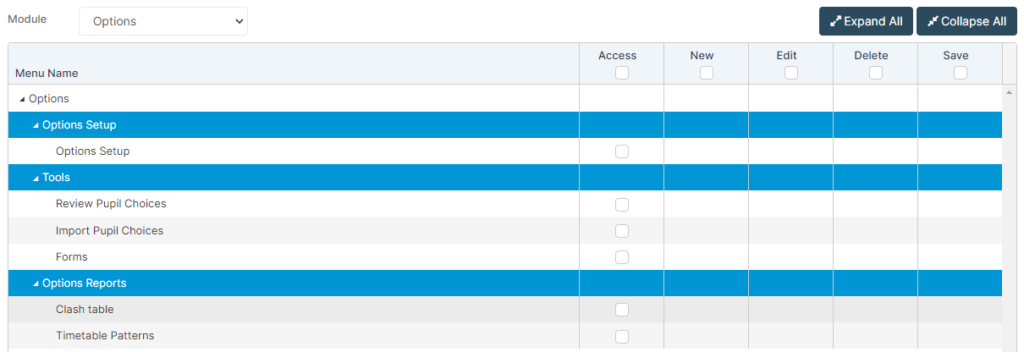
Access: Depending on which Options functions you would like staff to see/access, all of the relevant permissions are located in the Options Module of Config>Setup>Roles & Permissions (after it has been licensed).
See also : How to Import Pupil Choices and How to Review Pupil Choices
This guide is most applicable to Curriculum Managers, Exam Officers, Timetablers and any other users involved with GCSE/Post 16 Options. This guide will cover the Options Setup page specifically which is made up of the following sections;
Once the Options module has been licensed and permissions are granted, you can access it from the side Menu. The Options module is currently broken down into three main areas;
- Options Reports
- Options Setup
- Tools

As stated above, this guide will focus on the Option Setup page.
Options Setup
Go to Modules>Options>Options Setup.
Copy or Delete
- Copy: Once you have set up an Options Setup you will be able to Copy the Setup in the example you want to re-use one with an Expired Status from a previous academic year.
- Delete: use this in the example you have created a Setup however, you want to delete it. PLEASE BE AWARE IF A SETUP IS LIVE AND PUPILS HAVE MADE CHOICES THE DELETE WILL DELETE ALL THEIR CHOICES.
Initially, the page will be blank so you need to press the top left New.

This opens a pop out wizard, which is made up of five steps. Each step will be explained as you read through the guide.
1 – Setup Details
Setup Details is where you create the Options record and define the following data (any fields marked with * are mandatory);
- Name – The name of the Options record. (Please keep in mind Students/Parents will see this).
- Studies Type* – The Study type the Options relate to (GCSE/Post 16). GCSE gives access to Year 8 and Year 9 and Post 16 gives access to Year 11 students with the option to add applicants.
- Year Group* – The Year Group that the Options are being offered to.
- Options Window Open Date* – Start Date that the Options are available from for Students and/or Parents to make choices. You can come back into the Setup wizard and change this date if needed.
- Options Window Close Date* – End Date that the Options are available until for Students and/or Parents to make choices. You can add choices after this date from within Bromcom yourself. You can come back into the Setup wizard and change this date if needed
- Description – A Description of the Options record. This Description is not visible to parents or students
- Dry Run – A Dry Run allows the user to use a cohort more than once in the academic year but the Setup cannot overlap. For example if a school runs options for Y9 from 01/01/2023 to 10/01/2023 they cannot use the students for another Setup that academic year unless Dry Run is selected. Logically this would come before the main options to test what student preferences are in advance. Essentially if Dry Run is not ticked you can only add a Student to One Setup however, if Dry Run is ticked you can add Students to multiple Setups. So Dry Run can be used in the example you want to practice and then have multiple Setups for the same Students.
- Save: this allows the user to save the step without having to use the Next button, this will close the popup. (Clicking Next will save before you move to the next step as usual).
- The Student Choices to be made using Form checkbox will be a default setting. This will allow a school to have access to the Form customisation adding additional information and hyperlinks, even if the method of collection is through Student Portal or MCAS. Import, and Student Portal checkboxes can also be checked as required. It is not possible to untick Form.
- Each Form now requires the user to set a Total Main Choice and a Total Reserves Count which will then be used in the Setup Rules table in step 5 as a check.
So for example if you had the scenario below you would set this as Total Main Choice = 4 and Total Reserves Count = 2
- Student chooses 4 Options i.e. 1 subject from a Language Block, 1 from a Humanities Block and 1 from 2 Options Blocks
- Student chooses 1 reserve from each of the 2 Options Blocks

*Studies Type: select GCSE with option to choose Year 8 or Year 9 from the drop down as per the example below.

*Studies Type select Post 16 and choose on roll Year 11 students with the option in the next screen to add Post 16 applicants.

Student choices to be made using is where you define how the Options are to be submitted/recorded;
- Import – Requires you to manually record and Import Student choices from your own spreadsheet
- Form – Forms can be emailed to the Students, selected by Default, cannot be unticked, however you do not need to use Forms.
- Student Portal – Requires Students to complete their choices via Student Portal.
- MCAS – tick to unlock the following two options, the MCAS user can only submit the choices once
- View Only – Means the Options are only visible/for display on MCAS and cannot be submitted.
- Editable – Means the Options are Editable/can be submitted via MCAS.
Note: You can select more than one choice for how the Options are submitted/recorded if you wish. The Description box is not visible to parents or students, this is purely for your notes when creating the Setup.
- Legal Names or Preferred Names – users can choose between Legal Names (default) and Preferred Names for Students. This should be set at the beginning of the process.
Once these details are all entered, press Next.
2 – Select Pupils
Select Pupils is where you define which Pupils you are offering the Options to. Pupils can only be allocated to one Set Up unless Dry Run is selected.
It works by ticking the desired Pupils on the left side of the page and then using the right arrow in the centre of the page. This will move the desired Pupils over to the Selected pupils panel on the right.
If at a later date you have Students joining the school after you have created the Setup you can then come back in and edit the Setup and add the new Students in from Select Pupils.

On the Pupils drop down you have the option to choose either On Roll, Pre Admission or Applicant. Applicant is only available when Studies Type is set to Post 16

IMPORTANT NOTE:


Clicking Download Template will Download a PupilImport CSV file locally to your computer with 3 headings; Last name, First name and Date of Birth

Once you have completed the data in the 3 columns for the Applicants and saved the file as a CSV click the Import Pupils icon.
Note: The Post 16 – Options Setup process for importing Applicants will only import pupils that are not already in the system, therefore preventing duplicate entries. Only unique Last Name, First Name, and DOB combinations will be imported. Use the Others page to add a new individual Applicant where duplicates are actually different students.
Importing the CSV file will immediately add the Pupils to show in Others>Type = Applicant as per the example below;

The page will now show the Pupils in left hand list ready to selected and added to the Selected Pupils List

Note: It is possible for Pupils to be reused or be part of multiple Options Records.
Once you have chosen your Selected Pupils, press Next.
3 – Subject Configuration
Subject Configuration is where you add the Subjects you will be offering in the Options, either as a Core or Option(al) Subject.
If you want to add a new Subject that hasn’t been taught in your school before you would need to first add the Subject in order for it to appear in the Add Subjects list see How to Create a New Subject.
Users will be able to set up rules when Adding Subjects however, you must have added subjects first before setting the rules.
Click Add Subject

Once you press Add Subjects, tick the desired Subjects and then click Add Subjects on the bottom right to confirm the selection.

To remove an added Subject, use the bin icon under the Actions heading against the Subject.

Once the desired Subjects are added and you have marked them as Core or Option, press Next.

Subject Rules
Once you have added the Subjects you will be able to set up the rules simply click Add Subjects then choose the required Combination Type from the drop down;

- Disallowed Combinations – allows the user to create a group of subjects that cannot be chosen together, even if they are in different setup option groups, with the following rules:
- Core subjects cannot be selected in combinations
- Multiple Disallowed Combinations are permitted
- A subject can only belong to one Disallowed Combination
Note: Users can now specify a subject that is already selected in a subject group – to be a reserve in another group.
In the example below Disallowed Combination has been chosen and Business Double, and Business Cert have been selected, therefore these subjects cannot be chosen together.
Click Add Subjects to confirm the Combination Type.

A Disallowed flag will be added to the Combination column for each subject in the group, with a count to distinguish the combination from other groups.
Note: Weighting (read only) has been added as a value of one in preparation of a new weighting functionality where some subjects count as more than one choice.
- Dependent Combinations – select the Main Subject and the Dependent Subject with the following rules:
- Core subjects cannot be selected in combinations
- Multiple subjects could be dependent on the same Main Subject
- Dependent Subject can also be a Main Subject for a 3rd Subject
- Dependent Subject cannot be the Dependent Subject for 2 different Main Subjects
In the example below Further Mathematics is Dependant on Mathematics, so for example for Post 16 Students must have chosen Mathematics if they want to study Further Mathematics
A Dependency flag will be added to the Combination column for the Dependent Subject only, with a count to distinguish the combination from other dependencies.
- Before the setup has gone live, users will be able to edit and add to combinations by selecting the edit icon in the Actions column against a subject in that combination. Combinations can be removed by simply deleting the Subjects using the edit function.
Note: Subjects can be deleted if they are not part of a combination.
4 – Subject Grouping
Subject Grouping is where you can sort the previously added Subjects in to Subject Groups. You must have a minimum of one Group and a Subject must be in a Group to be available as an Options choice.
For example you could have the following Groups
- a Group called Languages where Students have to pick a Language ,
- a Group called Humanities where Students have to pick a language
- and then 2 Options Blocks where Students have to pick one Subject
You can have a Subject in more than one Group in the example a Student wanted to study French and German so they could choose French from the Languages Group and German from one of the Options Groups.
In Group Name type the desired Group Name, select which Subjects you wish to add to the Subject Group and use the tick to confirm your selections.

Once you have created your Groups, press Create.

Fixed or Flexible.
This relates to how the Students choose their Options;
Fixed: this would be a tick box, so in the example you have a Languages Subject Group where the Students have to choose one of 2 Subjects they would simply tick either Subject.
Flexible: this is where there will be a list of all the available Subjects in a Subject Group and the Students can choose a number to define their choices for example;
- Graphics: choose number 1 as their first choice
- Textiles: choose number 2 as their second choice
- History: choose R1 as their reserve
5 – Setup Rules
The final stage of the process is Setup Rules. This is where you would specify how the Options can be picked based on how they have been Grouped.
The Rules Detail column will display the rules set using Total Choice Count, Total Reserves Count, Disallowed Combinations, and Dependent Combinations.
You can choose from a selection of Rules at the bottom of the page, please keep in mind that Parents may also have access to this if you selected MCAS at the start of the process;
- Pick N Choices from Group X – Allows the student to pick N Choices from within a Subject Group (N is a number that you can define).
- Choose only 1 item from Group X – Allows the student to select one Option from the Subject Group (you can have multiple Subject Groups).
- Choose at least 1 item from Group X – Allows the student to select at least one Item from the Subject Group (You can choose which Subject Group, X refers to).
- Choose all items from Group X or none at all – Allows the student to select all or none of the items from the chosen Subject Group.
- Choose 1 item from each Group – Allows the student to select one Option from each Subject Group (this selection is good if the Options are grouped by Departments like Sports or Science ). If selected this will default the Groups for this rule to be ALL Groups so there is no requirement to set up individually.
- Ignore maximum of N Groups – Allows the student to ignore (skip) making choices for a specific number of Subject Groups. This would be normally used for 6th form where there may be 5 Subject Groups but only 3 Options to choose.
Once you have added a Rule, use the tick on the far right to confirm the selection.

Once you are happy with your Rule(s), press Create, the setup will remain in draft until the user has clicked Create. Once Create has been selected, the button will switch to read Update.
Note: Clicking Update is required to activate any further changes to the setup.
If further rules are added in step 5 which do not match the setup rules, when a user selects Create/Update – a message will appear to let the user know that the setup cannot be created.
Because the rules allow multiple possibilities, some combinations may cause problems but may still be possible depending on the combination the student selects, according to groups being created, users may see this warning message.