
Timetable Patterns are ‘alternative suggestions’ for how to assign your classes to the blocks, with the Level of Satisfaction for each alternative pattern shown.
In this guide, we will show you how to use Options Timetable Patterns to;
- View Timetable Patterns
- Actions
- Automatic Pattern
- Manual Pattern
- View Details
- Pupil Review
- Change Block Names
- View and Amend Students, Subjects and Classes
- Set a pattern as Final
Prerequisites: You must have the Options Module licenced on your MIS. The Options Module is available for all G Cloud 13 One Stop Shop customers and you can get this licenced by emailing onboarding@bromcom.com
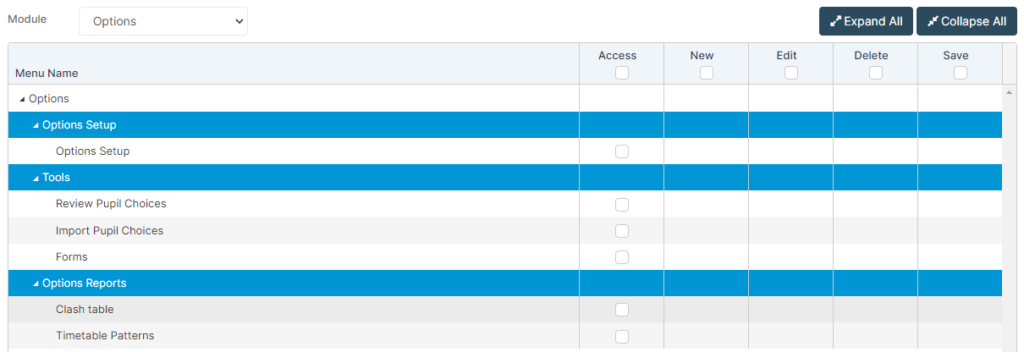
Access: Depending on which Options functions you would like staff to see/access, all of the relevant permissions are located in the Options Module of Config>Setup>Roles & Permissions (after it has been licensed).
See also :
- How to use the Options Set Up Page,
- How to Import Pupil Choices,
- How to Review Pupil Choices
- How to use the Clash Table
View Timetable Patterns
Go to Modules>Options>Options Reports>Timetable Patterns

The Timetable Pattern page shows the Name, Year group, Start Date – End Date, Number of submissions made, Status ,and Actions for each Options Set Up.

Type in the Column Headers to Search for Name, Year and Start Date – End Date.
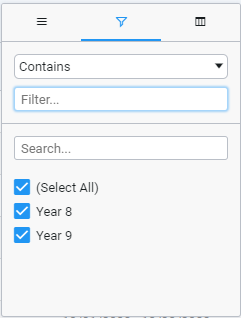
Use the Filter cups next to Column Headings to further Filter within the Table.

Click the burger stack symbol to the right of each Column Header.

From here you can Pin the Column Left, Right or No Pin.
Autosize This Column or All Columns and Reset Columns.

Use the Filter Symbol to further Filter using the dropdown.
Use the Grid Symbol to Hide/Unhide Columns in Timetable Patterns.

Actions
When the Status column shows Settings Required the eye symbol which = View Patterns will not be editable.
Once the Patterns have been set the Status will show Complete with the option to both View Patterns or View/Amend Timetable Patterns settings.

Manual and Automatic Timetable Patterns
For both automatic and manual pattern generation, enhancements have been made to improve the balancing of blocks:
- The process will aim, as a minimum, to generate an appropriate number of classes for each block to ensure all students can be allocated to a class without exceeding the maximum class limit.
Note: In certain circumstances the system will allow a tolerance of 10% +1 for class assignments.
- For example, 100 students selecting 3 subjects in 3 blocks with a class size of 20 min and 30 max. The system will aim to generate between 4 and 5 classes to allow students to be assigned, according to the distribution of student choices.
- Balance the distribution of student gender allocated to classes for a subject, where multiple classes exist, but not to the detriment of the assignment of the students if this improves the overall satisfaction rate.
- For example, a subject has 60 students across 2 classes, of which 40 are girls and 20 boys, the target = 20 girls and 10 boys in each class.
Automatic Pattern
Click the Settings cog in the Actions column to View, Add or Amend an Automatic or Manual Pattern.

The example screenshots below are for an Automatic Pattern.
Generation – Settings.
From here you can amend the following;
- Number of Blocks
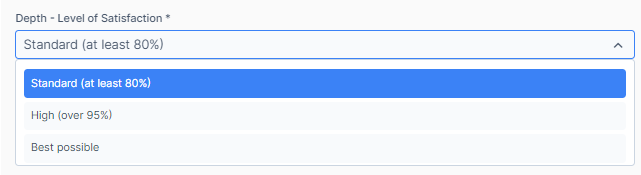
- Depth – Level of Satisfaction (using a dropdown choice)
- Number of Patterns (this must be between 3 and 6).

When you are happy with the Generation Settings Click Next.
Subjects in Blocks
The toggle Subjects in Blocks (default off)for Automatic Pattern > Generation – Settings popup which when toggled on will keep chosen Subjects in different blocks to each other, to prevent staffing issues later in the process.

When the Subjects in Blocks toggle is set to on, the popup expands to reveal the Subject Relationship table. Clicking Add New takes the user to Step 1 General Settings which requires two subjects to be linked, where Subject 1 must not be in the same block as Subject 2.
Step 2 Group Settings per Subject works as before.
Note:
- Number of Blocks should be set to greater than 1.
- Multiple Subject Relationships can be added.
- Where a Subject has multiple classes the Subject can be selected for Subject 1 and Subject 2, so that they are automatically added to different blocks.
Users will see the Subjects chosen have been added to different blocks.
Modules > Options > Timetable Patterns > View Patterns > View Details > Pupil Review
For both Automatic and Manual pattern generation, enhancements have been made to improve the balancing of blocks:
- The distribution to classes will be balanced by key attributes: Gender, SEN, PP, and EAL so that no classes are overloaded with a particular type of student.
These key attributes mentioned above have been added to the Pupil Review popup, which can be exported using the Export button to export by Subject and Block, or by right clicking in the table to export the Pupil Review grid.
Use the Group Settings per Subject to filter on Subject and view and/or amend the Min Size of Groups, Max Size of Groups, and Max Number of Groups for each Subject. The Subjects can be fine tuned just before generating if for example you need a 2nd Chemistry Group.
Click Generate.

You can now click View Details showing the Subjects within each Block and the Level of Satisfaction.
Manual Pattern
Click the settings cog in the Actions column and select Manual Pattern.

Now you will see Generation – Settings.
From here you can amend the Number of Blocks, Depth – Level of Satisfaction (using a dropdown) and Number of Patterns (this must be between 3 and 6).

Click Next.
Use the Group Settings per Subject to filter on Subject and view and/or amend the Min Size of Groups, Max Size of Groups, and Max Number of Groups for each Subject. The Subjects can be fine tuned just before generating if for example you need a 2nd Chemistry Group.
Click New.

Creating a manual pattern will overwrite any existing pattern. Click OK.

A blank View Timetable Patterns page will appear.
Click on View Details, for each pattern, which takes you to the Block Pattern Design popup where you can start to build the pattern.

In the Block Pattern Design page, the first stage is to click the Subject Information button first to assign Subject Classes to Blocks as required.

Assign Subjects to Blocks by double clicking in the Block cell and then selecting a Block from the dropdown.
Note: The Class Name column updates as Blocks are assigned.

Click Apply once the required Subjects have been assigned to Blocks.

This will prompt the user to confirm OK that Subject Classes with Blocks will be added to the Block design, and in the next step users will complete the Pattern.

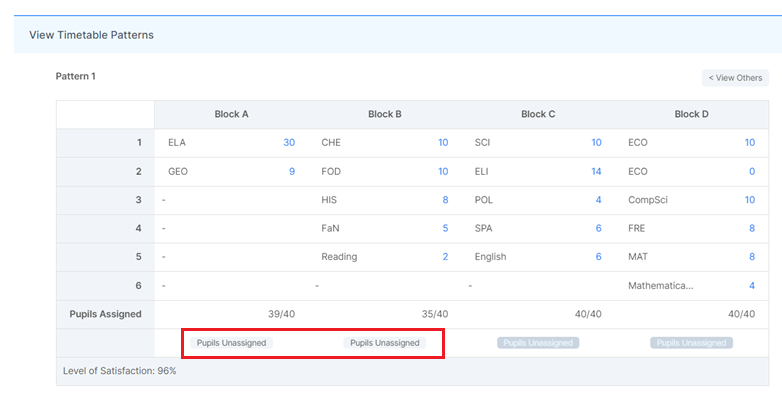
Back in the Block Pattern Design page, the second stage is to click Pupils Unassigned, for each Block one at a time.

Assign Students to Subject Classes from the Unassigned Subjects column to lock them into the class and protect them. Do this by clicking anywhere in the red text, select the Subject from the dropdown and click Save.
Note: Students who have Subjects assigned to them will drop off the Pupils Unassigned list.
Click Back to repeat for the next Block.

Each pattern can be designed independently, click the Generate button and the pattern will generate just for the current pattern.
Any Subjects unassigned to a Block will be added and populated automatically during this process. Generation is complete and the user is returned to the Block Pattern Design popup, where Generate is greyed out, click View Others to generate the remaining patterns.

View Details
Click the eye symbol to see View Patterns and choose your Timetable Pattern.


Click View Details, this shows Subject, Block, Student Numbers and any unassigned Students

Pupil Review Improvements (March 2024)
When viewing an individual pattern, click on the Pupil Review button in the View Timetable Patterns popup. Clicking on this button will open the new Pupil Review page.
In the Pupil Review page, users can see class assignment by block for each student, where they can:
- Assign Subjects to Blocks by clicking on the pencil icon.
- Lock the class (Shuffle ignores locked classes).
- Remove a class.
- Export the grid to Excel.
Change Block Names
Change the Block Name by clicking on the Pencil icon next to the Block

View and Amend Students, Subjects and Classes
View and Amend Student Choices – Click on any subject count (number will be in red if it is over the subject setting but within 10% (by default) to see Students and amend choices.

Click on the 3 dots to the right of each class to Move the class to another Block , Remove Students or Remove Subject.

Remove Students from a Subject. Students can be removed from a Subject in a Block by clicking on the row in the Student count column.
Tick the check box against the Student’s name and click Remove. Those Students will be added back to the Pupils Unassigned list for that Block.

View Unassigned Pupils. This will display all the Students whose choices cannot be fulfilled in that block
Use Reserve Choices. This switch enables the user to add a Reserve choice which was to the unassigned subject through the subject group at setup

Click Subject Information in the selected Pattern

You will then see a page showing Subject, Number of Class, Block, Class Name, Student Count, Unassigned, M/F split and Actions.

Export Subject Information. Click Export and from the dropdown Export Allocations to see the Student List with Class Information
Export Example

Export Allocation Example

Click on Student Count or Unassigned to see a Student List

Set a Timetable Pattern as Final
Go to Modules > Options > Options Reports > Timetable Patterns.

Users can set a Timetable Pattern as final by selecting the radio button for that pattern and clicking Set as Final.
Where 100% student assignment is not achieved in the selected pattern, users will be asked if they want to continue, click Proceed.
A Final badge is displayed next to the pattern. To remove Final status, users should select the pattern where Final is already set, and click Remove Final.
Note: A pattern should only be Set as Final once all Students have been assigned and the user is satisfied this will be the final pattern. Where set ups need to be combined to produce the final pattern, future development will also provide a single cohort to this end.