Use this guide to produce an Individual Student Report to be sent to Parents. These Individual Reports can then be either printed off, published to MyChildAtSchool, the Student Portal or emailed to Parents.
For information on managing the reports once they have been created see How to Manage the Document Management Server (DMS).
Access: The minimum permissions required to access Quick Reports can be found in the Reporting module from within Config > Setup > Roles and Permissions.

Note: Permissions for individual Report Domains are managed through Report Design Permissions.

IMPORTANT: There are two ways to produce a Web Merge document using either the Student (Basic) domain or the Assessment Results domain in Quick Reports
For ease of use, the Students Basic Domain method is recommended rather than the Assessment Results domain.
Creating a Report to Parents is a 6 step progress;
- Setting up a Report
- Including Attendance Data
- Including Assessment Data
- Creating a Template
- Running a Web Merge
- Preview Data
Setting up a Report
Go to Reports > Quick Report > Quick Report

Next, select the Domain from the dropdown. For most Web Merge reports Students (Basic) will contain the required information

A report created in Students (Basic) will automatically include Preferred first name, Preferred Last Name, Admission Number and Year Group Name. Other required data items can be added to the report either by scrolling through the list on the left, ticking them and then clicking the Add button at the top.

Alternatively, click the Magnifying Glass and search for the Data Item, then select it from the list to add it to the report.

In order to publish the document to MCAS the Student ID data item must be included in the report. If the Students (Basic) domain is being used, this Data Item is already added to the report but will be hidden by default. To unhide it turn on Advanced Mode in the top left hand corner.

Then click the red eye icon on the right hand side of the Student ID Data Item. The eye will disappear, indicating the column is now displaying.

To add Attendance Data or Assessment Data to the report go to the Including Attendance Data and Including Assessment Data sections of this guide.
Once all the required information has been added to the report, click Save in the top left hand corner.

In Save Quick Report;
- Enter a name for the report in the Report Title field
- Select a folder to Save the report to
- Check that the Permissions for the report are correct and whether the report will export as Landscape or Portrait (Note: this does not apply to the Web Merge document, only if you export the report itself)
Once complete, click Save.

Including Attendance Data
To include Attendance Data we would recommend selecting the Students (Basic) domain from the dropdown at the top.

Then, turn on the Advanced Mode toggle in the top right hand corner.

Then, to add the required Attendance information, click the + button and select Add Attendance Summary.

In Add Attendance Summary
- Name the column in the Column Label field
- Select whether the attendance data need to be Attendance Meaning or Attendance Mark.
- Select which Attendance Meaning or Mark
- Select Period Types to be included in the calculation
- Choose to display a Percentage or a Count.
- In the bottom half of the pop-up select which Interval and Relative Year to be include in the figures. If selecting anything other than Custom Date Range then the Date Range fields will be greyed out.
Once complete click Add.

Including Assessment Data
To include Assessment Data we would recommend selecting the Students (Basic) domain from the dropdown at the top.
Then, turn on the Advanced Mode toggle in the top right hand corner.
To add the required Assessment information, click the + button and select Add Assessment Results.

In the pop-up that appears, first select whether to use Tracker Assessments or Stage Assessments

If Tracker Assessment is selected then the Assessment Type, Term, Year Group and Subjects need to be defined.
Note: Try to only include the Assessment Types, Terms, Year Groups and Subjects needed in the report as including too many fields can affect the performance of the report and the speed of the Web Merge process .

Then choose the Assessment Attribute to include in the report.

If needed tick Grade Colour turn the Show Grade Colour toggle on.

Finally, choose what order the columns should appear in on the report. Choose to order either By Assessment Type or By Subject

To add Stage Assessment information to the report, select the Stage Assessment Tab.

You then need to select the Stage, Subjects and Components you would like to add to the report, you also have the option to select a Method and Res Qual if you would like to further refine the results but these are not mandatory.
Once you’re happy, click Add.

If you then turn off the toggle for Advanced Mode in the top right hand corner you’ll see that the assessment data has been added to the report. For Tracker Assessments the column labels will automatically be formatted Assessment Attribute – Assessment Type – Term – Year Group – Subject, for Stage Assessments the column header will be the name of the Component. However, you can rename them by right clicking on the column heading and selecting Edit.

Then change the Column Label and click OK to save.

Creating A Template
You will need to create your Web Merge template as a Word Document. Any information that you would like to be read from a field in the report should be contained within brackets for example for a Students Preferred First Name you could use <<preferredfirstname>>.
For the Web Merge process to work, the Word Document must contain tags, such as <<text>> Uploading a blank document with no Student information is not supported.
IMPORTANT : Please be aware the merge fields do not work if placed in the Header or Footer section of the Word Template, fields must be placed in the main body of the word template

When including Assessment Data in the report, if at all possible we would advise that you use the column header as the tag to enable the system to map the fields automatically. For example if you are including the Target Grade for English in the Spring Term for Year 7 Students, you could use <<Result-Target-Spring-7-English>> . However, this is not necessary as you will be able to map them manually in the next step.
Running a Web Merge
When you’re ready to run your Web Merge report, go to Reports > Quick Report > View Reports.

Select the folder that you saved the report in from the menu on the right, locate the report and select it using the tick box on the left and then press Run.

Preview Data
When the report initially loads it will be in Preview Data mode. This allows the report to run faster but limits you to the first 500 records, for larger reports you will need to turn this off using the toggle in the top right hand corner.
IMPORTANT : Any Exports and scheduled outputs will also be limited when Preview Data is enabled, users must turn it off to export the full dataset.

If you would like to filter to only specific students, hover over the column header that you would like to filter on and click the 3 lines.

In the box that appears, you can use the dropdown, the search box and the tick boxes to refine your results to just the students you would like to run the report for. Once you’ve selected all the required results, click Apply.

The report will update to just the selected students.

Click Web Merge.

In Step 1 – Template use the Browse button to locate the word document you created.

Select the template file and click Open, it will then appear in the pop-up. Once you’re happy click Next.

In Step 2 – Merge Fields you need to map the fields on the report with the tags in your document using the dropdowns. The system will attempt to match them as closely as possible however we would advise that you check that the mapping is correct before proceeding. Once you’re happy click Next.

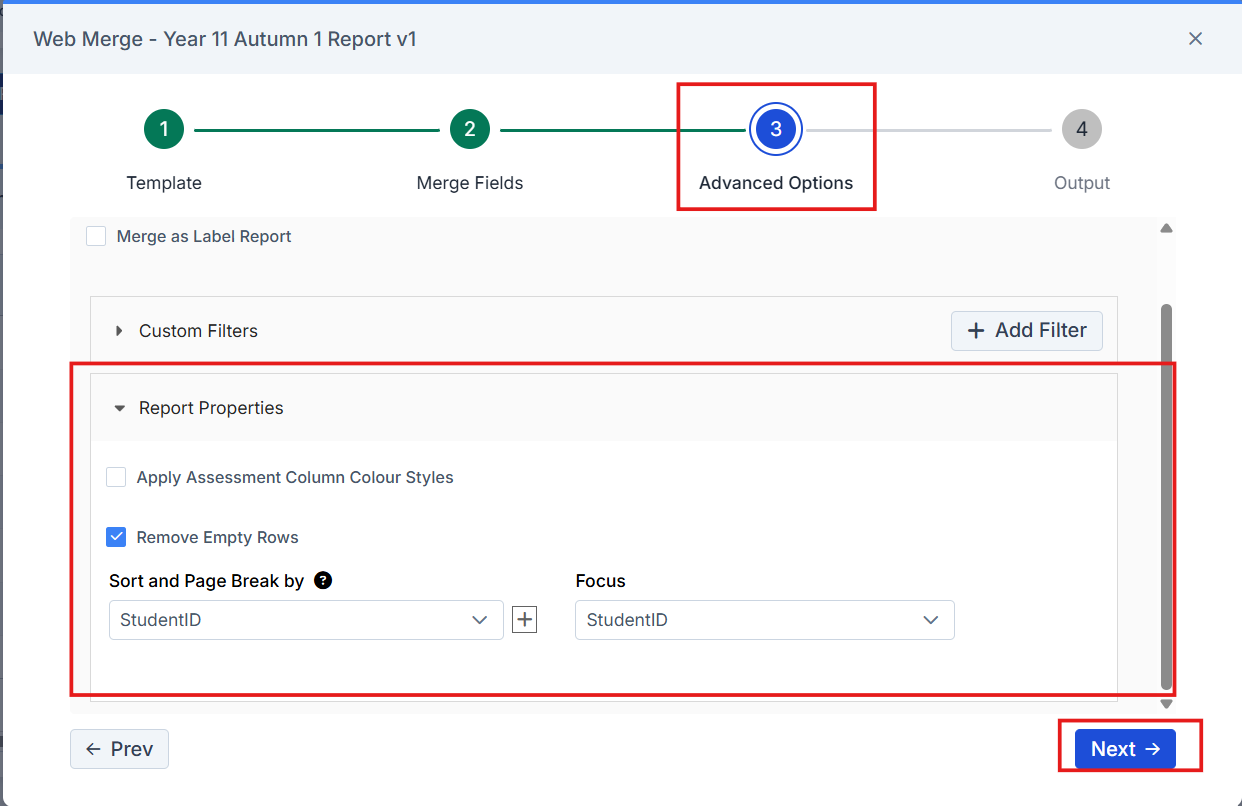
In Step 3 – Advanced Options there are 3 sections: Merge as Label Report, Custom Filters and Report Properties.

If you are using the report to create labels and will have information for multiple students on one page, you can select Merge as Label Report.
In Custom Filters you can filter the web merge to only produce documents for certain students by clicking Add Filter, then select the Attribute and the conditions to filter by.

In Report Properties, if you are including Assessment Results and would like to apply the colour from the marksheets to the Web Merge, tick Apply Assessment Column Colour Styles, once you’ve ticked this option a new box will appear to allow you to Use Result Colours Where Grade Set Colours Do No Exist.
You also have the option to Remove Empty Rows which can be useful in the instance that Students are taking different options but you are using the same report for all of them, as this allows you to remove any rows where the Web Merge finds no data.
At the Bottom, you have Sort and Page Break By and Focus.
IMPORTANT INFORMATION – Please read:
Sort and Page Break by and Focus MUST CONTAIN a unique identifier, for example Student ID or Admission Number. Using any other identifier risks information being communicated to the wrong parent.
Publish to Parents via MCAS: in order to publish a report to MCAS you must choose StudentID in the Report Properties> Focus drop down choice

*Sort and Page Break By
- If using Contact ID as one of the page break/sort options this will create two letters in the example the student has two contacts, however, if you publish the report to MCAS, the parents will be able to view both letters as the report is for the Student. If the letters contain address information both parents will be able to see both addresses.
- This means the report will generate per StudentID per ContactID – i.e. if a Student has 2 contacts eligible for this report, the Student would have 2 reports created – one for each, however, as the contacts have access to the Students report, they therefore have access to both documents.

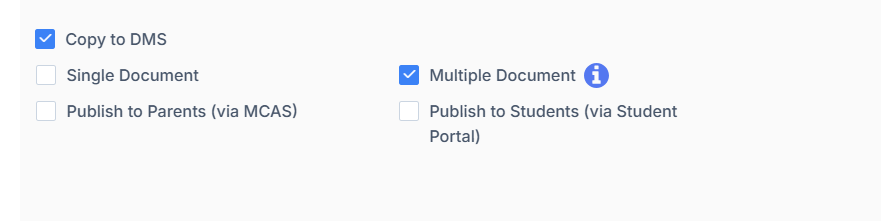
In Step 4 – Output select whether to export as Word or PDF, then select from the following options.

- Copy To DMS – This saves the Web Merge Documents to My Documents within Bromcom. If you leave this unticked a copy will be downloaded to your PC but it will not remain on Bromcom. Note: in order to publish the report to MCAS you will need to select Copy to DMS.
- Single Document/ Multiple Document – This applies to how the file stores within MCAS. If you select Single Document if you run the Web Merge for multiple students then all the documents will be stored in the DMS within 1 file. If you select Multiple Document then each document will be stored separately according to the Focus you selected in Step 3. Note: In order to publish the reports to MCAS or Student Portal you will need to select Multiple Document.
- Publish to Parents (Via MCAS) – Selecting this will publish the reports to MCAS as soon as the Web Merge has finished processing. We would recommend that you process the report once without ticking this before publishing it to MCAS to allow you to ensure that the document is how you would want it before making it available to parents.
- Publish to Students (Via Student Portal) – Selecting this will publish the reports to Student Portal as soon as the Web Merge has finished processing. We would recommend that you process the report once without ticking this before publishing it to Student Portal to allow you to ensure that the document is how you would want it before making it available to Students.
Once you’re happy click Save and Process and the documents will be generated.

If you have selected Copy to DMS the documents will be available to view in there. For more information on how to manage Reports in the DMS please see How to Manage the DMS.
IMPORTANT: If you selected Publish to Parents or Publish to Students the documents will be published to MCAS or Student Portal immediately.
Creating a Report to Parents is a 4 step progress;
- Create a Word Document
- Import the Assessment IDs Report and the Example Assessment Report from the Online Report Repository
- Run/Edit the Assessment IDs Report
- Run/Edit the Example Assessment Report
Create a Word Document
The Word Document is created outside of Bromcom and must be saved locally on the computer in Word format.
This is then used as the report template and is specific to each Year Group.
The example below shows a Word Document for a Year 11 Report to Parents for the Autumn 1 Term.
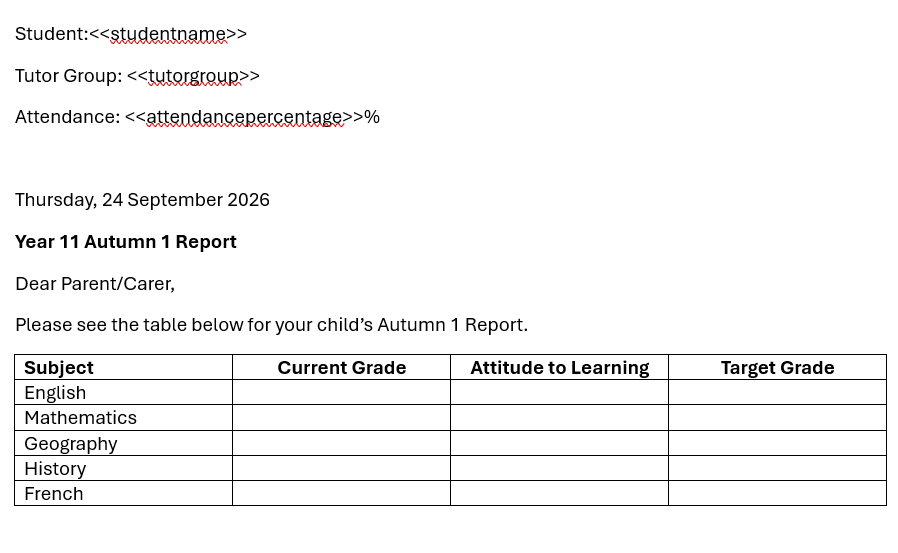
Note the fields with <<>> around the text, these fields will be merged from information within the Student Record on Bromcom.
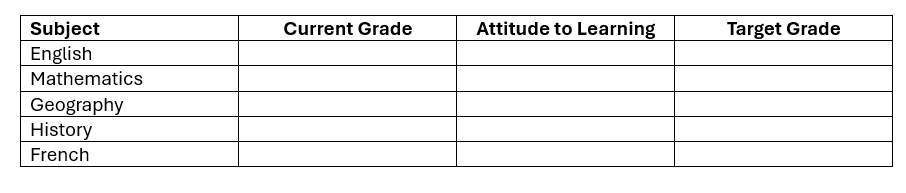
The table of contents with headings Subject, Current Grade , Attitude to Learning and Target Grade will need to be populated with the relevant Concatenated Association ID.
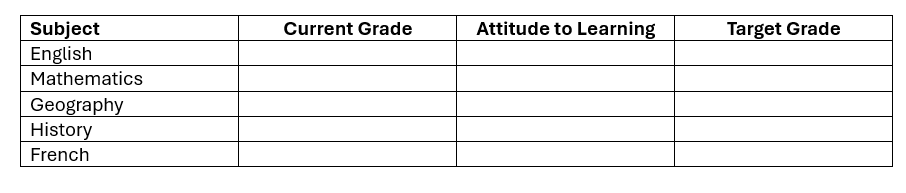
This process is defined in Step 3 of this guide: How to Run the Assessment ID’s Report.
Note on Subjects : If for example this report is for Year 11 students and you deliver 30 subjects at your school in Year 11
- Add all subjects into the word document as a line.
- Then on the final step when all the information is merged, there is an option to tick Remove Empty Rows meaning that if a student does not have data for the Subject defined in the Word Document Table, this row will be removed from their report.
For Adding a Class Teacher column to the report: In the example below we have added a ‘Class Teacher’ column with the field <<subjectclassteacher>>, we have also added a subject reference followed by a colon after the first brackets << to assist with the web merge in Step 4 of this guide
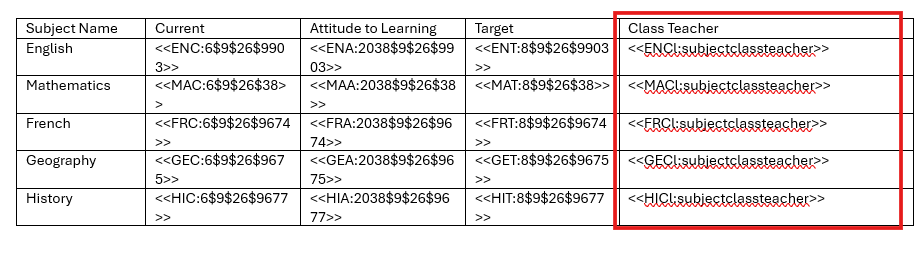
Save the Word Document locally.
Import the Assessment IDs Report and the Example Assessment Report
This next step covers importing the two reports from the Online Report Repository, for more information on this process see How to use the Online Report Repository.
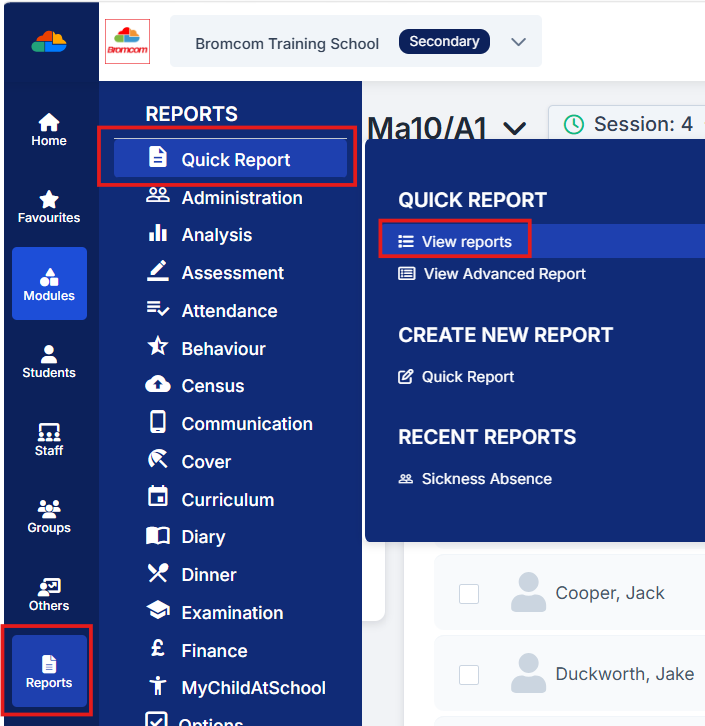
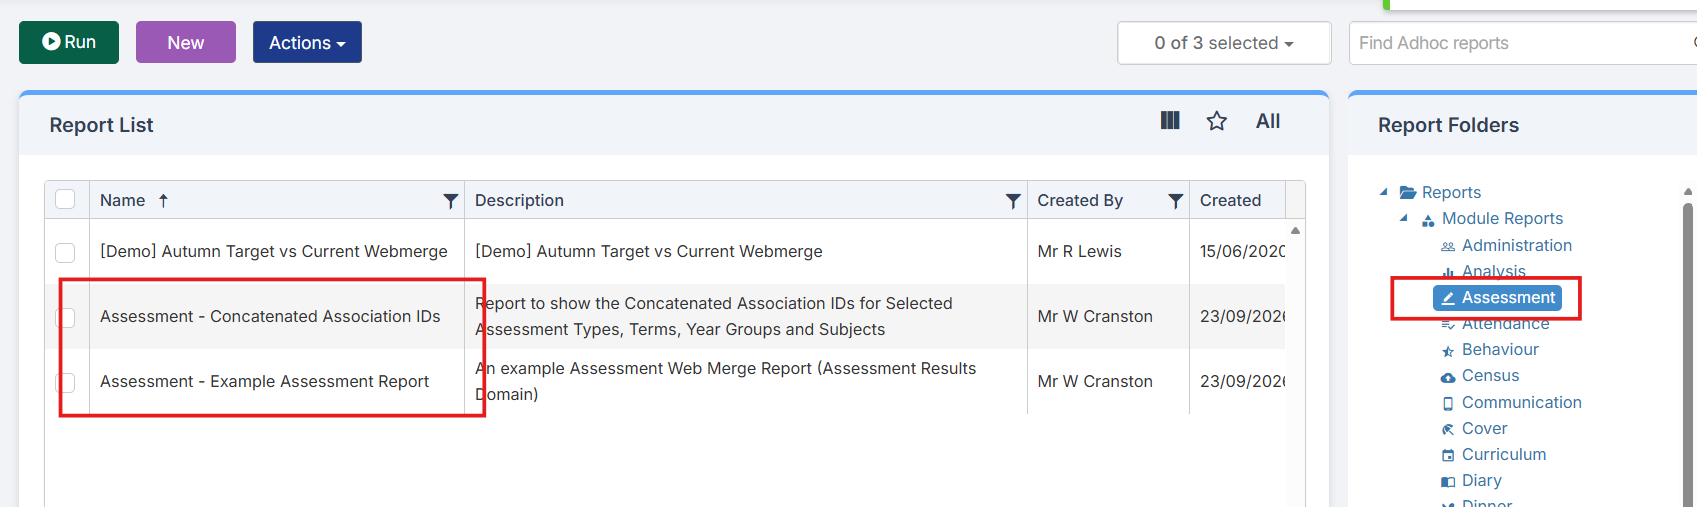
Navigate to Reports>Quick Reports>View Reports
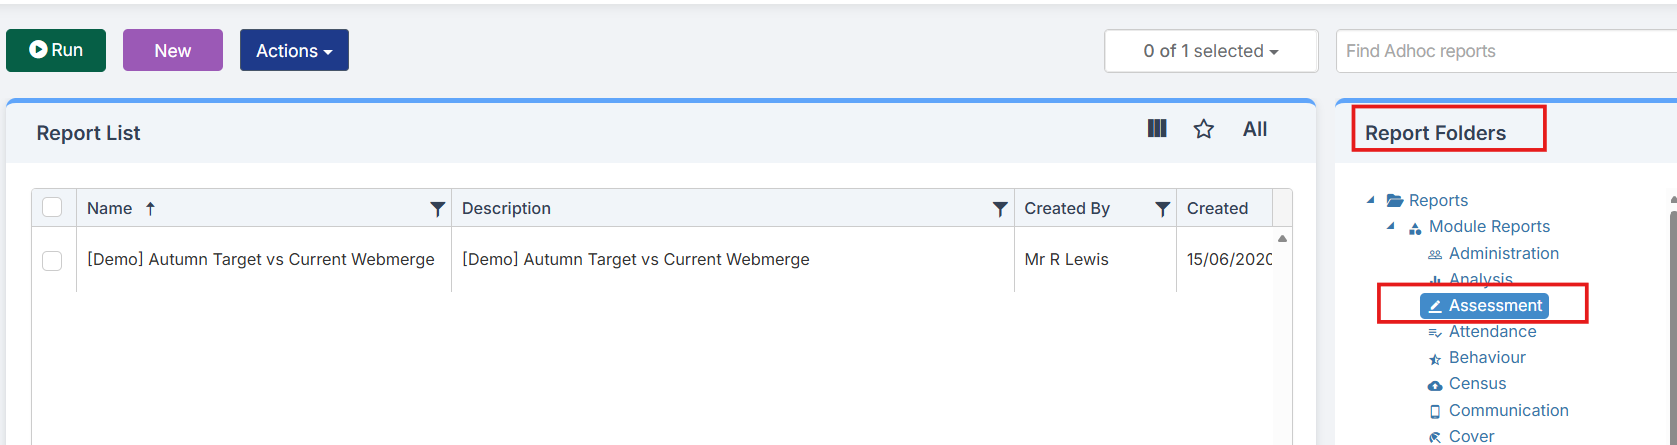
First click on the right-hand the Report Folder that the report is going to be saved in, in this example we have chosen Assessment.
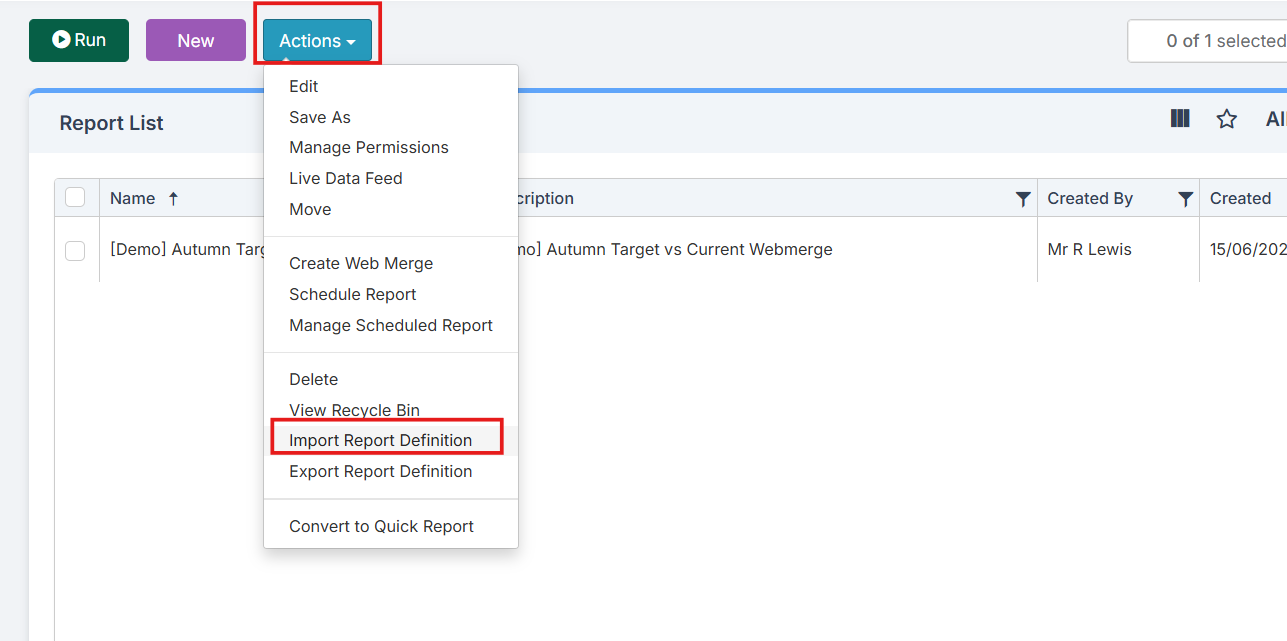
From the Actions drop down choose Import Report Definition.
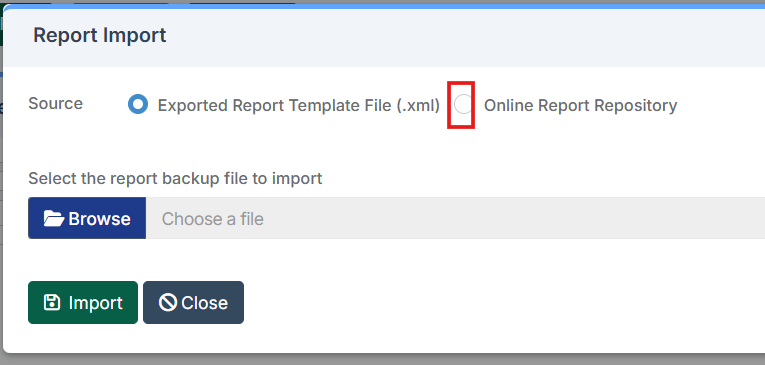
In the Report Import pop up move the toggle to Online Report Repository
In the top right Search box type Assessment.
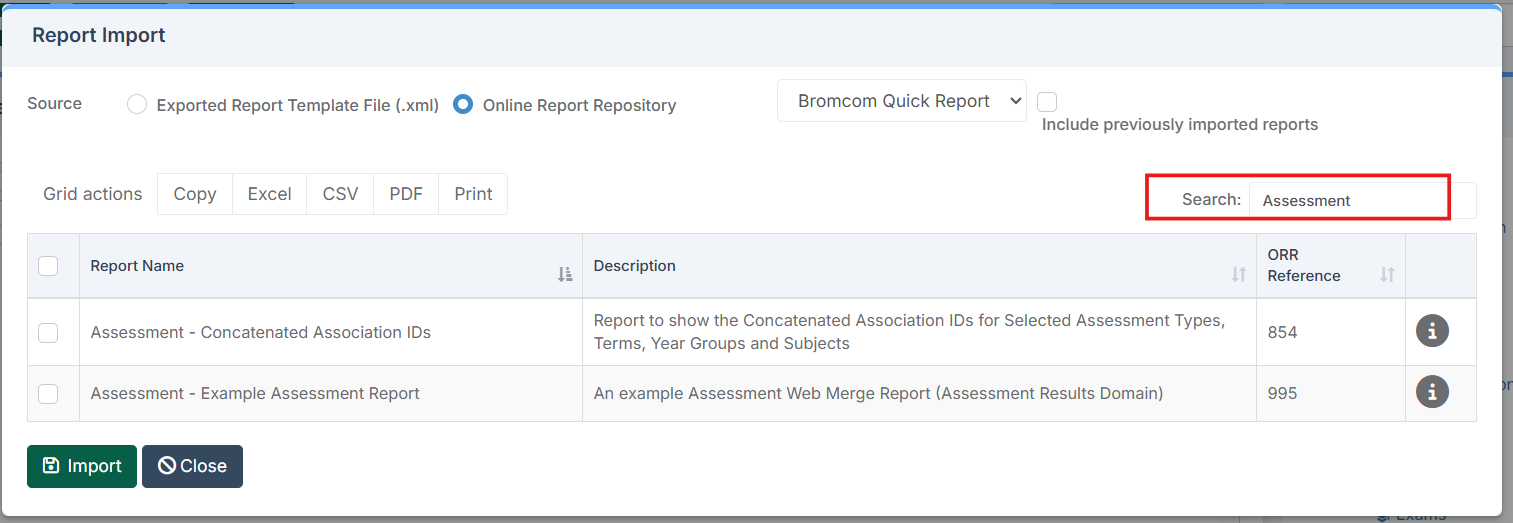
It may be necessary to tick to include previously imported reports if the reports have already been imported by another user.
Select the 2 reports and click Import.
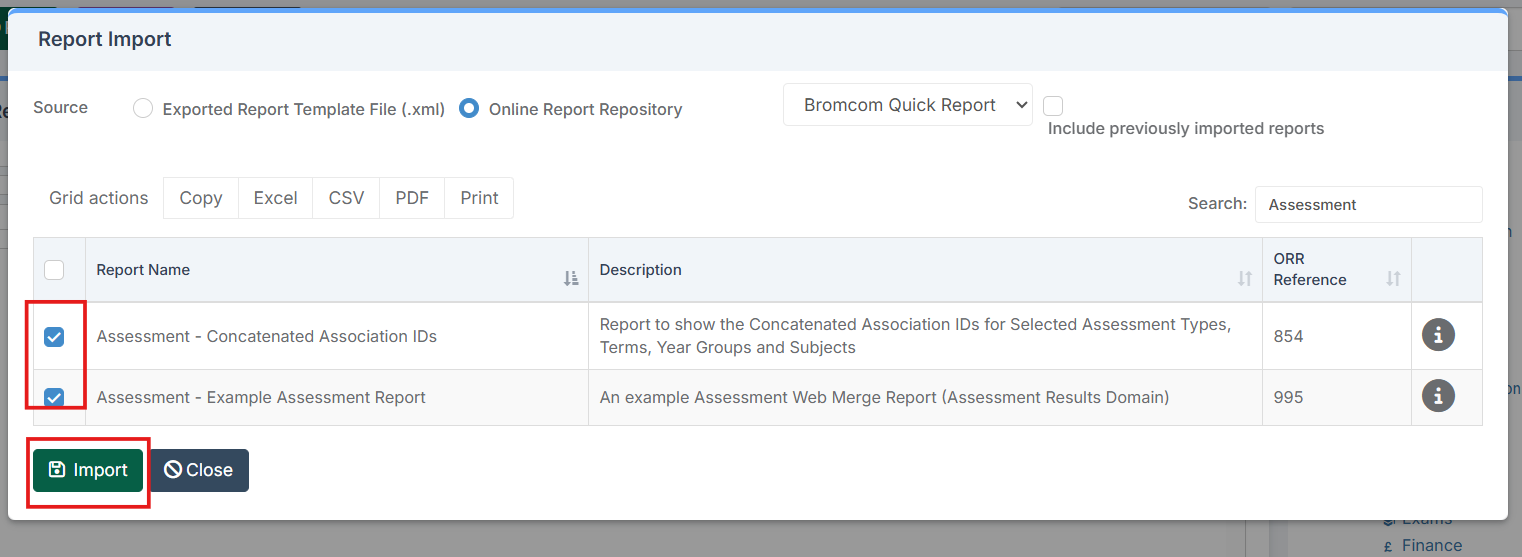
The 2 Reports have now been placed in the Module Reports>Assessment Report Folder.
Run/Edit the Assessment IDs Report
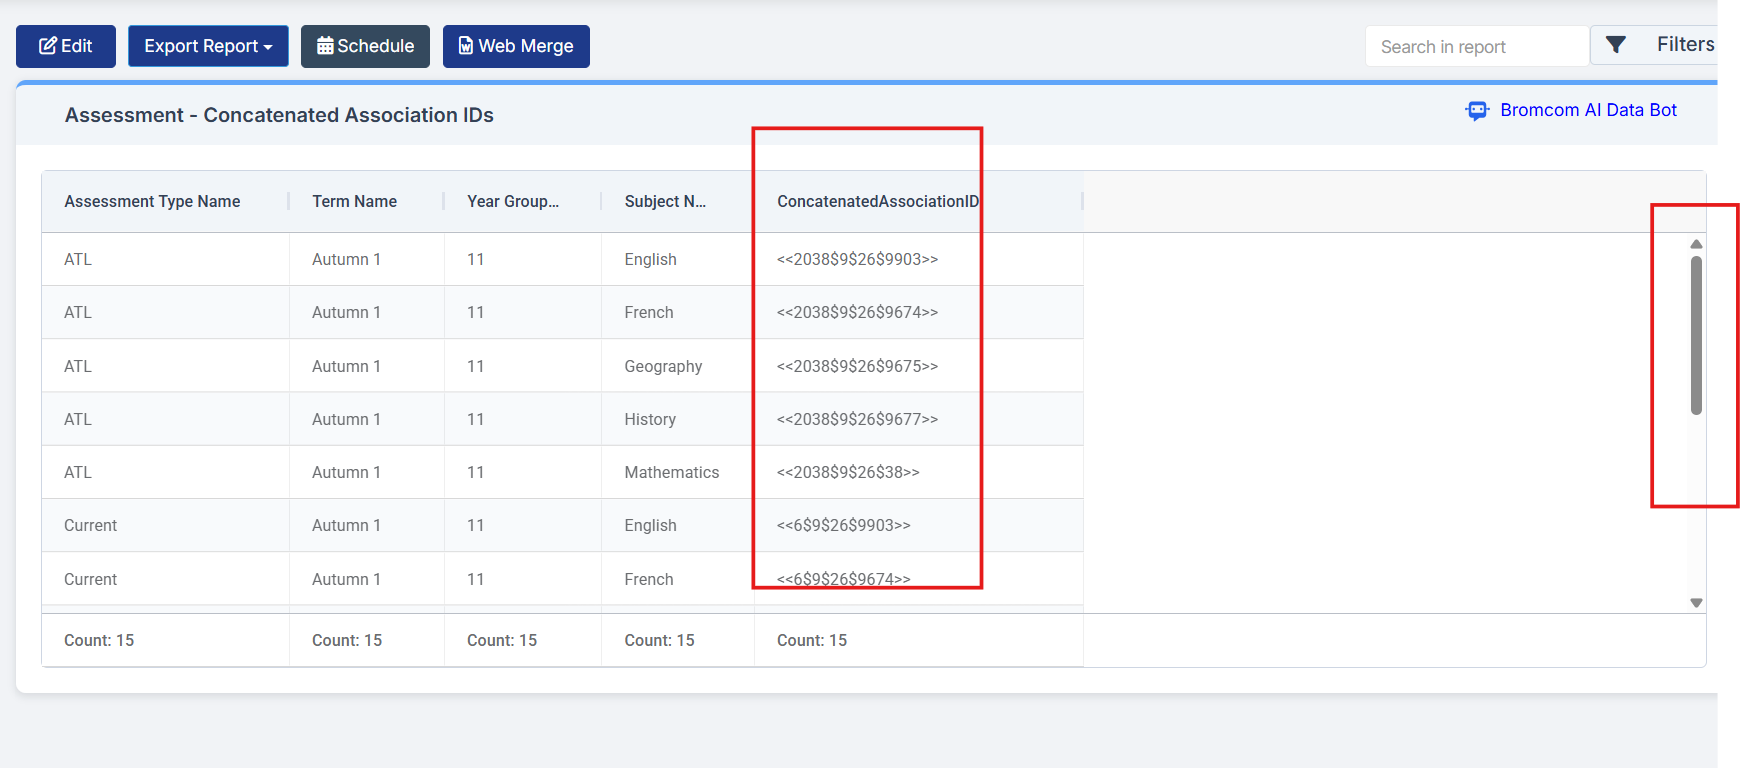
The Assessment IDs Report is needed to produce the Concatenated Association IDs for each Assessment Result that is present in the Word Document.
- These Concatenated Association IDs are then pasted into the Word Document
- Note if any Assessment Results are from a Grade Set or Mark Set that is colour coded, this will show on the final output when you merge the data.
Check Word Document
- The next step is to refer back to the pre built Word Document to check with Assessment information is needed
- This example Word Document is a Year 11 Report for Autumn 1 and below is the table for the Assessment Results.
There are 4 fields to pick and in this example they are;
- Assessment Type = Current Grade, ATL and Target Grade
- Note the column names in the Word Document can be different to the actual Assessment Type Name. In this example the Assessment Type Name ATL is named Attitude to Learning in the Word Document.
- Terms = Autumn 1
- Year Group Name = Year 11
- Subject Name = English, Mathematics, Geography, History and French
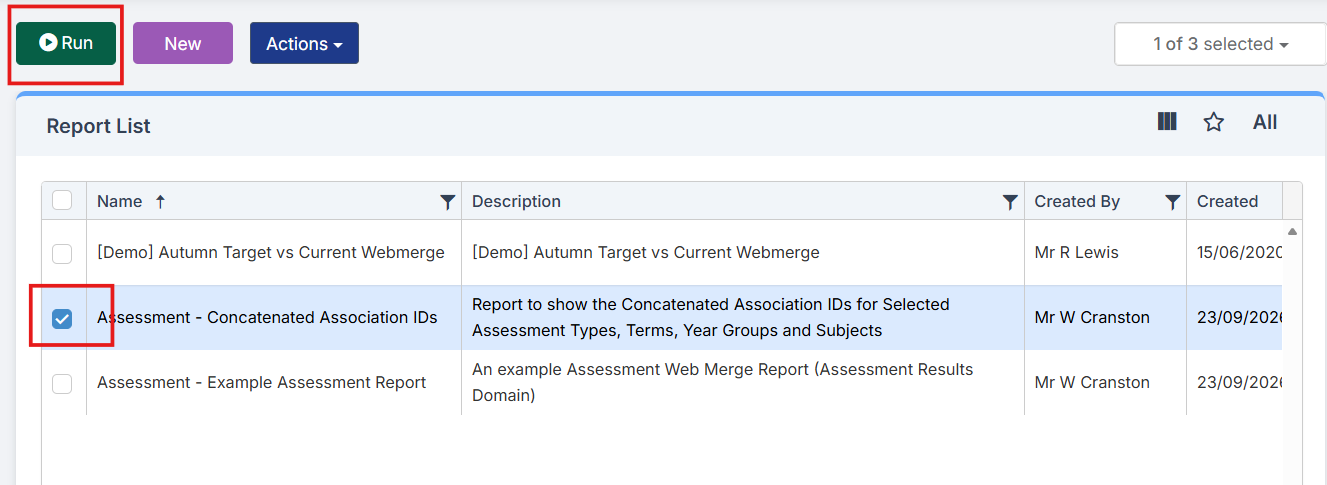
Select the Assessment-Concatenated Association IDs report and click Run.
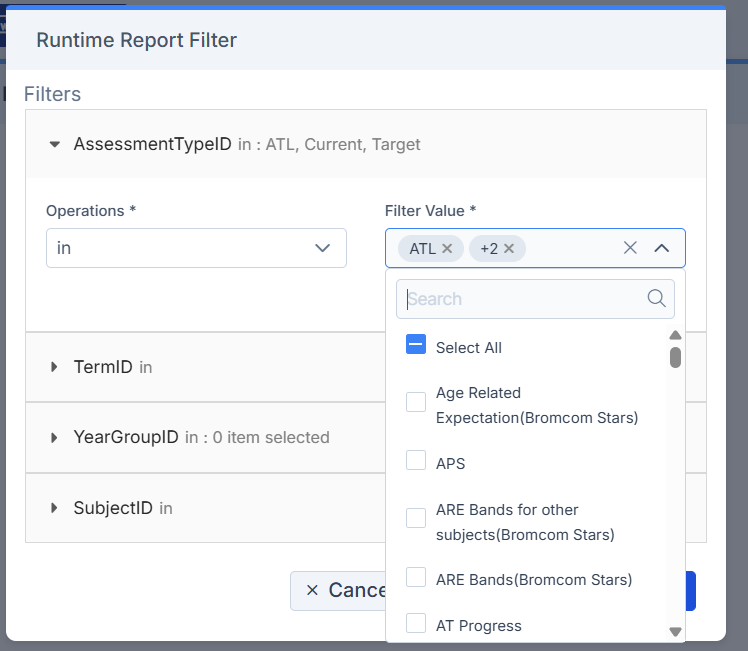
In the Report Run Time Filter pop up click the arrows in each section to select the Assessment Items
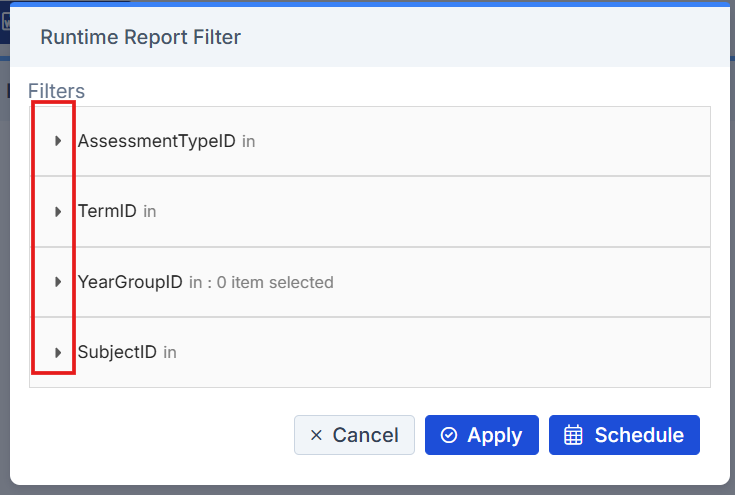
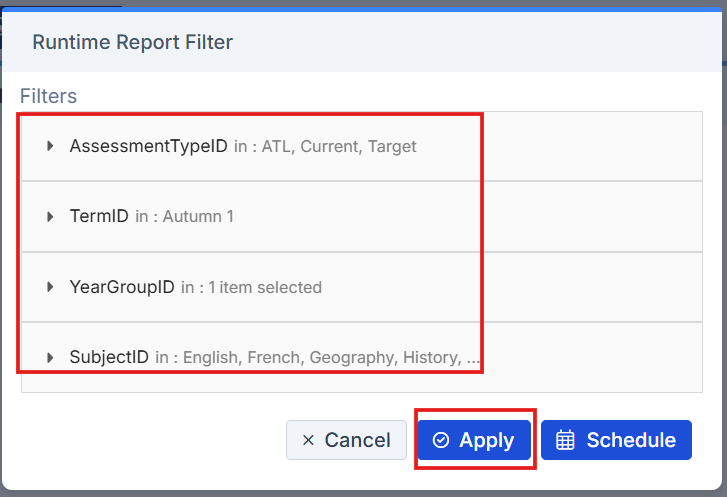
In this example we need to select
- AssessmentTypeID – Current, ATL and Target
- YearGroupID – 11
- TermID – Autumn 1
- SubjectID – English, Mathematics, French, Geography and History
In the example below in AssessmentTypeID we have selected ATL, Current and Target.
Remember to define the filter in all four sections
Once complete click Apply.
The next process is to copy each of the Concatenated Association IDs into the relevant box within the table in the Word Document.
You can either highlight each Concatenated Association ID>right click>Copy directly from Bromcom or Export the Report and and copy the IDs in from your Excel or CSV document – this is just personal preference.
Below is an example Word Document with the ID’s pasted in
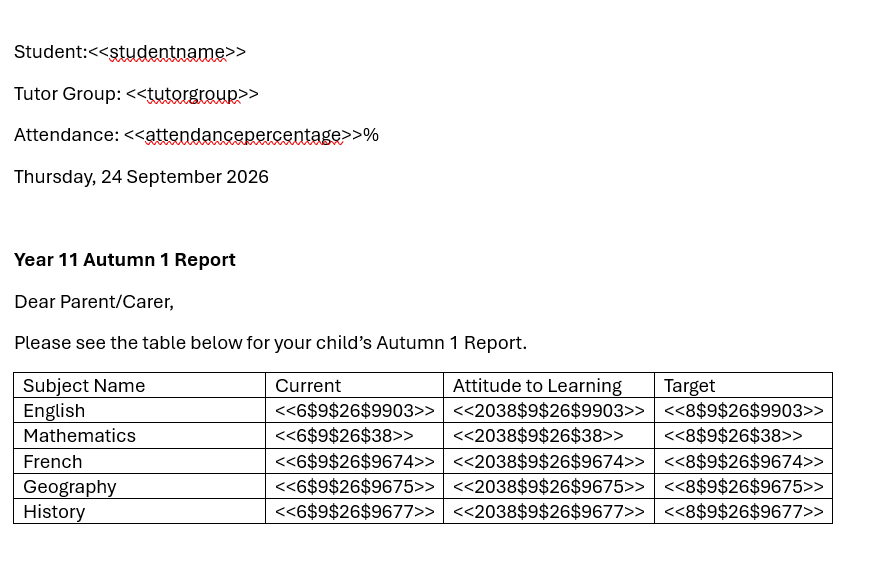
The last step in this process is to insert your own reference followed by a colon (:)after the first two brackets <<.
- For example ENC: has been inserted in the English Current Grade column after the <<.
- This is to aid the user when running the Example Assessment Report in Step 4 ENC will be visible as a personal reference if you need to check the merge has worked correctly and imported the correct result into the Word Document.
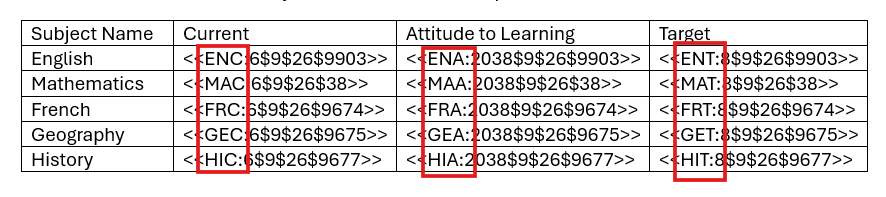
Once you have pasted in all the Concatenated Association IDs Save the Word Document.
Run/Edit the Example Assessment Report
The Example Assessment Report is a Web Merge Report and is used to merge the information from Bromcom into your pre-prepared Word Document.
This report needs to be amended so it has the same fields in that are present on the pre-prepared Word Document.
If you have added a column for Class Teacher to your Word Document then you will need to add SubjectClassTeacher to your report.
Important Note: do not remove any of the 5 x Assessment Fields as these will merge with the Concatenated Association ID‘s in your Word Document AND Do Not Remove the Student ID field.

The first step is to ensure that all the fields in your pre-prepared Word Document are present in the Example Assessment Report.
Locate the Example Assessment Report and click Actions>Edit
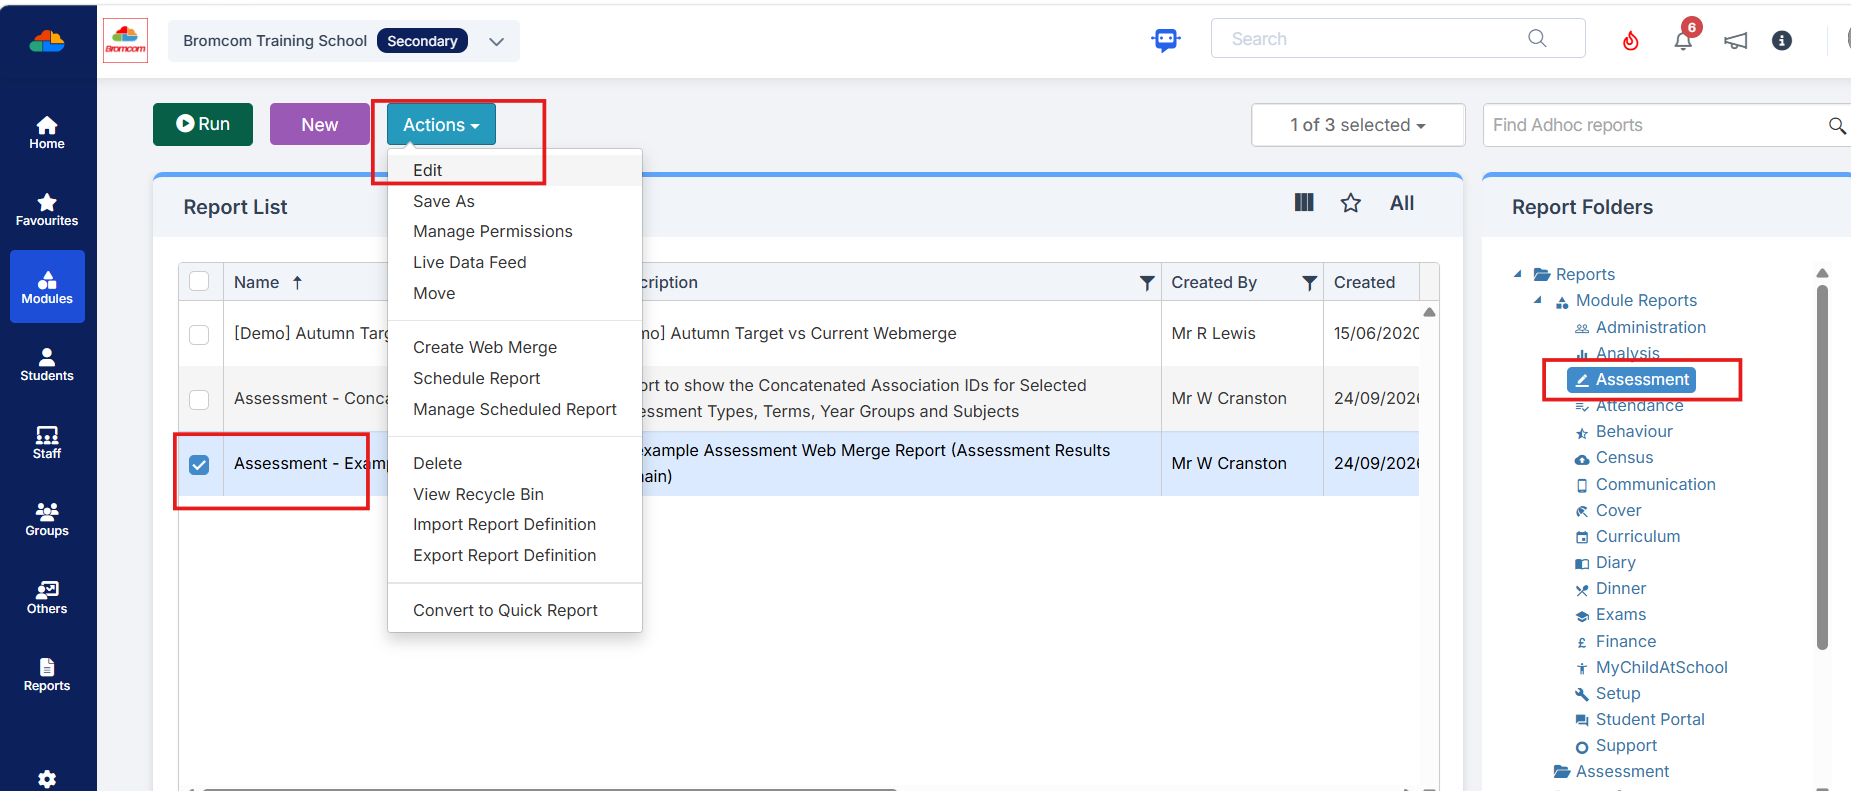
In the next step ensure all the <<fields>> in the Word Document are in the Example Assessment Report.
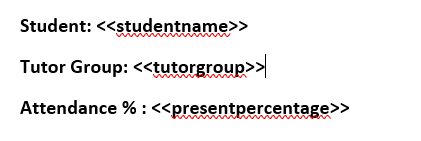
Below is a screenshot of a Word Document. In this example the following 3 fields need to be in the Example Assessment Report. These are the fields with <<>> around them.
- Student Name
- Tutor Group
- Attendance Percentage
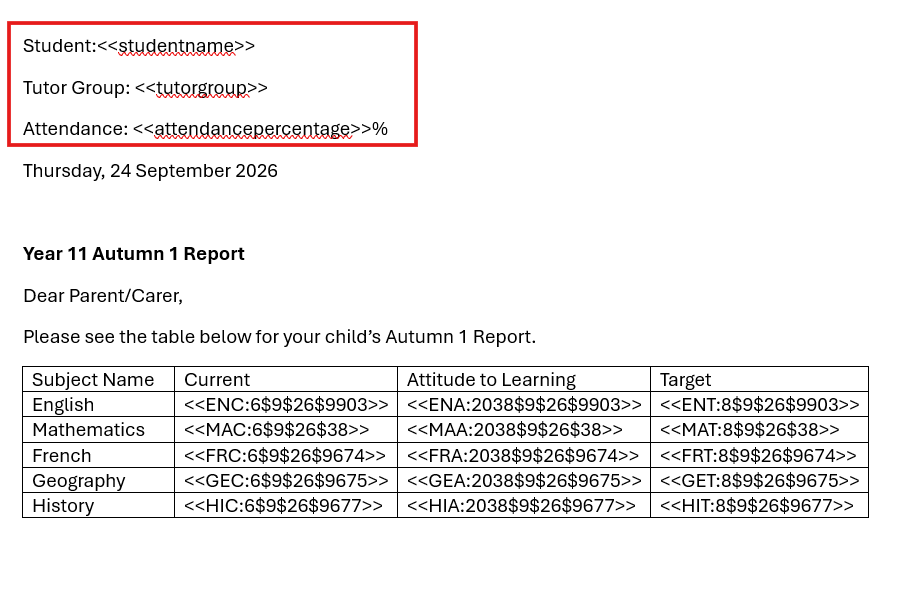
When you open the Example Assessment Report use the left hand list Data Items list to select the fields you have in your Word Document or remove any fields that aren’t in your Word Document.
IMPORTANT : DO NOT REMOVE STUDENT ID FROM THE REPORT AS IT IS NEEDED TO IDENTIFY STUDENTS
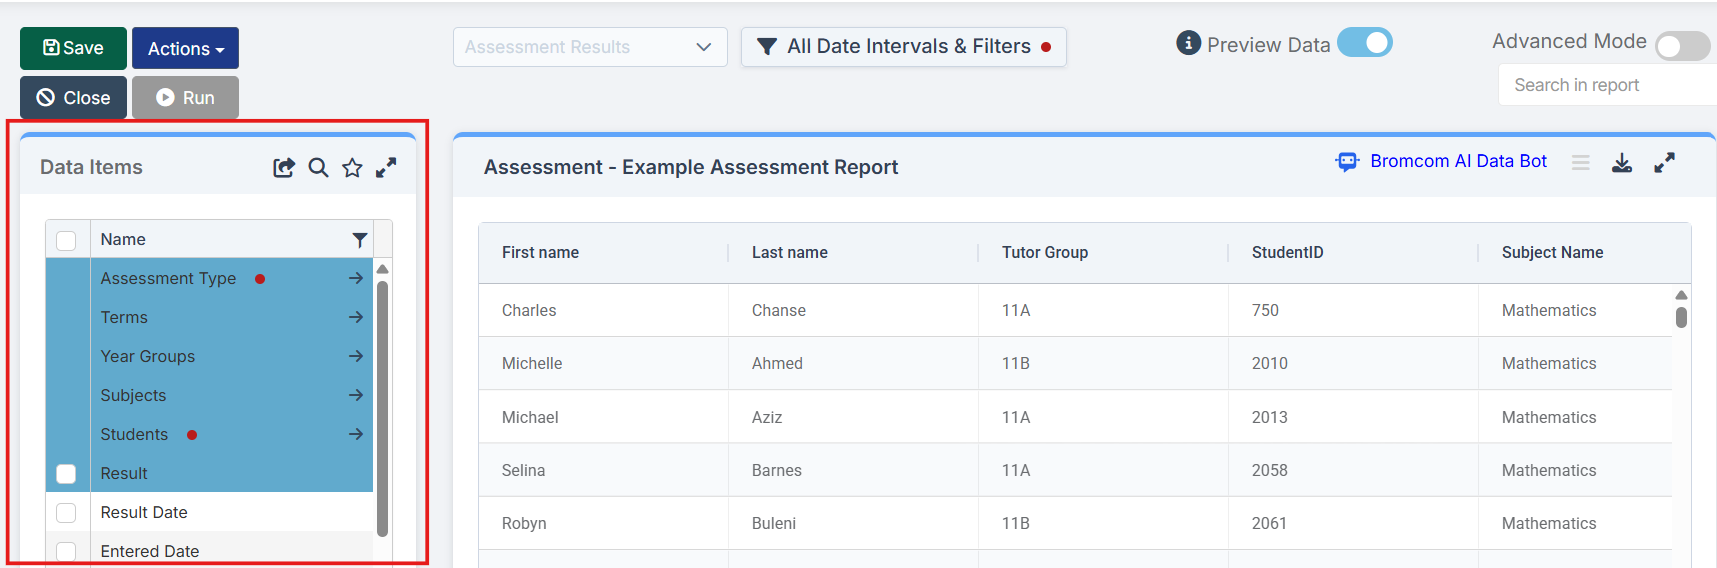
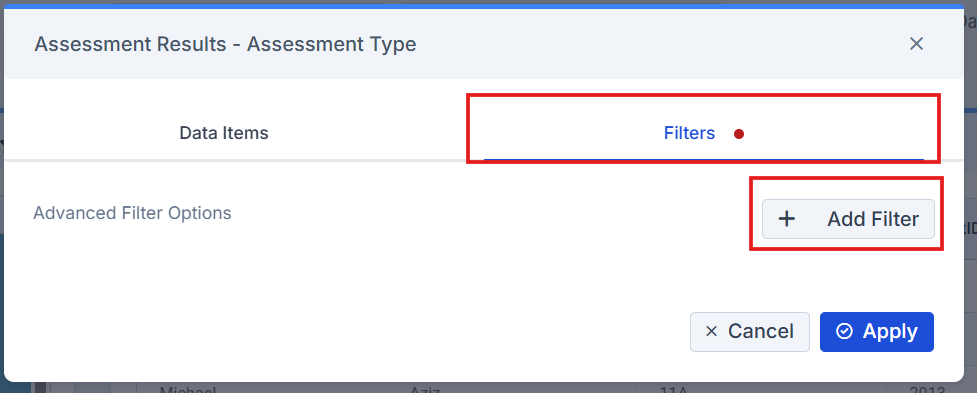
In the example below in Data Items we have clicked the arrow to the right of Assessment Type , then click on the Filters>Add Filter
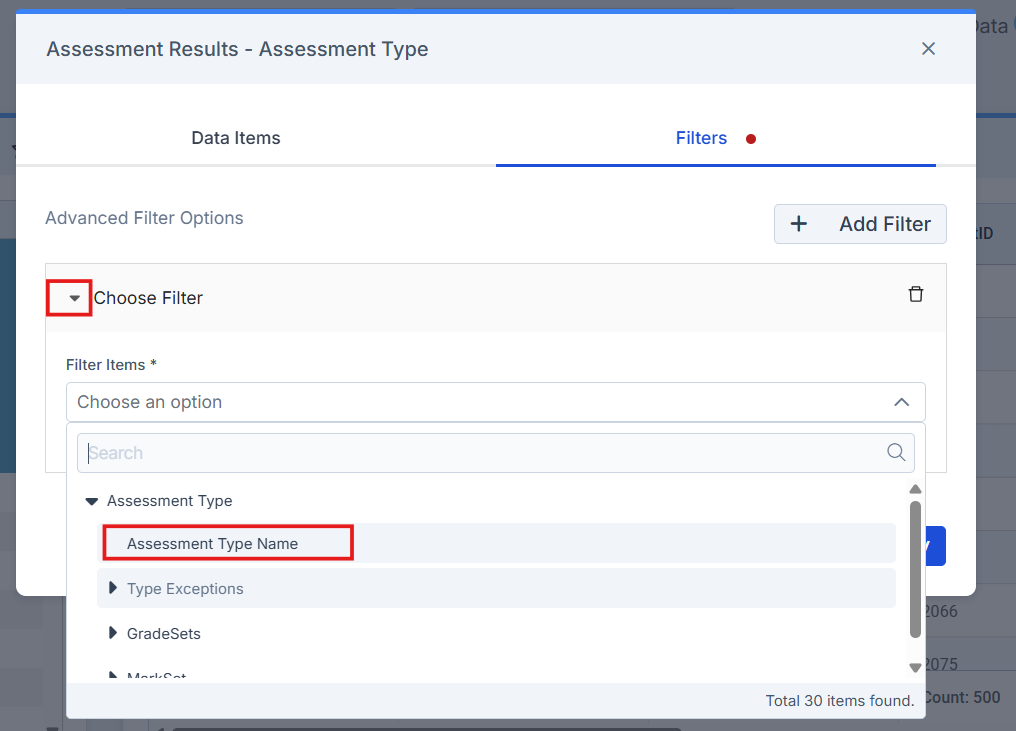
Click the drop down Choose Filter>Filter Items>Choose an option then click Assessment Type Name
Then in Filter Value, scroll or use the search box to select the Assessment Types, in this example ATL, Current and Target.
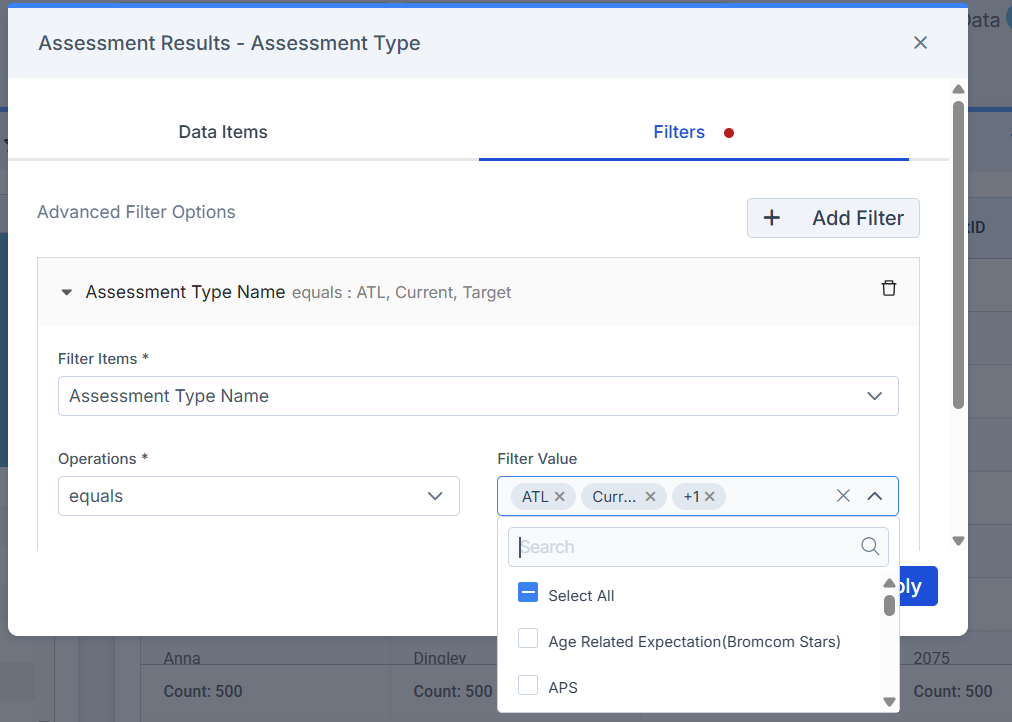
Click Apply.
Repeat this process using the arrows in the left hand Data Items column for Terms, Year Groups and Subjects
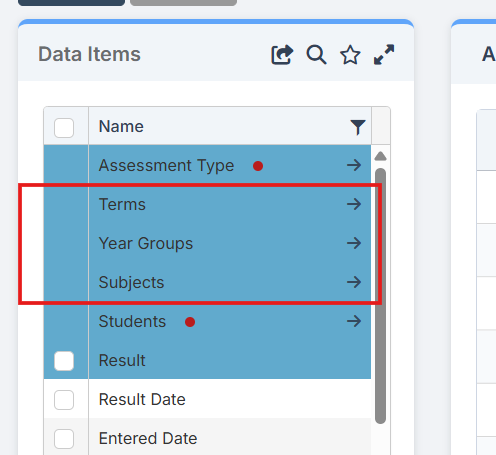
In this example;
- Term = Autumn 1
- Year Group = 11
- *Subjects – English, Mathematics, French, Geography and History
For Subject see example below for filtering for multiple subjects.
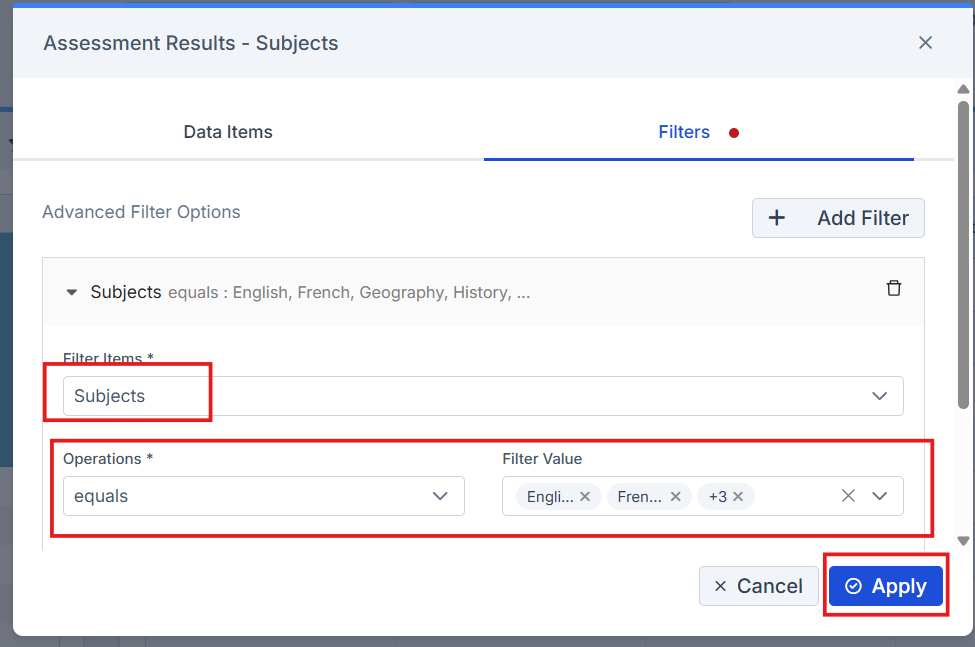
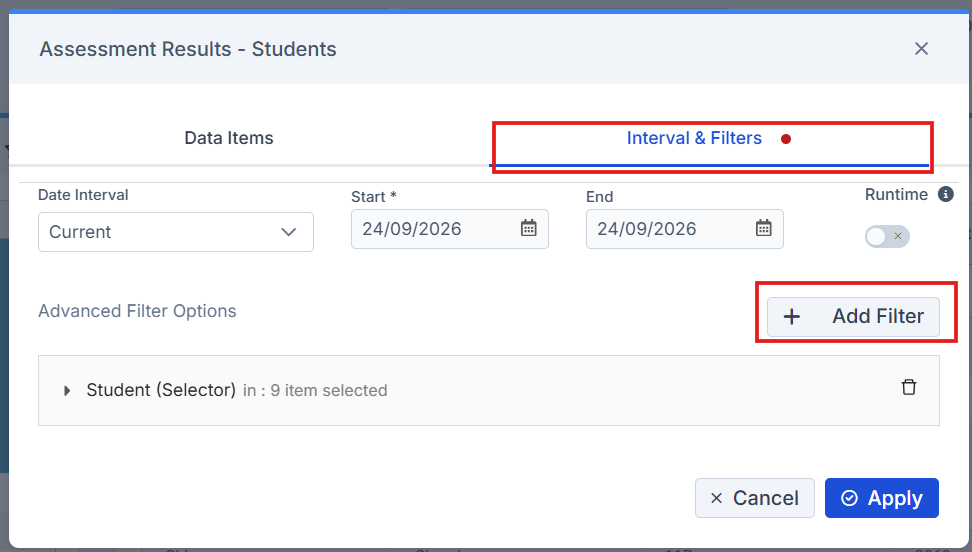
In this example we are running the report for a small amount of students as apposed to the whole year group.
To filter for Students repeat the process Data Items> Students>Intervals and Filters>Add Filter
Student Selector click drop down>Find Student , this will open the Student Selector List for all Students on roll. Select the required Students.
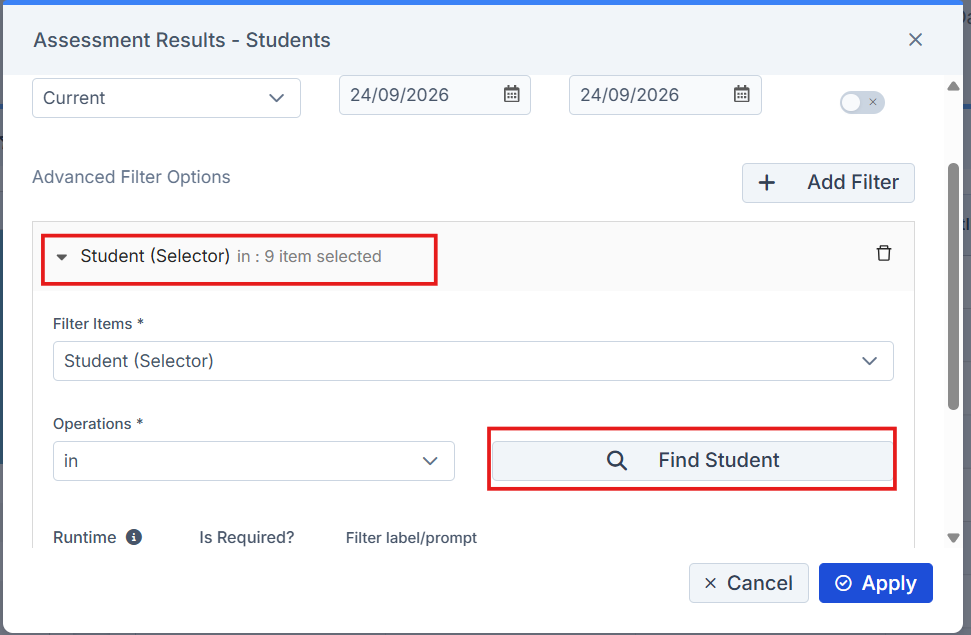
Click Apply.
Once complete click Save or from Actions choose Save As in order to re-name the Example Assessment Report.
Click the top-left Run
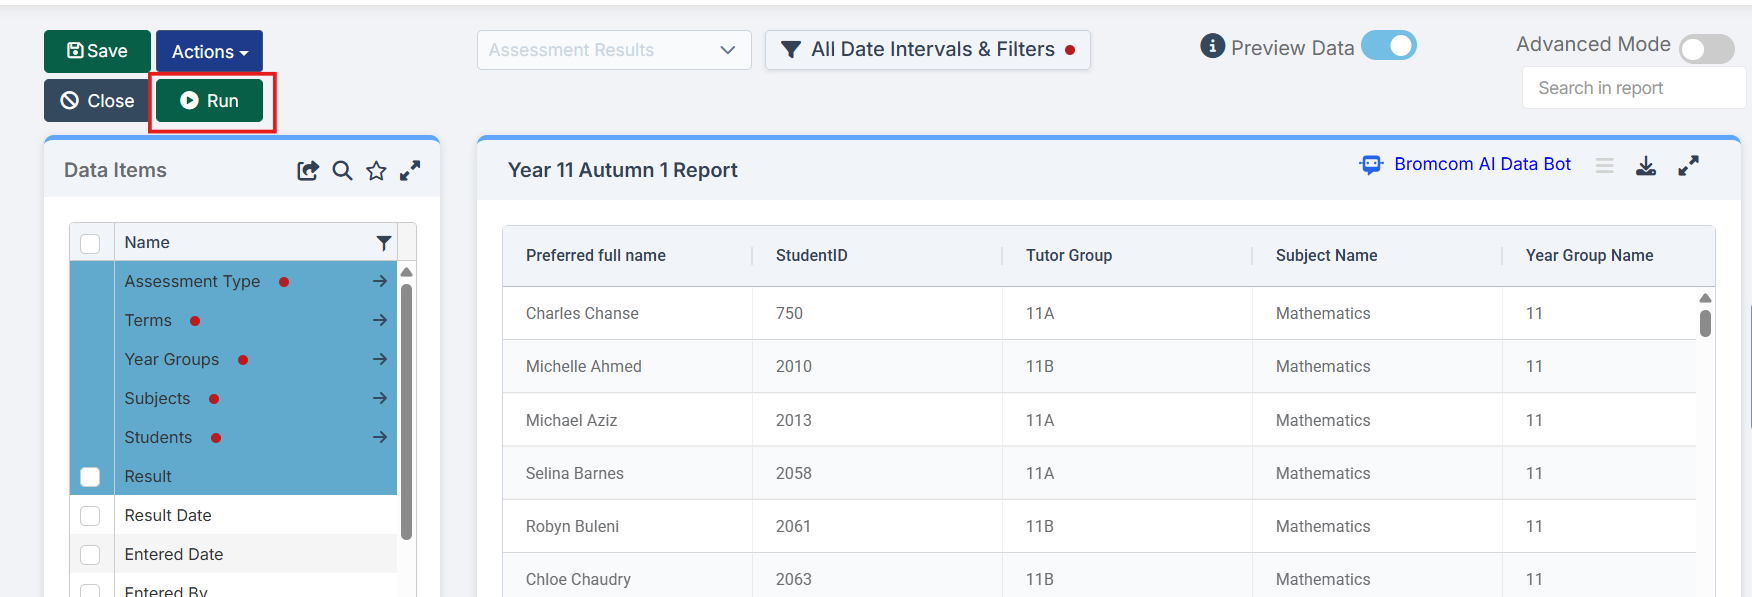
If any runtime filters have been defined then complete as required.
Click Web Merge.

Click Browse to locate your Word Document saved to your PC.
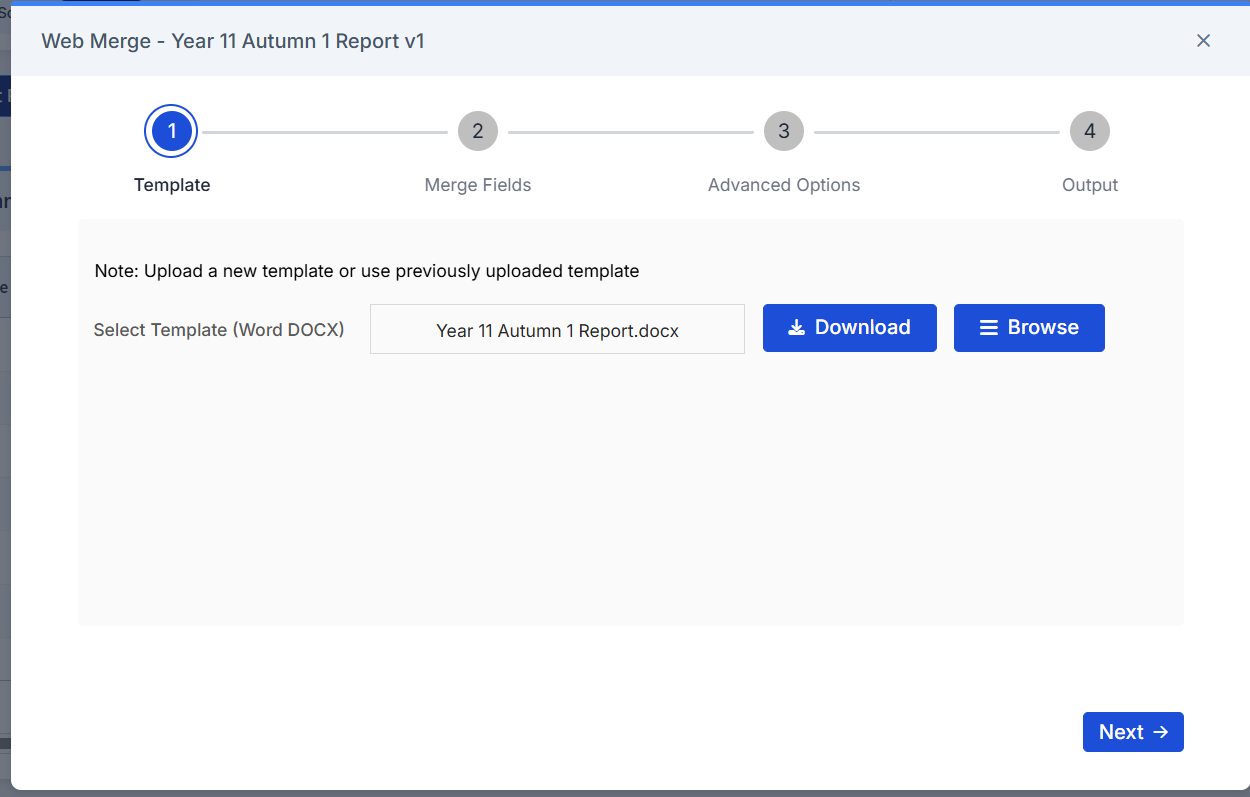
Click Next.
In Step 2 panel ensure all the fields match by using the drop down Filter cups to match the fields in your Example Assessment Report with the fields in your Word Document.
The items above the drop downs are the fields in the word document,
Click on the blue filter cups to check the Results are correct.
In this example ENA should be English ATL
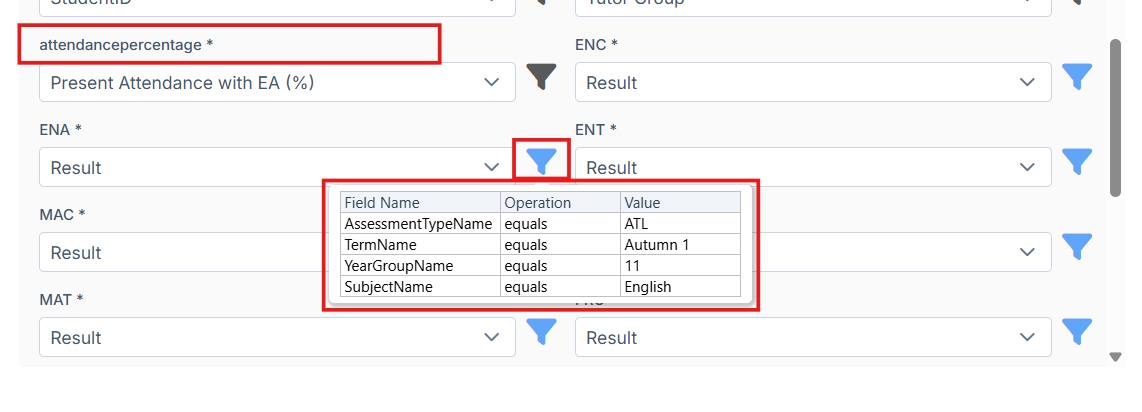
Once complete click Next.
In 3 Advanced Options in Report Properties,we have chosen to Remove Empty Rows and sort by Student.
Focus should ALWAYS BE STUDENT ID Focus links the documents to MCAS, if focus is anything else other than Student ID, it will not be to publish documents on MCAS.
The user has the option to add multiple options under Sort and page break by
- Click Add
- Tutor Group
- Preferred Full Name
The above will then sort it by Tutor Group followed by name
Click Next.
If you have added a Class Teacher column in your word document then you will need to;
- Click on the filter cup next to each Subject Class Teacher field
- Add a filter for the Subject Name and choose the Subject Name from the drop down choices ,you will need to do this for each SubjectClassTeacher field.
- Click Add and then OK
In 4 Output choose either Word or Adobe PDF.
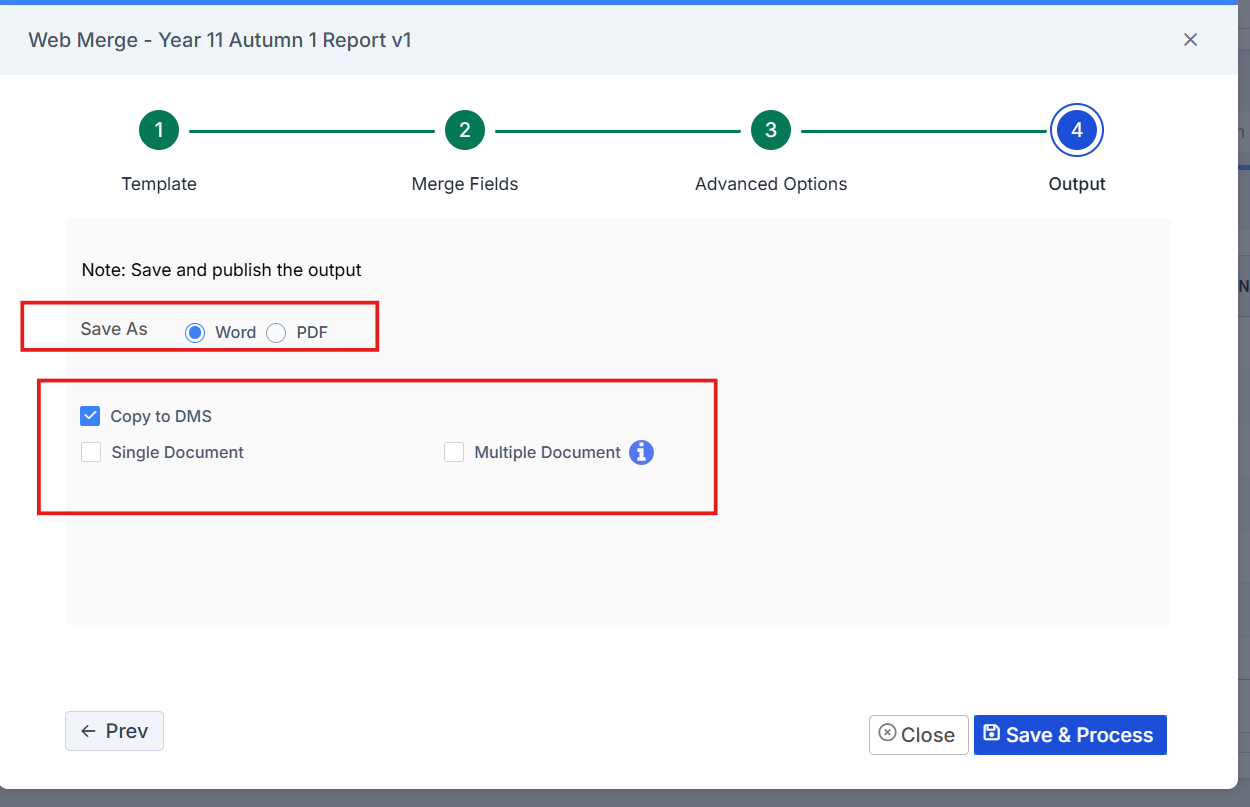
Multiple Documents are individual reports per student, Single Document in one report with multiple pages.
For Multiple Document, once selected the user will see the option to Publish to Parent (via MCAS) or Publish to Students(via Student Portal)
Click Save & Process
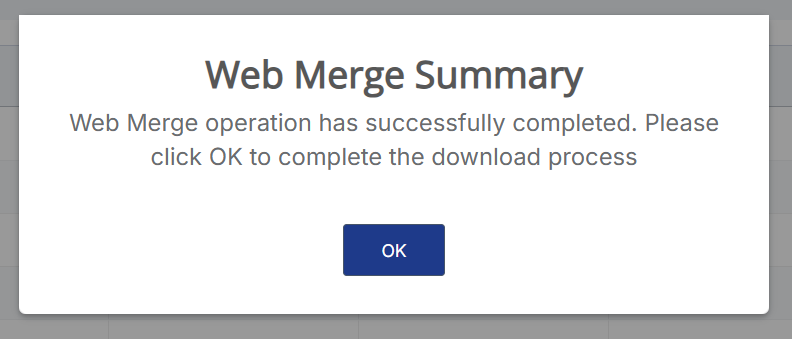
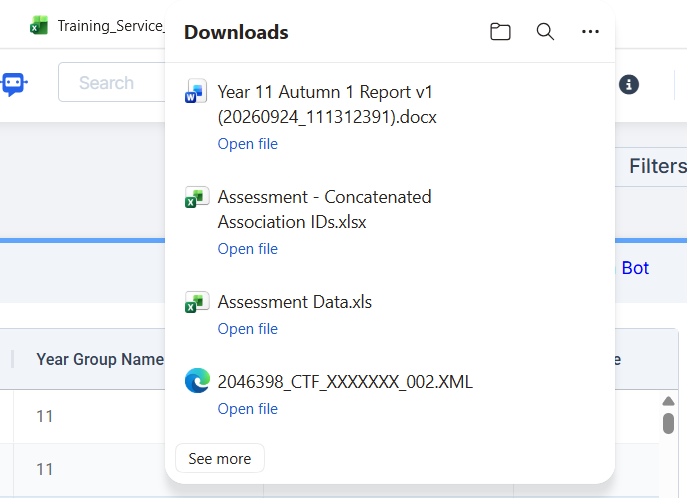
In this example the reports then show in the top-right Downloads
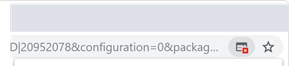
Note: If the Report does not download or appear in your browser, usually this is caused by having a Pop Up Blocker on your browser which will appear as a Red warning. If you see this when running the Report, click the Red warning and allow popups for this page. You should then receive a download next time you repeat the Web Merge process.