This article contains information on the Bromcom Document Management System (DMS) and DMS storage limits, including how to buy more storage.
Access: All pages below are subject to having relevant Roles and Permissions. All Bromcom users will get access to My Documents and My Reports however, only users with the Bromcom Administrator role will be able to see Everyones Reports and Documents
DMS Management
Managing the size of DMS can be done via the My Reports area.
It is important to understand the difference between My Reports and My Documents.
- My Reports – these are copies of reports that can be viewed again without having to re-run the report, for example, WebMerge Reports or Scheduled Reports. From here you can safely delete without it affecting the associated document that is already sitting on your DMS.
- My Documents – these are the physical documents (i.e. PDF/Documents) which are created as part of the WebMerge process and are what sits against the student record and what parents download from MyChildAtSchool. The removal of the associated report in the My Reports area will have no effect on these documents.
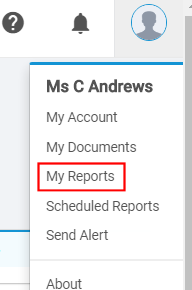
Click on your picture on the top right of screen to get the dropdown menu and select My Reports.


Click on the top left Filter

On the next page click on the Filter option and you will see an Originator dropdown menu, if you click on this, you will be able to see all the reports for specific Users or go to the top of the list and select Everyone to view all the reports for all Users in the MIS.
Note: You will only see the option for Everyone within the DMS if you have the Administrator Role on Bromcom.

On this Filter page, there is also an option to show the Archived and Not Archived documents under the Status dropdown menu.

You can also filter on date using the Created between date ranges

By default the Filters are set to Include Documents/Reports with Focus. Focus related to documents or reports that are attached to a Student Profile via a Student/Contact Email being present in the Student Profile giving the ability to email the Report to Students and/or Contacts.

If you were to set the Originator to Everyone and the Status to All and click on Filter you should get a similar screen to the following one.


You can Search in My Documents by typing into the top left Search

You will then get a pop up showing number found in Search Results with the ability to sort the view by Relevance, Date or Name or download the documents.

For searching in My Documents you have the option from the Filters button to refine your Search to whole document, title only or contents only

You can also Filter in My Documents by using the Filter options at the top of each column. Hover on each column to see and click on the burger stack symbol

By clicking on the top right Actions drop down you can choose to Delete, Expire, Archive or Restore the selected Reports

Click on the top right Grid Actions dropdown to Copy, Excel or CSV the My Reports List.


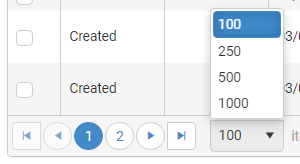
At the bottom of the page there is a Page Size option which will show up to 1000 reports to a page. This makes it easier to remove reports on mass from this screen.

DMS Storage by School Phase

The default storage limit for a primary school is 3GB.
The default storage limit for a secondary or all through school is 10GB.
Additional storage can be purchased by emailing orders@bromcom.com. The prices for the academic year are below:
Additional DMS pricing:

