
This guide explains how to configure the MIS for integration with a third-party cashless catering provider to manage dinner services.
Important: Prior to setting up Cashless Catering, please ensure the MIS has been licensed for Online Payments. For more information, see How to Configure Online Payments.
- Use the + symbol to expand and follow each step in sequence
- To print this as a checklist, click ‘Collapse All’, then right-click the page and select ‘Print’.
- To print this as a full guide, click ‘Expand All‘, then right-click the page and select ‘Print‘.
This section explains how to enable Online Payments in MCAS and define which Bank Accounts are used for Dinner Money Payments.
Navigate to Config>MyChildAtSchool>Online Payments

In the Online Payment Settings panel, tick Enable Online Payment and click Save.

The Bank Accounts section indicates which Bank Account is used for Dinner Money Payments. In the example below, there are two bank accounts available to select.

For more information, see How to Configure Online Payments in MCAS
This section covers the following Dinner Money configurations in MCAS:
- Dinner Money Settings
- Dinner Money Collection
Navigate to Config>MyChildAtSchool>Dinner Money

Dinner Money Settings
Use the Dinner Money Settings panel to:
- Enable the Dinner Money module in MCAS – this allows parents to view and use the Dinner Money features within MCAS
- Select the Year Groups that can use Dinner Money – defines which students are included
- Show Dinner Details – shows an overview of past dinner transactions to parents in MCAS
- Apply a minimum deposit amount – Enter the minimum amount a parent can top up when using MCAS. Please note that all transactions incur a 1.275% fee, please take this into account when setting the amount.

Dinner Money Collection
The Dinner Money Collection panel is used to define which year groups can use Cashless Catering.
When the Enable Dinner Money Collection box is ticked, options appear to assign Years Groups for either:
- Use Bromcom Dinner Money
- Use Cashless Catering
The relevant year groups will typically appear under Bromcom Dinner Money by default. They will need to be moved to Cashless Catering on the right-hand side.
Note: Schools cannot edit this section. Please contact Bromcom Customer Support for any required changes.

For more information, see How to Configure Dinner Money in MCAS.
A Third Party User Account is required to enable the cashless catering company to integrate with the MIS to update balances and dinner details.
Please refer to the following guide to assist with creating a third party user account: How to Manage Third Party User Accounts.
The role associated with the third party account must be configured with ‘Write Back‘ permissions for Dinner Transactions.
Schools are provided with a default Third Party role within the MIS. As a school may have more than one third party application, it is recommended to create a new role specifically for the Dinners third party account.
To do this:
- Export the default third party role.
- Import it back into the MIS with a new name.
For more information on this process, see How to Export/Import a Role.
Once the new role has been created, Dinner Transaction Write back permissions can be added by following these steps:
- Navigate to Config>Setup>Roles and Permissions
- Select the newly created role from the dropdown and click Edit
- Select Setup from the Module dropdown
- Within System Security>Security Settings, locate the Third Party Write Back – Dinner Transactions permission
- Tick Access
- Click Save

Important: Provide the details of this third party user account to the Cashless Catering company.
This section explains the various methods available to top up Student Dinner Balances.
Important: When using Cashless Catering, balances displayed in the MIS are managed entirely by the third-party provider. When dinner money is topped up, the balance will only update after the provider completes its next data write-back. As a result, balances may not be immediately reflected in the MIS, and schools cannot manually adjust them.
Adding Dinner Money via MCAS
A parent can add Dinner Money via the MCAS web version or the MCAS app. A school can configure how both the web version and app are presented to parents.
MCAS Web Version
- The dinner money top-up widget is available on the dashboard.
- The widget displays the current Credit Balance Summary and provides the option to top-up the balance.
- To top up the dinner money balance:
1. Enter an amount in the Deposit Amount field
2. Click Add to Basket.

For more information, see How to Add Dinner Money in MCAS
MCAS App
- Go to My Child>Dinner.
- The blue wallet icon at the top right of the Dinner screen displays the available Dinner Money balance.
- To top-up the dinner money balance:
1. Click Add Dinner Money.
2. Enter an Amount.
3. Click Add to Basket.

For more information, see How to View and Add Dinner Money in the MCAS App
Adding a Dinner Money Order via the MIS
This process can be used when a parent comes into school and wants to pay cash for Dinners.
Navigate to Modules>MyChildAtSchool>View Orders

Click Create Order

Click the blue spyglass icon to the right of Select Student to open the Student Selector List.
Select the student(s), then click Add Dinner Money Balance on the original screen.

The following pop-up will appear.

Enter the Amount for the order and click Add to Order. This will return to the Order Details screen, where the order can be finalised and paid for using the Next button.

For more information on this process, see Adding Dinner Money.
This section covers the configuration of Staff Dinners. This configuration is required so staff can top up their Dinner Balance from the Overview Dashboard in Bromcom.
Important: When using Cashless Catering, balances displayed in the MIS are managed entirely by the third-party provider. When dinner money is topped up, the balance will only update after the provider completes its next data write-back. As a result, balances may not be immediately reflected in the MIS, and schools cannot manually adjust them.
Configuration
Navigate to Config>Dinner>Configurations

In the Staff Dinner Options panel, ensure the top two toggles are switched off.
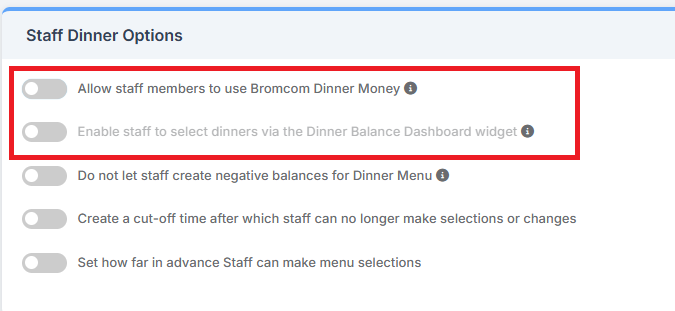
Click Save to retain any changes made.

Top Up Dinner Balance
Staff can use the Dinner Balance widget in the Overview dashboard to top up their Dinner Balance.
For teaching staff: Click the My Dashboard dropdown and select Overview. This will open the Overview dashboard.
For non-teaching staff: the MIS will default to the Overview dashboard.

The Dinner Balance information will appear within either an expanded or collapsed widget, depending on the selected settings.


If the Dinner Balance widget is not visible on the Overview dashboard, click the Settings dropdown in the top-right corner, ensure Dinner Balance is ticked and click Save & Close.

In the example below, the Dinner Balance widget is shown in its expanded view. Note the three icons in the top-right corner of the widget.
From left to right, the icons represent:
- Go to Dinner Balance page – opens the full Dinner Balance page for viewing dinner information and topping up balances
- Collapse – collapses the widget to a smaller view
- Refresh – refreshes the widget to display the most up-to-date balance information

Click the first icon to go to the Dinner Balance Page.
On this page, the last month’s Dinner Charges are displayed. It is also possible to click Pay to top up and pay for dinners.

For more information, see How to Manage Staff Dinners.
To view dinner balances updated in the MIS by the Cashless Catering company, navigate to Modules>MyChildAtSchool> School Meal Balances

From this page, the School Meal Balances can be viewed and exported as a CSV file for further analysis, if required.
