This guide will show you how to:
- Post a Non Order Invoice
- Post a VAT only Non Order Invoice
Post a Non Order Invoice
Access: The minimum permissions required to access the Invoices and Credit Notes page is found in the Finance module of Config > Setup > Roles and Permissions.
Go to the Modules > Finance > Finance Home Page and Accounts Payable.
Select Invoices and Credit Notes from Accounts Payable section.

A new Toolbar will be displayed and the screen will show existing Invoices.

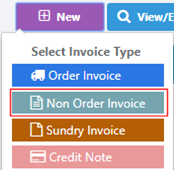
Select New then click the Non Order Invoice button.

Enter Supplier, Bank Account, and Posting Period.

Enter the Invoice Number, Invoice Total (£), Invoice Date, and Paid by Date.

Save the Invoice then check the Lines.

Use the Record/Edit Invoice Row button to add Rows to the Balance.

Add the Cost Centre, Ledger Code, Fund Code and VAT Code information in the Accounting section and the Description and Net Amount in the Item section.

Save the Line and create more if required.

The Invoice will be shown as Unauthorised to approve the Invoice for payment, click Authorise button. Alternatively, another party can authorise the invoice at a later date.
Note once an Invoice is approved, it cannot be cancelled, and Credit Note will need to be raised.

The Invoice will now be shown as Authorised and is ready for Payment Processing.

Post a VAT Only Non Order Invoice
Access: The permission required to raise VAT Only Invoices and Credit Notes is found in the Finance module of Config > Setup > Roles and Permissions under Finance > Accounts Payable > Invoices and Credit Notes.

When adding an Invoice Item select the VAT Code that has a rate greater than zero and set the Net Amount (£) for the Item to zero.
Users can then double click on the VAT Invoice Row to edit the VAT Net Amount (£).
In Adjust VAT Total popup, users can now edit the VAT Amount (£) and Save.
This will result in a VAT only Invoice or Credit Note.
