This article shows you how to get data from the Bromcom MIS into Power BI using oData. oData can be used with any software allowing an oData connection, for example, Excel.
Prequisites:
- A Power BI Pro account;
- Power BI desktop already installed (as installation is not covered in this guide); and
- One Stop Shop licence.
Query the Data
The first step after downloading and installing Power BI Desktop is to get the data.
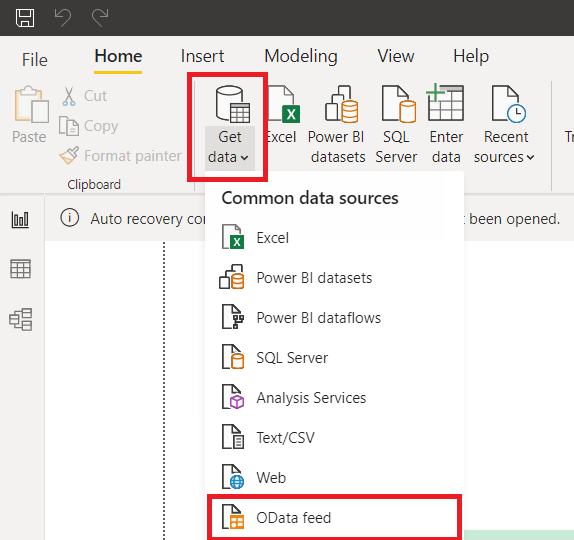
Click the Get Data Dropdown on the Home tab and select OData Feed.

You will be prompted to provide a URL for the feed. Enter https://cloudmis.bromcom.com/Nucleus/OData
Select Basic from the tab on the left and provide the following credentials:

- Username: Your five digit site ID
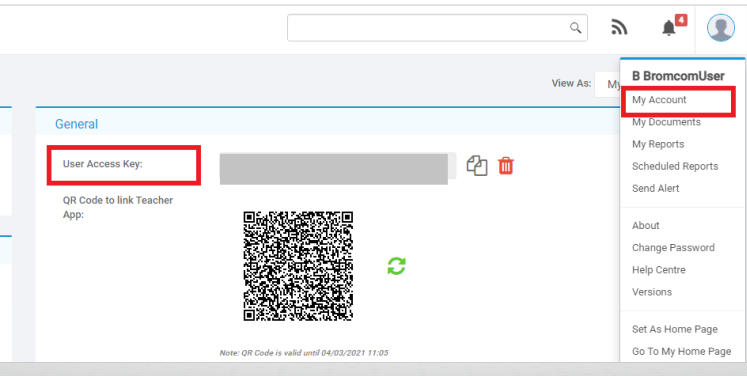
- Password: Your User Access Key. You can generate and access your User Access Key via the My Account menu in the top right-hand corner of the MIS

Filter and Transform the Data Before Loading
You will see a preview of the MIS data tables in the Navigator pop up. Select the tables you want to import by selecting these from the list on the left hand.
Important: you must select only a handful of tables to load into BI at any one time. If you select too many tables the volume of data will be too large and it is likely the import will fail.

When you are ready to load the tables, select Load.

Tip: With larger datasets, e.g. Attendance, use the Transform Data button to format the data at this point via the Query Editor, to ensure the volume of data is small enough to load. From the Query Editor you can apply various filters, eg filtering to the current academic year.

The data might take a few moments to load. Once its finished your query will now be stored in the BI dashboard ready to manipulate and start creating visualisations.

