
In this guide, you will be shown how to add Tutors to Tutor Groups as Associated Staff and then assign them to the Tutor Timetable in Associated Timetable. Once they are assigned in the Associated Timetable this will create the Lessons Dashboard view for the assigned Tutor and Tutor Group.
Access: The minimum permissions required to access the Groups Page are found in the Framework Module of Config>Setup>Roles & Permissions.

See also How to approach Year Group and Tutor Group Promotion and How to Edit a Tutor Group Timetable.
From the left Menu go to Groups, in a Secondary School this screen will default to Teaching Class and in a Primary School this will default to Tutor Group

Next, select a Tutor Group so it is highlighted blue and then click on the View button, you can choose more than one Tutor Group and click Next to move through several groups.

If you adding a Tutor to a Tutor Group you need to first ensure that the required staff are visible in the Associated Staff panel.
To add a new member of staff click Add New Record in Associated Staff.

Once all of the required staff have been added, scroll down to find the Associated Timetable panel.
This panel shows which Staff are assigned on which dates for which sessions, this in effect creates the Lessons Dashboard for the staff.
To Add a Member of Staff to Multiple Sessions in the Associated Timetable Panel click Add Multiple, which allows you to add a staff member to multiple periods in one process.

Pressing Add Multiple opens the following pop out window.
Select the Staff and Room that you wish to add periods for, you can now either use the table at the bottom of the screen to add individual periods, or press Add Multiple Periods.
Note: Only Staff and Rooms that are already Associated with the Tutor Group will be available here.

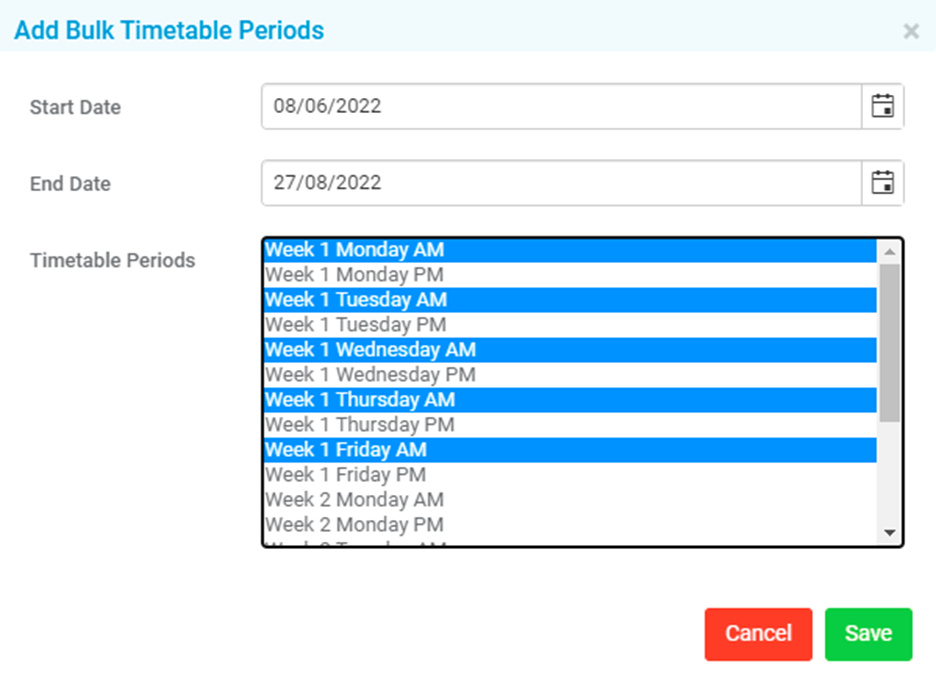
Add Multiple Periods opens another pop out window where you can select all of the periods you would like to add for the required Start/End Date.
Note: You need to press shift or control on your keyboard while you click on periods to select more than one.
Pressing Save takes you back to the original pop out window.
You can now see all of the chosen periods and if you are happy with them, press Save.
