
In this guide, we will cover how to do a Manual Data Export/Import.
A Manual Data Export allows you to extract selected student/staff data from the MIS on to a spreadsheet for the purpose of bulk updating/overwriting it.
A Manual Data Import then allows you to import this new information back in to the MIS against the selected students/staff in one action. This process can be used to import/update various types of data for single or multiple records without affecting each other.
See also: How to use Quick Edit for Bulk changes and Blank System Set Up and Data Import Guide for more detailed information on the Data required when importing data through the Manual Data Import Process.
Access: The minimum permissions required to carry out a Manual Data Export and Manual Data Import are found in the Framework Module of Config>Setup>Roles & Permissions.

Manual Data Export
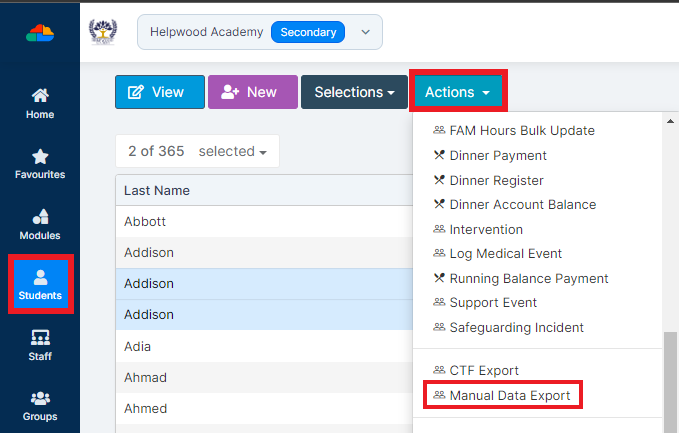
To begin this process, go to the Students list page from the left Menu.
Once there, select at least one student and press Actions>Manual Data Export.
You will then be asked which Data Source you wish to Export data from for these students.

Use the drop to change the Data Source if needed and press Export once you are happy.

This will create a download which should appear at the bottom of your browser. Please double check that you don’t have a popup blocker or another download window open on your browser, as this can prevent the download.
Once you have the file, click on it to open it.
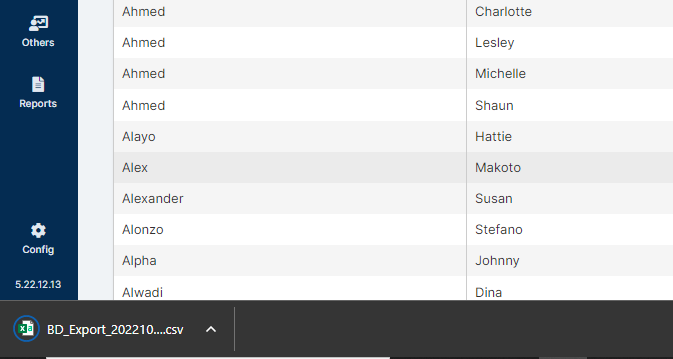
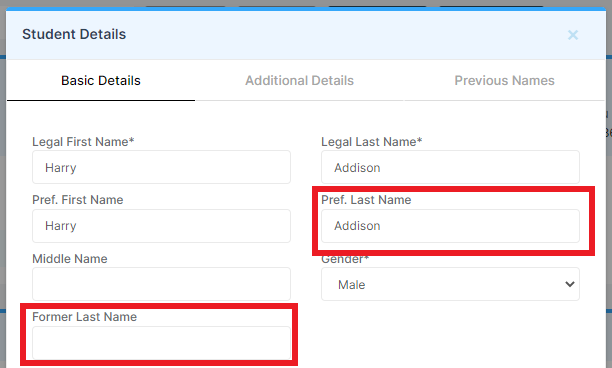
You will see all the current information from the Data Source for the selected students, in this case we have used Basic Details.
Important: Ideally, it is recommended not to change the column headings in the spreadsheet once they are exported. This ensures smooth column/data mapping when you re-import later.

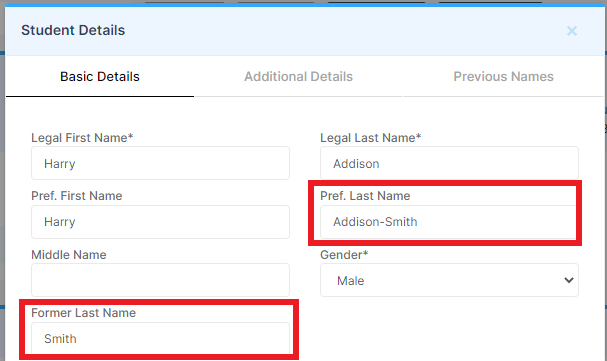
In the example below, the Former Last Names and Preferred Last Names have been updated for these two students who are also siblings.
Once you are happy with the changes, simply save the same spreadsheet by using the save disc icon in excel and close the sheet.

Manual Data Import
Now that you have completed the Manual Data Export and updated the information, it is time to import it back in to the MIS.
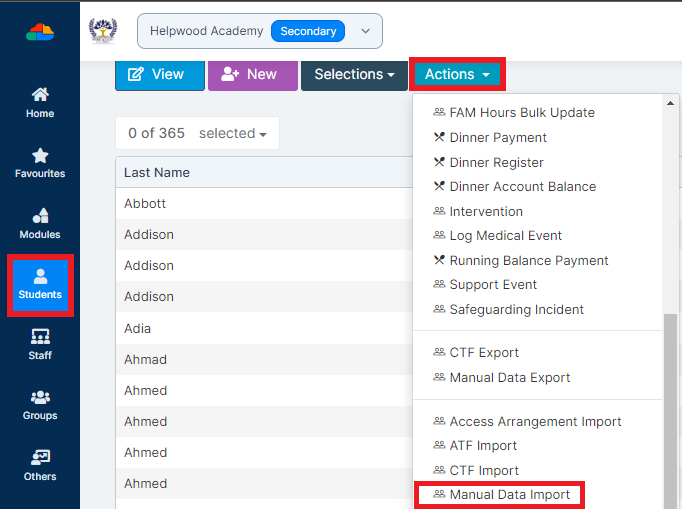
To begin, go to the Students list page from the left Menu.
You do not need to re-select the same students to import because matches the data to their UPN or Admission Number, simply press Actions>Manual Data Import.
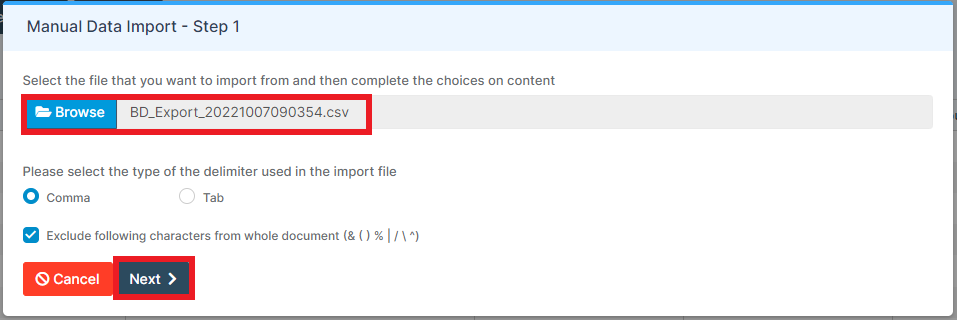
From there, use the Browse button to find and select the spreadsheet from your pc.
It should be in the downloads folder by default but if you moved it elsewhere then navigate to where it is.
Once the file is selected, press Next.
The next screen looks like this by default, you need to match the Data Destination to the Data Source that you exported earlier.

The crucial last step is to make sure that all the Column Headings are mapped correctly and look okay.
In the example below they match perfectly because they were not changed in the spreadsheet, but if you did change them, just be sure to map them to where the data should go.
So in my example, First Name = FirstName, Date of Birth = DateOfBirth etc. During your import, First Name could be First, or Admission Number could be AdNo, depending on if you amend the columns in the sheet. As long as the columns are mapped here to the correct import columns from the spreadsheet, the data should still import fine.
Once you are happy, press Import.

You should now receive a Success message, press OK to close.

Now if you go to the student’s record and look at the area you imported data for, you will notice it is updated.
This is before the import.
This is the same record after the import.
That concludes how to carry out a Manual Data Export/Import, thank you for using this guide.
Things to consider
There are a couple of things to consider when using this process, which are as follows;
- Updating data for students/staff is a big responsibility, particularly when personal data or contact information is included. This process will import exactly what you tell it to so please check, check and check again that the information is correct and is against the correct people.
- Sometimes certain data such as emails cannot be imported if something is already in it’s place on the MIS. For example, if a student has a Priority 1 Home Email Address already, you cannot then import another Priority 1 Home Email Address for them.
- What you can do is use Manual Data Export/Import to change the Priority of existing emails to be Priority 2 or Work type, then you would be able to import new Priority 1 Home Email Addresses because that space is no longer occupied. Alternatively, you can change the Priority or email type of the new emails so that they added alongside what is already on the MIS.
- A Manual Data Export/Import works exactly the same way for staff as it does for students, you just need to navigate to the Staff list page and then follow the above steps.
- When Importing/Exporting Attendance Comments individual comments cannot be more than 200 characters long or the process will fail.
- Lastly, when you are re-importing certain data like dates and gender, it must be written in the same format that it was exported. For example, if gender exported as F/M, writing Female/Male will cause it to fail. Or if dates exported as Thur 22/09/22 00:00, writing Thursday 22/09 will fail. The data must be written in the same format it was exported and the column headings ideally shouldn’t be changed, but if they are they must be mapped correctly during the import.