
Note: All pages shown below are subject to having relevant Roles & Permissions.
In this guide, we will show you how to set Homework as a Teacher via the MIS. This includes up to 5 steps for creating Homework, which include;
- Basic Details
- Submission Type
- Resources
- Assigned Groups
- Assigned Students
- Assessment Links
- Clone Homework

See also: How to Add and View Homework via the Teacher App
To begin, go to Modules>Student Portal>Learning Resources. For the Resource Type on the left choose either;
- Learning Resources is where teachers can view shared homework, quizzes and lesson plans, for example when a teacher creates homework they get a tick box that says share in learning resources, other teachers can then access that homework and use it.
- Assignments is where a teacher can create/view/edit Homework, Differentiated Homework, Quizzes and Lesson plans they have created.
The page will appear blank unless you have any previously created any Homework, quizzes or lessons plans.

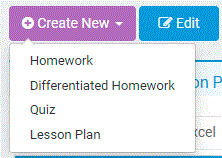
To create a new one, press Create New and selected the desired option from the dropdown either Homework, Differentiated Homework , Quizzes or Lesson plans.
Differentiated Homework is where you can set up differentiated exercises for your students. You can create up to 5 different exercises. You can choose to assign students to specific exercises or let them choose themselves.

Our example is going to be for a Homework.
Basic Details
The first tab that requires populating is the Basic Details tab of the Homework.
Here you are required to populate the Title, Description, Subject and Set By Fields, all others are optional.
Click on Share in Learning Resources so other members of staff can see the Homework

Submission Type
Choose from the following drop down choices;

No Submission Required
This could be used in the example you have set Homework where the Students need to read a chapter of a book or write an essay that they would need to discuss or ‘hand in’ at the next timetabled lesson. In this scenario you could set the due date as the next lessons date. Then once all the Homework has been handed in the Teacher can mark the homework as completed.


The Teacher then selects the Homework on the Lessons Dashboard, in the example 4/5 Students have been selected as one Student didn’t do the required Homework set to ‘Read Chapter One’

The Teacher has then marked all the Homework as for example Submitted a hard copy and ticked Valid Homework as the Homework did not have a score set.
The Submission Date is set to before the Due Date set so the Homework doesn’t then show as late on the MCAS or Student Portal.
Click Save.


Once the Basic Details are populated, you need to work through the tabs at the top of the screen, with Resources being next.

Resources
The Resources Tab is where you would attach any Learning Materials or Links to assist the Students with the Homework.
You can either upload a Document by pressing Browse or Add a URL Link (including http://) by typing it in the Add a Link box and pressing Add on the far right, such as http://bbc.co.uk.

Assigned Groups
The next tab is Assigned Groups.
Usually you would either assign the Homework to a Group or set of Students, at least one of them is required to be able to Save the Homework.
Use the Search Tool/Magnifying Glass next to the Group field to choose a specific Group if required.

Once a Group is selected, it will appear in the Selection List.
You then need to set the desired Available from and Due Date and press Add to confirm the Group selection.

The Homework can now be Saved because a Group has been added.
Assigned Students
If you wish to assign the Homework to specific Students as well or instead, navigate to the Assigned Students tab.

The same principle applies for Assign Students as it did with Assign Groups.
Select a Student from the Students dropdown, set the Available from and Due Date, then press Add.

Once the Student/Students you have selected have been added, they will appear as confirmed.
You can now press Save to confirm the selection again.

Assessment Links
The Final tab to Navigate to is the Assessment Links tab which is used if the Homework you are setting will tie in to or contribute to Assessment.

The options for Assessment Type, Term and Year Group will populate from what is available on your system.
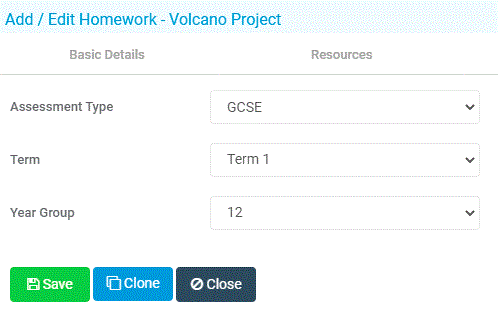
Once you have added the Assessment Links (if required), press Save to complete the process.
The Homework will now be visible when you reload the Learning Resources page confirming that the Homework has been set.

Cloning Homework
Once the homework has been created in this example Homework has been created for 2 Year 11 English Classes

In the example we wanted to clone this homework for Year 10 English Class as well we would select the homework and click Edit
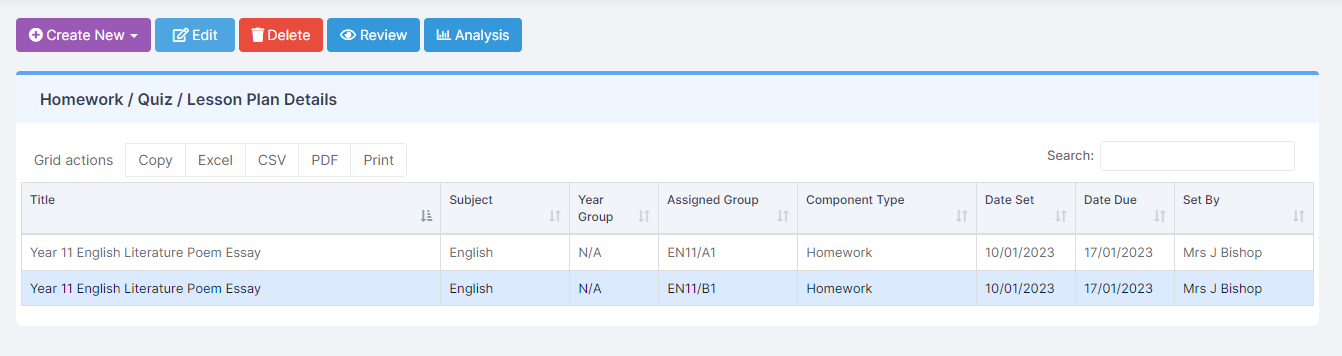
Then click Clone and Proceed

This creates an identical copy of the Homework which you can then edit to say for example Year 10 English Literature Poem Essay and amend the assigned groups.