
Note: All pages below are subject to having relevant Roles and Permissions.
In this guide, we will cover the process for finding and removing duplicate Contact Records, which will create issues with MCAS User Accounts if not corrected.
See also: How to create MCAS Accounts for multiple Children and MCAS Duplicate User Accounts.
Before any MCAS User Accounts are created, it is very important to make sure that you do not have any duplicate Contact Records when you go to Others from the side Menu.
This will cause issues when you create User Accounts and link Students, especially when there is more than one child in a family.
Accessing and Filtering the Others page
Select Others from the side Menu.

When you go to Others, use the Search Filters option on the top right of the page.

The Search Filters will let you choose which Contact Type you are viewing across your desired Date Range.

There are three Contact Types;
Linked Contacts – This is a Contact who is currently linked to at least one active Student.
Orphaned Contacts – This is a Contact who is not linked to any Student.
All Contacts – This is a combination of the above which will give you the best overall view.

You also have options for Active Date Filter and Active On;
Active Date Filter – Ticking this means that the Records displayed are based on the date you choose for Active On. Unticking it means Records for ALL TIME will display (Past, Present and Future).
Active On – When Active Date Filter is ticked, the date you select within Active On will determine which Records are displayed.
For the purpose of finding duplicate Contact Records, you should remove/untick the Active Date Filter shown below to conduct a more complete search.

Note: By default Linked Contacts will be displayed as of Today’s Date (The Academic Date you view this page on).
Change this to All Contacts and this will show you any/all Contacts currently on your system, regardless of if they are currently linked to a Student or not.
Next, you should enable the Person ID Column if it is not already visible.
This is found by clicking on the Add/Remove Additional Columns icon on the top right of the page.


Now that Person ID has been added and your Search Filters are changed to All Contacts, you can begin looking for duplicate Contact Records.
Searching for duplicate Records
With the Others page now filtered to All Contacts and with the Active Date Filter removed, you can begin scrolling through the page or use the Search box to check for specific families.

An example would be if you are scrolling and find three Records for a Contact called David Potter, each of those Records will have a unique Person ID.
You would need to determine how many children David has currently attending the School.
You would then need to go to the Student Record for his oldest child at the School.
Within the Contacts section of the Student Record, you will see David’s Contact Record with a Person ID next to it.

Because this is the Person ID of the Contact Record that is linked to David’s oldest child, this is how you know it is the correct Contact Record and Person ID.
The next step would be to open the Student Records of his other children and see which Contact Record of David they are linked to.
If you find that his other children are linked to a different Contact Record with a different Person ID, hover over the Contact Record and use the Bin icon on the far right to Delete this Contact Record from the Student.

There must only be one Contact Record for each Contact on your system, and all Students who share a relation to that Contact should all be linked to the same Contact Record.
Linking the correct Contact Record
So the next step is to link the correct Contact Record of David to the other children.
You would do this within the Student Record by clicking on the + on the top right of the Contacts section shown below.

You would then need to select Click to Add Existing Contact because you are linking an existing Contact Record, not creating a new one.
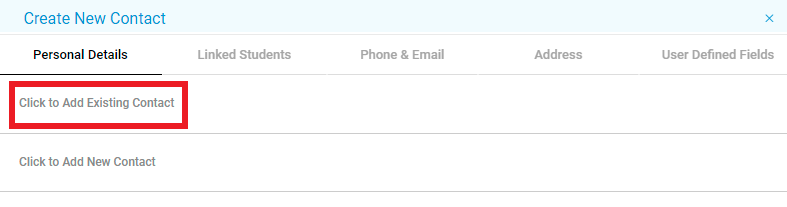
Lastly, type the name of the Contact (David Potter in this example) and any active Contact Records will appear.
YOU MUST select the Contact Record with the correct Person ID.
It will be the same Person ID that you saw on the oldest child’s Record (719 in this example).

Once you have selected the Contact Record with the correct Person ID, you will just need to make sure their details and relation to the Student are correct.
Other details like Email Address and Address will be populated already, based on the details already saved against this existing Contact Record.

Double check that they are correct and if you are happy, press Save.
You will need to repeat this process for any other children that the Parent has currently attending the School to ensure they are all linked to the same Contact Record.
Deleting duplicate Contact Records
Once all children have been linked to the same Contact Record with the correct Person ID, you can now Delete any duplicate Contact Records from the Others page.
On the Others page, set the Search Filters as All Contacts and remove the Active Date Filter again.
Search the name of the Contact and highlight any Contact Records that have the incorrect Person ID.

Once they are highlighted, scroll to the top of the page and press Actions>Delete.

Lastly, confirm that you are happy to proceed with the deletion of the highlighted Contact Record/s by pressing Delete.

You have now successfully identified and removed duplicate Contact Record/s for a family, as well as ensuring any siblings have all been linked to the Contact Record with the correct Person ID.
Every step listed above should take around ten minutes to carry out for one Contact from start to finish.
It is advisable to share this task if you have hundreds/thousands of Contacts as it can be time consuming but is an extremely important task to complete before you begin to use MyChildAtSchool.
See also: How to create MCAS Accounts for multiple Children and MCAS Duplicate User Accounts.