Note: All pages shown below are subject to having relevant Roles & Permissions.
In this guide, you will be shown how to create a Product for the purpose of selling it to Parents via MCAS, such as School Uniform or Learning Equipment. This includes the following steps;
Please Note: It is best practice to create Products to use for selling physical items such as Blazers or Pencil Cases.
Before creating a Product you will need to Create a Product Category, see : How to Manage Product Categories and How to Configure Online Payments.
Note: There is a £1 minimum checkout amount on MCAS, meaning any purchasable items, Clubs, Trips or Products must cost £1 or above.
Creating a Product
To begin, you will need to go to Modules > MCAS > Online Payments > Products.
Once the page loads, you will see any existing Products that have been created previously (if any).

Assuming that there are no Products or that you wish to create a new Product, press the New button at the top of the page.

This will display the Add/Edit Product page.

All fields with * next to them are mandatory and must be populated before you can create the Product.
Once all of the required fields and any additional fields you wish to populate are completed, press Save at the top of the page to create the Product.
Note: Products can be created without being Published to MCAS straightaway so there is no rush/pressure to do so in one go.
Product Options/Scenarios
There are some crucial options to consider depending on how you want to Product to appear on MCAS/Behave
For example, you may want the Product to be available to all Students, to only specific Students or for the Product to be available from a future date. Below is every option provided when creating a Product and what they allow you to do;
- Product Code – This is usually an abbreviation of the Product Name. Blazer could be BLZ or School Shoes could be SS.
- Product Name – This is the actual Name of the Product that will appear to Parents on MCAS.
- Product Category – This determines which area of your MCAS Online Store it will appear (Categories must exist for you to create a Product as it is a required field).
- Product Description – This is a description of what the Product contains/offers/provides or sizing guides for Uniform etc.
- Published – This tick box is crucial as it determines whether or not the Product is visible on MCAS for Parents.
- Account Limit – This is how many of this product a parent can purchase, regardless of how many students they are linked to. For example an account limit of 1 means that a parent can only purchase 1 of this product, even if they have 2 or more children at the school
- Quantity Options -This is how many the school has to sell for example Stock Count
- Display To – This is another crucial option and allows you to only make the Product available to Students in a specific Group. For example, you could create a Report Group with 20 Students and only those Families can Purchase the Product on MCAS, this prevents accidental Purchases and means Students must be added to the Report Group to Purchase the Product.
- Requires Parental Responsibility for Purchase – This allows you to make the Product only purchasable by a Parent/Contact with Parental Responsibility.
- Display Between – This outlines when the Product will appear on MCAS from/until, you could make the Product available from a future date or only Publish it for a week if desired.
- External Ledger Code – If you use an External Finance Software, this field allows you to link the Product to a specific Ledger Code.
- External Cost Centre Code – If you use an External Finance Software, this field allows you to link the Product to a specific Cost Centre.
- External Analysis Code – If you use an External Finance Software, this field allows you to link the Product to a specific Analysis Code.
- Consent Required – This creates a popup on MCAS which requires the Parent/Contact to acknowledge they are providing consent for something you have set upon purchasing the Product.
Payment Options
The Payment Options section is where you can select Variations in Price for different Groups of Students with Price Options.
The Variations option is by default set to No, when changed to Yes an additional table is displayed allowing Variations to be added by clicking the + icon at the top of the first column.
You can also assign Variations to specific Groups within your school and those Groups will only see the Prices they are eligible for. Once you have entered the Variation details click the Tick icon to Save it.

- Fixed Price – This is a set amount that Parents must pay in one full Payment.
- Variable Price – This allows you to set a price range that Parents can pay at their discretion (minimum of £5 and up to £10 for example).
- Instalments or Part Payments
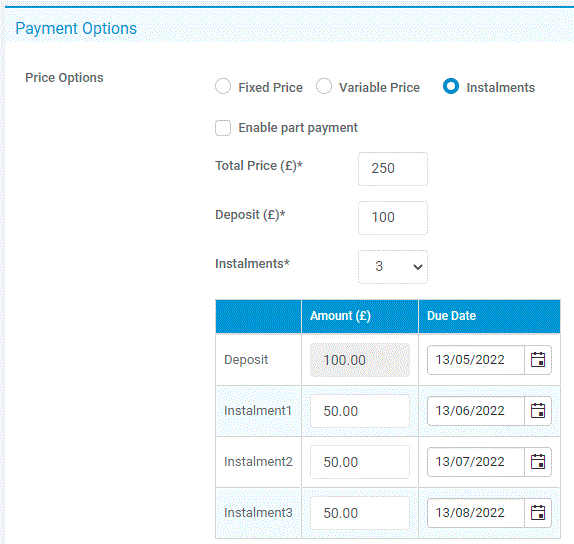
- Instalments allow you to set a deposit and a structured series of payments that allow Parents to pay for the Product over time.
- Part Payment means that the Parent can chip away at the Product and pay the amount they want as and when they want (this method can mean a lot of chasing/manual management but gives Parents flexibility).
- Associated Account – This determines which of the School’s Bank Accounts the money for this Product will be paid in to. If none appear for you, please Contact customercareteam@bromcom.com.
- Enable Offline Payments – Lastly, this option means that Parents are not forced to Pay by Card for the Product on MCAS and can pay by Cash or Voucher (if applicable) while still obtaining the Product. Again, this method means a lot of chasing/manual management but gives Parents a lot of flexibility.
Payment Options in detail
Below is a closer look at each Payment Option and what they allow the Parent to do when purchasing the Product.
If needed, the Price Options can be changed once the Product is live and there are Orders against it. So if the Product is initially charged in Instalments, you are able to then change it to a Fixed Price Product should you wish.
Note: Any options where Enable Offline Payment is NOT ticked mean that Payment must be made via MCAS.
Fixed Price – The Product has been set at a Fixed Price of £250 which must be paid in full upon purchase/check out on MCAS.

Variable Price – The Product has been set at a Variable Price between £150 and £200 so Parents can pay the price they desire between those amounts.

Instalments – The Product has been set at £250 with a £100 deposit and the remaining £150 split over three monthly Instalments/Scheduled Payments.

Part Payment – This option is only accessible when you select Instalments but they are not the same and work differently.
Part Payment allows the Parent to Pay any amount they want (above £1) at a time off of the total price of the Product, meaning they can chip away when it suits them.
Note: Enable Offline Payments is ticked here so they could also bring Cash or Vouchers (if applicable) in to School if they want.

Particularly with Payment Options, if you are unsure at any point which one is relevant or best suited to your needs, please contact the Bromcom Helpdesk before you Publish the Product and Parents start buying it.
This prevents accidental purchases, confusion for Parents and the need for Refunds, which can take a while if there are many to process.
Note: We cannot guide you through the entire Product creation process over the Phone/Chat, but can advise which options would best suit your needs/requirements.
Viewing the Product in MCAS
Once a Product has been created, it can be Published to make it visible in MCAS.
To test how a Product looks or see where it appears in MCAS, you need to find a Student who already has MCAS setup for them.
Once you have, use the Green Person Icon against their Parent/Contact to view their MCAS Account.

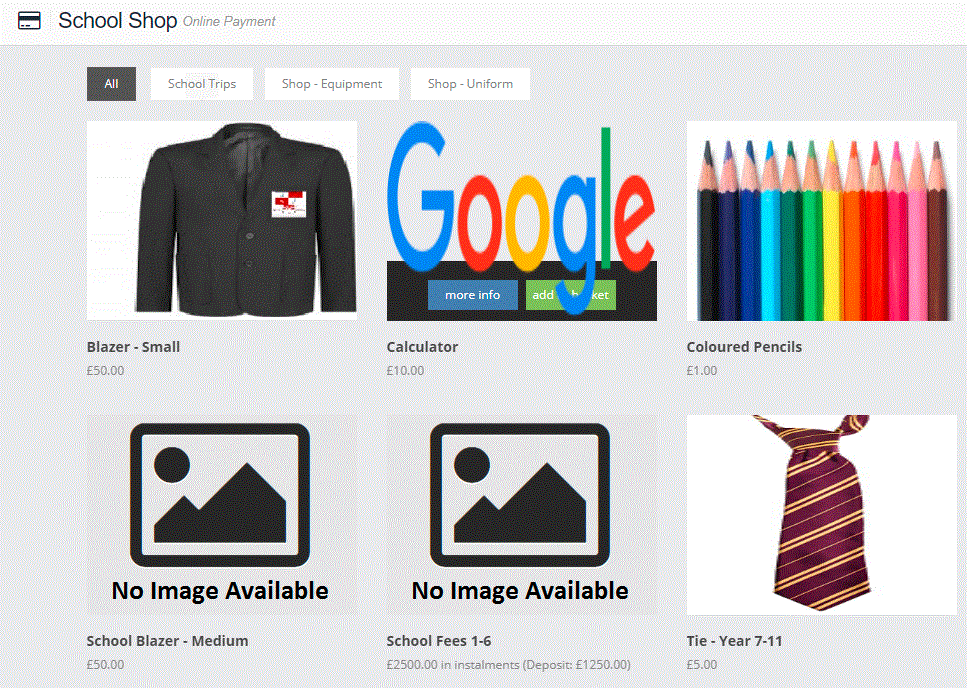
This will take you to MCAS, where you need to select School Shop from the left Menu.

From there, any and all Published Products will be available for you to see meaning that they can now be purchased by Parents/Contacts.

