
In this guide, we are going to show you how to create a Top Up Funding Record for a Student either manually or in Bulk.
Access: The minimum permissions required to access Funding & Allowances are found in the Framework module from within Config > Setup > Roles and Permissions.

See also: Pupil Premium Status, How to use Quick Edit for Bulk Changes and How to add FSM Eligibility to a Student.
Adding Top Up Funding Manually
To begin, you will need to go to the Students List page.
Once you have identified the Student, click on them so that they are highlighted and press View.

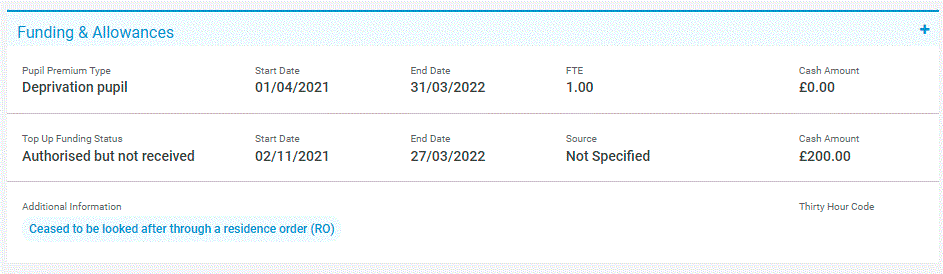
Once you have opened the Student’s Record, either scroll down or use the Panel Selector to bring up the Funding & Allowances Panel as shown below;

Once you have the Funding & Allowances Panel in front of you, press the + Icon to the right of the Panel.
This will bring up four options, the one you need to click is Top Up Fundings.

This will open a pop out screen containing a Tab for each of the five options, which you can navigate through later if needed.
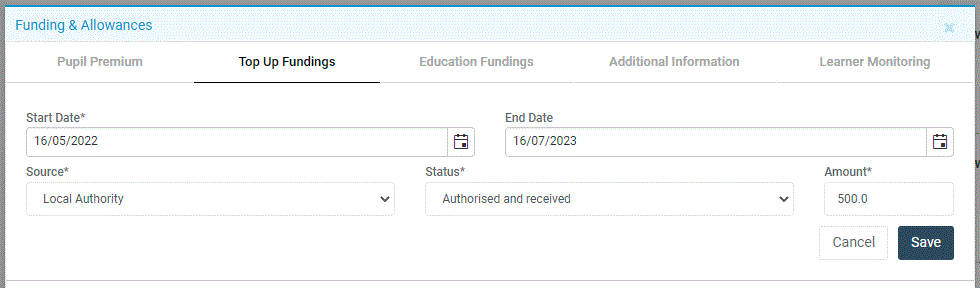
For the purpose of adding Top Up Funding, select the Top Up Funding Tab and click on the Click to Add New Top Up button.

This will allow you to add a new Top Up Funding Record by entering the information you have for the Student.
Once entered, press Save.
Note: All fields with * next to them are mandatory and must be completed.
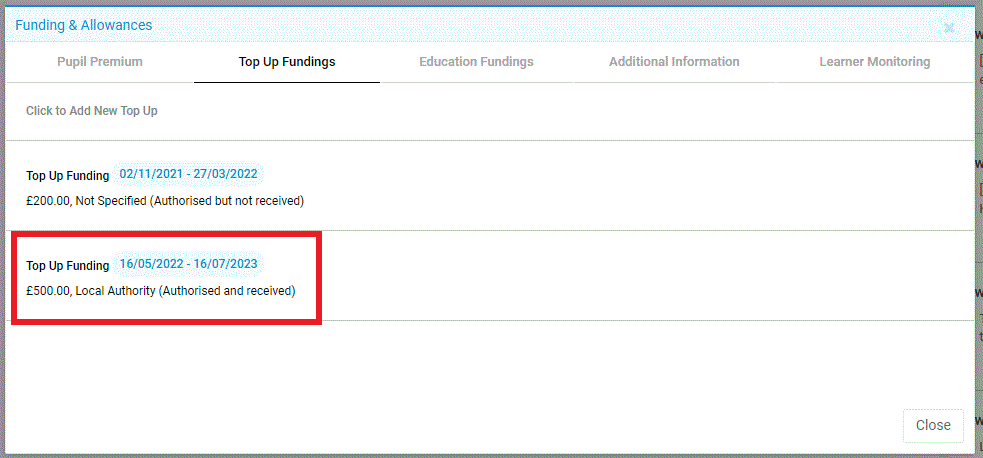
The Funding Record will now be visible when you go back to the Top Up Funding Panel of the Student.
As previously mentioned, you can navigate through the other Tabs such as Additional Information if you need to enter information there too.
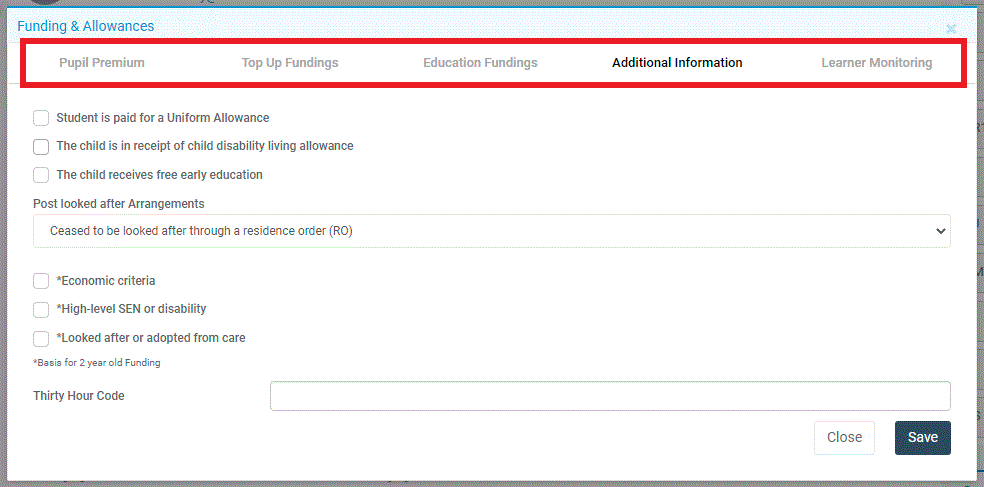
In the Additional Information Tab you can add the following fields; for example Looked After or Adopted from Care.

Adding Top Up Funding in Bulk
To Add Top Up Funding in Bulk (to multiple Students), you can use Quick Edit.
Quick Edit works on the basis of selecting multiple Students from the Students List page and using Quick Edit to flood fill each of their Records with the exact same data.
Note: This method will apply the exact same information to each Student selected. If some of the data is/needs to be different for some of the Students, it may be wise to carry out multiple Quick Edits.
Quick Edit is found via the Students List page under Actions.
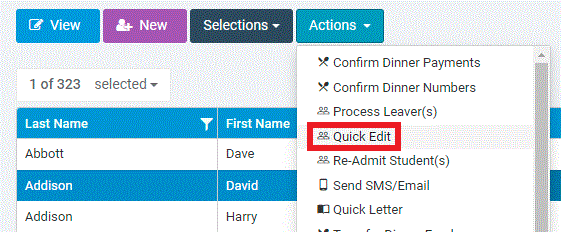
Within Quick Edit, you can find Top Up Funding towards the bottom of the list.
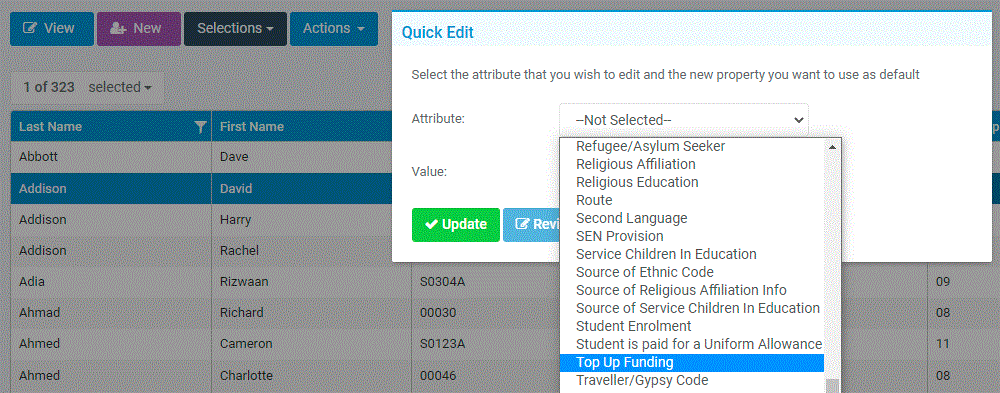
Once you select it, you will be able to enter the same information that you would if you were creating a Funding Record manually;

Once the information is entered, press Update.

You should then receive a Success Notification.
Note: If this was carried out for a lot of Students, double check some of their Records to ensure it has been processed for all of them.

In this guide, we are going to show you how to create a Top Up Funding Record for a Student either manually or in Bulk.
Access: The minimum permissions required to access Funding & Allowances are found in the Framework module from within Config > Setup > Roles and Permissions.
See also: Pupil Premium Status, How to use Quick Edit for Bulk Changes and How to add FSM Eligibility to a Student.
Adding Top Up Funding Manually
To begin, you will need to go to the Students List page.
Once you have identified the Student, click on them so that they are highlighted and press View.

Once you have opened the Student’s Record, either scroll down or use the Panel Selector to bring up the Funding & Allowances Panel as shown below;


Once you have the Funding & Allowances Panel in front of you, press the + Icon to the right of the Panel.
This will bring up Six Options, the one you need to click is Top Up Fundings.

This will open a pop out screen containing a Tab for each of the five options, which you can navigate through later if needed.
For the purpose of adding Top Up Funding, select the Top Up Funding Tab and click on the Click to Add New Top Up button.

This will allow you to add a new Top Up Funding Record by entering the information you have for the Student.
Once entered, press Save.
Note: All fields with * next to them are mandatory and must be completed.

The Funding Record will now be visible when you go back to the Top Up Funding Panel of the Student.

As previously mentioned, you can navigate through the other Tabs such as Additional Information if you need to enter information there too.
In the Additional Information Tab you can add the following fields; for example Looked After or Adopted from Care.

Adding Top Up Funding in Bulk
To Add Top Up Funding in Bulk (to multiple Students), you can use Quick Edit.
Quick Edit works on the basis of selecting multiple Students from the Students List page and using Quick Edit to flood fill each of their Records with the exact same data.
Note: This method will apply the exact same information to each Student selected. If some of the data is/needs to be different for some of the Students, it may be wise to carry out multiple Quick Edits.
First, select the Students you would like to make changes to by clicking on them once to highlight them, then select Actions and Quick Edit.

Within Quick Edit, you can find Top Up Funding towards the bottom of the list.

Once you select it, you will be able to enter the same information that you would if you were creating a Funding Record manually;
Once the information is entered, press Update.

You should then receive a Success Notification.
Note: If this was carried out for a lot of Students, double check some of their Records to ensure it has been processed for all of them.
