In this guide, we will show you how to update the Additional Information section of a Student’s Record. The Additional Information can be updated anytime after the initial Student profile is created.
This guide will show you how to update information such as identifying a Student as Pregnant, a Service Child, Post Looked After and SEN Additional Information.
Access: The minimum permissions required to access this part of the Student’s Record are found in the Framework Module of Config>Setup>Roles & Permissions.

See also How to Add Top Up Funding, How To Add a Student
Student Details – Additional Information
To begin, go to the Student List Page.
From there, click on the Student you need to update and press View.

On the Profile page of the record, you will see a Pencil next to the Student’s name.
Click on the Pencil to Edit

In the pop up window that appears, click on the middle tab, Additional Details, to add Information such as Pregnant, Service Child, Post Looked After Arrangements etc.

Once you have updated the areas, please click Save.
Note: If the Service Children In Education drop down is set to Yes then the Student will be returned in the Census as a Service Child. You still need to update this indicator even if the Contact is marked as a Member of the Armed Forces on their Contact record. For more information on this please see How to Manage and add Contacts from a Student’s Record.
Special Educational Needs – Additional Information
On the Profile page of the Student Record, navigate to the Special Educational Needs panel by scrolling down.
Click the + icon on the top right of the panel and select Additional Information.

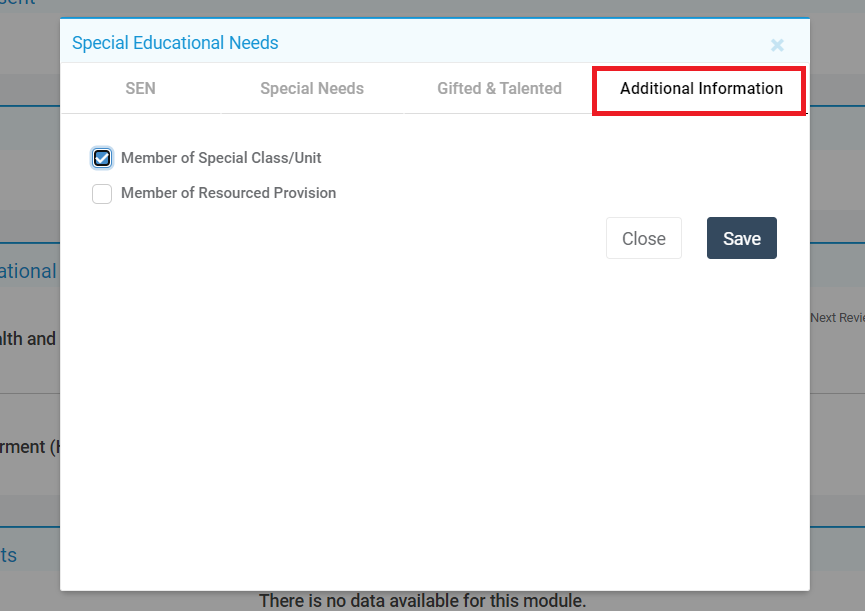
This will open the Special Educational Needs pop-up, on the Additional Information tab. This allows you to add detail such as whether a Student is a member of a Special Class/Unit, or other Provision.

Once this information has been updated, click Save.
The other tabs in this section cover SEN and Special Needs. To update the Next Review Date, Navigate to the SEN tab. Hover over the Provision you would like to add a Review for and click on the Magnifying Glass.

Click on the + icon to add new review date and notes.

Add your review date, notes and any attachments. Click Save.

In this guide, we will show you how to update the Additional Information section of a Student’s Record. The Additional Information can be updated anytime after the initial Student profile is created.
This guide will show you how to update information such as identifying a Student as Pregnant, a Service Child, Post Looked After and SEN Additional Information.
Access: The minimum permissions required to access this part of the Student’s Record are found in the Framework Module of Config>Setup>Roles & Permissions.

See also How to Add Top Up Funding, How To Add a Student
Student Details – Additional Information
To begin, go to the Student List Page.
From there, click on the Student you need to update and press View.

On the Profile page of the record, hover over the Student’s Name and you will see a Pencil.
Click on the Pencil to Edit

In the pop up window that appears, click on the middle tab, Additional Details, to add Information such as Pregnant, Service Child, Post Looked After Arrangements, Jobseekers/Income Support etc.

Once you have updated the areas, please click Save.
Note: If the Service Children In Education drop down is set to Yes then the Student will be returned in the Census as a Service Child. You still need to update this indicator even if the Contact is marked as a Member of the Armed Forces on their Contact record. For more information on this please see How to Manage and add Contacts from a Student’s Record.
Special Educational Needs – Additional Information
On the Profile page of the Student Record, navigate to the Special Educational Needs panel by scrolling down.
Click the + icon on the top right of the panel and select Additional Information.

This will open the Special Educational Needs pop-up, on the Additional Information tab. This allows you to add detail such as whether a Student is a member of a Special Class/Unit, or other Provision.

Once this information has been updated, click Save.
The other tabs in this section cover SEN and Special Needs. To update the Next Review Date, Navigate to the SEN tab. Hover over the Provision you would like to add a Review for and click on the Magnifying Glass.

Click on the + icon to add new review date and notes.

Add your review date, notes and any attachments. Click Save.

